Jeff Webb
Senior Technical Writer, Applications Programmability Business Unit
Created: April 30, 1993
OLE (object linking and embedding) Automation is part of OLE version 2.0. It provides a documented, standard way of creating and accessing applications programmatically—OLE 2.0 includes documentation, dynamic-link libraries (DLLs), and samples that demonstrate the various aspects of OLE Automation. This article can't cover the whole spectrum, but it will give you a solid overview of how you create and access applications that use OLE Automation.
Object linking and embedding (OLE) Automation puts the power to create programmable applications in the grasp of C/C++ developers and lets developers for Microsoft® Visual Basic™ access and manipulate those applications. This frees developers for Windows™ and C/C++ from the complications of providing specialized user-interface solutions and gives programmers for Visual Basic a reliable way to assemble custom solutions out of pieces of application-supplied components.
If you're familiar with Microsoft Visual Basic or Visual C++™, you know the utility of custom controls. By implementing OLE Automation in your C/C++ application, you essentially turn your application into a collection of custom controls. The application still looks and behaves the way it used to, but now each part of the application can be used by itself or with other objects in Visual Basic or C/C++ applications. These "parts" are called programmable objects—OLE Automation defines how these objects are implemented and how they are accessed.
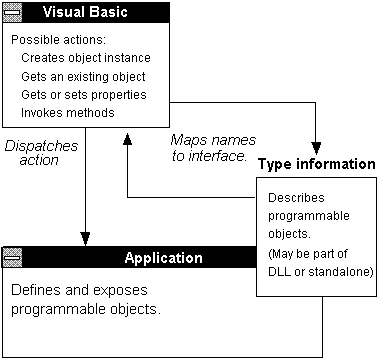
Figure 1 shows how applications that expose programmable objects interact with Visual Basic. OLE Automation also provides facilities for other programming tools to access programmable objects.

Figure 1. How applications expose and access programmable objects
Exposing programmable objects provides a way to operate your application. This allows your customers to use a programming tool, such as Visual Basic, to automate repetitive tasks.
Programming tools that access programmable objects offer advantages over implementations of other macro languages included within applications. In particular, objects exposed through OLE Automation are available from many applications in a single programming environment. In this way, systems integrators can bring together the best pieces from different applications and can create completely new, specialized applications out of existing pieces.
Another advantage is that programmable objects are accessible from any macro language or programming tool that implements OLE Automation. Users may choose a programming tool based on their current knowledge, rather than learning a new language for each application.
With OLE Automation, object names can remain consistent across versions of an application, unlike keystroke-based macro languages that change with the user interface. This means that macros written for one version of an application don't have to be converted to work with new versions. It also means that users don't have to be re-educated with every upgrade. Object names can also automatically conform to the user's national language. This is a major benefit if you are replacing an existing, localized macro language with one that uses OLE Automation.
A programmable object is an instance of a class within your application that you wish to manipulate. These may be new classes whose sole purpose is to collect and expose data and functions in a way that makes sense to your users. Each object has member functions that uniquely apply to that object. The object becomes programmable when you expose those member functions.
OLE Automation defines two types of members that you may expose for an object. Methods are member functions that perform an action on an object, such as resizing it or causing it to evaluate member data. Properties are member function pairs that set or return information about the state of an object, such as whether or not an object is visible.
One of the key advantages of the Windows interface is the common elements and navigation mechanisms it provides to users. Programmable objects and the methods and properties they expose provide a language equivalent to the visual interface.
To understand this abstract concept, imagine a Window object. Its methods would closely match the actions you can perform from a window's Control menu: Activate, Restore, Minimize, and so on. The Window object's properties describe the appearance of a window: Height, Width, WindowState, and so on.
To provide access to more than one instance of an object, OLE Automation provides collections. A collection is a group of programmable objects that can be referred to as a unit. For instance, the Window object might expose the "Windows" collection. This lets you act on all of the windows in an application at once. In Visual Basic code, a statement like Windows.Minimize would minimize all of the application's windows.
How you name and organize the objects you expose for your application is entirely up to you. In general, you should use language that is obvious to your customers and that takes advantage of the unique strengths of your application. The goal is to provide an understandable language your customers can use and that you will be able to maintain over multiple versions of your product. Don't expect code written for one application to be 100 percent portable to other applications with similar features.
If you want examples of how objects, methods, properties, and collections interact, you should pick up a copy of Microsoft Visual Basic. The Language Reference includes summary tables that give you an overview of how a generalized set of objects can be named and organized. This will be a useful guide when planning the programmable objects you expose in your application. The OLE 2.0 documentation also includes some useful guidelines.
OLE Automation has two halves: interfaces for creating applications that expose programmable objects, and interfaces for creating programming tools that access those objects.
The dispatch interfaces and functions let you create applications that expose objects and provide a standard implementation of functions to access exposed objects. This includes the IDispatch interface, dispatch and data manipulation functions (OLE2DISP.DLL), and the IEnumVARIANT interface.
The type interfaces let you access programmable objects. This includes the ITypeLib and ITypeInfo interfaces and type information functions (TYPELIB.DLL).
OLE Automation also includes national language support functions (OLE2NLS.DLL) that can be used by any application. These functions provide a way to evaluate and act on language differences. This allows programmers to provide localized object, method, property, and argument names for their applications that expose objects. These functions aren't restricted to use with OLE Automation, however. They are useful in a wide variety of contexts.
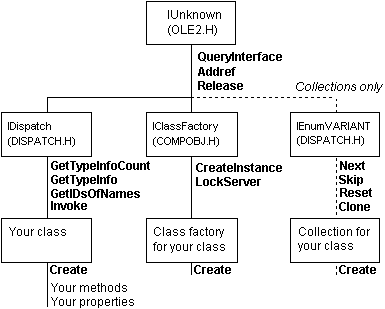
Figure 2 shows the classes and member functions you need to implement in order to expose programmable objects.

Figure 2. Interfaces for exposing programmable objects
In Figure 2, the member functions you must implement are shown in bold. IUnknown and IClassFactory are general OLE interfaces—they identify what OLE features an object supports and provide a means for OLE to create the object's class. The IDispatch and IEnumVARIANT interfaces are specific to OLE Automation.
All of the IDispatch member functions can be implemented by calling a single API function—CreateStdDispatch actually implements the IDispatch functions for you at run time. This greatly simplifies the process of implementing OLE Automation and gives you a jump-start for existing applications. After you've put IUnknown and IClassFactory in place, you can get programmable objects up and running with only a couple lines of code.
After you've implemented your objects, you need to describe them by creating type information. Type information is the data OLE Automation uses to describe objects, properties, and methods to programming tools that access those objects. You create type information by writing an object description script (.ODL) and compiling it with the MyTypLib tool, provided with OLE 2.0.
Note The type library DLL and MkTypLib are included in Beta test form with OLE 2.0.
An object description script is essentially an annotated header file that identifies the names and types of objects, methods, properties, and arguments that an application exposes through OLE Automation. Type information compiled with MkTypLib is called a type library (.TLB). Type libraries can be queried for documentation and help on specific objects; they can support multiple national languages; and they provide a mechanism for early binding that can be used by compilers.
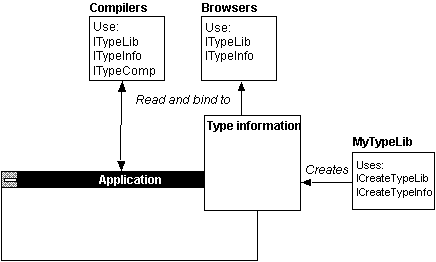
There are several ways to access programmable objects: You can use the CreateObject and GetObject functions that are built into Visual Basic version 3.0, or you can access the objects using OLE APIs in C/C++. Figure 3 shows how the OLE Automation interfaces are used to access objects exposed through OLE Automation.


Figure 3. Interfaces for accessing programmable objects
For Visual Basic 3.0, you must provide printed or online documentation with your application so your customers will know the names of the programmable objects, methods, and properties your application exposes. Type libraries can build this documentation directly into your application. Browsers and other programming tools will read this information and make it even easier for your customers to use programmable objects.
Use the Set keyword to assign the object returned by the CreateObject or GetObject function to the object variable. When this code executes, the application providing the object is started (if it is not already running) and an object is created. Unlike the image displayed when you create a linked or embedded object, the object's image is not displayed anywhere in Visual Basic, nor is the object's data maintained by Visual Basic. The object is part of the application that created it. This object can be referenced in Visual Basic code using the object variable you defined.
Some applications may provide objects that are never displayed to the user. For example, a word processing application may expose its spelling checker engine as an object. Let's say this object supports a method called CheckWord that takes a string as an argument. If the string is spelled correctly, True is returned; otherwise, the method returns False. If the string is spelled incorrectly, then you could pass it to another (hypothetical) method called SuggestWord that takes a misspelled word as an argument and returns a suggestion for its correct spelling.
You can also use the OLE control (MSOLE2.VBX) to create and display linked and embedded objects in a Visual Basic application. Some applications that supply objects support both linking and embedding and OLE Automation. If you use the OLE control to create a linked or embedded object and that object supports OLE Automation, you can access that object's properties and methods in Visual Basic using the Object property. The Object property returns the object in the OLE control. This property refers to an OLE object in the same way an object variable created using the CreateObject or GetObject functions refers to an object.
Applications may allow the user to save objects in files. For example, a spreadsheet application that has a worksheet object allows the user to save the worksheet in a file. The same application may support a chart object that the user can also save in a file. You use the GetObject function to activate an object that has been saved to a file.
Once you have created a variable that references an OLE object, the object can be manipulated in Visual Basic in the same way as any Visual Basic object (such as a control). You use the object.property syntax to get and set the object's properties or to perform methods on the object.
To assign a value to a property of an object, put the object variable and property name on the left side of an equation and the desired property setting on the right side.
All arguments to programmable objects use the Variant data type. When retrieving a value from a property or method, programmable objects always return values with the Variant data type. If you assign a variable with a data type other than Variant when setting a property value or performing a method, the variable is coerced to the Variant data type when the property is set or the method is performed.
Some objects contain subobjects. For example, a cell could be considered a subobject of a spreadsheet object. You can include multiple objects, properties, and methods on the same line of code using the dot syntax, just as you would with a Visual Basic object (for example, Form.Control.Property).
Programmable objects should support some method that closes the object and the application that created it. Since OLE objects can use a significant amount of memory in your Visual Basic application, it is a good idea to explicitly close an object when you no longer need it. To close an object, use the appropriate method (most objects support the Close method or the Quit method).
The user can close an object using the application that created the object. When an object has been closed, either programmatically or by the user, any object variables that refer to the object are no longer valid.
When an object variable loses scope, the object and its application are not closed. However, you can no longer use that object variable to refer to the object. If the object is still active, you can use the GetObject function to assign another object variable to the object.
Example 1 demonstrates how you create a programmable object. The code is abbreviated, so it doesn't show the Windows message loop or other parts of the application that aren't directly related to the object. Example 2 demonstrates accessing the object in Example 1 using Visual Basic. Complete versions of these examples are included in OLE 2.0.
Example 1. Exposing a programmable object in C++
// DSPCALC2.ODL
// Object description script--portions omitted for brevity. This is the
// input file for MKTYPLIB.EXE which is invoked with this command line:
//
//    MKTYPLIB /tlb dspcalc2.tlb /h dspcalc2.h dspcalc2.odl
//
library DspCalc2
{
    interface _Calculator : IUnknown
    {
     // Calculator properties
      [propput]
      void Accum([in] long l);
      [propget, helpstring("The value stored in the calculator")]
      long Accum();
      [propput]
      void Op([in] short op);
      [propget]
      short Op();

     // Calculator methods
      boolean Eval(void);
      void Clear(void);
      void Display(void);
      void Quit(void);
      boolean Button([in] BSTR button);
    }

}

// DSPCALC2.CPP type library loading and IDispatch interface creation.

CCalc FAR* CCalc::Create()
{
    HRESULT hresult;
    CCalc FAR* pcalc;
    ITypeLib FAR* ptlib;
    ITypeInfo FAR* ptinfo;
    IUnknown FAR* punkStdDisp;

    ptlib = NULL;

    if((pcalc = new FAR CCalc()) == NULL)
      return NULL;

   // Load type library.
   hresult = LoadTypeLib("dspcalc2.tlb", &ptlib)

   // Get type information.
   hresult = ptlib->GetTypeInfoOfGuid(CLSID_CCalc2, &ptinfo)

   // Create IDispatch interface using type information
    hresult = CreateStdDispatch(
      pcalc,
      &pcalc->m_arith,
      ptinfo,
      &punkStdDisp);

    ptinfo->Release();

// Error handling code omitted for brevity.
}

// Accum property and Quit method implementations.
// Other properties and methods ommitted for brevity.

STDMETHODIMP_(void) CCalc::CArith::put_Accum(long l)
{
    m_accum = l;
}

STDMETHODIMP_(long)
CCalc::CArith::get_Accum()
{
    return m_accum;
}

CCalc::CArith::Quit()
{
    PostQuitMessage(0);
}
Example 2. Accessing a programmable object with Visual Basic
Dim DispCalc As Object                            ' Dimension object.
Set DispCalc = CreateObject("dispcalc.ccalc")     ' Start calculator.

DispCalc.Accum = 9                                ' Multiply 9 by 12.
DispCalc.Op = OP_MULT
DispCalc.Opnd = 12
If DispCalc.Eval() Then DispCalc.Display()        ' Evaluate and display.
DispCalc.Quit()                                   ' Close calculator.