Fred Pace
MSDN Content Development Group
March 1997
The CTLPAL sample is associated with this article. For installation instructions and sample code associated with this article and related Banking articles, please go to Banking Samples: Installation Overview.
A control palette is an ActiveX™ control that wraps up the functionality of both the user-interface and data manipulation routines. Now that Microsoft® Visual Basic® version 5.0 allows you to create your own controls, you can take a user interface and turn it into your own drag-and-drop control—a window into your data at the click of a button. This article examines the design and development process that goes into creating a control palette. Additionally, this article guides you through the creation of a control palette called BankView, which allows you to display and navigate bank and account information. And most importantly, the article shows you how to create your control using a robust, layered, client/server methodology.
Wouldn’t it be nice to drag a control onto a form, set a few properties or write a few lines of initialization code, and have an instant interface to your data? Control palettes allow you to have exactly this type of functionality. Wouldn’t it be even better still to have a solid, multilayered, client/server application wrapped up into a control? Anyone can throw a few controls together, bind them to a database, and compile the whole enchilada into an ActiveX control. Will it be robust? Extensible? Programmable? Will it adhere to a solid design methodology? My money is on none of the above. After reading this article, however, you'll be able to build a control you could take home to Mom.
Our design methodology breaks out the control’s functionality into four separate, yet inter-dependent, layers.
The user-interface layer is what you will show the user. Controls that display data and navigational routines belong here. No other layer depends on the user-interface layer; however, the user interface is directly dependent on the data layer.
All of the control's data is contained and manipulated here. The data layer supports the interface and depends on the transaction layer.
The transaction layer is where all of the transactional elements are assembled, such as insert and update routines; however, they are not executed here—that comes next. This layer supports the data layer and depends on the external access layer.
The external access layer performs your transactions on an external data source. This layer directly supports the transaction layer and depends on nothing.
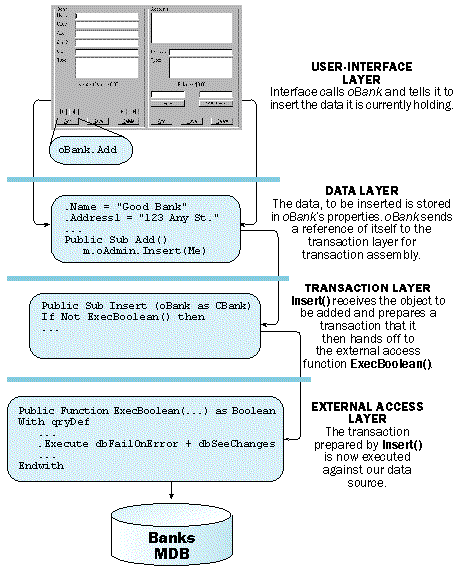
Often when given a design model, we do our best to modify our application needs to fit the model. This type of rigidity only causes headaches and can lead to code hacks and poor performance. The layered paradigm does not propose stringent separation between the layers. In fact, the lines between each layer are extremely fluid. Figure 1 depicts a purist approach to coding for the layered model.
Figure 1. Purist implementation
From a purist perspective, the user interface only calls the data layer, which in turn only calls on the transaction layer, which talks to the external access layer. In real-world applications, this type of strict enforcement of the model may not be practical. Notice, in Figure 1, the redundant calls to insert a record—an Add method calls an Insert() service in the transaction layer. Figure 1 also shows redundant calls to update, delete, and run any other transaction services available. The code is growing and growing and performance is fading away with each extra step. That’s just one drawback. You’ll also have to keep your naming conventions straight, maintenance will be a bear, and any hope of reuse diminishes with each added service.
When designing an application using the layered paradigm, it’s not important that your application show a physical separation of code denoting the different layers. What is important is the dependencies of code from one layer to another. Understand that the layered paradigm is a logical model, not a physical one. The BankView control palette built in this article exhibits each layer and the correct dependencies. Figure 2 depicts a more realistic implementation of the layered paradigm.
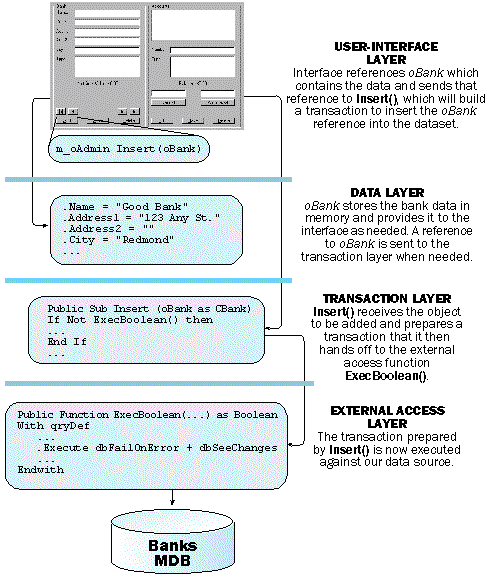
Figure 2. Realistic implementation
It’s important to decide up front how you plan to implement the layered methodology. If your application includes many data objects that are going to need transaction services, then the implementation used in BankView may not be the best approach.
As you will see, BankView uses transaction functions that accept optional data object parameters. The transaction function then identifies the object and builds a transaction specific to that object’s type. This is great for the two data objects of the BankView control, but what if your application has twenty or more data objects? Imagine the size of the function that accepts twenty optional parameters and creates a transaction string for each! In this instance it may be better to build your transaction building code—not external access—into your individual data classes. This method still fits the model because the transaction lines are fluid; again, this is a logical model, not a physical one. It’s the dependencies that matter, not necessarily the location or call structure of the code. An even better approach is to give your data classes a .Deleted property and a Persist() method, because it could scale up to handle many data objects. A simple scenario would have the Persist() method acting in support of the transaction layer. Persist() would determine if and how the object would persist (by examining its .Deleted property, or checking to see whether a primary key exists yet) and then handing off the object to the proper service of the transaction layer.
It is also important to consider how your implementation affects your application’s object model. You don’t want to end up with a model that is difficult or clumsy to use. For instance, in BankView’s implementation of layers, physically storing a data object (adds, edits, or deletes)—a.k.a. persistence—requires that the object be delivered directly to a transaction service, for example oAdmin.Delete(oBank). The purist approach described above requires a method call on the object specific to the transaction, oBank.Remove(). The final scenario described above requires a single call for any transaction, oBank.Persist (if this object were being removed, you would need to set the .Deleted property).
At first glance, none of the scenarios look too challenging to use. But what if you had several more types of transactions? BankView’s model and the purist model become a lot more difficult to manage. A .Persist method maintains its ease of use. Of course, now the complexity of coding the .Persist method comes into play. It’s a game of tradeoffs.
When using the layered paradigm as a model for your applications, it’s important to make implementation decisions up front. Ease of development, ease of use, reusability, flexibility, performance—all need to be considered. Spend time planning; it could be very difficult to implement changes later.
The BankView control palette exposes an interface detailing bank and account information. Users can navigate through bank and account data as well as add, edit, and delete data. Next, you'll see how the parts all fit together.
The BankView user interface includes all the visual elements of the control and includes the methods and properties shown in Figure 3.
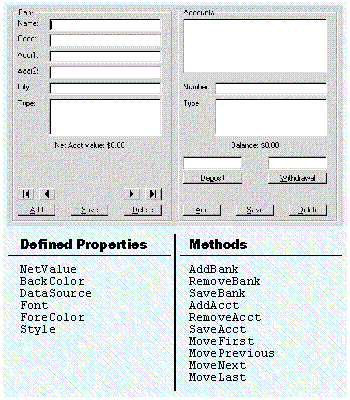
Figure 3. BankView interface, methods, and properties
The layered model states that the user interface is totally dependent on the data layer. Does the interface reflect that? Examine the following code from the .DisplayBank method of the control.
With oBank
    txtBank(icBankName) = .Name
    txtBank(icBankCode) = .Code
    txtBank(icAddress1) = .Address1
    txtBank(icAddress2) = .Address2
    txtBank(icCity) = .City
    . . .
    FindItem lstBankType, .TypeId

    For Each oAcct In .Accounts
       lstAcct.AddItem Trim$(oAcct.Number) & _
                   " " & Format$(oAcct.Balance, _
                            "Currency")
    . . .
   Next oAcct
    . . .
End With
Notice that the user interface’s only contact with data is by referencing the data class CBank. Without the data class, the interface is empty and nonfunctional. The user-interface does indeed adhere to the layered model.
The CBank and CAccount classes contain the data used by the BankView interface. Our object model is a simple one-to-many relationship between Bank and Account. A single Admin object is referenced by each object to handle transaction and external access requests. Figure 4 depicts the object model.
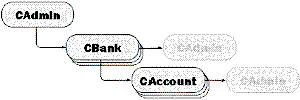
Figure 4. Object model for the BankView Control Palette.
To clarify, an Admin object is only created once for the whole model. Each Bank or Account object then sets a reference to that object. In the BankView control, you’ll see that each oBank and oAccount object sets a reference to m_oAdmin.
The data classes fit nicely into the data layer since they act only as a container for data. Data isn’t sent anywhere; the user interface must reference it. The data objects don’t get the data from a database; instead, data must be requested from another layer. The code below illustrates how data gets from text box controls on the interface to the bank data object, and then to the transaction layer function, Insert.
Set oBank = New CBank
With oBank
    .Name = txtBank(icBankName)
    .Code = txtBank(icBankCode)
    .Address1 = txtBank(icAddress1)
    .Address2 = txtBank(icAddress2)
    .City = txtBank(icCity)
    .TypeId = lstBankType.ItemData(lstBankType.ListIndex)
End With
If m_oAdmin.Insert(oBank:=oBank) Then
. . .
As you can see, the bank object doesn’t know how to insert a new bank, it merely contains the data that needs to be inserted. Therefore, the bank object must be sent to the Insert() function, which resides in the transaction layer. Since the data classes directly support the interface and depend upon the support of the transaction layer, they fit nicely into the data layer of the model.
The transaction layer of the BankView control includes the following functionality:
|
|
|
|
|
|
|
|
Examine the following code from the Insert() subroutine.
With oBank
. . .
    Set cParms = New Collection
    cParms.Add Trim$(Left$(.Address1, 60)), _
                    "[@Address1]"
    cParms.Add Trim$(Left$(.Address2, 60)), _
                    "[@Address2]"
. . .
cParms.Add .TypeId, "[@BankTypeId]"
End With
If Not ExecBoolean("pcIns_Bank", cParms) Then
. . .
The Microsoft Access database contains QueryDefs with parameter variables. Insert() prepares a transaction by storing the object data and associated QueryDef parameters in the collection cParms. The parameter collection and the name of the QueryDef that is to be executed (in this case, pc_InsBank) is then delivered to the external access layer for handling—courtesy of the ExecBoolean() function. The functionality of the transaction layer should mostly be reusable beyond this component.
BankView’s transaction layer also follows the layered approach, since it supports the transactional needs of the data classes and is dependent upon the functionality of the external access layer.
Finally, you can see a description of the layer that actually operates on a data source in conjunction with the requests of the transaction layer. BankView’s external access layer includes the functions ExecFillArray() and ExecBoolean(). Examine the following snippet from the ExecBoolean() function:
m_wsAccess.BeginTrans
Set qryDef = m_dbAccess.QueryDefs(sQry)
With qryDef
    For Each pParm In .Parameters
        pParm.Value = cParms(pParm.Name)
    Next pParm
    Err = False
    .Execute dbFailOnError + dbSeeChanges
    If CBool(Err) Then
        m_wsAccess.Rollback
. . .
ExecBoolean() is designed to operate against a specific type of a data source. In this case, it operates against a Microsoft Access database. ExecBoolean() takes the transaction parameters assembled by the transaction layer, as well as the name of a QueryDef that will handle the transaction, and executes it against a Microsoft Access database file. The functions of the external access layer should be completely reusable when used against the data source for which they were designed.
The external access layer of the control completes the layered model. It supports the requests of the transaction layer and depends upon nothing.
The layered paradigm is an atomic design model in that it breaks functionality down into related groups. Because functionality of the BankView control palette has been segregated into atomic units, functionality changes shouldn’t be catastrophic to the control.
Say you’ve built the control palette and it’s been in production for a while. Because of the amazing popularity of the control, your Microsoft Access database is approaching its performance limits. You need to change from a Microsoft Access back end to a SQL Server back end. Is it back to the drawing board for the control? Not at all. Are you going to have to gut major sections of your code wherever you’ve referenced a Microsoft Access database? No way. Because of the layered design, the external access layer of the control contains all of the database-specific code. You could rewrite ExecBoolean() as ExecBooleanSQL() to act on SQL Server data; or better yet, you could get the best of both worlds by including it as ExecBooleanMDB() and ExecBooleanSQL(). Now the external access layer (and thus, the control palette) can act upon both Microsoft Access and SQL Server data sources. That is one of the beauties of layered design—transport independence.
Okay, you’ve built the darned thing. Now how do you go about using it? Using the BankView control palette is as easy as dropping it onto a form and setting its DataSource property to point to your database. Run your project and you’ll have a ready-made data interface.
You can also control the control palette through code. You can turn off the navigational controls and navigate the control palette’s data using the control's methods. The following code snippet details how you can initialize and navigate the BankView control using code.
Public Sub Test()
Dim sDBPath as String
sDBPath = “c:\work\banks.mdb”
BankView1.NavStyle = CodeNavigate
If Not BankView1.Init(sDBPath) Then
       MsgBox "Didn't work."
    Exit Sub
End If
BankView1.MoveLast
BankView1.RemoveBank
BankView1.MoveLast
End Sub
As you can see, the control palette doesn’t require a Ph.D. to operate it using code.
Okay, you’ve designed it, you’ve built it, and you’ve even seen it run in a tiny sample Visual Basic project. So what will you do with a canned interface into your bank’s data source, or any control palette for that matter?
What you have created is the ultimate in code reusability. After creating and testing the control, what you wind up with is a bona fide ActiveX control! You can drop this control into a Visual C++ application . . . you can drop it into a Visual FoxPro application . . . hey, even another Visual Basic application. In fact you can drop this control into any environment that accepts ActiveX controls. You could also drop this control onto an HTML page and, in seconds, have a Web application! Is it starting to sink in?
Imagine having a toolbox full of control palettes! Building applications becomes nothing more than dropping your controls onto forms and writing any necessary administrative code.
Step back and examine the material you've just read. Notice how much of the article was dedicated strictly to design issues and considerations. It’s important to understand up front how you are going to design your applications. Spend time on your design, and you will save yourself many headaches later. Of course, I’m sure that our readers would never use a design-as-you-go technique, but there are folks who do . . .
If you'd like to read more about the layered paradigm, be sure to read Ken Bergmann's series of articles on client/server solutions. The series starts with "Client/Server Solutions: The Architecture Process" and includes "Client/Server Solutions: Implementing the Layered Paradigm."
The source code for the BankView control palette is meant to be used as a study tool and should by no means be considered production code. By all means, though, get the sample code and play with it. Perhaps you can come up with a more flexible and reusable implementation of BankView that utilizes the layered paradigm.