Ken Lassesen
Microsoft Developer Network Technology Group
January 23, 1996
Click to open or copy the files in the SPLFORM sample application.
Click to open or copy the files in the SPMFORM sample application.
Click to open or copy the files in the SAUFORM sample application.
This article describes the Microsoft® Schedule+ 95 OLE Automation server using Microsoft Visual Basic® for Applications. Three sample applications accompany the article.
The most important features of Microsoft® Schedule+ for Windows® 95 are the result of its design as an OLE Automation–centric application. These features include the use of recursive and overloaded objects. Features? Am I using the term in the sense familiar to programmers—as another way of saying "bugs"?
When I started working with Schedule+, I found the product extremely frustrating. I assumed that it would work like other OLE Automation servers such as Microsoft Excel, the Data Access Object (DAO), or Microsoft SQL Distributed Data Management Objects (SQL-DMO). After redecorating my office walls with the impression of my forehead, I began to understand that this OLE Automation server was different—and perhaps better. If a bug is anything in a program that frustrates a developer, a feature is anything that makes it possible to do more than expected. This article explains these OLE Automation features of Schedule+ and their logic. So get a latte, put up your feet, and get ready to learn.
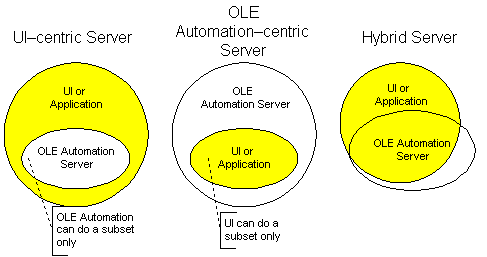
Traditionally, OLE Automation servers have centered on the user interface (UI). Some OLE Automation servers (for example, DAO and SQL-DMO) are pure servers without a UI. Schedule+ is neither of these types; instead, it is an OLE Automation–centric application server.
By UI-centric application I mean an application in which the OLE Automation command set is a subset of the capabilities available in the UI. OLE Automation is added after the application is created. The command set mimics user keystrokes or dynamic data exchange (DDE) commands.
Pure servers have no UI independent of OLE Automation. Pure servers usually reside in dynamic-link libraries (DLLs) and are in-process servers.
The UI of OLE Automation–centric servers is created after the OLE Automation engine. The UI becomes a shell around the OLE Automation server. Typically this results in the UI capabilities being a subset of the OLE Automation command set. In other words, you can do things with OLE Automation that you can never see in the UI or change from the UI. Schedule+ is an OLE Automation–centric server.
A hybrid server is also possible but is rarely seen. Figure 1 shows the relationship between the OLE Automation capabilities and the UI capabilities.

Figure 1. Relationships between the UI and OLE Automation capabilities of applications
Schedule+ uses object overloading (one class is used for many named objects) to create a single OLE Automation server. Many of the objects in the Schedule+ OLE Automation model are represented by the overloaded Item object or the Table class. I refer to these overloaded objects as the Item class and Table class (these objects could also be called object types or object classes). The term class helps to distinguish objects from Schedule+ objects. The Microsoft Exchange Server Software Development Kit (SDK) documentation describes objects named as Contact or Project with different lists of properties. Actually, Contact and Project objects are both Item classes with identical sets of properties.
The Exchange SDK documentation describes some Item classes as having Exceptions objects and Attendees objects. These objects are Table classes that consist of Item classes. Because all Item classes include Table classes, Item classes and Table classes are recursive. Figure 2 illustrates this recursion with the abstract classes and some Schedule+ objects.
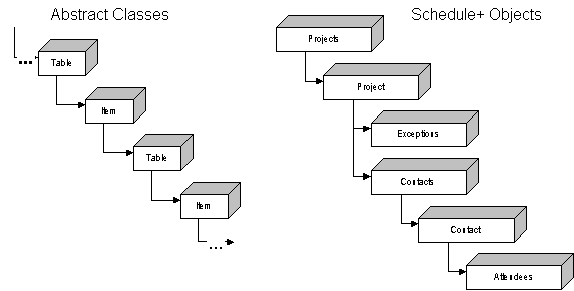
Figure 2. Examples of recursion in Schedule+
You may jump to the conclusion that Schedule+ is a hierarchical database. It is not a classic hierarchical database: Hierarchical databases have a finite depth of child elements, whereas Schedule+ has no bounds on the depth of child elements. Hierarchical databases have a static number of fields in a record; Schedule+ has a dynamic number of fields (accessed through the oxymoronic Properties method).
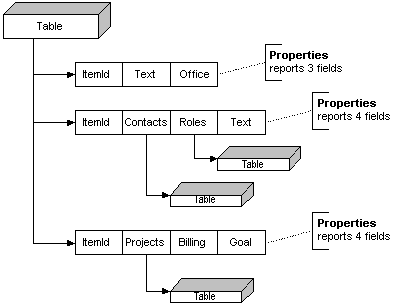
Figure 3. Data map of a Schedule+ Table
Figure 3 illustrates the internal data map of a Schedule+ Table. This type of structure cannot be easily implemented in Microsoft Access or Microsoft SQL Server. The structure is closer to that of an object-oriented database.
The structural design of Schedule+ allows for elegant and powerful solutions. This power, however, requires a few changes in how developers think about OLE Automation. In order to understand the design, we must look at three extended maps of Schedule+.
The Schedule+ OLE Automation server has three views, each represented by a different map. These maps are:
The Schedule+ object library (SPL) exposes only five objects, as shown in Figure 4. These objects are a distillation of the entire server. The SPL is intended for use by Microsoft Visual C++ programmers and experienced Microsoft Visual Basic for Applications developers. The SPL provides constants and should always be included in your references. The SPL lacks named properties on Item classes but provides the Properties method to obtain all of the Property classes. See "Mapping the Schedule+ 7.0 Object Library: SPL 7.0" for an extended map of this type library.
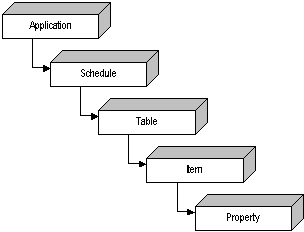
Figure 4. Map of the Schedule+ object library
Figure 5 illustrates how the Schedule+ OLE Automation documentation describes Schedule+ in terms of the traditional view of OLE Automation servers. This extended map is designed for the developer who wishes to work with the UI capabilities only. Programming model (PM) objects have properties and methods like other OLE Automation servers, but PM objects such as the Contacts table and Tasks table have different sets of properties (remember that both of these objects are the Item class). Most of these properties are visible in the Schedule+ application. For an extended map, see "Mapping the Schedule+ OLE Automation Server: Programming Model."
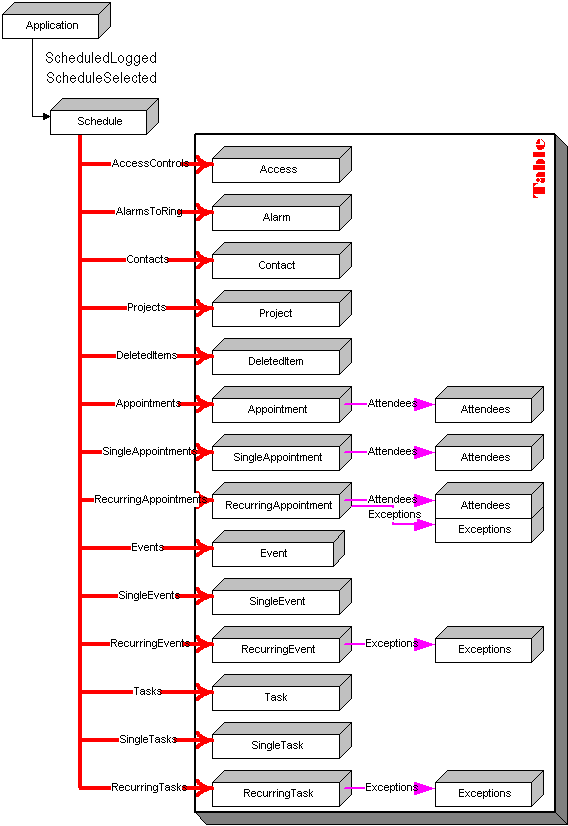
Figure 5. Map of the Schedule+ programming model
The third view is of Schedule+ internal objects (IO). The Schedule+ IO map is designed for the developer who wishes to use the full potential of Schedule+. The object overloading is seen in the identical sets of properties in the Tasks table and the Contacts table. The IO map shows that all of the Property objects are available on all Item objects. For an extended map of internal objects, see "Mapping the Schedule 95 OLE Automation Server: Internal Objects."
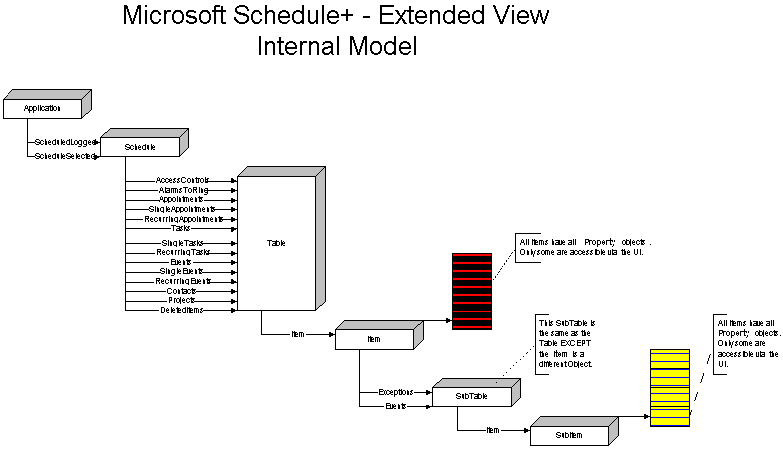
Figure 6. Map of the Schedule+ 95 internal objects
The relationships between the named objects (Projects, Project, Schedule, and Roles) and the object type or class is shown in Table 1. The type library describes the classes and not the named objects.
Table 1. Values Returned by TypeName on Schedule+ Instances
| Instance of object | TypeName() returned |
| Application | Application |
| Schedule | Schedule |
| AccessControls, AlarmsToRing, Appointments, Attendees, Contacts, DeletedItems, Events, Exceptions, Projects, RecurringAppointments, RecurringEvents, RecurringTasks, Tasks, SingleAppointments, SingleEvents, SingleTasks | Table |
| Access, Alarm, Appointment, Attendees, Contact, DeletedItem, Event, Exception, Project, RecurringAppointment, RecurringEvent, RecurringTask, SingleAppointment, SingleEvent, SingleTask, Task | Item |
Now that you've finished that latte, it's time to start reviewing code. In the following sections I will be building several sample applications that display the same objects and information in the Schedule+ file in very different ways. Each application illustrates some aspect of the three views above, coding issues, or performance factors. Read and run all of them before you start Schedule+ programming.
Note The code in this article assumes that you have the latest beta version of Schedule+ installed from the Microsoft Developer Network Development Platform. The Schedule+ type library that shipped with Windows 95 is broken and will not bind.
The key factors shown are listed in Table 2.
Table 2. Samples and Points Illustrated
| Sample Name | Points |
| SPLFORM | Uses type-library classes only. Illustrates the use of Item.Properties. Exposes Table, Item, and Property classes. |
| SPMFORM | Uses the programming model and the type library. Illustrates the use of Table.GetRows. Improves performance by a factor of 1,000. |
| SAUFORM | Extends the SPMFORM sample by supporting the addition, modification, and deletion of objects. |
In the SPLFORM sample, I create a viewer that shows all of the information existing in a Schedule+ Schedule. The viewer, shown in Figure 7, uses the Item.Properties method to obtain all of the Property classes and Table classes. It uses generic routines that operate on the Schedule object, the Table class (class), and the Item object (class).
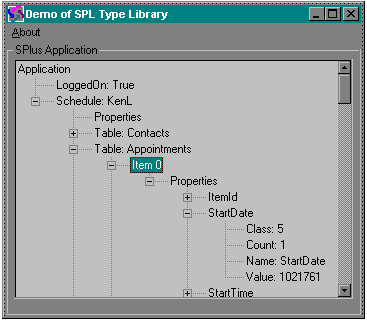
Figure 7. SPLFORM application form showing the structure of Schedule+ objects
Figure 7 shows Application (as the root object) and its descendants. The bottom object is a Property class (for example, StartDate) comprised of data members. Although the tool is slow, it allows for comprehensive exploration of the Schedule+ object (every object that exists can be obtained).
I need to create an instance of Schedule+ and to open a Schedule+ document (the Schedule object). The following code allows me to access my local Schedule+ file:
'The Exchange version of SP7EN32.OLB must be installed.
'The version shipped with Windows 95 is broken.
Global SPlusApplication As SPL.Application
Global scdSchedule As SPL.Schedule

Sub SchedulePlus_Init()
Set SPlusApplication = CreateObject("Schedule+.Application")
If SPlusApplication.LoggedOn = False Then
    SPlusApplication.Logon
End If
Set scdSchedule = SPlusApplication.ScheduleLogged
End Sub
After initializing Schedule+, I start filling a TreeView control with the root Application object and Schedule object. I use a Visual Basic collection to link the TreeView items with the Schedule+ objects via a common key. The resulting links give me a TreeView with objects available for each item (instead of the traditional ItemData available in a list box). Clicking any item in the TreeView gives me the associated object with the following code:
Private Sub TreeView_NodeClick(ByVal Node As Node)
Set SelectedObject = TreeCollection(Node.Key)
'other code
End Sub
The TreeView's Nodes collection is considerably richer in methods and properties than the Visual Basic collection, with such elements as Key, Sorted, Child, Parent, FirstSibling, and LastSibling. The Nodes collection, unlike the Visual Basic collection, also can be hierarchical.
The implementation is simple: create a key, add it to the Nodes by key, and then add it to the Visual Basic collection by key. This is shown in OutlineSPlusApplication below:
Sub OutlineSPlusApplication()
treSPlus.Nodes.Add , , "SPLUSAPPLICATION", "Application"
TreeCollection.Add Item:=SPlusApplication, Key:="SPLUSAPPLICATION"

treSPlus.Nodes.Add "SPLUSAPPLICATION", tvwChild, "A", _
    TypeName(scdSchedule) & ": " & scdSchedule.Name
TreeCollection.Add Item:=scdSchedule, Key:="A"
'TreeView does not support named arguments.
The next routine, OutlineAddTables, is a generic routine that works on any Item or Schedule class. This routines show the child objects of the passed object. After verifying the object passed, the following occurs:
As was the case in the previous example, the items in the TreeView control and the objects in our collection are linked with a common key (TableKey). I did not enumerate the properties for performance reasons (see later in this section).
Sub OutlineAddTables(OTL As Control, ScdItem As Object, ByVal ParentKey$)
If OTL.Nodes(ParentKey$).Children > 0 Then
    Exit Sub 'Control already populated
End If
Screen.MousePointer = 11
If TypeName(ScdItem) = "Item" Or TypeName(ScdItem) = "Schedule" Then
    OTL.Nodes.Add ParentKey$, tvwChild, "P_" & ParentKey$, "Properties"
    For p% = 0 To ScdItem.Properties - 1
        If TypeName(ScdItem.Properties(p%)) = "Table" Then
            TableKey = ParentKey$ & p%
            Set TblNode = OTL.Nodes.Add(ParentKey$, tvwChild, _
                TableKey, "Table: " & ScdItem.Properties(p%).Name)
            TblNode.EnsureVisible
            TreeCollection.Add ScdItem.Properties(p%), TableKey
        End If
    Next p%
End If
Screen.MousePointer = 0
End Sub
At this point the viewer contains items you can explore. Click an item to see the next level of its components. Three procedures may be called in treSPlus_NodeClick, the TreeView Click event:
The OutlineAddTables procedure is described above. The OutlineAddProperties procedure similarly walks the objects returned by the Properties method and explodes each Property class found, as shown below. The Property class may have multiple values, so the value of Property.Count must be tested. Because all of the properties (ChangeNumber, Class, Count, Name, and Value) of the Property class are data members (instead of objects), we do not add them to the collection. The Property class is added to the collection although it is not needed (unless you plan to update this object).
Sub OutlineAddProperties(OTL As Control, ScdItem As Object, ByVal ParentKey$)
If OTL.Nodes(ParentKey$).Children > 0 Then
    Exit Sub 'Control already populated
End If
Screen.MousePointer = 11
On Error Resume Next
If TypeName(ScdItem) = "Item" Or TypeName(ScdItem) = "Schedule" Then
    For p% = 0 To ScdItem.Properties - 1
        If TypeName(ScdItem.Properties(p%)) = "Property" Then
            PropKey$ = ParentKey$ & p%
            Set TblNode = OTL.Nodes.Add(ParentKey$, tvwChild, _
                PropKey$, ScdItem.Properties(p%).Name)
            TreeCollection.Add ScdItem.Properties(p%), PropKey$ 'Optional
            TblNode.EnsureVisible
            OTL.Nodes.Add PropKey$, tvwChild, , _
                "ChangeNumber: " & ScdItem.Properties(p%).ChangeNumber
            OTL.Nodes.Add PropKey$, tvwChild, , _
                "Class: " & ScdItem.Properties(p%).Class
            OTL.Nodes.Add PropKey$, tvwChild, , _
                "Count: " & ScdItem.Properties(p%).Count
            OTL.Nodes.Add PropKey$, tvwChild, , _
                "Name: " & ScdItem.Properties(p%).Name 'Nothing
            If ScdItem.Properties(p%).Count > 1 Then
                ValueParent = PropKey$ & "V"
                Set PropNode = OTL.Notes.Add(PropKey$, _
                    tvwChild, ValueParent, _
                    " Value" & vbTab & ScdItem.Properties(p%).Value)
                For i% = 0 To ScdItem.Properties(p%).Count - 1
                    OTL.Notes.Add ValueParent, tvwChild, , _
                    "Value(" & i% & ")" & vbTab & ScdItem.Properties(p%).Value
                Next i%
            Else
                    OTL.Nodes.Add PropKey$, tvwChild, , _
                    "Value: " & ScdItem.Properties(p%).Value
            End If

            TreeCollection.Add ScdItem.Properties(p%), PropKey$
        End If
    Next p%
End If
On Error GoTo 0
Screen.MousePointer = 0
End Sub
The OutlineShowItems procedure is different because it names the Item classes in a Table. The first Item class in the Table is obtained by calling the Reset method; this class is then added to the TreeView control and our collection. The next record is obtained by calling the Skip method until the IsEndOfTable property is True.
Sub OutlineShowItems(OTL As Control, ScdTable As Table, ByVal ParentKey$)
If OTL.Nodes(ParentKey$).Children > 0 Then
    Exit Sub 'Control already populated
End If
If TypeName(ScdTable) <> "Table" Then Exit Sub
ScdTable.Reset
i% = 0
While Not ScdTable.IsEndOfTable
    NewKey$ = ParentKey$ & i%
    Set NewNode = OTL.Nodes.Add(ParentKey$, tvwChild, _
          NewKey$, "Item " & ScdTable.Item.Name & i%)
    NewNode.EnsureVisible
    TreeCollection.Add ScdTable.Item, NewKey$
    i% = i% + 1
    ScdTable.Skip
Wend
End Sub
The fact that the TreeView fills very slowly is not the fault of the code nor of Schedule+. The slowness occurs because of the large number of OLE Automation calls being done across processes. Schedule+ is an out-of-process OLE Automation server, so each call may take one-tenth of a second on slower computers. This is the time it takes to move the data across the interface, regardless of the size of the data or the speed of the code at either end. An Item class with 60 properties may take 60 seconds to fully display. Examine the OutlineAddProperties procedure above and you will find that 60 properties require 600 out-of-process calls.
This code, although it is simple and illustrates well the structure of Schedule+, is too slow for most practical uses. This leads us to our second sample, SPMFORM.
In the SPMFORM sample, I create another viewer that shows most of the information existing in a Schedule+ Schedule. I select a subset of relevant information only. Low-level information such as Property.ChangeNumber or Property.Class cannot be obtained. The viewer uses the Table.GetRows method to obtain all of the values of the Property classes. The Table classes are obtained explicitly by examining the value of Table.Rows. The viewer similarly uses generic routines that operate on the Schedule object, the Table class (class), and the Item object (class).
The same general logic used in the SPLFORM sample applies here, except that the code in each procedure is different. This application, illustrated in Figure 8, appears slightly different.
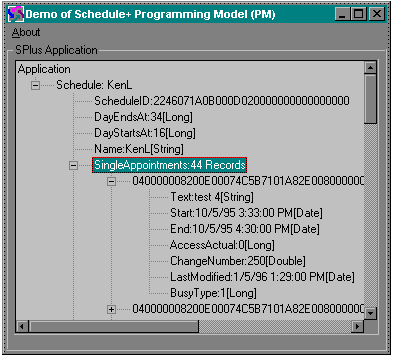
Figure 8. SPMFORM application form showing the structure of Schedule+ objects
Figure 8 shows Application as the root object and its descendants. The bottom objects are data members of Property classes (for example, StartDate) comprised of name, value, and data type. This is a faster but more selective tool for exploring the Schedule+ object (only some data members can be obtained).
The OutlineSPlusApplication and SchedulePlus_Init procedures are identical. The OutlineAddTables procedure does not check to see which Table classes exist via the Properties method; instead, it checks the count of items in the table (the count is 0 if the Table class does not exist). The amount of code is many times larger than the code we needed above (I wished for COBOL's classic Perform Corresponding instruction). The difference in performance is great. For any Item class, this procedure takes only 14 out-of-process calls to obtain all of the seven possible Table classes, whereas the same procedure above required 2 * (number of Tables) + 2 * (number of properties), a major improvement!
Sub OutlineAddTables(OTL As Control, ScdItem As Object, ByVal ParentKey$)
'This is a selection of the procedure.

If TypeName(ScdItem) = "Item" Or TypeName(ScdItem) = "Schedule" Then
   '...Code below is repeated for each Table that is unique to Schedule object.
    KeyCounter = KeyCounter + 1: NewKey = ParentKey$ & ":" & KeyCounter
    OTL.Nodes.Add ParentKey$, tvwChild, NewKey, "Roles:" & ScdItem.Roles.Rows & " Records"
    TreeCollection.Add ScdItem.Roles, NewKey
End If

If TypeName(ScdItem) = "Item" Then
   '...Code Above repeated for each Table common to all Items...
End If
End Sub
The OutlineAddProperties procedure is merged into the OutlineShowItems procedure. As with the OutlineAddTables procedure above, I ask for the value instead of getting Property classes and then the Value data member of this object. I must enumerate the names of the properties as shown in the code below. The Table.GetRows method is limited to 100 rows and 31 values per rows in one out-of-process call (versus 6,200 out-of-process calls that the method above could require). We have just jumped to Warp speed!
Sub OutlineShowItems(OTL As Control, ScdTable As Table, ByVal ParentKey$)
Dim arrData As Variant
Const nFieldNames = 22
Dim FieldNames$(1 To nFieldNames)
If OTL.Nodes(ParentKey$).Children > 0 Then Exit Sub
If TypeName(ScdTable) <> "Table" Then Exit Sub
FieldNames$(1) = "CreatorName"   'Enumerate names of Properties
'More similar lines
FieldNames$(22) = "IsRecurringInstance"
ScdTable.Reset
I% = 0
On Error Resume Next
' If no rows -> skip
' if error -> no rows -> skip
Clipcnt% = ScdTable.Rows
On Error GoTo 0
While Not ScdTable.IsEndOfTable And Clipcnt% > 0
    If ScdTable.Rows - I% > 100 Then 'Only 100 rows may be obtained at a time
        Clipcnt% = 100
    Else
        Clipcnt% = ScdTable.Rows - I%
    End If
    arrData = Array(Clipcnt% - 1, nFieldNames)
    I% = I% + Clipcnt%
    'ItemID is FIRST since it always exists
    arrData = ScdTable.GetRows(Clipcnt%, "ItemId", _
    FieldNames$(1), [Lots of arguments omitted] FieldNames$(22))
    'On Error Resume Next
    For r% = 0 To Clipcnt% - 1
        rp& = rp& + 1 'RowPosition
        ItemKey$ = "I" & ParentKey$ & "-" & rp&
        OTL.Nodes.Add ParentKey$, tvwChild, ItemKey$, arrData(r%, 0)
        For c% = 1 To nFieldNames
            If Not IsError(arrData(r%, c%)) Then
                OTL.Nodes.Add ItemKey$, tvwChild, , _
                  FieldNames$(c%) & ":" & arrData(r%, c%) _
                  & "[" & TypeName(arrData(r%, c%)) & "]"
            End If
        Next c%
    Next r%
    On Error GoTo 0

Wend
End Sub
All of the values of the Property classes could be obtained via multiple passes through the Table class. The GetRows method advances the pointer to the end of the records read. If I wanted to read 80 values per Item class, I would go through the tables three times, obtaining 62 (2 x 31) values on the first two passes and 18 values on the last pass.
You can easily get information about any Table classes in an Item class. If the Table.Name is used as an argument in the Table.GetRows or Item.GetProperties methods and there is an empty Table class, an error (IsError) is returned. If the Table class is not empty, a valid data type is returned (TypeName reports Empty, Binary, or Date). There is no need to walk the Item classes of the Table class testing for possible child Table classes.
Note Data members are not retrievable by Table.GetRows or Item.GetProperties. Fortunately, data members only occur in the Schedule object. There are no data members in the Item class.
This second sample results in a significant performance increase over our first sample: the new sample is literally 1,000 times faster! This sample does not add any Item classes or Property classes to our collection, so our ability to update easily is lost. In the next sample, I examine the problems of updating and adding objects.
In the SUAFORM sample, I modify the SPMFORM sample to add and update Schedule+ objects. The term add bears explaining. The developer also can add new Item classes to a Table class. The developer can add Property classes to an Item class by assigning a value to the Property.Value. I refer to this process as adding because the Property class will be included in the objects returned by the Properties method as a result. Similarly, by adding an Item to an empty child, Table class adds the Table class to the Item class.
An important cosmetic change to the SPMFORM sample is the addition of icons in the TreeView as shown in Figure 9.
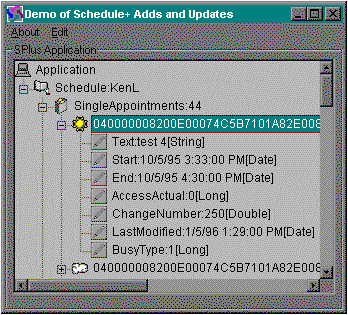
Figure 9. SAUFORM application form showing the structure of Schedule+ objects with icons
Figure 9 shows two different icons for Item classes—a cloud and a sun. The cloud icon represents an Item class that exists but the application does not have its object included in its Visual Basic collection. The sun icon represents an Item class that exists and its object is included in the application's collection. These icons will help you understand the program logic described next.
My first modification of the SPMFORM sample allows me to selectively get Schedule+ objects. I do not wish to get all of them because that will take a long time (remember Schedule+ is an out-of-process OLE Automation server). The only objects I obtained in the SPMFORM sample are the Schedule object and its child Table classes. I will modify the code to obtain all of the Item (and Item.Table) classes on an as-needed basis. The information displayed on the form are values of the Property classes available directly through these Item classes (instead of retrieving each Property class).
The code is simple because of our use of the TreeView control combined with a collection, as the following code fragment shows. The TreeView control gives us a collection with a key that can be updated. The first character of the key determines whether the associated object has been placed in the object collection. In the sample code, an Item item (in the TreeView) is found. This item gives us the key of its parent in the object collection and the Schedule+ ItemID (stored in Node.Text) for the Item class. Combining the two results in the Item class being retrieved and added to our object collection.
Private Sub treSPlus_NodeClick(ByVal Node As Node)
' code extract
Select Case Left(Node.Key, 1)
Case Const_ItemNoObject
   'Change Key to show Object is in Collection
    Node.Key = KeyItemObject$ & Mid$(Node.Key, 2)
    'Add to Collection
    TreeCollection.Add TreeCollection.Item(Node.Parent.Key).Item(Node.Text), _
        Node.Key
'Change the image to show a Sun
    Node.Image = "Item"
Making similar modifications to other code adds all of the Table and Item classes to our collection.
My second modification allows me to edit the value of any Item class's Property class. Again, I exploit the TreeView control to produce compact code below:
Private Sub treSPlus_NodeClick(ByVal Node As Node)
Select Case Left(Node.Parent.Key, 1)
Case Const_ItemNoObject
'The following forces the Parent into the Tree Collection.
       treSPlus_NodeClick Node.Parent
' code extract
Case Const_Property 'We have a Property
    NameIs$ = Left(Node.Text, InStr(Node.Text, ":") - 1)
    SetPropertyValue AnItem:=TreeCollection(Node.Parent.Key), NameIs:=NameIs$
    'We must put (()) around variables in this call to be ByVal[BUG]
    ValueIs = TreeCollection(Node.Parent.Key).GetProperty((NameIs$))
    Node.Text = NameIs$ & ":" & ValueIs & "(" & TypeName(ValueIs) & ")"
In the code above, I use the node's key to tell me that the object is a Property class (so I do not waste time making an out-of-process OLE Automation call). If the Item class associated with this property has not been placed in the collection of objects, I force this Item class to be retrieved by calling the treSPlus_NodeClick procedure passing the node's parent. The edit is done by the SetPropertyValue procedure. The text in the TreeView control is then updated to reflect any changes.
The SetPropertyValue procedure is a long procedure that enumerates all the properties you intend to modify. The code below shows the general structure:
Sub SetPropertyValue(ByVal NameIs$, AnItem As Object)
'We CANNOT use "As Item", because of SetProperties method BUG
OldValue = AnItem.GetProperty((NameIs$))
If IsError(OldValue) Then OldValue = "{new}"
ValueIs = InputBox("New Value for " & NameIs$ & " is", _
        "Simplified Input", OldValue)
If Len(ValueIs) = 0 Then Exit Sub 'No value do not Delete
Select Case NameIs$
Case "AlarmTypeUnit"
    AnItem.SetProperties AlarmTypeUnit:=ValueIs
Case "Text"
    AnItem.SetProperties Text:=ValueIs
'a lot more Case statements
End Select
'Make sure file is updated
AnItem.Flush
This procedure uses a variant. Visual Basic will do any needed automatic type conversion when I set the value of the Property object by calling the Item.SetProperties method. (I could also use TypeName on OldValue to convert the result into the appropriate data type.) You are not restricted to one field when you call the Item.SetProperties method but may update all the fields that appear on a form that are part of a single Item class. The Item.Flush method flushes the data out of any cache back to the Schedule+ file.
My third modification is the ability to add Items. There are three types of additions that may occur:
Adding a Table class is simple (assuming that you have the key of the Item class it will be added to, KeyLastItem$). From the collection I obtain the Item class, then call the NameToTable function (another long Select Case procedure) to get the appropriate Table class. The Table class requires a child Item class to come into existence so I create an Item class and set its Text Property class value to today's date. I then click this table to enumerate its Item classes in the TreeView:
Private Sub mnuTables_Click(Index As Integer)
Set a = NameToTable(TreeCollection(KeyLastItem$), mnuTables(Index).Caption)
Set X = a.New
X.Text = Date$
X.Flush
treSPlus_NodeClick (treSPlus.Nodes(KeyLastItem$).Parent)
End Sub
Similarly, adding an Item class is simple if you have the Table class key:
Private Sub mnuAddItem_Click()
Set X = TreeCollection(KeyLastTable$).New
    X.Text = "New Item"
    X.Flush
    treSPlus_NodeClick treSPlus.Nodes(KeyLastTable$)
End Sub
And adding a Property class only requires setting its value:
Private Sub MnuProperty_Click(Index As Integer)
    SetPropertyValue NameIs$, TreeCollection(KeyLastItem$)
    ValueIs = TreeCollection(KeyLastItem$).GetProperty((NameIs$))
    PropKey$ = Const_Property + NewKey$()
    treSPlus.Nodes.Add KeyLastItem$, tvwChild, PropKey$, _
          NameIs$ & ":" & ValueIs & "[" & TypeName(ValueIs) & "]", _
          "Property"
End Sub
Deleting Item, Table, and Property classes is simple and is shown in the sample.
I did not cover the more mundane aspects of Schedule+ OLE Automation in this article. The samples in the documentation address these aspects well. I have focused on the architecture of Schedule+ because it is very different from the older OLE Automation servers.
There are a few bugs in the version that I am using. These may or may not be corrected by the final released version. In case they are not, here is a short table of the more significant ones.
Table 3. Significant Bugs in Schedule+ OLE Automation
| Element | Description | Solution | |
| Item.SetProperties | Cannot specify property name if early bound object. | Object may not be "As Item" but must be late bound "As Object." | |
| Item.GetProperty Item.GetProperties |
Type mismatch on variable. | You must put an extra set of () around the variable so that it is passed by value. | |
| References | Type library does not bind. | The original Windows 95 and early beta type libraries have errors. Install current version. | |
| Item.GetProperties Item.SetProperties |
Cannot list enough arguments. | Documentation is incorrect. The limit is 31 property names. | |
| Table.GetRows | An Item class is skipped. | The second and subsequent calls to Table.GetRows method cause an extra Skip to occur. Read all of the records on the first call to the GetRows method if TableRows property is less than 100, or add a "Skip -1" after the first call to the GetRows method. | |
| For Each | Does not work on Table classes. | The Table class is not a collection. The For Each command would be very slow if implemented. | |
| Schedule.Top Schedule.Left Schedule.Width Schedule.Height |
Does not exist. | Oops—forgotten elements! You must walk the processes to get the hWnd of the Schedule+ window and then use a SendMessage to move. | |
| Schedule.GetProperties Schedule.GetProperty |
Fail on data members (CanUndo, SupportedOperations, Timezone, Usage, UserAddress, UserEntryID, UserName, UserSearchKey, Visible). | These methods only work on Property classes. | |
The Schedule+ Automation servers allow developers to produce powerful and customizable personal information managers (PIMs). Microsoft applications such as Word, Microsoft Excel, Microsoft Access, and Microsoft Project can be integrated within an enterprise-class PIM that will meet the needs of corporate developers and their clients. This different, extensible OLE Automation–centric view of OLE Automation allows better information flow across the corporation.
Lassesen, Ken. "A Hot Date: How OLE Automation Boosts Functionality in Schedule+." Developer Network News, March 1996. (Available on Developer Network News Online at http://www.microsoft.com/devnews/.)
Lassesen, Ken. "Mapping the Schedule+ OLE Automation Server: Internal Objects." (MSDN Library, Technical Articles)
Lassesen, Ken. "Mapping the Schedule+ OLE Automation Server: Programming Model." (MSDN Library, Technical Articles)
Lassesen, Ken. "Mapping the Schedule+ 7.0 Object Library: SPL 7.0." (MSDN Library, Technical Articles)
Lassesen, Ken. "Using Microsoft OLE Automation Servers to Develop Solutions." (MSDN Library, Technical Articles)
Microsoft Exchange Server SDK Microsoft Schedule+ Programmer's Guide.