Les Pinter
Publisher of The Pinter FoxPro Letter
January 1996
Les Pinter is the publisher of the Pinter FoxPro Letter, a monthly newsletter for professional FoxPro programmers. He has given presentations at Microsoft FoxPro Developers' Conferences in the United States, Spain, and Russia. Les has written six books about FoxPro for McGraw-Hill. He writes a monthly column for FoxTalk, and is a frequent speaker at FoxPro user groups around the United States and abroad, speaking in Spanish, French, Portuguese, Russian, and English. Les once played lead guitar in the road band for Jerry Lee Lewis.
Les Pinter can be reached at (916) 582-0595, on CompuServe at 76434,104, on the GO PINTER forum on Compuserve, or at 800-995-2797 (voicemail/fax).
Click to open or copy the files in the SECURITY sample application for this technical article.
Pinter Consulting has been in the Microsoft® FoxPro® software development business since the first version of FoxPro appeared. Although we've developed many different kinds of applications, most of our clients ask for some kind of security system, so that access to screens and functionality is restricted. After writing a number of these, we've come up with a general-purpose system that seems to meet most clients' needs. The system has evolved through several versions of FoxPro, and our most recent version is based on Microsoft Visual FoxPro™. This article describes that system.
We patterned our approach after the Novell® security system. Novell uses a two-tiered system of user groups, to which rights are assigned, then assigns users to groups. That way, you only have to describe who can do what one time, as long as users who belong to the same group enjoy the same rights.
What if a user has the same rights as a particular group, plus one or two additional access rights? Rather than set up a new group, we took a simpler approach. We first load the rights for the group the user is assigned to, then allow additional rights that complement or override those of the group. In that way, your users can create custom rights assignments with the minimum possible effort.
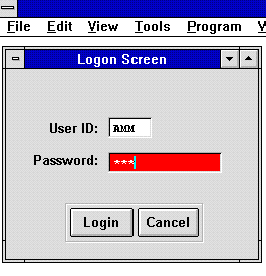
The user must first log in, as seen in Figure 1. The Logon Screen uses the PassWordChar property to replace the characters typed by the user with an asterisk, or whatever character you choose. This prevents people standing behind the user from seeing the password as it's typed.
Figure 1
The ControlSource for UserID is a public variable named pUserID, declared in SECURITY.PRG when the application starts. (See Listing 1, shown below.) Note that SECURITY.APP only runs at the startup of your application, so these public declarations only happen once. If you try to PUBLIC a variable that already exists, you get an error message.
We use PUBLIC variables so that SECURITY can be called as a procedure. To review, Visual FoxPro lets you refer to a variable in the program, function, or procedure in which it was created, as well as in any functions or procedures called by that program. If, however, you try to do something like this:
* Main.PRG
DO Initial   && initialization procedure
? pUserID
PROCEDURE Initial
pUserID = "FRED"
you'll get an error message. But, if the called procedure creates pUserID with a PUBLIC statement, for example:
PUBLIC pUserID
then the variable exists as if it had been created in the MAIN routine. So you can use the PUBLIC statement to move all of your initialization code to a called function, thereby making your MAIN easier to read. That's what we're doing here. The prefix p, which is not required, is simply a way of reminding the programmer reading the code that the variable is a public variable. Some programmers use an initial letter l for local variables, but you can also simply assume that variables lacking an initial p are local and save yourself a character.
The security system uses a function called GRANTED.PRG to return a value of .T. if the user has access to a requested feature, or .F. otherwise. The way we do this is simple: At log in, we build a table with the name "S_" + the UserID, but with the alias "UserRght". A SEEK to the table using a key consisting of the concatenation of (1) the name of the item in question, and (2) the access right in question (for example, "READ", "WRITE", and so on), returns either .T. or .F.. Our screens, menus, and programs have to know what to do with that returned value.
The framework for the security system is the project shown in Figure 2. This project contains all of the screens needed to manage the security system for an application. It also has a "test" screen to show the effects of the current security settings, and login and logout options in its menu. You would remove the test screen in production, and move the login and logout menu choices to your own menu.

Figure 2
Listing 1 shows SECURITY.PRG, the main program for our application.
Listing 1: Security.prg - Main program for security
*--------------------------------------------------
SET TALK OFF
SET ECHO OFF
SET DELE ON
SET EXCL ON
PUBLIC pUserID, pUserPW, pSupervisor
pUserID     = SPACE( 4)
pUserPW     = SPACE(10)
pSupervisor = .F.
LOCAL Accessed
Accessed    = .F.
DO FORM Login TO Accessed
IF Accessed
   DO Security.mpr
   READ EVENTS
   CLOSE DATA
   CLEAR WINDOW
   IF FILE("S_"+ALLT(pUserID)+".dbf")
      IF USED( "UserRght" )
         USE IN UserRght
      ENDIF
      DELE FILE ("S_"+ALLT(pUserID)+".dbf")
      DELE FILE ("S_"+ALLT(pUserID)+".cdx")
   ENDIF
   SET SYSMENU TO DEFA
ENDIF
*-----------------------------------------------------------
The application only runs if it's able to log in. In normal use, you might restrict entry to the security system to someone with SUPERVISOR rights, but we couldn't demonstrate its features if we did so here.
The security system uses five tables.
The USERS table stores the names of users, a password that ensures that no one else logs in under their UserID, and some descriptive information. In addition, if the user has supervisor status, the GRANTED function simply grants access and returns.
Structure for table: USERS.DBF
Field Name      Type         Width
USERID          Character        4
PASSWORD        Character       10
NAME            Character       30
PHONE           Character       14
NOTE            Memo             4
SUPER           Logical          1
** Total **                     64
The GROUPS file simply lists the names and descriptions of the available groups for list popups:
Structure for table: GROUPS.DBF
Field Name      Type         Width
ID              Character        4
NAME            Character       20
NOTES           Memo             4
** Total **                     29
The USR2GRP file maps users to groups:
Structure for table: USR2GRP.DBF
Field Name      Type         Width
USERID          Character        4
GROUPID         Character        4
** Total **                      9
The RIGHTS file describes which rights are assignable:
Structure for table: RIGHTS.DBF
Field Name      Type         Width
USRORGRPID      Character        4
ITEMID          Character       20
ACCESS          Logical          1
READ            Logical          1
WRITE           Logical          1
CREATE          Logical          1
DELETE          Logical          1
PRINT           Logical          1
** Total **                     31
The ITEMS file describes who has what rights to what item:
Structure for table: RIGHTS.DBF
Field Name      Type         Width
USRORGRPID      Character        4
ITEMID          Character       20
ACCESS          Logical          1
READ            Logical          1
WRITE           Logical          1
CREATE          Logical          1
DELETE          Logical          1
PRINT           Logical          1
** Total **                     31
These five tables are used to produce a sixth table at login time. It's created with the name <UserID>.DBF, where the logged-in user's UserID replaces the filename, and has a structural .CDX file of the same name. The only fields are ITEMID and ACCESS, both of which are included in the index tag as a single key. Here's the program that uses the USERRGHT table:
Listing 2: GRANTED.PRG
*-----------------------------------------------------------
* File name : Granted.prg
* Purpose   : Checks if user has specified rights for the
* named item
* Parameters:item Id, <expC> - name of the right
*       : Type of access <expC> - (ACCESS,READ etc.)
* Returns   : .t. or .f.
* Called by: Various
*-----------------------------------------------------------
PARAMETER inItem,inRight
IF pSupervisor
   RETURN .T.
ENDIF
IF NOT USED("UserRght")      && Testing
   RETURN .T.
ENDIF
inItem  = padr(upper(inItem),20," ")
inRight = upper(inRight)
RETURN SEEK(inItem+inRight,'UserRght', "USERRGHT")
*-----------------------------------------------------------
How you code this function is determined by the way you want the access system to work. The reason we use both a topic and an access right is that we wanted to simplify the process of setting rights.
The basic rights screen appears in Figure 3.
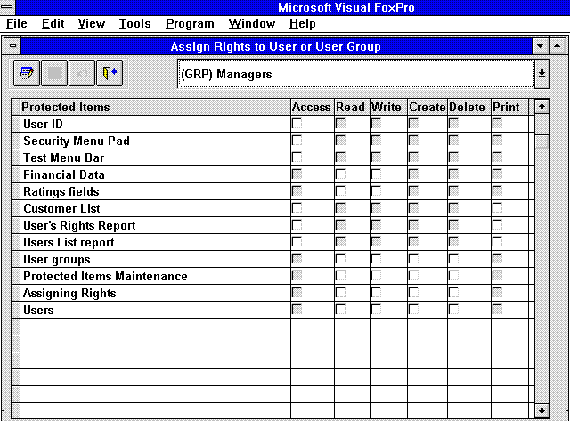
Figure 3
We wanted to simplify the granting of rights, so we limited them to six categories, represented by the rightmost six columns shown in Figure 3. Rights are divided into five groups, represented by the index tabs on the page frame:
This division was done to reduce the number of available selections in the grid, and to help organize users' thinking. Only some of the columns apply to any one of the five groups; for example, menus are only access protected.
A simpler system can be written based on a hierarchy of rights. For example, viewing a screen might be Level 1, printing reports could be Level 2, and deleting records might be Level 3. Thus, Level 2 users could view screens and print reports, but couldn't delete records. It's easy to program, but that's about all it's got going for itself.
We've never liked this kind of system, for two reasons. First, such hierarchies are artificial and arbitrary; I can easily imagine an environment where a data entry clerk could enter and delete data, but shouldn't be printing out hard copies that might leave the premises. So it's hard to get consensus on such a hierarchy, and if it changes, it gets really messy.
But perhaps the more serious criticism of access hierarchies is that they imply a class system, with varying degrees of worthiness. Forgive my chauvinism, but I'm an American, and we ain't got no stinking class system. So I don't like to build systems that declare Mary superior to Joe in a linear fashion. It just goes against my Texan nature.
The five categories are somewhat arbitrary, and based on a particular application. But you'll be happy to know that all you have to do to use this approach is to change the captions on the pages, or even the number of pages, and the system will know what to do with them. This bit of name-driven magic is shown later.
The keys to using this system are shown in screen TEST.SCX, which is included in the SECURITY project. The screen is shown in Figure 4, below.
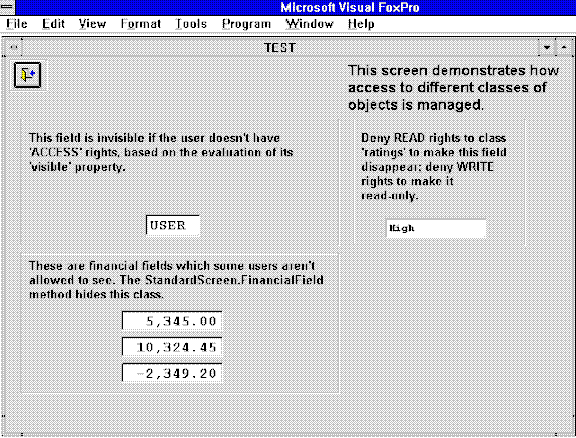
Figure 4
This screen's INIT code looks like this:
StandardScreen::Init   && Run the template's default code
THISFORM.ShowButton    && Hide buttons that aren't used here
THISFORM.FinancialFields && Can they see "FinancialFields"?

THISFORM.InputField1.Value = "USER"
THISFORM.FinancialField2.Value = "5,345.00"
THISFORM.FinancialField3.Value = "10,324.45"
THISFORM.FinancialField4.Value ="-2,349.20"
The assignment of values is required so that something will appear in the fields. The other three lines of code call methods in the template class StandardScreen—the standard Init logic and two other library methods.
The section immediately following this one is a review of the StandardScreen object that is the template for all of our screens. Templates are assigned in the Tools, Options, Forms dialog window. FinancialFields is a method in our StandardScreen class, which is used as the template for all of the screens in our application. When you add properties and methods to a class, then use it as the template for your screens, each screen can reference those methods. So this is what the FinancialFields method does:
PROCEDURE financialfields
IF NOT Granted("OTHFINANCE","READ")
   THISFORM.SetAll ( "Visible",  .F., "Financialfield" )
ENDIF
IF NOT Granted("OTHFINANCE","WRITE")
   THISFORM.SetAll ( "Readonly", .T., "Financialfield" )
ENDIF
ENDPROC
SetAll is a form method built into Visual FoxPro's form object, and it's used to set properties for classes of screen objects. For example, you can make all of the list boxes on a screen disabled like this:
THISFORM.SetAll ( "Enabled", .F., "Listbox" )
Listbox is the name of the Visual FoxPro base class. If you create your own class, just substitute its name:
THISFORM.SetAll ( "Enabled", .F., "Listbox" )
However, there's one restriction. While you can refer to a Visual FoxPro base class that isn't represented on your form, the same isn't true for your own class names. If you include the statement
THISFORM.SetAll ( "Enabled", .F., "Financialfield" )
and you don't have at least one FinancialField object on the form, you'll get an error.
Having said that, it's clear that you have to put code into the Init routine for each screen that knows that you have, for example, financial fields to protect. You can't simply add blanket calls to SetAll in the template and expect that they'll have no effect if no such fields are present. But you can create a generic routine in the template screen that can be called as needed. That's what we've done here. The FinancialFields method is in the StandardScreen class, so you call it in screens that have financial fields, and don't refer to it in screens that don't.
We've done a few more things in each of our screens based on StandardScreen and its contained objects. So let's take a moment to look at the classes used in this application.
In the CLASSES subdirectory, you'll find a pair of files called MYLIB.VCX and MYLIB.VCT. This is where our class library resides. To use a library, you SET CLASSLIB TO MYLIB ADDITIVE. Alternatively, from within the Form Designer, activate the Form Controls toolbar, then click the "View Classes" icon, which looks like a small stack of books. If MYLIB isn't showing, click on Add, then go to the CLASSES directory and select it. Once it's in the list of available classes, you can select it. The Form Controls toolbar will change to reflect what's available.
The first and most important class to consider is StandardScreen. We created this by opening the Form Designer, creating the basic screen we wanted to use for all of our screens, then saving it as a class in a class library called MYLIB.VCX.
We used the "source code listing" option from the Class Browser that comes with the Professional Edition of Visual FoxPro to list the code. It does a better job of describing the details of the class. However, don't get the impression that we wrote code to do anything in this application; we didn't. The code listing is simply a convenient way to explain what's going on in the class itself. Essentially, in the Init section of the code listing, you can see new properties that we've added, or settings that we've made to properties that the class already contains.
StandardScreen is shown below in Figure 5. It has a standard set of buttons, which are themselves based on classes that we created previously. Many shops add a logo in the upper right corner of the screen.
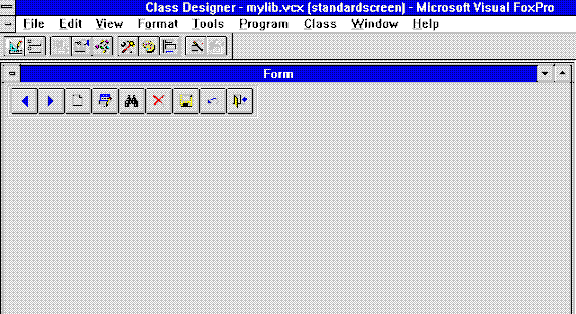
Figure 5
Here's the code that describes StandardScreen:
Listing 3: StandardScreen in MYLIB.VCX
**************************************************
*-- Class:        standardscreen (mylib.vcx)
*-- ParentClass:  form
*-- BaseClass:    form
DEFINE CLASS standardscreen AS form
   Top = 6
   Left = -6
   Height = 418
   Width = 630
   DoCreate = .T.
   ShowTips = .T.
   BackColor = RGB(192,192,192)
   Caption = "Form"
   Closable = .F.
   WindowState = 0
   Name = "standardscreen"
* The following are new form properties that we added:
   primarytable = ""
   saverecord   =  0
   searchkey    = ""
   adding       = .F.
   savealias    = ""
   browsefields = ""

   ADD OBJECT box3d1 AS box3d WITH ;
      Height = 36, ;
      Left = 4, ;
      Top = 3, ;
      Width = 279, ;
      Name = "Box3d1"

   ADD OBJECT cmdadd1 AS cmdadd WITH ;
      Top = 6, ;
      Left = 68, ;
      Height = 29, ;
      Width = 30, ;
      TabIndex = 3, ;
      Name = "Cmdadd1"

   ADD OBJECT cmdedit2 AS cmdedit WITH ;
      Top = 6, ;
      Left = 98, ;
      Height = 29, ;
      Width = 30, ;
      TabIndex = 4, ;
      Name = "Cmdedit2"

   ADD OBJECT cmdfind3 AS cmdfind WITH ;
      Top = 6, ;
      Left = 128, ;
      Height = 29, ;
      Width = 30, ;
      TabIndex = 5, ;
      Name = "Cmdfind3"

   ADD OBJECT cmddelete4 AS cmddelete WITH ;
      Top = 6, ;
      Left = 158, ;
      Height = 29, ;
      Width = 30, ;
      TabIndex = 6, ;
      Name = "Cmddelete4"

   ADD OBJECT cmdsave5 AS cmdsave WITH ;
      Top = 6, ;
      Left = 188, ;
      Height = 29, ;
      Width = 30, ;
      TabIndex = 7, ;
      Name = "Cmdsave5"

   ADD OBJECT cmdcancel6 AS cmdcancel WITH ;
      Top = 6, ;
      Left = 218, ;
      Height = 29, ;
      Width = 30, ;
      TabIndex = 8, ;
      Name = "Cmdcancel6"

   ADD OBJECT cmdexit7 AS cmdexit WITH ;
      Top = 6, ;
      Left = 248, ;
      Height = 29, ;
      Width = 30, ;
      Picture = "..\bmps\close.bmp", ;
      Caption = "", ;
      TabIndex = 9, ;
      Name = "Cmdexit7"

   ADD OBJECT cmdnext8 AS cmdnext WITH ;
      Top = 6, ;
      Left = 38, ;
      Height = 29, ;
      Width = 30, ;
      TabIndex = 2, ;
      Name = "Cmdnext8"

   ADD OBJECT cmdprev9 AS cmdprev WITH ;
      Top = 6, ;
      Left = 8, ;
      Height = 29, ;
      Width = 30, ;
      TabIndex = 1, ;
      Name = "Cmdprev9"

   PROCEDURE buttonson
      IF Granted( "SCR"   ;
         + UPPER(THISFORM.Name),"CREATE")
         THISFORM.cmdAdd1.Enabled = .T.
      ELSE
         THISFORM.cmdAdd1.Enabled = .F.
      ENDIF
      IF Granted("SCR" ;
         + UPPER(THISFORM.Name),"WRITE")
         THISFORM.cmdEdit2.Enabled = .T.
      ELSE
         THISFORM.cmdEdit2.Enabled = .F.
      ENDIF
      THISFORM.cmdFind3.Enabled    = .T.
      IF Granted("SCR"   ;
         + UPPER(THISFORM.Name),"DELETE")
         THISFORM.cmdDelete4.Enabled=.T.
      ELSE
         THISFORM.cmdDelete4.Enabled=.F.
      ENDIF
      THISFORM.cmdSave5.Enabled    = .F.
      THISFORM.cmdCancel6.Enabled  = .F.
      THISFORM.cmdExit7.Enabled    = .T.
      THISFORM.cmdNext8.Enabled    = .T.
      THISFORM.cmdPrev9.Enabled    = .T.
      THISFORM.TestBofEof()
   ENDPROC

   PROCEDURE buttonsoff
      THISFORM.cmdAdd1.Enabled     = .F.
      THISFORM.cmdEdit2.Enabled    = .F.
      THISFORM.cmdFind3.Enabled    = .F.
      THISFORM.cmdDelete4.Enabled  = .F.
      THISFORM.cmdSave5.Enabled    = .F.
      THISFORM.cmdCancel6.Enabled  = .F.
      THISFORM.cmdExit7.Enabled    = .F.
      THISFORM.cmdNext8.Enabled    = .F.
      THISFORM.cmdPrev9.Enabled    = .F.
      THISFORM.TestBofEof()
   ENDPROC

   PROCEDURE testbofeof
      IF NOT EMPTY ( THISFORM.PrimaryTable )
         SELECT    ( THISFORM.PrimaryTable )
      ENDIF
      IF ! EOF()
         SaveRec = RECNO()
         COUNT TO LocalCount FOR NOT DELETED()
      ELSE
         LocalCount = 0
      ENDIF

      IF LocalCount = 0
         THISFORM.SetAll("Enabled", .F.,"cmdNext")
         THISFORM.SetAll("Enabled", .F.,"cmdPrev")
         THISFORM.SetAll("Enabled", .F.,"cmdEdit")
         THISFORM.SetAll("Enabled", .F.,cmdDelete")
         RETURN
      ENDIF
      GO ( SaveRec )
      THISFORM.SetAll ("Enabled",   .T., "cmdNext")
      SKIP
      IF EOF()
         THISFORM.SetAll("Enabled", .F.,"cmdNext" )
      ENDIF
      GO ( SaveRec )
      THISFORM.SetAll   ("Enabled", .T.,"cmdPrev" )
      SKIP -1
      IF BOF()
         THISFORM.SetAll("Enabled", .F.,"cmdPrev" )
      ENDIF
      GO ( SaveRec )
   ENDPROC

   PROCEDURE financialfields
      IF NOT Granted("OTHFINANCE","READ")
         THISFORM.SetAll ( "Visible",  .F., ;
         "Financialfield" )
      ENDIF
      IF NOT Granted("OTHFINANCE","WRITE")
         THISFORM.SetAll ( "Readonly", .T., ;
         "Financialfield" )
      ENDIF
   ENDPROC

   PROCEDURE showbutton
* The following code makes invisible those controlbuttons whose SELECT property (which we created) is set to .T. for the current form. It also resizes the 3D box around the controls.

      THISFORM.cmdAdd1.Visible     = ;
IIF(THISFORM.cmdAdd1.Select  = .T., .T., .F.)
      THISFORM.cmdEdit2.Visible     = ;
IIF(THISFORM.cmdEdit2.Select = .T., .T., .F.)
      THISFORM.cmdFind3.Visible     = ;
IIF(THISFORM.cmdFind3.Select = .T., .T., .F.)
      THISFORM.cmdDelete4.Visible  = ;
IIF(THISFORM.cmdDelete4.Select= .T., .T.,.F.)
      THISFORM.cmdSave5.Visible     = ;
IIF(THISFORM.cmdSave5.Select = .T., .T., .F.)
      THISFORM.cmdCancel6.Visible  = ;
IIF(THISFORM.cmdCancel6.Select= .T., .T.,.F.)
      THISFORM.cmdExit7.Visible     = ;
IIF(THISFORM.cmdExit7.Select = .T., .T., .F.)
      THISFORM.cmdPrev9.Visible     = ;
IIF(THISFORM.cmdPrev9.Select = .T., .T., .F.)
      THISFORM.cmdNext8.Visible     = ;
      IIF(THISFORM.cmdNext8.Select = .T., .T., .F.)
      I = 10
      IF THISFORM.cmdFind3.Select = .T.
         THISFORM.cmdFind1.Left = I
         I = I + THISFORM.CmdFind1.Width + 1
      ENDIF
      IF THISFORM.cmdPrev9.Select = .T.
         THISFORM.cmdPrev9.Left = I
         I = I + THISFORM.cmdPrev9.Width + 1
      ENDIF
      IF THISFORM.cmdNext8.Select = .T.
         THISFORM.cmdNext8.Left = I
         I = I + THISFORM.cmdNext8.Width + 1
      ENDIF
      IF THISFORM.cmdAdd1.Select = .T.
         THISFORM.cmdAdd1.Left = I
         I = I + THISFORM.cmdAdd1.Width + 1
      ENDIF
      IF THISFORM.cmdEdit2.Select = .T.
         THISFORM.cmdEdit2.Left = I
         I = I + THISFORM.cmdEdit2.Width + 1
      ENDIF
      IF THISFORM.cmdDelete4.Select = .T.
         THISFORM.cmdDelete4.Left = I
         I = I + THISFORM.cmdDelete4.Width + 1
      ENDIF
      IF THISFORM.cmdSave5.Select = .T.
         THISFORM.cmdSave5.Left = I
         I = I + THISFORM.cmdSave5.Width + 1
      ENDIF
      IF THISFORM.cmdCancel6.Select = .T.
         THISFORM.cmdCancel6.Left = I
         I = I + THISFORM.cmdCancel6.Width + 1
      ENDIF
      IF THISFORM.cmdPrev9.Select = .T.
         THISFORM.cmdPrev9.Left = I
         I = I + THISFORM.cmdPrev9.Width + 1
      ENDIF
      IF THISFORM.cmdNext8.Select = .T.
         THISFORM.cmdNext8.Left = I
         I = I + THISFORm.cmdNext8.Width + 1
      ENDIF
      IF THISFORM.cmdExit7.Select = .T.
         THISFORM.cmdExit7.Left = I
         I = I + THISFORM.cmdExit7.Width + 1
      ENDIF
      IF I>10
         THISFORM.Box3d1.Width = I + 2
      ELSE
         THISFORM.Box3d1.Visible = .F.
      ENDIF
   ENDPROC

   PROCEDURE Init
      THIS.AutoCenter = .T.
      THIS.ButtonsOn
   ENDPROC

ENDDEFINE
*
*-- EndDefine: standardscreen
**************************************************
This code assumes that the command buttons have already been defined. Here they are:
**************************************************
*-- Class:        cmdnext (classes\mylib.vcx)
*-- ParentClass:  commandbutton
*-- BaseClass:    commandbutton
*
DEFINE CLASS cmdnext AS commandbutton

   Height = 25
   Width = 40
   Picture = "..\bmps\wznext.bmp"
   Caption = ""
   ToolTipText = "Next record"
   select = .T.
   Name = "cmdnext"

   PROCEDURE Click
      SaveAlias = ALIAS()
      IF NOT EMPTY ( THISFORM.PrimaryTable )
         SELECT    ( THISFORM.PrimaryTable )
      ENDIF
      IF NOT EOF()
         SKIP
         IF EOF()
            GO BOTTOM
         ENDIF
      ENDIF
      THISFORM.Refresh
      IF NOT EMPTY ( SaveAlias )
         SELECT    ( SaveAlias )
      ENDIF
      THISFORM.TestBofEof
   ENDPROC

ENDDEFINE
*
*-- EndDefine: cmdnext
**************************************************

**************************************************
*-- Class:        cmdprev (classes\mylib.vcx)
*-- ParentClass:  commandbutton
*-- BaseClass:    commandbutton
*
DEFINE CLASS cmdprev AS commandbutton

   Height = 25
   Width = 40
   Picture = "..\bmps\wzback.bmp"
   Caption = ""
   ToolTipText = "Previous record"
   select = .T.
   Name = "cmdprev"

   PROCEDURE Click
      SaveAlias = ALIAS()
      IF NOT EMPTY ( THISFORM.PrimaryTable )
         SELECT    ( THISFORM.PrimaryTable )
      ENDIF
      IF NOT BOF()
         SKIP -1
         IF BOF()
            GO TOP
         ENDIF
      ENDIF
      THISFORM.Refresh
      IF NOT EMPTY ( SaveAlias )
         SELECT    ( SaveAlias )
      ENDIF
      THISFORM.TestBofEof
   ENDPROC

ENDDEFINE
*
*-- EndDefine: cmdprev
**************************************************

**************************************************
*-- Class:        cmdadd (classes\mylib.vcx)
*-- ParentClass:  commandbutton
*-- BaseClass:    commandbutton
*
DEFINE CLASS cmdadd AS commandbutton

   Height = 25
   Width = 40
   Picture = "..\bmps\wznew.bmp"
   Caption = ""
   ToolTipText = "Add a record"
   select = .T.
   Name = "cmdadd"

   PROCEDURE Click
      IF NOT EMPTY ( THISFORM.PrimaryTable )
         SELECT    ( THISFORM.PrimaryTable )
      ENDIF
      THISFORM.Adding = .T.
      THISFORM.SaveRecord = RECNO()
      * Recycle deleted records
      LOCATE FOR DELETED()
      IF NOT FOUND()
         APPEND BLANK
      ENDIF
      THISFORM.Refresh

      * Activate any base class objects ;
        and disable command buttons
      THISFORM.SetAll("Enabled", .T., "Combobox"   )
      THISFORM.SetAll("Enabled", .T., "Spinner"  )
      THISFORM.SetAll("Enabled",;
               .T.,"Commandbutton")
      THISFORM.SetAll("Enabled", .T., "Editbox"   )
      * The only derived class that is expected ;
      *  on every form is InputField:
      THISFORM.SetAll("Enabled", .T.,"Inputfield")

      * To add others, type the following into the;
      *  edit button click event code window:
      *cmdEdit::Click

      *THISFORM.SetAll("Enabled", .T.,"Classname") * Classname is case-sensitive
      *THISFORM.FirstField.SetFocus

      THISFORM.SetAll("Enabled", .F., "cmdAdd"   )
      THISFORM.SetAll("Enabled", .F., "cmdEdit"  )
      THISFORM.SetAll("Enabled", .F., "cmdNext"  )
      THISFORM.SetAll("Enabled", .F., "cmdPrev"  )
      THISFORM.SetAll("Enabled", .F., "cmdDelete")
      THISFORM.SetAll("Enabled", .F., "cmdExit"  )
      THISFORM.SetAll("Enabled", .F., "cmdFind"  )
      THISFORM.SetAll("Enabled", .T., "cmdSave"  )
      THISFORM.SetAll("Enabled", .T., "cmdCancel")
   ENDPROC

ENDDEFINE
*
*-- EndDefine: cmdadd
**************************************************

**************************************************
*-- Class:        cmdedit (classes\mylib.vcx)
*-- ParentClass:  commandbutton
*-- BaseClass:    commandbutton
*
DEFINE CLASS cmdedit AS commandbutton

   Height = 25
   Width = 40
   Picture = "..\bmps\wzedit.bmp"
   Caption = ""
   ToolTipText = "Edit this record"
   Name = "cmdedit"

   Select    = .T.   && property added by us

   PROCEDURE Click
      IF NOT EMPTY ( THISFORM.PrimaryTable )
         SELECT    ( THISFORM.PrimaryTable )
      ENDIF
      THISFORM.SaveRecord = recno()
      THISFORM.SetAll("Enabled", .T., "Combobox")
      THISFORM.SetAll("Enabled", .T., "Spinner" )
      THISFORM.SetAll("Enabled",.T.,Commandbutton")
      THISFORM.SetAll("Enabled", .T., "Editbox" )

      * Derived class assumed present on all forms:
      THISFORM.SetAll("Enabled", .T., "Inputfield")

      * To add others, type the following into the
      *  edit button click event code window:
      *cmdEdit::Click
      *THISFORM.SetAll("Enabled", .T., "Classname")      *THISFORM.FirstField.SetFocus

      THISFORM.SetAll("Enabled", .F., "cmdAdd"   )
      THISFORM.SetAll("Enabled", .F., "cmdEdit"  )
      THISFORM.SetAll("Enabled", .F., "cmdNext"  )
      THISFORM.SetAll("Enabled", .F., "cmdPrev"  )
      THISFORM.SetAll("Enabled", .F., "cmdDelete")
      THISFORM.SetAll("Enabled", .F., "cmdExit"  )
      THISFORM.SetAll("Enabled", .F., "cmdFind"  )
      THISFORM.SetAll("Enabled", .T., "cmdSave"  )
      THISFORM.SetAll("Enabled", .T., "cmdCancel")
   ENDPROC

ENDDEFINE
*
*-- EndDefine: cmdedit
**************************************************

**************************************************
*-- Class:        cmdfind (classes\mylib.vcx)
*-- ParentClass:  commandbutton
*-- BaseClass:    commandbutton
DEFINE CLASS cmdfind AS commandbutton

   Height = 25
   Width = 40
   Picture = "..\bmps\find.bmp"
   Caption = ""
   ToolTipText = "Open/Find a record"
   select = .T.
   Name = "cmdfind"

   PROCEDURE Click
      IF NOT EMPTY(THISFORM.PrimaryTable)
         SELECT (THISFORM.PrimaryTable)
      ENDIF
      IF NOT "JKEY" $ SET("CLASSLIB")
         SET LIBRARY TO JKEY ADDITIVE
      ENDIF
      _JExitKey = 13
      =JKeyInit("U")
      IF EMPTY (THISFORM.BrowseFields)
         BROWSE TITLE ;
      "Highlight your selection and press ENTER"
      ELSE
         LOCAL lFields
         lFields = THISFORM.BrowseFields
         BROWSE FIELDS &lFields TITLE ;
      "Highlight your selection and press ENTER"
      ENDIF
      =JKeyCanc()
      THISFORM.TestBofEof
      THISFORM.Refresh
   ENDPROC
ENDDEFINE
*-- EndDefine: cmdfind
**************************************************

**************************************************
*-- Class:        cmddelete (classes\mylib.vcx)
*-- ParentClass:  commandbutton
*-- BaseClass:    commandbutton

DEFINE CLASS cmddelete AS commandbutton

   Height = 25
   Width = 40
   Picture = "..\bmps\delete.bmp"
   Caption = ""
   ToolTipText = "Delete this record"
   Name = "cmddelete"

   select = .T.   && property added by us

   PROCEDURE Click
      SaveAlias = ALIAS()
      IF TYPE  ( "THISFORM.PrimaryTable" ) <> [U]
         SELECT ( THISFORM.PrimaryTable )
      ENDIF
      IF MessageBox("Delete this record?", ;
         4 + 32 + 256 , "Note: Can't undo" ) = 6
         DELETE NEXT 1
         SET DELETED ON
         GO TOP
      ENDIF
      THISFORM.Refresh
      IF NOT EMPTY ( SaveAlias )
         SELECT    ( SaveAlias )
      ENDIF
      THISFORM.TestBofEof
   ENDPROC

ENDDEFINE
*
*-- EndDefine: cmddelete
**************************************************

**************************************************
*-- Class:        cmdsave (classes\mylib.vcx)
*-- ParentClass:  commandbutton
*-- BaseClass:    commandbutton
*
DEFINE CLASS cmdsave AS commandbutton

   Height = 25
   Width = 40
   Picture = "..\bmps\wzsave.bmp"
   Caption = ""
   ToolTipText = "Save changes"
   Name = "cmdsave"
   select = .T.   && property added by us

   PROCEDURE Click
      IF NOT EMPTY ( THISFORM.PrimaryTable )
         SELECT    ( THISFORM.PrimaryTable )
      ENDIF
      =TableUpdate()
      THISFORM.Adding = .F.
      THISFORM.SetAll("Enabled", .F., "Combobox" )
      THISFORM.SetAll("Enabled", .F., "Spinner"  )
      THISFORM.SetAll("Enabled",.F.,Commandbutton")
      THISFORM.SetAll("Enabled", .F., "Editbox"  )

      * Derived class assumed to exist in every
      *  form (otherwise, an error results)
      THISFORM.SetAll("Enabled",.F.,"Inputfield" )

      THISFORM.SetAll("Enabled", .T., "cmdAdd"   )
      THISFORM.SetAll("Enabled", .T., "cmdEdit"  )
      THISFORM.SetAll("Enabled", .T., "cmdNext"  )
      THISFORM.SetAll("Enabled", .T., "cmdPrev"  )
      THISFORM.SetAll("Enabled", .T., "cmdDelete")
      THISFORM.SetAll("Enabled", .T., "cmdExit"  )
      THISFORM.SetAll("Enabled", .T., "cmdFind"  )
      THISFORM.SetAll("Enabled", .F., "cmdSave"  )
      THISFORM.SetAll("Enabled", .F., "cmdCancel")
      THISFORM.Refresh
   ENDPROC

ENDDEFINE
*
*-- EndDefine: cmdsave
**************************************************

**************************************************
*-- Class:        cmdcancel (classes\mylib.vcx)
*-- ParentClass:  commandbutton
*-- BaseClass:    commandbutton
*
DEFINE CLASS cmdcancel AS commandbutton

   Height = 25
   Width = 40
   Picture = "..\bmps\undo.bmp"
   Caption = ""
   ToolTipText = "Abandon changes"
   Name = "cmdcancel"
   select = .T.   && property added by us

   PROCEDURE Click
      IF NOT EMPTY ( THISFORM.PrimaryTable )
         SELECT    ( THISFORM.PrimaryTable )
      ENDIF
      =TableRevert() && PrimaryTable buffermode 3
      IF NOT THISFORM.Adding
         GO ( THISFORM.SaveRecord )
      ENDIF
      THISFORM.Refresh
      THISFORM.Adding = .F.
      THISFORM.SetAll("Enabled", .F., "Combobox" )
      THISFORM.SetAll("Enabled", .F., "Spinner"  )
           THISFORM.SetAll("Enabled",.F.,"Commandbutton")
      THISFORM.SetAll("Enabled", .F., "Editbox"  )
      THISFORM.SetAll("Enabled", .F., "Inputfield")

      THISFORM.SetAll("Enabled", .T., "cmdAdd"   )
      THISFORM.SetAll("Enabled", .T., "cmdEdit"  )
      THISFORM.SetAll("Enabled", .T., "cmdNext"  )
      THISFORM.SetAll("Enabled", .T., "cmdPrev"  )
      THISFORM.SetAll("Enabled", .T., "cmdDelete")
      THISFORM.SetAll("Enabled", .T., "cmdExit"  )
      THISFORM.SetAll("Enabled", .T., "cmdFind"  )
      THISFORM.SetAll("Enabled", .F., "cmdSave"  )
      THISFORM.SetAll("Enabled", .F., "cmdCancel")
   ENDPROC

ENDDEFINE
*
*-- EndDefine: cmdcancel
**************************************************

**************************************************
*-- Class:        cmdexit (classes\mylib.vcx)
*-- ParentClass:  commandbutton
*-- BaseClass:    commandbutton
*
DEFINE CLASS cmdexit AS commandbutton

   AutoSize = .F.
   Height = 25
   Width = 40
   FontSize = 9
   Caption = " E\<xit"
   ToolTipText = "Exit this screen"
   Name = "cmdexit"
   select = .T.   && property added by us

   PROCEDURE Click
      THISFORM.Release
   ENDPROC

ENDDEFINE
*
*-- EndDefine: cmdexit
**************************************************
We added a property called Select to each of the command buttons, because not all forms use all of the buttons. We found that, after instantiating a form, we had to go back, make the unnecessary buttons invisible, then change the size of the 3D box that surrounds them. We decided that it would be easier to set a property on each button to .F. if we didn't want that button to appear on the form, then let the template calculate the width of the box around the remaining buttons. That's what the code in procedure ShowButton in StandardScreen is all about. It looks like a lot of work, but once we did it, we never had to remove unused command buttons from screens again.
We added a few properties to our StandardScreen template. First, we wanted to make sure the correct table was selected before we performed record-related operations, like moving the record pointer or deleting a record. So we require that the principal table in each form (the one that we SKIP or SKIP -1 in when the Next or Previous buttons are clicked) be named in our new form property THISFORM.PrimaryTable. Then, we preceded every movement or deletion command with this:
   IF NOT EMPTY ( THISFORM.PrimaryTable)
      SELECT    ( THISFORM.PrimaryTable)
   ENDIF
Second, we decided to use optimistic record locking for editing. That means that changes to a record aren't actually written to disk until (1) the record pointer moves, or (2) the TableUpdate() function is called. In our case, only (2) can happen, because we disable all movement command buttons until adding or editing has either been saved or canceled. (Case 1 is generally used with BROWSE or GRIDS.)
If you add the primary table to the form's Data Environment, then right click on the Data Environment and select the Properties Sheet, you'll see a property called BufferModeOverride. Set it to 3, and Visual FoxPro will know what to do with the TableUpdate and TableRevert calls in the Save and Cancel buttons. (You also have to SET MULTILOCKS ON in your environment, and of course in your MAIN program.)
This isn't a form property; it's a convention that we require to make our SAVE and CANCEL commands work right. You can also add the following two lines to every Load event code:
   SELECT ( THISFORM.PrimaryTable )
   =CursorSetProp("Buffering",3)
Finally, we wanted to make our FIND command easier to customize. As we saw above, we use a BROWSE that relies on Joe Gotthelf's JKEY utility, which turns BROWSE into an incremental search. But BROWSE alone shows the first few fields in the table. The leftmost field isn't always the current key field (which is what JKEY searches on as you type).
We added a form property called BrowseFields. When you call the Search function, if the form has a comma-delimited list of fields in its BrowseFields property, the Find button (which uses a JKEY search) will display only the named fields. Just make the leftmost field the current key field, and your FIND function will work very intuitively.
What if you don't want the Find button to do anything? Here's one way: Open up the Click code window in your form based on StandardScreen and type a single asterisk, like this:
* Click code for cmdFind:
*      <== this is it!
That's all it takes to tell Visual FoxPro to ignore the class's original code! The fact is, if you enter so much as a single comment—even a single asterisk—the original code is ignored. You probably wouldn't do this, except by mistake. A more likely case is when you want to use the original code, then add more commands.
A typical case is the one where you have a list box on the screen. List boxes that use structured query language (SQL) to load their contents aren't refreshed automatically when you issue the THISFORM.REFRESH command. So, if you FIND a new parent record, and you want a list box to show the related child records, you have to do it yourself:
   CmdFind::Click
   THISFORM.ListBox1.Requery
The first line is called the scope resolution operator. It has to name the name of the class containing the Click code you want to execute. You can use this with WIZARD-generated command buttons as well, making the Form Wizard a usable tool for the first time.
The first thing you do when setting up our security system is to define what the protected items are. The screen shown in Figure 6 is used for that purpose.
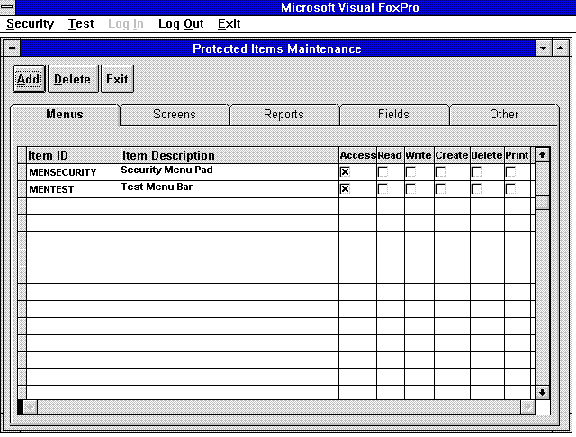
Figure 6
The tabs on the page frame are used to group the items functionally. Although we've used Menus, Screens, Reports, Fields, and Other, there's no requirement as to what categories you choose. To change them, select the page frame in Screen Items, then open the Properties Sheet and click Other. The PageCount property can be set to any number of pages. You'll see something like Figure 7:
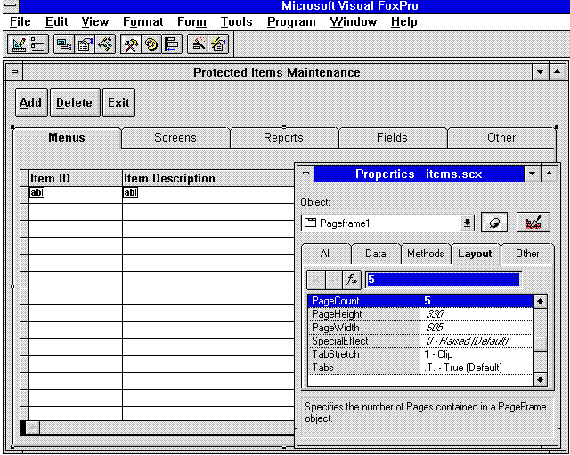
Figure 7
Then, set the page captions to whatever you want. As you create new item ID records, they'll be stamped with the caption of the page they're created on.
The mechanism used to make the grid display the items that correspond to the page frame captions (the tabs) is widely used. The trick consists of two parts:
For example, this is the ACTIVATE code for each one of the pages:
   Page    = THIS.Name
   PageName = UPPER(THISFORM.PageFrame1.&Page..Caption)
   SET FILTER TO TYPE  = PageName
   GO TOP
   THISFORM.Refresh
The item ID field can contain any identifier that is easy for you to remember. In the examples shown, we prefixed each ID with a few letters indicating the type of usage, but it's optional.
This screen isn't used to assign rights to users; it has two other uses: to add items available for assignment elsewhere, and to indicate which selections make sense. For example, we grant ACCESS to menu pads, but we read or write fields, and delete records. So no item has all rights, simply because it wouldn't make sense.
Our security system supports user groups. Their purpose is to grant rights in ways that are shared by the same type of user. For example, accounting personnel probably need to have access to almost everything; data entry clerks, on the other hand, might need access only to the data they're entering. Financial information—salaries, for example—might be especially sensitive. By granting rights by group, then assigning users to groups, we can greatly cut down on the work involved in setting up and administering a security system.
The GROUPS screen is shown in Figure 8.

Figure 8
All we do here is add names to the group's member list. We can also enter a note that describes the nature of the grouping.
The data environment for this screen is shown in Figure 9. Users are related to groups through an intermediate table called USR2GRP.
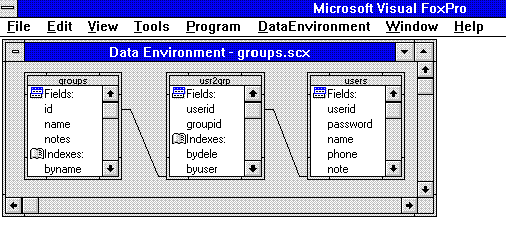
Figure 9
There are eight pieces of event code in this screen. The code for the Activate event consists of a single line:
SELECT GROUPS
The standard buttons at the top of the screen also required a little modification. Here's the ADD button code:
cmdAdd::Click
THISFORM.SetAll("Enabled",.T.,"EditBox")
THISFORM.infGroupID.SetFocus
This runs the standard cmdAdd CLICK code, then enables the EditBox on the screen (the note field), and sets the focus on the GroupID text box.
The EDIT button code is almost identical:
cmdAdd::Click
THISFORM.SetAll("Enabled",.T.,"EditBox")
THISFORM.infGr
The Save and Cancel buttons are also practically identical:
cmdSave::Click
THISFORM.SetAll("Enabled",.F.,"EditBox")
THISFORM.SetAll("Enabled",.T.,"CommandButton")
cmdCancel::Click
THISFORM.SetAll("Enabled",.F.,"EditBox")
THISFORM.SetAll("Enabled",.T.,"CommandButton")
We didn't want users to edit the GroupID, although they can change the description. The technique we used to accomplish this is clean and simple. Here's the When event code for the GroupID:
RETURN THISFORM.Adding
which means that if the user is adding a new group, he or she can get into the field, because THISFORM.Adding contains the value .T.. But if the user is editing, the field is effectively disabled, because the statement would return a .F..
The GroupID VALID clause has to do several things: It avoids duplication of GroupIDs; and it ensures that a GroupID is not entered that's already in use as a UserID, since at the time they're used, GroupIDs and UserIDs are indistinguishable. Returning to the original record location after a SEEK is imperative.
LOCAL SaveRecord
SaveRecord = recno("Groups")
=SEEK (THIS.Value,"Groups","ById")
DO CASE
   CASE FOUND("Groups") AND RECNO("Grops") <> SaveRecord
        =MessageBox("This ID is not Unique",0,"ERROR")
       SELECT Groups
       GO (SaveRecord)
       RETURN .F.
   CASE FOUND()
       SKIP
       IF NOT EOF() AND Groups.ID = THIS.Value
          =MessageBox("This ID is not Unique",0,"ERROR")
          SELECT Groups
          GO (SaveRecord)
         RETURN .F.
       ENDIF
ENDCASE
SELECT Groups
GO (SaveRecord)
=SEEK(THIS.Value,"Users","ById")
IF FOUND("Users")
   =MessageBox("This ID is used for a User",0,"ERROR")
   SELECT Groups
   GO (SaveRecord)
   RETURN .F.
ENDIF
Adding a new member to a group is accomplished using the following code:
   DO FORM AddMemb
   SELECT Groups
   THISFORM.Refresh
Form AddMemb is shown in Figure 10. However, when it runs, only the Save and Cancel buttons are visible: the rest have their Select property set to .F., so StandardScreen's ShowButton method hides them.
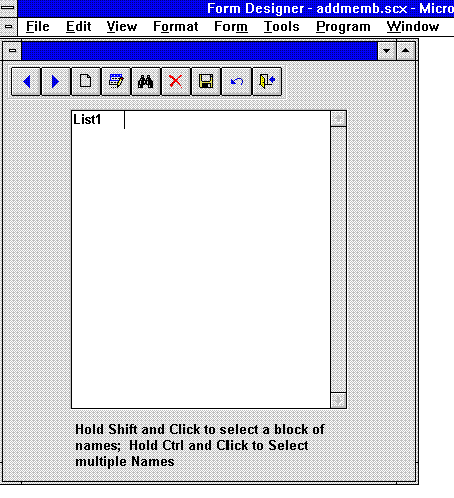
Figure 10
This form has three event code segments:
Init:
   StandardScreen::Init
   THIS.ShowButton
   THIS.Caption = "Add members to "+UPPER(ALLT(Groups.Name))
Activate:
   StandardScreen::Activate
   THIS.Setall("Enabled",.T.,"cmdSave")
   THIS.SetAll("Enabled",.T.,"cmdCancel")
cmdSave:click:
   WITH THISFORM.List1
   LOCAL I
   I=1
   FOR I=1 TO .ListCount
       IF NOT .Selected(I)
          LOOP
       ENDIF
       IF SEEK (.List(i,1)+Groups.ID,"Usr2Grp","ByUser")
          LOOP
       ENDIF
       SELECT Usr2Grp
       APPEND BLANK
       REPLACE UserID WITH .List(i,1), ;
        GroupID WITH GRoups.ID
   ENDFOR
   ENDWITH
   SELECT usr2Grp
   IF NOT EOF() AND NOT BOF()
      GO RECNO()
   ENDIF
   THISFORM.Release
This code uses the WITH statement, which allows you to abbreviate THISFORM.List1.Selected(I) to .Selected(I).
If the last few lines of code above look wrong, allow me to explain. For some time, we've noticed that SET RELATIONs can do strange things. If you SELECT a child file and move around, then return to the parent and can't get your grid to refresh, try this little trick. It works in both Visual FoxPro version 2.6 and version 3.0. We don't know why.
Deleting a member also requires refreshing the form:
   IF MessageBox(             ;
      "Delete " + ALLTRIM(Users.Name) + "?",    ;
       4 + 32 + 256 ,            ;
       "NOTE: Cannot undo!") = 6
   SELECT Usr2Grp
   DELETE
   GO TOP
   ENDIF
   THISFORM.Refresh
The first parameter in MessageBox is a text string to be displayed in the box. Here we build a question asking the user to confirm the name of the user to be deleted.
The second consists of the sum of three values:
The "6" to the right of the equal sign means "Yes". The numeric values and their meanings can be found under MessageBox Help, or in \VFP\FOXPRO.H. So this says: "If they answer 'yes' to the question in the message box, delete the record."
So far, this system is a straightforward mechanism for adding records from one file to another. Assigning rights is slightly more complicated, but not much.
Rights are assigned to users with the Rights screen, shown in Figure 11.
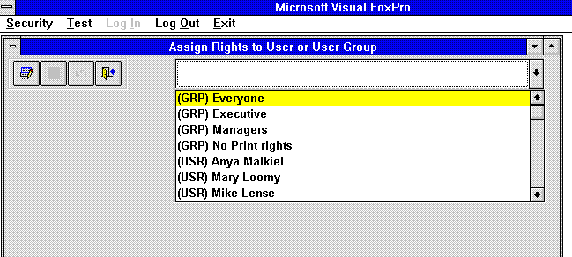
Figure 11
When this screen is first opened, no user or group is selected. After you select a user or group, a grid appears with the rights that have been assigned, based on (1) group membership and (2) individual rights assignment, as seen in Figure 12. Notice that some check boxes on each line are shaded. These options are unavailable because on the Protected Items screen shown previously in Figure 3, they weren't selected as relevant to the type of option. For example, granting WRITE privileges to a menu doesn't make sense, so you can't select it here.
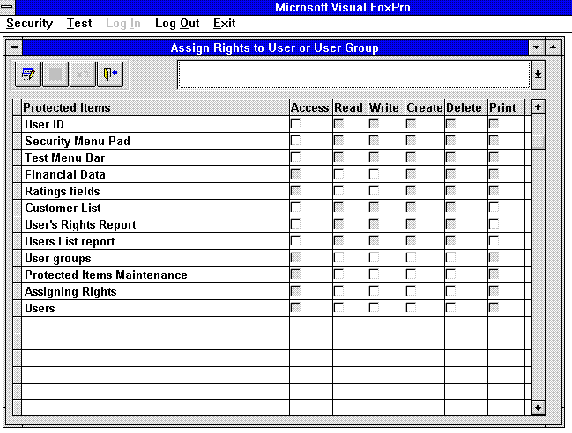
Figure 12
This is where you determine what the user or group can do. In Figure 12, above, we're setting the rights for Manager group members. Check those that you want to permit; leave the ones blank that aren't granted. That's all there is to it!
The first thing you want to ensure is that users log in and log out. After all, what good does it do to restrict access rights if users can easily use another user's password? So we've added a few menu features to make the system a little tighter.
Figure 13 shows the menu that controls our security system. You'll want to add a Log In and Log Out to your menu, and it's very easy.
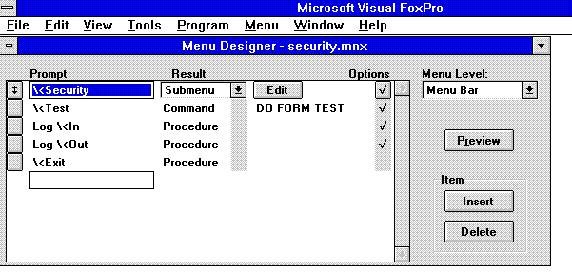
Figure 13
First, click the Options button to the right of the Log In option; then, check the Skip For check box; finally, fill in the Skip For condition with "not empty (pUserID)". The result is shown in Figure 14.
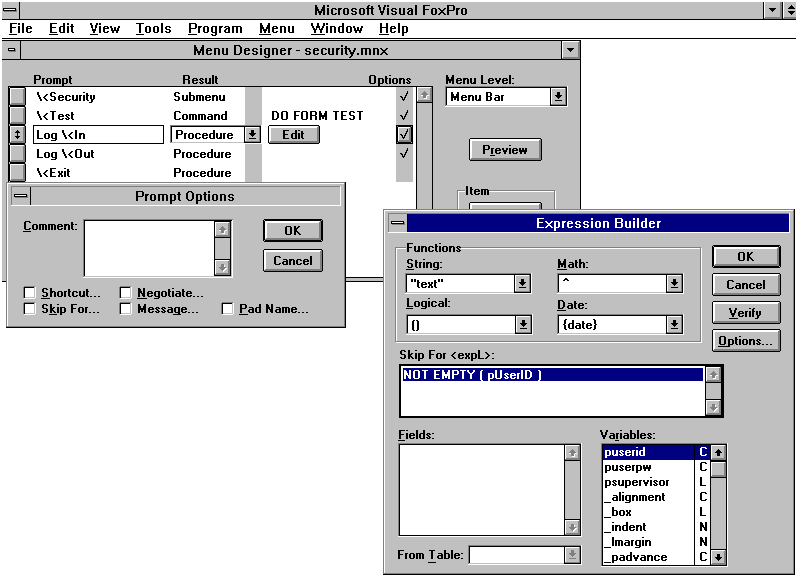
Figure 14
Now, users can't do anything except log in when the variable pUserID is empty. Do the same with all of the entries on your application's menu, and all the user can do, when no one is logged in, is log in or exit.
Our security system menu does something similar. Because only supervisors can change assignment of rights, all of the pads on the Security menu popup are disabled unless a supervisor is logged in. pSupervisor is a global memory variable assigned at login time from a value in the USERS table.
The Users screen shown in Figure 15 is used to add users and assign them to groups.

Figure 15
While being added, a new user can be designated as a supervisor. This gives him or her the right to enter and make changes in the security system. In order to ensure that the password is entered correctly, it must be entered twice, and both entries must match. This simple but useful technique is seen often in Microsoft products like Windows NT™ and Microsoft Mail.
Assigning users to groups is done in the second page of the page frame, as seen in Figure 16. Users can belong to several groups, and inherit all of the rights granted by each group to which they belong.
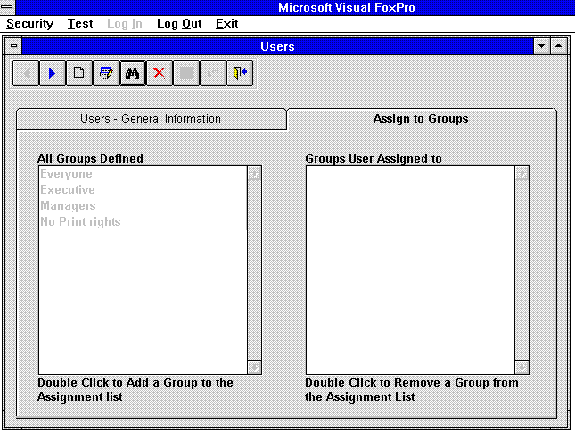
Figure 16
This is the most complex screen in this application. It has a two-column "mover" picklist, complex validations, and uses several interesting new types of Visual FoxPro syntax. So let's get started.
The Form Designer view of the Rights screen appears in Figure 17.
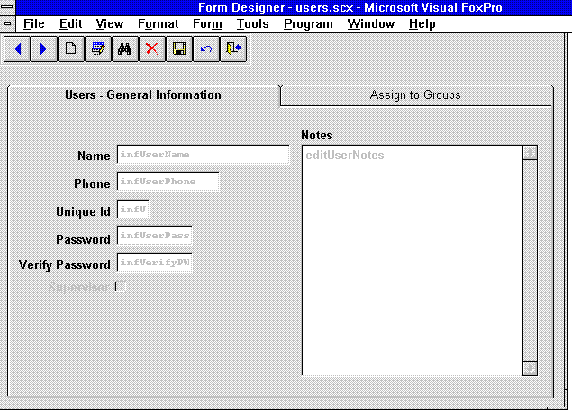
Figure 17
The first five fields on page 1 of the page frame are based on our InputField class, which is stored in MYLIB:
**************************************************
*-- Class:        inputfield (classes\mylib.vcx)
*-- ParentClass:  textbox
*-- BaseClass:    textbox
DEFINE CLASS inputfield AS textbox
   FontBold = .T.
   FontName = "Courier New"
   FontSize =  8
   Enabled    = .F.
   Format    = ""
   Height    = 23
   Width    = 113
   Name    = "inputfield"

   PROCEDURE GotFocus
      THIS.ForeColor=RGB ( 255, 255, 255 )
      THIS.BackColor=RGB ( 255,   0,   0 )
   ENDPROC
   PROCEDURE LostFocus
      THIS.ForeColor=RGB (   0,   0,   0 )
      THIS.BackColor=RGB ( 255, 255, 255 )
   ENDPROC
ENDDEFINE
*-- EndDefine: inputfield
**************************************************
Objects based on this class are initially disabled, use a small boldfaced Courier New font, and change their color from black on white to white on red when they have the focus.
All of the command buttons in StandardScreen are used in this form. However, four of them have modifications to their Click event code:
cmdAdd:
   cmdAdd::Click
   THISFORM.PageFrame1.Page1.SetAll("Enabled",.T.,"EditBox")
   THISFORM.PageFrame1.Page1.SetAll("Enabled",.T.,"CheckBox")
   THISFORM.PageFrame1.Page2.SetAll("Enabled",.T.,"ListBox")
   THISFORM.PageFrame1.ActivePage = 1
cmdEdit:
   cmdEdit::Click
   THISFORM.PageFrame1.Page1.SetAll("Enabled",.T.,"EditBox")
   THISFORM.PageFrame1.Page1.SetAll("Enabled",.T.,"CheckBox")
   THISFORM.PageFrame1.Page2.SetAll("Enabled",.T.,"ListBox")
cmdSave:
   THISFORM.SavingNow = .T.
   cmdSave::Click
   *-------------------------
   * Save Groups assignment
   *-------------------------
   SELE Usr2Grp
   DELETE ALL FOR UserID = MyUser.UserID

   WITH THISFORM.PageFrame1.Page2.List2
        LOCAL i
        FOR i=1 TO .ListCount
            APPEND  BLANK
            REPLACE UserId  WITH MyUser.UserID,;
            GroupID WITH .List(i,2)
        ENDFOR
   ENDWITH
   THISFORM.PageFrame1.Page1.SetAll("Enabled",.F.,"EditBox")
   THISFORM.PageFrame1.Page1.SetAll("Enabled",.F.,"CheckBox")
   THISFORM.PageFrame1.Page2.SetAll("Enabled",.F.,"ListBox")
   THISFORM.SavingNow = .F.
cmdCancel:
   cmdCancel::Click
   THISFORM.PageFrame1.Page1.SetAll("Enabled",.F.,"EditBox")
   THISFORM.PageFrame1.Page1.SetAll("Enabled",.F.,"CheckBox")
   THISFORM.PageFrame1.Page2.SetAll("Enabled",.F.,"ListBox")
Several of the input fields have event code to ensure correct and complete data, as follows.
Unique ID (infUserID) WHEN code:
RETURN THISFORM.Adding
Unique ID (infUserID) VALID code:
   IF EMPTY(THIS.Value)
      =MessageBox("ID cannot be empty",0,"ERROR")
      RETURN .F.
   ENDIF
   =SEEK(THIS.Value,"Users1","ById")
   DO CASE
   CASE FOUND("Users1") ;
    and RECNO("Users1") <> RECNO("USERS")
      =MessageBox("This ID is not unique",0,"ERROR")
      RETURN .F.
   CASE FOUND("Users1")
      SKIP IN Users1
      IF NOT EOF("Users1") ;
         AND Users1.UserID == THIS.Value
         =MessageBox("This ID is not unique",0,"ERROR")
         RETURN .F.
      ENDIF
   ENDCASE
   *---------------------------------------------
   * Rights are common for users and groups,
   * So, ID should be unique through both files
   *---------------------------------------------
   =SEEK(THIS.Value,"Groups","ById")
   IF FOUND()
      =MessageBox("This ID is used for a Group",0,"ERROR")
      RETURN .F.
   ENDIF
Password (infUserPassw) VALID code:
RETURN NOT EMPTY(THIS.Value)
Verify password (infVerifyPW) VALID code:
   LOCAL TorF
   TorF = IIF(THIS.Value==THIS.Parent.infUserPassW.Value,;
      .T., .F. )
   THIS.Value = SPACE(LEN(Users.PassWord))
   RETURN TorF
Page 2 ACTIVATE code:
IF EMPTY(ALIAS())
   SELECT Myuser
ENDIF
REPLACE MyUser.UserID WITH Users.UserID
THIS.List2.Requery
Page 2 List1 RightClick code:
SELECT DIST Users.Name         ;
    FROM Users,Usr2Grp, MyUser      ;
   WHERE Users.UserID    = Usr2Grp.UserID   ;
     AND Usr2Grp.GroupID = THIS.Value    ;
     AND Users.UserID <> MyUser.UserID    ;
    INTO ARRAY aInGroup

WITH THIS.Parent.List2
   LOCAL I
   FOR I=1 TO .ListCount
      IF .List(i,2) == THIS.Value
            EXIT
      ENDIF
   ENDFOR
   IF I <= .ListCount
      IF _tally = 0
         DIME aInGroup(1)
         aInGroup(1) = Users.Name
       ELSE
         DIME aInGroup(ALEN(aInGroup)+1)
         aInGroup(ALEN(aInGroup)) = Users.Name
         =ASORT(aIngroup)
      ENDIF
   ENDIF
ENDWITH
IF TYPE('aInGroup') = "U"
   =MessageBox (
    "Nobody is assigned to " + THIS.List(THIS.ListIndex,1),;
    0, ;
    "Information" )
   RETURN
ENDIF
LOCAL lMessage,i
lMessage = aInGroup(1)
FOR i=2 TO ALEN("aInGroup")
    lMessage = lMessage + CHR(13) + ALLT(aInGroup(i))
ENDFOR
=MessageBox (    ;
   lMessage,   ;
   0,      ;
   " assigned to " + THIS.List(THIS.ListIndex,1) )
Page 2 List1 DoubleClick code:
LOCAL i
WITH THIS.Parent.List2
     FOR I=1 TO .ListCount
     IF .List(i,2) = THIS.Value
         EXIT
     ENDIF
     ENDFOR
     IF i > .ListCount
    .AddItem (THIS.List(THIS.ListIndex))
    .AddListitem(THIS.Value,.ListCount,2)
     ENDIF
     .Refresh
ENDWITH
Page 2 List2 DoubleClick code:
THIS.RemoveItem(THIS.ListIndex)
THIS.Refresh
The two-column mover is one of the more useful tools you can build, and it's particularly easy in Visual FoxPro. In fact, this is a relatively complicated version. In the simplest case, all you need to do is to construct two list boxes on a form, making sure that both have RowSourceType = 0 (None) or 1 (Value). If RowSourceType is 0, you leave RowSource empty and use the AddListItem method to build the contents of the list; if RowSourceType = 1, you simply enter a comma-delimited list of entries into RowSource. Then, your only code is the following:
List1 DoubleClick code:
     THISFORM.List2.AddListItem(THIS.Value)
     THIS.RemoveItem(THIS.ListIndex)
     THISFORM.Refresh
List2 DoubleClick code:
     THISFORM.List1.AddListItem(THIS.Value)
     THIS.RemoveItem(THIS.ListIndex)
     THISFORM.Refresh
You can then post-process the selected items as follows:
   FOR I = 1 TO THISFORM.LIST2.ListCount
       x = THISFORM.List2.Item(I)
      * Do what you want with x...
   ENDFOR
However, if you use any other RowSourceType, for example, an array (RowSourceType=5), you have to rebuild the array and redisplay the object each time it changes. So we use the form REFRESH code to do so.
There are five form events that have code:
FORM LOAD event code:
   CREATE CURSOR MyUser (UserId C(4))
   APPEND BLANK
* This cursor holds all of the entries that this user has on file
FORM INIT event code:
   StandardScreen::Init
   THISFORM.ButtonsOn
   THISFORM.TestBofEof
FORM ACTIVATE event code:
* Ensure that the USERS table is selected when this form is up
     SELECT USERS
FORM REFRESH event code:
* All we do here is ensure that the table matches the screen
   THIS.Caption = "Users - " + ALLT(Users.Name) ;
   + " (" + ALLT(Users.UserID) + ")"
   IF EMPTY(ALIAS())
      SELECT MyUser
   ENDIF
   REPLACE MyUser.UserID WITH Users.UserID
   IF NOT THISFORM.SavingNow
      SELECT groups.name, usr2grp.groupid;
      FROM Usr2Grp,Groups ,MyUser;
      WHERE  usr2grp.UserId  ==  MyUser.UserID AND;
      Usr2Grp.GroupID == Groups.ID INTO CURSOR X
     WITH THISFORM.PageFrame1.Page2.List2
          .Clear
          SCAN
         .AddItem(Name)
         .AddListItem(GroupId,.ListCount,2)
          ENDSCAN
     ENDWITH
      USE IN X
   ENDIF
FORM UNLOAD event code:
   IF USED ('MyUser')
      USE IN MyUser
   ENDIF
   IF USED ('X')
     USE IN X
   ENDIF
To start using the security system, log in as SUP, password SUP, as shown in Figure 18. Only supervisors can have access to the system.
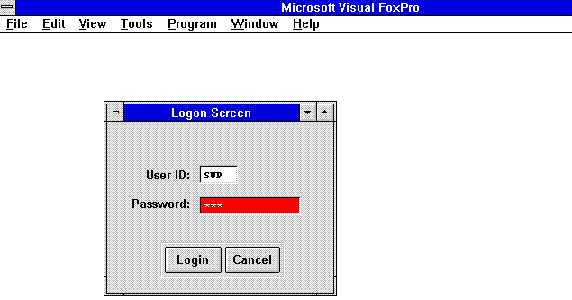
Figure 18
Next, add any rights that you want controlled in your screens, as seen in Figure 19:
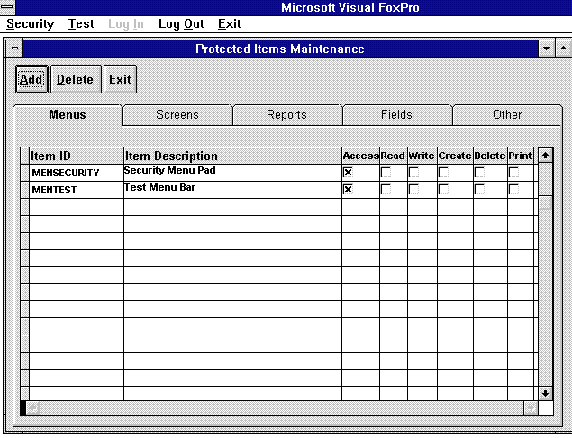
Figure 19
Afterwards, add the users in your system (Figure 20):
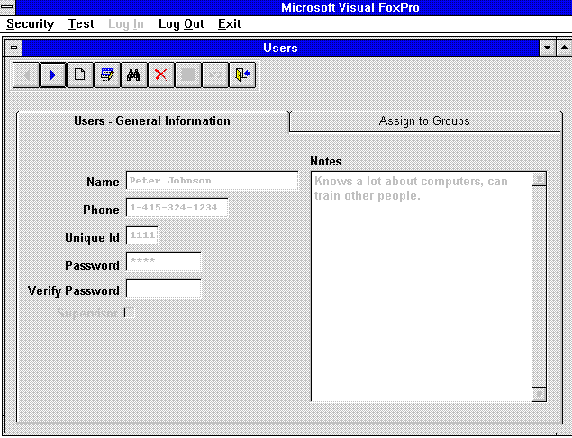
Figure 20
Then, create any groups that your user(s) might belong to, as shown in Figure 21. You can add users to groups at this point:
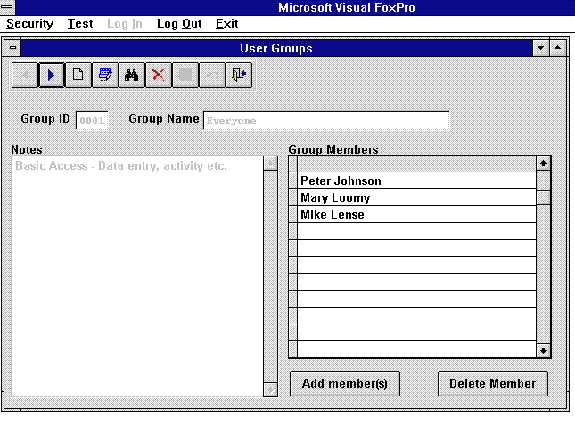
Figure 21
Finally, go to the Rights screen shown in Figure 22 and determine who can do what. Of course, this can be changed at any time.
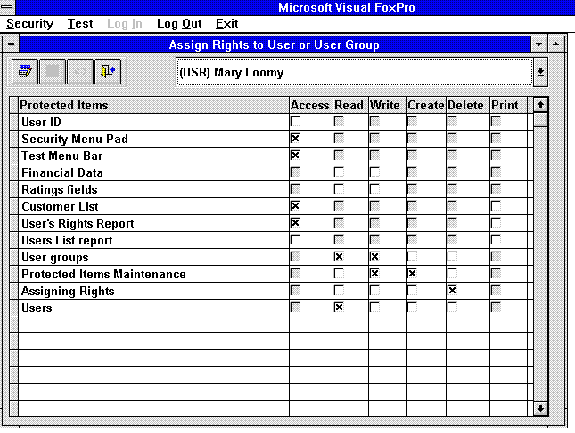
Figure 22
The INIT section of each screen is where most of the security system is implemented. Here, for example, is the Init code form TEST.SCX:
StandardScreen::Init && call the Init code in StandardScreen

THISFORM.ShowButton  && turn off buttons that have property
           &&    "select" = .F.
These are usually the first two commands in the Init section of each form. The next few lines simply assign values to the on-screen fields, so that you can see how they work. Usually, fields are bound to some control source:
THISFORM.InputField1.Value       = "USER"
THISFORM.FinancialField2.Value = "5,345.00"
THISFORM.FinancialField3.Value = "10,324.45"
THISFORM.FinancialField4.Value = "-2,349.20"
THISFORM.Ratings5.Value       = "High"
Next, we call the FinancialFields method found in the StandardScreen template class. This is an example of a method that's included in the template class to provide standard functionality. If there are lots of places where sensitive information should be displayed only to users who have access to it, you simply tell your programmers to (1) use class FinancialField for all sensitive data; and (2) call this method in the Init event of each screen that contains the FinancialField class, like this:
THISFORM.FinancialFields
You can only call this method if the form contains fields that are instantiated from the FinancialField class in MYLIB.VCX. Otherwise, an error results.
Another type of functionality is "read-only" access to certain fields. I've created a new class called Ratings, which is based on InputField. Its Enabled property is set to .T., in our test screen, but it's otherwise unchanged.
To create a read-only object, add the following Init code to any screen that contains an object instantiated from the Ratings class:
IF NOT Granted ( "RATINGS", "READ"  )
   THISFORM.SetAll ( "Visible", .F.,  "Ratings"  )
ENDIF
IF NOT Granted ( "RATINGS", "WRITE" )
   THISFORM.SetAll ( "Readonly", .T.,  "Ratings"  )
ENDIF
If, on the user's Ratings entry in the Rights screen, READ is checked but WRITE isn't, the user can see the data but can't change it.
To test this, you have to log in as SUP/SUP, then go to the Rights screen and pick user TEST/TEST. Check or uncheck the READ and WRITE column entries for Ratings and exit the screen. Now, log out and log back in as TEST/TEST, then activate the Test screen. Each time you want to test a new combination, you'll have to log back in as SUP/SUP to make the changes, then log out and log in as TEST/TEST to see their effect.
If you want a user's access to a menu option to be restricted based on his or her rights, you could simply include a skip for condition that calls the GRANTED function. But, since menu evaluation is almost continuous, it might be preferable to include a public variable HasAccess, and set it at login time. That way, the menu system won't slow your application down unnecessarily.
We believe that you can do just about anything you can think of using this approach to security. It's powerful, yet fast and simple to use. Next time your client asks for password protection, surprise them with this.