Nancy Winnick Cluts
Microsoft Developer Network Technology Group
October 1994
Revised: February 1995 (PSN_HASHELP segment removed from code in "Example: Processing Notifications" section)
Click to open or copy the files for the WIZARD sample application for this technical article.
There is a new control provided with the Microsoft® Windows® 95 operating system called the Wizard control. This control is based on the property sheet control included in the common control library, COMCTL32, and was designed to make it easier for developers to create wizards within their applications. This article takes a light-hearted look at this new Wizard control. The accompanying sample, WIZARD, implements a handy tool that is used for generating a performance review. The user is prompted for information such as work habits and attitude, and the information gathered is then translated into a form that manager-types can appreciate.
Note The information contained in this article is based on preliminary information that is subject to change before the final release of Windows 95. I will update this article with any new information about the Wizard control as I receive it.
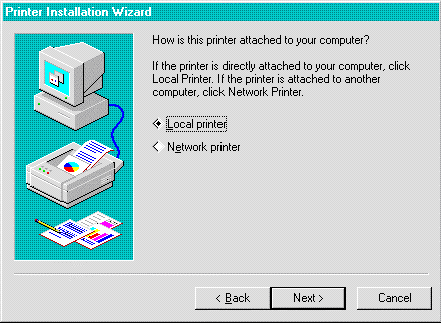
It's a person who wears a funny pointed hat with stars on it and makes magic happen. At least, that's one way to define it. The term wizard, when used in the context of an application, refers to a piece of code that walks the user through a series of steps (in the form of dialog boxes) in order to accomplish a complex task. Many applications today take advantage of wizards during application or device setup operations. For example, the illustration below is the Printer Installation Wizard used by the Microsoft® Windows® 95 operating system.

Figure 1. The Printer Installation Wizard
A wizard is basically a property sheet with extra buttons and no tabs. In a standard property sheet, the user can navigate among its pages by clicking tabs. There is no special navigation order to conform to, and the user doesn't even have to look at every page. In contrast, when running a wizard, the user is taken through a series of dialog boxes synchronously. The user can always go backward or forward, but the application determines the order in which the steps must be taken or the information must be filled out. If the application requires input for a particular page, it can disallow paging forward by disabling the Next button.
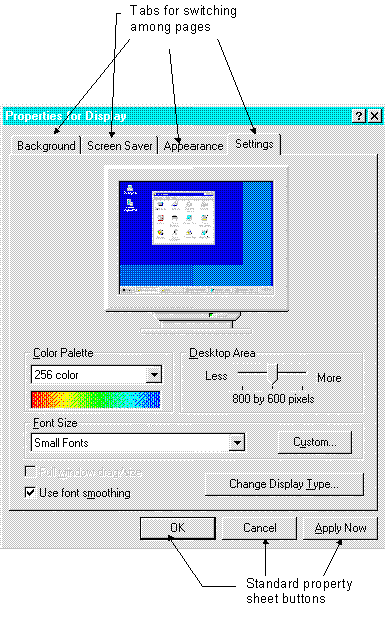
Another difference between property sheets and wizards is the buttons that are presented to the user. A property sheet, as shown below, has an OK, Cancel, Apply Now, and an optional Help button. These buttons are used for all the different pages within the property sheet. The buttons that reside at the bottom of a page in a wizard, typically the Back, Next, and Cancel buttons, apply only to the currently active page.

Figure 2. The Properties For Display property sheet
No witches' broomsticks are needed to get your wizard to appear, but creating a wizard does involve filling out a bit of paper work. Much of this is the same paper work you would do if you were creating a property sheet.
The first step in creating a wizard is to create a dialog box for each page of information you want to collect. You can do this with the same resource editor you use for standard dialog boxes. One difference between a property sheet page and a typical dialog box is that, for the dialog box, you should remove the OK and Cancel buttons that are included in the default template.
After you've created the dialog boxes, the application must fill out a PROPSHEETPAGE structure for each page (dialog box) that will be displayed. Then the application must fill out a PROPSHEETHEADER structure for the overall property sheet. The .dwFlags field of this structure must include the PSH_WIZARD flag to specify that the property sheet is a wizard. Finally, the application must call the PropertySheet function. The code below, from the WIZARD sample in the Windows 95 Software Development Kit (SDK), demonstrates how to fill out these structures to create a wizard.
//  FUNCTION: FillInPropertyPage(PROPSHEETPAGE *, int, LPSTR, LPFN)
//
//  PURPOSE: Fills in the given PROPSHEETPAGE structure.
//
//  COMMENTS:
//
//      This function fills in a PROPSHEETPAGE structure with the
//      information the system needs to create the page.
//
void FillInPropertyPage( PROPSHEETPAGE* psp, int idDlg, LPSTR pszProc, DLGPROC
     pfnDlgProc)
{
    // Set the size of this structure.
    psp->dwSize = sizeof(PROPSHEETPAGE);
    // No special flags.
    psp->dwFlags = 0;
    // The instance associated with this application.
    psp->hInstance = rvInfo.hInst;
    // The dialog box template to use.
    psp->pszTemplate = MAKEINTRESOURCE(idDlg);
    // Don't use a special icon in the caption bar.
    psp->pszIcon = NULL;
    // The dialog procedure that handles this page.
    psp->pfnDlgProc = pfnDlgProc;
    // The title for this page.
    psp->pszTitle = pszProc;
    // No special application-specific data.
    psp->lParam = 0;

}

//  FUNCTION: CreateWizard(HWND)
//
//  PURPOSE: Create the Wizard control.
//
//  COMMENTS:
//
//      This function creates the wizard property sheet.
//
int CreateWizard(HWND hwndOwner, HINSTANCE hInst)
{
    PROPSHEETPAGE psp[NUM_PAGES];
    PROPSHEETHEADER psh;

    // For each of the pages that I need, fill in a PROPSHEETPAGE structure.
    FillInPropertyPage( &psp[0], IDD_INFO, "Your Information", YourInfo);
    FillInPropertyPage( &psp[1], IDD_WORKHABITS, "Work Habits", WorkHabits);
    FillInPropertyPage( &psp[2], IDD_TEAMWORK, "Team Work", TeamWork);
    FillInPropertyPage( &psp[3], IDD_RELIABILITY, "Reliability", Reliability);
    FillInPropertyPage( &psp[4], IDD_GOALS, "Attainment of Goals", Goals);
    FillInPropertyPage( &psp[5], IDD_ADAPTATION, "Adaptability to Change",
      Adaptation);

    // Fill in the size of the PROPSHEETHEADER structure.
    psh.dwSize = sizeof(PROPSHEETHEADER);
    // Specify that this is a wizard property sheet with no Apply Now button.
    psh.dwFlags = PSH_PROPSHEETPAGE | PSH_WIZARD | PSH_NOAPPLYNOW;
    // Specify the parent window.
    psh.hwndParent = hwndOwner;
    // The caption for the wizard.
    psh.pszCaption = (LPSTR) "Review Wizard";
    // The number of pages in this wizard.
    psh.nPages = sizeof(psp) / sizeof(PROPSHEETPAGE);
    // Point to the array of property sheet pages.
    psh.ppsp = (LPCPROPSHEETPAGE) &psp;

    // Create and run the wizard.
    return (PropertySheet(&psh));
}
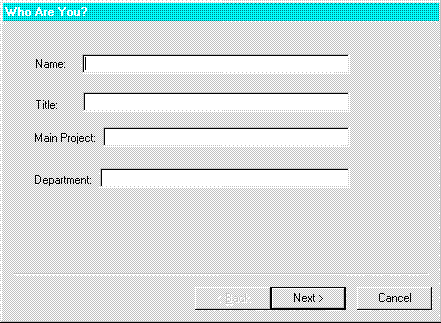
When you've supplied the information, compiled the code, and run it, you should see a page that looks like this:

Figure 3. First page of Performance Review Wizard
Although the Wizard control simplifies the task of creating a wizard, it doesn't perform magic: You still have to do a lot of work yourself. The code above simply filled out the structures and called the function to create and run the wizard. If you want those dialog boxes to gather the data and use the information entered in them, you still need to do some work in your dialog box functions.
Each dialog box function, as specified by the .pfnDlgProc member of the PROPSHEETPAGE structure, must process the messages and notifications it receives. Property sheets rely heavily on notifications, packaged as WM_NOTIFY messages. The code used to trap the notifications is very similar to the code used for standard property sheets. There are, however, three new notifications associated with wizards:
When these notifications are sent, the default action is to advance to the next page or to move back to the previous page. The handler can disallow this by setting the notification result to –1. But let's say that you want to create a wizard that branches to a specific page dependent upon some feedback from the user. For example, let's say that your wizard installs a piece of software, and your application must prompt for extra information depending upon whether the user prefers a standard setup or a custom setup. The default behavior is for the next page in the array of property sheet pages to be displayed. You can override that behavior and branch to a specific page by setting the notification result to the ID of the dialog box that should be shown. In our example above, your application would branch past the custom dialog boxes for a standard setup but could, by default, display the custom dialog boxes in order.
The PSN_APPLYNOW notification, which is sent to standard property sheets when the Apply Now button is pressed, is not sent to wizards for obvious reasons (there is no Apply Now button). The PSN_SETACTIVE notification is sent when a page is becoming active. When the page receives this notification, it can prevent itself from being activated and return activation to another page. Setting the notification result to –1 will set the activation to the next or previous page (depending upon the button pressed) in the array of property sheet pages. Setting the notification to the ID of another dialog box will cause the specified dialog box to be activated.
If you would like more detailed information about property sheets in general and the structures and messages that are used with them, the Windows 95 SDK and the technical article "Win32 Common Controls, Part 6: Tab Controls and Property Sheets" in the MSDN Library contain the background material you will need.
The following code, from the WIZARD sample, demonstrates how an application can trap the different notifications that are sent to a wizard. In this code, the dialog procedure initializes the text buffers with NULL strings upon the first entrance into the wizard and whenever the dialog box receives a PSN_RESET notification. When this dialog box receives the PSN_WIZNEXT notification, it saves the information that has been entered into the text fields. If this dialog box is called again and receives a PSN_SETACTIVE notification, the text buffers are reinitialized with the information that has been previously entered into the text fields. This dialog box also sets the Next button as the only enabled function when it receives the PSN_SETACTIVE notification. Because this is the first dialog box that is entered in the wizard, the Back button should not be enabled.
//  FUNCTION: YourInfo(HWND, UINT, UINT, LONG)
//
//  PURPOSE:  Processes messages for "Your Information" page.
//
//  MESSAGES:
//
//  WM_INITDIALOG - intializes the page.
//  WM_NOTIFY - processes the notifications sent to the page.
//
BOOL APIENTRY YourInfo(HWND hDlg, UINT message, UINT wParam,
   LONG lParam)
{

  switch (message)
  {
    case WM_INITDIALOG:
      // Initialize the text buffers with NULL.
      strcpy(rvInfo.pszName, "");
      strcpy(rvInfo.pszTitle, "");
      strcpy(rvInfo.pszProject, "");
      strcpy(rvInfo.pszDepartment, "");
      break;

    case WM_NOTIFY:
        switch (((NMHDR FAR *) lParam)->code)
        {

          case PSN_KILLACTIVE:
            SetWindowLong(hDlg,  DWL_MSGRESULT, FALSE);
            return 1;
            break;

          case PSN_RESET:
            // Reset to the original values.
            strcpy(rvInfo.pszName, "");;
            strcpy(rvInfo.pszTitle, "");
            strcpy(rvInfo.pszProject, "");
            strcpy(rvInfo.pszDepartment, "");
            SetWindowLong(hDlg,  DWL_MSGRESULT, FALSE);
            break;

          case PSN_SETACTIVE:
            PropSheet_SetWizButtons(GetParent(hDlg), PSWIZB_NEXT);
            SendMessage(GetDlgItem(hDlg, IDE_NAME), WM_SETTEXT, 0,
              (LPARAM)rvInfo.pszName);
            SendMessage(GetDlgItem(hDlg, IDE_TITLE), WM_SETTEXT, 0,
              (LPARAM)rvInfo.pszTitle);
            SendMessage(GetDlgItem(hDlg, IDE_PROJECT), WM_SETTEXT, 0,
              (LPARAM)rvInfo.pszProject);
            SendMessage(GetDlgItem(hDlg, IDE_DEPARTMENT), WM_SETTEXT, 0,
              (LPARAM)rvInfo.pszDepartment);
            break;

          case PSN_WIZNEXT:
            // The Next button was pressed - get the text info entered.
            SendDlgItemMessage(hDlg, IDE_NAME, WM_GETTEXT,
              (WPARAM)MAX_PATH, (LPARAM) rvInfo.pszName);
            SendDlgItemMessage(hDlg, IDE_TITLE, WM_GETTEXT,
              (WPARAM)MAX_PATH, (LPARAM)rvInfo.pszTitle);
            SendDlgItemMessage(hDlg, IDE_PROJECT, WM_GETTEXT,
              (WPARAM)MAX_PATH, (LPARAM)rvInfo.pszProject);
            SendDlgItemMessage(hDlg, IDE_DEPARTMENT, WM_GETTEXT,
              (WPARAM)MAX_PATH, (LPARAM)rvInfo.pszDepartment);
            break;

          default:
            return FALSE;

       }
       break;

     default:
       return FALSE;
  }
  return TRUE;
}
There are three messages that are especially useful when working with wizard controls. The first, PSM_PRESSBUTTON, can be useful for property sheets in general. The others, PSM_SETFINISHTEXT and PSM_SETWIZBUTTONS, are used exclusively for wizard controls. Each message has a macro associated with it that the application can use instead of sending the message.
PSM_PRESSBUTTON indicates the button specified in wParam to be "pressed." The button can have one of the following values:
| PSBTN_BACK | Press the Back button. |
| PSBTN_NEXT | Press the Next button. |
| PSBTN_FINISH | Press the Finish button. |
| PSBTN_OK | Press the OK button. |
| PSBTN_APPLYNOW | Press the Apply Now button. |
| PSBTN_CANCEL | Press the Cancel button. |
| PSBTN_HELP | Press the Help button. |
The macro to use to send the PSM_PRESSBUTTON message is:
(VOID)PropSheet_PressButton(hPropSheetDlg, iButton);
PSM_SETFINISH enables the Finish button, hides the Back button, and sets the text on the Finish button to the text specified in lParam. The macro to use to send the PSM_SETFINISH message is:
(VOID)PropSheet_SetFinishText(hPropSheetDlg, lpszText);
PSM_SETWIZBUTTONS specifies which buttons should be enabled within the wizard. It is only supported in wizard controls. lParam specifies which buttons are enabled. This parameter can be a combination of the following values:
| PSWIZB_BACK | Enable the Back pushbutton. |
| PSWIZB_NEXT | Enable the Next pushbutton. |
| PSWIZB_FINISH | Enable the Finish pushbutton. |
The macro to use to send the PSM_SETWIZBUTTONS message is:
(VOID)PropSheet_SetWizButtons (hPropSheetDlg, dwFlags);
Now that you've gotten the information from the wizard, it's time to click those heels together and get back to Kansas. In the WIZARD sample, the information is gathered in order to generate text for a performance review. While the wizard is running, the results entered by the user are kept in a structure, and these results are used to generate the review. This review is generated via indexes into a string table, and the resulting buffer is displayed in a multiline edit field in the main window. The code below is what the WIZARD sample used to generate the final text buffer.
//  FUNCTION: GenerateReview(void)
//
//  PURPOSE: Generate the review.
//
//  COMMENTS:
//
//      This function generates the review based upon the answers
//      given to the Wizard. The function translates lame reality into
//      impressive-sounding manager-speak via a string table.
//
void GenerateReview( HWND hDlg )
{
  char lpBuf1[MAX_LINE];  // Buffers for the lines in the review.
  char lpBuf2[MAX_LINE];
  char lpBuf3[MAX_LINE];
  char lpBuf4[MAX_LINE];
  char lpBuf5[MAX_LINE];


  wsprintf(lpReview, "Name: %s%C%C%C%CTitle: %s%C%C%C%CDepartment:
    %s%C%C%C%CMain Project: %s%C%C%C%C",
    rvInfo.pszName, 0x0d, 0x0a, 0x0d, 0x0a,
    rvInfo.pszTitle, 0x0d, 0x0a, 0x0d, 0x0a,
    rvInfo.pszDepartment, 0x0d, 0x0a, 0x0d, 0x0a,
    rvInfo.pszProject,0x0d, 0x0a, 0x0d, 0x0a );

  // Add a line describing work habits.
  if (LoadString(rvInfo.hInst, rvInfo.iWorkHabits, lpBuf1, sizeof(lpBuf1)))
    lstrcat(lpReview, lpBuf1);

  // Add a line describing teamwork.
  if (LoadString(rvInfo.hInst, rvInfo.iTeamWork, lpBuf2, sizeof(lpBuf2)))
    lstrcat(lpReview, lpBuf2);

  // Add a line describing reliability.
  if (LoadString(rvInfo.hInst, rvInfo.iReliability, lpBuf3, sizeof(lpBuf3)))
    lstrcat(lpReview, lpBuf3);

  // Add a line describing goals.
  if (LoadString(rvInfo.hInst, rvInfo.iGoals, lpBuf4, sizeof(lpBuf4)))
    lstrcat(lpReview, lpBuf4);

  // Add a line describing adaptability.
  if (LoadString(rvInfo.hInst, rvInfo.iAdaptation, lpBuf5, sizeof(lpBuf5)))
    lstrcat(lpReview, lpBuf5);
}
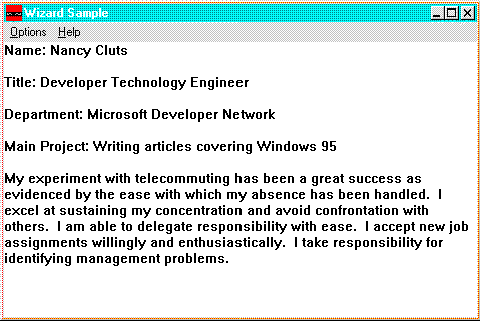
If you build and run the sample now, you can fill in the appropriate information, check the boxes that most accurately reflect your skills and work habits, and have a review generated for you. Just for grins, I filled one out and picked the last option in the list for each of the questions asked. Here is the result:

Figure 4. The generated review
This article covers the basic steps you need to take to use the Wizard control in Windows 95. If you made the effort to copy the files used to create the WIZARD sample, build it, and run it, you have a good idea of what the Wizard control buys you. The sample can be easily altered to be used for practical purposes. It could even be altered to create a genuine performance review. Of course, from now on I'll never get away with using the phrases that I have used in the past on my performance review to get a better rating. I did this for your enjoyment, so the least you can do is let me know if you enjoyed it.