Configuring SQL Server to Match an Oracle Database
With an understanding of the basic structural differences between Oracle and SQL Server, you are ready to perform the first step in your migration process. The following process is an example of the simplest translation that can be made from Oracle to SQL Server:
-
Use Windows NT software-based RAID or hardware-based RAID level 0 to create a logical drive big enough to hold all your data. An estimate of space can be calculated by adding the total file space used by the Oracle system, temporary, and application tablespaces.
-
Create one data device on the logical drive defined in step 1, taking up all the available space (unless it must be shared with other SQL Server databases on the same server). You can do this with SQL Enterprise Manager.
-
Create a second logical drive for holding transaction logs using Windows NT software-based RAID or hardware-based RAID level 1. The size of this drive should be at least as large as sum of the size of the online redo and rollback segment tablespace(s).
-
Create one log device taking up all the space defined on the drive created in step 3. Use SQL Enterprise Manager to create this device.
-
Use SQL Enterprise Manager to create a user database with the same name as the Oracle application's tablespace (the name that you use is not that important). The sample application uses the database name USER_DB. Use the data and log devices created in steps 2 and 4. If you are using multiple Oracle tablespaces, it is not necessary or even recommended that you create multiple SQL Server databases or devices. Allow RAID to do the work for you.
-
Create the SQL Server login accounts:
USE MASTER
GO
SP_ADDLOGIN STUDENT_ADMIN, STUDENT_ADMIN, STUDENT_DB
GO
SP_ADDLOGIN DEPT_ADMIN, DEPT_ADMIN, DEPT_DB
GO
SP_ADDLOGIN ENDUSER1, ENDUSER1, STUDENT_DB
GO
-
Add the groups to the database:
USE USER_DB
GO
SP_ADDGROUP DATA_ADMIN
GO
SP_ADDGROUP USER_LOGON
GO
-
Grant permissions to the groups:
GRANT CREATE TABLE, CREATE TRIGGER, CREATE VIEW,
CREATE PROCEDURE TO DATA_ADMIN
GO
-
Add the login accounts as database user accounts:
SP_ADDUSER ENDUSER1, ENDUSER1, USER_LOGON
GO
SP_ADDUSER DEPT_ADMIN, DEPT_ADMIN, DATA_ADMIN
GO
SP_ADDUSER STUDENT_ADMIN, STUDENT_ADMIN, DATA_ADMIN
SQL Enterprise manager or ISQL/w should be used to run these scripts. If you use ISQL/w, you must be logged on as the SA account.
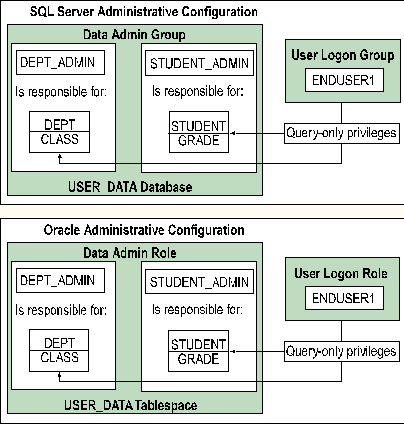
The following illustration shows the SQL Server and Oracle environments after this process is completed.


