Walking Through the Application Wizard
The Windows CE Application Install Wizard leads you through the steps necessary to create an installation program. There are eight steps you must complete.
 To create an installation program
-
Start the Application Wizard.
-
Click Next to proceed to the Step 2 window.
-
Type the name of the .PVB file for which you want to create an installation program. You must enter the full path in which the file is stored, including the drive name. The Toolkit saves your .PVB file in the location specified by the Local Path box on the Project Properties General Tab.
-
Click Next to proceed to the Step 3 window.
-
Enter the name of the directory where you want your output files created. You must include the drive name in your path.
-
Click Next to proceed to the Step 4 window.
-
Select the processors you would like to support. You must select at least one processor.
-
Click Next to proceed to the Step 5 window.
-
Select any additional ActiveX controls you want installed. If an ActiveX control is not supported for a processor you selected in the Step 4 window, it does not appear on the list.
-
Click Next to proceed to the Step 6 window.
-
Click the Add button to specify any additional data files you want to include with your program.
Once you have selected a file, the wizard asks if the file selected is a sytem file. All system files are installed in the \windows directory. All other files are installed in your application's directory.
-
Click Include Device Runtime in Cab file to install the following device runtime files:
-
pvb.exe
-
vbscript.dll
-
vbsen.dll
-
pvbrt.dll
-
regsvr.exe
-
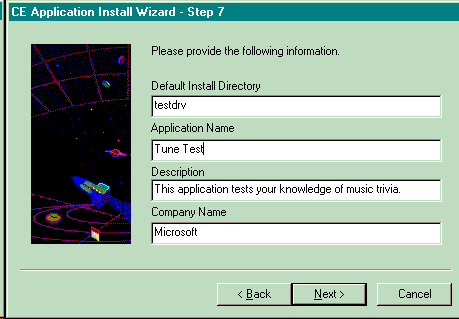
Click Next to proceed to the Step 7 window. The following screen appears:

-
Enter your program's default directory, name, description, and your company name. Each textbox must contain data. The company name and application name are combined and used for filenames later in the setup process. They must be legal windows filenames. Example: MyCompany MyApplication
-
Click Next to proceed to the Step 8 window.
-
Click Create Install to create your program. A process indicator appear on the screen.
-
Click Finish when the process indicator indicates that Create Install process is Finished.
Note Once the installation program is complete, you can customize your program by adding or changing code in the .INF file.
 Uninstalling a .pvb application using Application Install Wizard
-
Open the Mobile Devices window by clicking Start, Programs, Windows CE Services, Mobile Devices.
-
On the Mobile Devices menu, select Tools, Application Manager. The Application Manager retrieves a list of installed programs from the device.
-
Uncheck the box beside the application name inside the list box. The application name appears in the Description label box.
-
Click the OK button. In a few moments, the application disappears from the Application Manager list box, as well as from the device.
-
To close, click the OK button on the bottom of the Application Manager window.
 To create an installation program
 To create an installation program
 Uninstalling a .pvb application using Application Install Wizard