In this scenario, you can edit cells in a Hierarchical FlexGrid spreadsheet. This scenario illustrates some of the capabilities of the Hierarchical FlexGrid's control events and containers, and shows how this control can be used to create a spreadsheet with in-cell editing using standard Visual Basic controls.
Note The sample application (Flex.vbp) demonstrates the functionality necessary for navigating around and selecting ranges of cells.
To create this data display
To complete the scenario, follow the procedures in this section in the order shown.
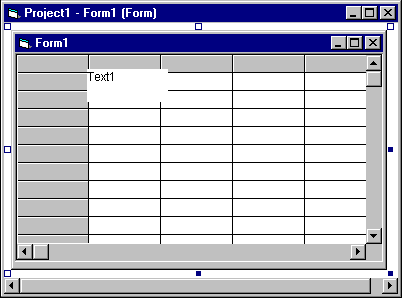
Add a Hierarchical FlexGrid to your project, and then add a TextBox control to it to create a parent-child relationship, as shown:

Set the properties of the Hierarchical FlexGrid and TextBox controls as follows:
MSHFlexGrid control
| Property | Setting |
| Name | Fg2 |
| Cols | 6 |
| Rows | 20 |
| FillStyle | 1 – Repeat |
| FocusRect | 2 – Heavy |
| FontName | Arial |
| FontSize | 9 |
TextBox control
| Property | Setting |
| Name | TxtEdit |
| FontName | Arial |
| FontSize | 9 |
| BorderSize | 0 – None |
| Visible | False |
Use the following procedures to edit cells in your Hierarchical FlexGrid.
To edit cells in a spreadsheet
Sub Form_Load ()
   Dim i As Integer

   ' Make first column narrow.
   Fg2.ColWidth(0) = Fg2.ColWidth(0) / 2
   Fg2.ColAlignment(0) = 1   ' Center center.

   ' Label rows and columns.
   For i = Fg2.FixedRows To Fg2.Rows - 1
      Fg2.TextArray(fgi(i, 0)) = i
   Next
   For i = Fg2.FixedCols To Fg2.Cols - 1
      Fg2.TextArray(fgi(0, i)) = i
   Next

   ' Initialize edit box (so it loads now).
   txtEdit = ""
End Sub
Function Fgi (r As Integer, c As Integer) As Integer
   Fgi = c + Fg2.Cols * r
End Function
Sub Fg2_KeyPress (KeyAscii As Integer)
   MSHFlexGridEdit Fg2, txtEdit, KeyAscii
End Sub

Sub Fg2_DblClick ()
   MSHFlexGridEdit Fg2, txtEdit, 32 ' Simulate a space.
End Sub
Sub MSHFlexGridEdit (MSHFlexGrid As Control, _
Edt As Control, KeyAscii As Integer)

   ' Use the character that was typed.
   Select Case keyascii

   ' A space means edit the current text.
   Case 0 To 32
      Edt = MSHFlexGrid
      Edt.SelStart = 1000

   ' Anything else means replace the current text.
   Case Else
      Edt = Chr(keyascii)
      Edt.SelStart = 1
   End Select

   ' Show Edt at the right place.
   Edt.Move MSHFlexGrid.Left + MSHFlexGrid.CellLeft, _
      MSHFlexGrid.Top + MSHFlexGrid.CellTop, _
      MSHFlexGrid.CellWidth - 8, _
      MSHFlexGrid.CellHeight - 8
   Edt.Visible = True

   ' And make it work.
   Edt.SetFocus
End Sub
Sub txtEdit_KeyPress (KeyAscii As Integer)
   ' Delete returns to get rid of beep.
   If KeyAscii = Asc(vbCr) Then KeyAscii = 0
End Sub

Sub txtEdit_KeyDown (KeyCode As Integer, _
Shift As Integer)
   EditKeyCode Fg2, txtEdit, KeyCode, Shift
End Sub

Sub EditKeyCode (MSHFlexGrid As Control, Edt As _
Control, KeyCode As Integer, Shift As Integer)

   ' Standard edit control processing.
   Select Case KeyCode

   Case 27   ' ESC: hide, return focus to MSHFlexGrid.
      Edt.Visible = False
      MSHFlexGrid.SetFocus

   Case 13   ' ENTER return focus to MSHFlexGrid.
      MSHFlexGrid.SetFocus

   Case 38      ' Up.
      MSHFlexGrid.SetFocus
      DoEvents
      If MSHFlexGrid.Row > MSHFlexGrid.FixedRows Then
         MSHFlexGrid.Row = MSHFlexGrid.Row - 1
      End If

   Case 40      ' Down.
      MSHFlexGrid.SetFocus
      DoEvents
      If MSHFlexGrid.Row < MSHFlexGrid.Rows - 1 Then
         MSHFlexGrid.Row = MSHFlexGrid.Row + 1
      End If
   End Select
End Sub
Next, you need to instruct the Hierarchical FlexGrid what to do with the data when it is entered into the text box. The focus returns to the control after the user enters the data and either presses enter or clicks a different cell in the Hierarchical FlexGrid. Therefore, you must copy the data from the text box into the active cell; to do this, continue with the following steps.
Sub Fg2_GotFocus ()
   If txtEdit.Visible = False Then Exit Sub
   Fg2 = txtEdit
   txtEdit.Visible = False
End Sub

Sub Fg2_LeaveCell ()
   If txtEdit.Visible = False Then Exit Sub
   Fg2 = txtEdit
   txtEdit.Visible = False
End Sub
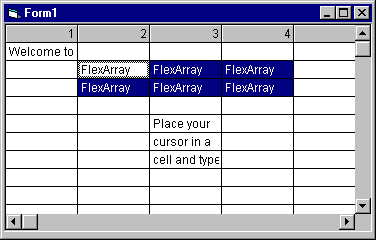
Once the procedures in this scenario are complete, data can be entered into individual cells at run time, as shown in the following figure.
