
There are three main steps to creating an application in Visual Basic:
To see how this is done, use the steps in the following procedures to create a simple application that consists of a text box and a command button. When you click the command button, the message "Hello, world!" appears in the text box.
Forms are the foundation for creating the interface of an application. You can use forms to add windows and dialog boxes to your application. You can also use them as containers for items that are not a visible part of the application's interface. For example, you might have a form in your application that serves as a container for graphics that you plan to display in other forms.
The first step in building a Visual Basic application is to create the forms that will be the basis for your application's interface. Then you draw the objects that make up the interface on the forms you create. For this first application, you'll use two controls from the Toolbox.
| Button | Control |
 |
Text box |
 |
Command button |
To draw a control using the Toolbox
Figure 2.3 Drawing a text box with the Toolbox

The control appears on the form.
Another simple way to add a control to a form is to double-click the button for that control in the Toolbox. This creates a default-size control located in the center of the form; then you can move the control to another location on the form.
Notice that small rectangular boxes called sizing handles appear at the corners of the control; you'll use these sizing handles in the next step as you resize the control. You can also use the mouse, keyboard, and menu commands to move controls, lock and unlock control positions, and adjust their positions.
To resize a control
Sizing handles appear on the control.
The corner handles resize controls horizontally and vertically, while the side handles resize in only one direction.
or
Use SHIFT with the arrow keys to resize the selected control.
To move a control
or
Use the Properties window to change the Top and Left properties.
When a control is selected, you can use CTRL with the arrow keys to move the control one grid unit at a time. If the grid is turned off, the control moves one pixel at a time.
To lock all control positions
or
Click the Lock Controls Toggle button on the Form Editor toolbar.
This will lock all controls on the form in their current positions so that you don't inadvertently move them once you have them in the desired location. This will lock controls only on the selected form; controls on other forms are untouched. This is a toggle command, so you can also use it to unlock control positions.
To adjust the position of locked controls
or
You can change the control's Top and Left properties in the Property window.
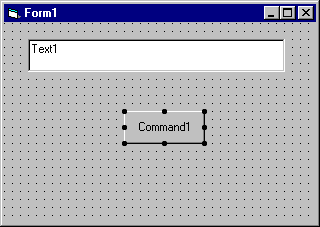
You now have the interface for the "Hello, world!" application, as shown in Figure 2.4.
Figure 2.4 The interface for the "Hello, world!" application

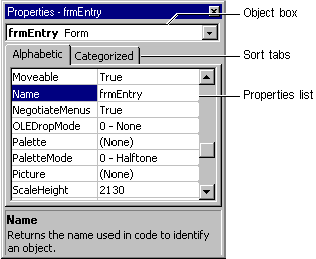
The next step is to set properties for the objects you've created. The Properties window (Figure 2.5) provides an easy way to set properties for all objects on a form. To open the Properties window, choose the Properties Window command from the View menu, click the Properties Window button on the toolbar, or use the context menu for the control.
Figure 2.5 The Properties window

The Properties window consists of the following elements:
To set properties from the Properties window
The Properties window displays the settings for the selected form or control.
Enumerated properties have a predefined list of settings. You can display the list by clicking the down arrow at the right of the Settings box, or you can cycle through the list by double-clicking a list item.
For the "Hello, world!" example, you'll need to change three property settings. Use the default settings for all other properties.
| Object | Property | Setting |
| Form | Caption | Hello, world! |
| Text box | Text | (Empty) |
| Command button | Caption | OK |
All forms in Visual Basic have a generic, default icon that appears when you minimize that form. However, you will probably change this icon to one that illustrates the use of the form or your application. To assign an icon to a form, set the Icon property for that form. You can use 32 x 32 pixel icons that were standard in 16-bit versions of Microsoft Windows and are also used in Windows 95 and Windows NT, as well as the 16 x 16 pixel icons used in Windows 95.
The Code Editor window is where you write Visual Basic code for your application. Code consists of language statements, constants, and declarations. Using the Code Editor window, you can quickly view and edit any of the code in your application.
To open the Code window
or
From the Project Explorer window, select the name of a form or module, and choose the View Code button.
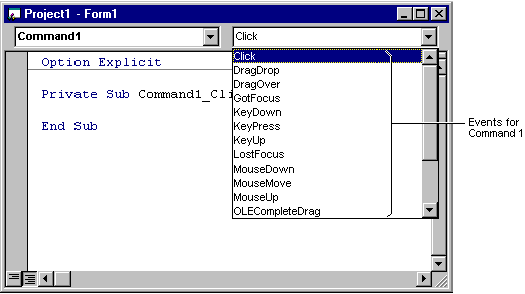
Figure 2.6 shows the Code Editor window that appears when you double-click the Command button control, and the events for that command.
Figure 2.6 The Code Editor window

You can choose to display all procedures in the same Code window, or display a single procedure at a time.
To display all procedures in the same Code window
or
Click the Full Module View button in the lower left corner of the Code Editor window.
To display one procedure at a time in the Code window
or
Click the Procedure View button in the lower left corner of the Code Editor window.
The Code window includes the following elements:
Code in a Visual Basic application is divided into smaller blocks called procedures. An event procedure, such as those you'll create here, contains code that is executed when an event occurs (such as when a user clicks a button). An event procedure for a control combines the control's actual name (specified in the Name property), an underscore (_), and the event name. For example, if you want a command button named Command1 to invoke an event procedure when it is clicked, use the procedure Command1_Click.
To create an event procedure
For this example, choose the command button, Command1.
Here, the Click procedure is already selected, because it's the default procedure for a command button. Note that a template for the event procedure is now displayed in the Code window.
Text1.Text = "Hello, world!"
The event procedure should look like this:
Private Sub Command1_Click ()
   Text1.Text = "Hello, world!"
End Sub
You'll note here that the code is simply changing the Text property of the control named Text1 to read "Hello, world!" The syntax for this example takes the form of object.property, where Text1 is the object and Text is the property. You can use this syntax to change property settings for any form or control in response to events that occur while your application is running.
For More Information For information on creating other types of procedures, see "Introduction to Procedures" in "Programming Fundamentals."
To run the application, choose Start from the Run menu, or click the Start button on the toolbar, or press F5. Click the command button you've created on the form, and you'll see "Hello, world!" displayed in the text box.