The text box control is used to display information entered by the user at run time, or assigned to the Text property of the control at design or run time.
Figure 7.44 The text box control

In general, the text box control should be used for editable text, although you can make it read-only by setting its Locked property to True. Text boxes also allow you to display multiple lines, to wrap text to the size of the control, and to add basic formatting.
Text entered into the text box control is contained in the Text property. By default, you can enter up to 2048 characters in a text box. If you set the MultiLine property of the control to True, you can enter up to 32K of text.
When text exceeds the boundaries of the control, you can allow the control to automatically wrap text by setting the MultiLine property to True and add scroll bars by setting the ScrollBars property to add either a horizontal or vertical scroll bar, or both. Automatic text wrapping will be unavailable, however, if you add a horizontal scroll bar because the horizontal edit area is increased by the presence of the scroll bar.
When the MultiLine property is set to True, you can also adjust the alignment of the text to either Left Justify, Center, or Right Justify. The text is left-justified by default. If the MultiLine property is False, setting the Alignment property has no effect.
For More Information See "Working with Text Boxes" for a demonstration of the MultiLine, ScrollBar, and Alignment properties.
You can control the insertion point and selection behavior in a text box with the SelStart, SelLength and SelText properties.
For More Information See "Working with Text Boxes" in "Forms, Controls, and Menus" for a demonstration of the SelStart, SelText, and SelLength properties.
A password box is a text box that allows a user to type in his or her password while displaying placeholder characters, such as asterisks. Visual Basic provides two text box properties, PasswordChar and MaxLength, which make it easy to create a password text box.
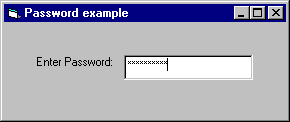
PasswordChar specifies the character displayed in the text box. For example, if you want asterisks displayed in the password box, you specify * for the PasswordChar property in the Properties window. Regardless of what character a user types in the text box, an asterisk is displayed, as shown in Figure 7.45.
Figure 7.45 Password example

With MaxLength, you determine how many characters can be typed in the text box. After MaxLength is exceeded, the system emits a beep and the text box does not accept any further characters.
You can use the KeyPress event to restrict or transform characters as they are typed. The KeyPress event uses one argument, keyascii. This argument is an integer that represents the numeric (ASCII) equivalent of the character typed in the text box.
The next example demonstrates how to cancel keystrokes as they are typed. If the character typed is not within the specified range, the procedure cancels it by setting KeyAscii to 0. The text box for this example is named txtEnterNums, and the procedure prevents the text box from receiving any characters other than digits. Compare KeyAscii directly to the numeric (Asc) values of various characters.
Private Sub txtEnterNums_KeyPress (KeyAscii As Integer)
   If KeyAscii < Asc("0") Or KeyAscii > Asc("9") Then
      KeyAscii = 0   ' Cancel the character.
      Beep            ' Sound error signal.
   End If
End Sub
For More Information See "Responding to Keyboard Events" in "Responding to Mouse and Keyboard Events" for more information about the KeyPress event.
You can use the Locked property to prevent users from editing text box contents. Set the Locked property to True to allow users to scroll and highlight text in a text box without allowing changes. With the Locked property set to True, a Copy command will work in a text box, but Cut and Paste commands will not. The Locked property only affects user interaction at run time. You can still change text box contents programmatically at run time by changing the Text property of the text box.
Sometimes quotation marks (" ") appear in a string of text.
She said, "You deserve a treat!"
Because strings assigned to a variable or property are surrounded by quotation marks (" "), you must insert an additional set of quotation marks for each set to display in a string. Visual Basic interprets two quotation marks in a row as an embedded quotation mark.
For example, to create the preceding string, use the following code:
Text1.Text = "She said, ""You deserve a treat!"" "
To achieve the same effect, you can use the ASCII character (34) for a quotation mark:
Text1.Text = "She said, " & Chr(34) + "You deserve a treat!" & Chr(34)