Creating the CoffeeWatch Test Project
See Also
"Out of process" means the component is running in a separate process from the client application. Therefore you need a separate process for your test program — which means starting another instance of the Visual Basic development environment.
The following procedure creates the test program and adds a reference to the out-of-process Coffee component.
Note This topic is part of a series that walks you through creating a sample ActiveX EXE. It begins with the topic Creating an ActiveX EXE Component.
To create the CoffeeWatch test project
-
Use the Windows Start menu or the Explorer to open another instance of Visual Basic. On the New Project dialog box, double-click the Standard EXE icon to open a new Standard EXE project.
-
On the Project menu, click Project1 Properties to open the Project Properties dialog box. Select the General tab, type CoffeeWatch in the Project Name box, then click OK.
-
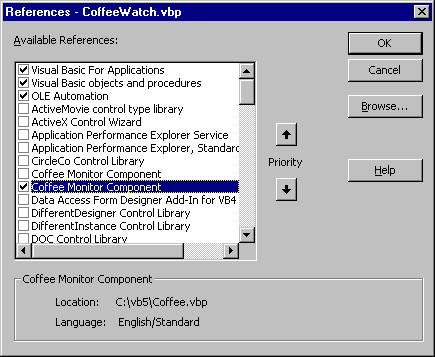
On the Project menu, click References to open the References dialog box. Check the entry for Coffee.vbp, as shown below, then click OK.

You can tell the entries apart by observing the Location in the information panel at the bottom of the dialog box.
Important You must check the entry for the project file (.vbp) in order to debug the project in the development environment. If you set a reference to the .exe file, visible just above the .vbp entry in the figure above, CoffeeWatch will obtain objects from an instance of the executable instead.
-
Add two command buttons to Form1, and set their properties as shown in the following table:
| Object |
Property |
Setting |
| Command button |
(Name)
Caption |
cmdModal
Show Modal Form |
| Command button |
(Name)
Caption |
cmdModeless
Show Modeless Form |
| Form |
Caption |
CoffeeWatch |
-
In the Declarations section of the code window for Form1, add the following declaration:
Option Explicit
Private mcmnTest As CoffeeMonitor
The prefix for the variable begins with the letter ‘m’ to indicate that this is a module-level variable. The letters ‘cmn’ were chosen to represent the CoffeeMonitor class type.
-
Add the following code to the Load event for Form1:
Private Sub Form_Load()
   Set mcmnTest = New CoffeeMonitor
End Sub
-
Add the following code to the Click event procedures for the command buttons:
Private Sub cmdModal_Click()
   mcmnTest.ShowForm cfeModal
End Sub

Private Sub cmdModeless_Click()
   mcmnTest.ShowForm cfeModeless
End Sub
-
On the File menu, click Save Project to save the project files, using the following names. Visual Basic will provide the extensions automatically.
| File |
File name |
Extension |
| Form |
CoffeeWatch_Form1 |
.frm |
| Project |
CoffeeWatch |
.vbp |
If you have the Auto List Members option enabled, you’ve noticed that the methods of the CoffeeMonitor class appeared in the list of available classes. This is because the reference you established in step 3 made the Coffee component’s type library information available.
For More Information The Auto List Members option can be set on the Editor tab of the Options dialog box, available from the Tools menu.
Step by Step
This topic is part of a series that walks you through creating a sample ActiveX EXE.
