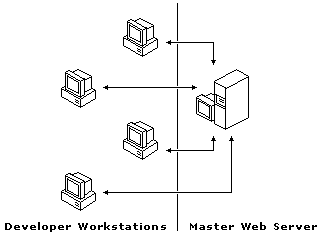
Sometimes it takes more than a single developer to create and maintain a Web application. When you work with a Web project, the master Web application is stored on a master Web server. When you work in a team taking advantage of Visual InterDev's developer isolation feature, individual team members work in local mode, with a local copy of the master application. This enables multiple developers to access the same master Web application from their local Web projects.

In addition to working in local mode, to facilitate team-based Web application development, you can use the built-in source control features of Visual InterDev.
In order to work with multiple developers on a single Web application, you'll need the following.
| Requirement | For more information, see |
| A Web server | Project Architecture |
| A master Web application and a Web project in local mode | Working Locally |
| Source control (optional) | Source Control |
In this walkthrough, the following scenarios are discussed:
Visual InterDev's built-in source control features allow multiple developers to work on the same files at the same time. When there are conflicts between different versions of the file, Visual InterDev's source control helps you merge the differences.
Visual InterDev allows multiple developers to create their own unique local Web projects that access the same master Web application, which resides on a master Web server. Each developer is able to get working copies of files, edit them, and then update the master server.
If you have a copy of Microsoft® Visual SourceSafe™, you can use that to control your sources instead of Visual InterDev's built-in source control features. Visual SourceSafe is discussed later in this topic under Controlling Sources with Microsoft Visual SourceSafe.
You can create a master Web application on the master Web server and then share it with other developers on your development team.
To create a master Web application
Note The name and location settings are for your local project only. These settings are not saved to the server and do not affect the name of the Web application or the Web site.
The Web Project Wizard appears.

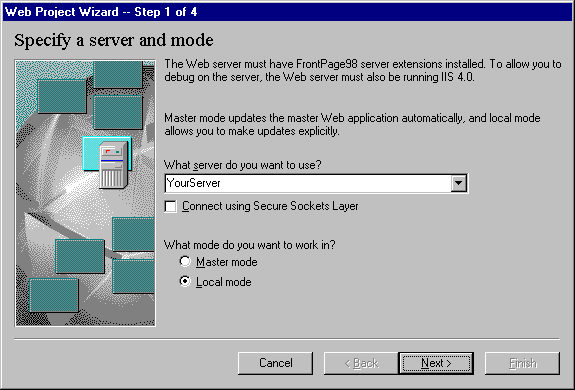
Step 1: Specify a server and mode
Specify the name of your master Web server and select Local mode. Local mode is typically the preferred mode for each developer working in a multi-developer environment. This allows the developer to edit and test files independently from the master Web application.
Step 2: Specify your Web
Select Create a new Web application and type in a name.
Step 3: Apply a layout
It is not necessary to use a layout. If you want, you can select <none> now and apply a layout at a later time.
Step 4: Apply a theme
It is not necessary to use a theme. If you want, you can select <none> now and apply a theme at a later time.
Visual InterDev simultaneously creates the new Web application on the master Web server and a new local project on your machine. After the new project is created, you see it displayed in the Project Explorer in your solution.
You are now able to use the commands on the Project menu to add HTML and ASP pages, get working copies, edit files, and update the server.
Now it's time to share files with one or more additional developers on your team. All new developers need to create their own local projects that access the existing master Web application. They follow steps that are similar to the ones above, except they do not create a new Web application.
To create local projects for an existing application
Note It is up to the developer's discretion whether or not to use the same name as the first developer. Using the same name can make it easier to identify a project that points to a shared Web application on the master Web server.
The Web Project Wizard appears.
Step 1: Specify a server and mode
The new developer specifies the same server as the first developer and also selects Local mode.
Step 2: Specify your Web
The new developer selects the Connect to an existing Web application on <server name> option.
The drop-down list contains a list of all available Web applications on the specified server. The new developer selects the appropriate Web application from the list.
Visual InterDev accesses the master Web application on the master Web server and creates the new local project on the developer's machine. The developer then sees the new project in the Project Explorer. The developer now has access to all the files that are in the Web application on the master Web server.
For more information about working with local copies of a Web application, see Working Locally and Project Architecture.
You and other developers can now access the same files in the master Web application. Each developer is able to get the latest version of each file. He can also get working copies, edit them locally, and then update the server with the changes.
Visual InterDev's source control features prevent you and the other developers from overwriting each other's work on the master Web server.
In the following scenarios Developer A and Developer B each have local projects on their machines that access the same master Web application.
To synchronize local projects with the master Web application
The files are now in his local Web application, but are not in the master Web application. The  (flag) icon indicates that a file exists in a local project but not in the master project.
The new files are copied to the master Web application. However, Developer B's project still reflects the former state of the master Web application.
Tip When working with other developers, it is a good idea to synchronize your local project frequently.
Developer B's local project now reflects the changes made to the master Web server by Developer A.
To resolve conflicts between files
Even though Developer A has already obtained a working copy of the file, Visual InterDev also allows Developer B to obtain a working copy.
Visual InterDev compares Developer B's working copy against the master Web application's version and detects merge conflicts. The Merge dialog box is displayed to resolve conflicts.
For more information about working with others on Web application files, see Managing Web Projects and Working Locally.
If you have Microsoft Visual SourceSafe, you can extend the capabilities of Visual InterDev's built-in source control to include version control, rollback, and other source control features.
To use Visual SourceSafe with Visual InterDev
Because Visual InterDev is compatible with Visual SourceSafe, it is not necessary to install Visual SourceSafe on the client (your local machine).
For information about installing Visual SourceSafe, see Setting Up Source Control.
To enable Visual SourceSafe as the source control, see Adding Source Control to a Web Application.
Now, instead of "getting" and "releasing" files, you "check out" and "check in" files.
For more information about using Visual SourceSafe, see Working with Multiple Developers and the Visual SourceSafe documentation.