Editing HTML
See Also
To display text in a Web page, you simply start a new HTML document (.htm file) or ASP page (.asp file) and enter text onto the page. If you want to format the text, or add features such as images or links to your page, you use HTML (Hypertext Markup Language).
If you aren't an HTML expert, you will probably want be familiar with how HTML works before getting started. Knowing HTML can help you get the most out of your Web-based application.
When you are creating HTML text, you most often use Design view in the editor, which displays text with all the formatting applied, the way you see documents in a word processor. Design view is the default editor for .htm files.
For more precise control over your document, you can edit in Source view, which displays your text and the HTML tags that are used to format it.
Working with HTML Tags
HTML is built around tags, which are formatting instructions embedded in the text. Tags are surrounded by angle brackets (< and >) to distinguish them from the surrounding text. Tags are also typically used in pairs around the text you want to format — an opening tag, the text, and a closing tag, which is marked with a slash (/). For example, the following line shows how you would format some text as bold (<B> tag) and some as italic (<I> tag):
<B>Welcome</B> to my <I>home page</I>.
When displayed in a browser, this line would look like this:
Welcome to my home page.
HTML includes tags for character formatting and paragraph formatting (for example, centering a paragraph). Tags are also used to specify features such as images, links, tables, and forms. The following table provides a brief outline of commonly-used tags.
| To insert |
Use |
Example |
| New paragraph |
<P> |
<P>This is a paragraph</P><P>This is a second paragraph</P> |
| Image |
<IMG> plus the name of the image file to display |
<IMG SRC="Monalisa.gif"> |
| Link |
<A> plus the address of the page to jump to, followed by link text |
<A HREF="home.htm">Go to Home Page</A> |
| Table |
<TABLE> to define the table
<TR> for each row
<TD> for each cell |
<TABLE>
<TR>
<TD>Row 1, Cell 1
</TD>
</TR>
<TR>
<TD>Row 2, Cell 1
</TD>
</TR>
</TABLE> |
| Form |
<FORM> to define the form
<INPUT> to define controls such as text boxes and buttons |
<FORM>
Name:
<INPUT Type="Text">
<INPUT Type="Submit">
</FORM> |
Note You can easily create HTML elements in your documents using menu commands and dialog boxes in the HTML editor.
For details, see Inserting Links and Bookmarks in Web Pages and Creating and Editing Tables in the HTML Editor.
To create forms, you can use Visual InterDev design-time controls. For details, see Creating Forms with Design-Time Controls.
Creating HTML in the Editor
The Visual InterDev editor allows you create HTML in new pages or existing ones. For details, see Creating Pages.
When you are editing, you can work with HTML in different ways:
-
In Design view, you can format text and paragraphs the way you would in a word processor and the editor will embed the appropriate HTML tags for you.
For example, if you select text and click the bold button in the toolbar, the editor inserts <B> and </B> tags around the selected text. For more complex tags, such as an image or table tag, you can insert an entire element by filling in choices in a dialog box.
-
In Source view, you can see HTML tags and edit them directly. You can also embed HTML tags using toolbar buttons or menu commands, as you can in Design view. For example, you can insert a link by choosing a menu command and specifying a target page.
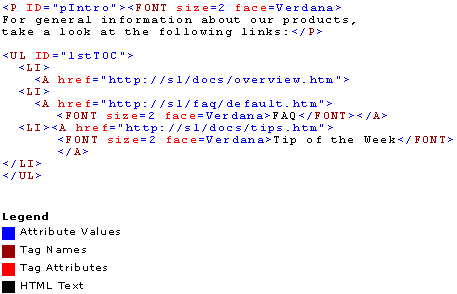
The editor colors HTML text in Source view to help you distinguish the different parts of HTML tags at a glance. For example, tag names are displayed in one color, tab attributes such as SIZE= in another, and so on. Unrecognized text is colored also, which helps you find errors, such as unmatched tag brackets, quickly.

Tip You can change the editor font style and colors in the Options window. From the Tools menu, choose Options, expand the Text Editor node, and choose Fonts and Colors.
-
In Quick view, you can see what .htm files will look like in Microsoft® Internet Explorer. (Quick view might not show you an accurate rendering of .asp files.)
At any point during your editing you can switch between views to see the effects of edits you are making.
To switch between views
-
At the bottom of the editing window, choose the tab for the view you want.
Note When you switch from Source to Design view, the editor might adjust white space (for example, spaces and tabs) and completes any incomplete HTML tags that exist in the Web page. For details, see Design View, HTML Editor.
When you initially create or open a Web page, it is displayed in either Design or Source view, depending on the default for the type of Web page you are editing.
To change the default view
-
From the Tools menu, choose Options.
-
In the left pane, expand HTML.
-
In the Initial View area, choose the default view for HTML (.htm or .html) pages and ASP (.asp) pages.
