Creating and Refining Visual Studio Analyzer Filters
See Also
With Visual Studio Analyzer filters, you can focus the data you use in your application analysis. Through filters, you determine which Visual Studio Analyzer events to collect and to include in an event log. You define a filter before you start collecting events. After you have collected events, you refine the filter to help you focus on the events that are most important to your analysis. You can have multiple filters to help you view the data in different ways.
To work with filters, you use the Filter Editor dialog box, which contains both a graphical and a textual interface. You can build most filters using the graphical interface. However, some complex filters, such as those that use comparison operators, cannot be represented using the graphical interface; you must build those filters using the textual interface, which you can access by clicking Edit Text. You can resize the Filter Editor dialog box to a size that suits you, and the dialog box will remember its size between sessions.
Visual Studio Analyzer also includes sample filters you can use to get started, or you can open an existing filter. Visual Studio Analyzer filters are saved as text files with the extension .vaf.
To create a filter
-
In the Project Explorer, select Filters.
-
Right-click to display the shortcut menu, and then click Add Item.
-
Click Filter.
A path and file name are proposed for you in the Name box.
-
In the Name box, change the path or file name if you want.
-
Click Open.
The Filter Editor dialog box opens so you can define your filter.
To define a filter
-
Click the View menu, and then click Designer.
The Filter Editor dialog box displays, enabling you to construct a filter graphically. To edit a filter's text directly instead, click Edit Text. You can also open the filter text editor by clicking the View menu, and then clicking Code.
The Filter Editor uses standard Boolean syntax for filter expressions. For guidelines on defining filters using the filter text editor, see Filter Syntax Reference.
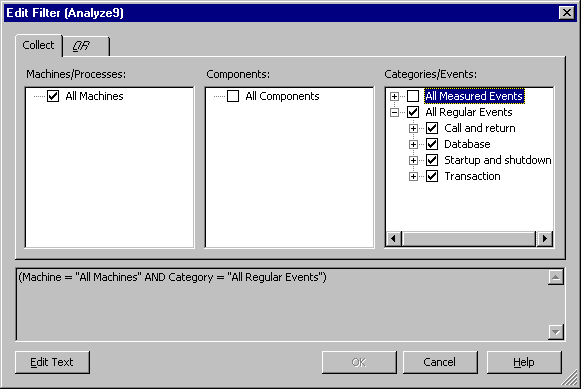
The Filter Editor dialog box is displayed in the following illustration. It is a resizable dialog box that you can resize by dragging, and it will remember its size for subsequent uses.
-
Select the machines or processes, components, categories, and events that you want monitored.
As you make selections, the text version of your filter is shown below the check boxes. Each selection you make within a single column is joined to the next using a logical OR. Each selection you make across columns is joined to the next using a logical AND.
If you cannot express your filter the way you want on the first tab, click the rightmost OR tab at the top of the box, or press the INSERT key followed by the SPACE key. Another OR tab is added and the choices you make on that tab will be added to the filter using a logical OR. You can add as many additional tabs as you need.
-
Click OK.
Changes you make to a filter take effect as soon as you click OK. To save changes to a filter, click Save All on the File menu.
To use a predefined filter
-
Right-click the Filters node in the Project Explorer, and then click Add Predefined Filter.
-
Click the name of the filter you want.
The filter is added to the Filters node in the Project Explorer. You can open it in the Filter Editor and modify it to reflect your needs.
Note You can also add a predefined filter with the Add Item command.
To save a filter
To open an existing filter
-
Right-click the Filters node in the Project Explorer, and then click Add Item.
-
Click the Existing tab.
-
Navigate to the project that contains the filter you want and select the filter.
-
Click Open.
To set a filter as the recording filter
In order for a filter to take effect when you collect events, you must mark the filter as the recording filter.
-
Right-click the filter to display the shortcut menu.
-
Click Set Record Filter.
To apply a filter to a Visual Studio Analyzer view
You can change the filter that is applied to a Visual Studio Analyzer view. If you have more than one view open, you can apply the same filter to all views (one at a time; there is no command to apply a filter to all views at once) or apply a different filter to each view. If you apply the same filter to multiple views, any changes you make to the filter are reflected immediately in each view, unless you disable automatic updates by turning off AutoFilter for that view and clearing the filter applied to that view.
-
Click in the view to which you want to apply the filter.
-
In the Project Explorer, select the filter you want to apply.
-
Right-click to display the shortcut menu, and then click Apply Filter to View.
To clear a filter from a view
-
Click in the view from which you want to clear the filter.
-
Click Analyzer, and then click Clear View Filter. You can also right-click in the view to display the shortcut menu, and then click Clear View Filter.
To disable automatic view updates when filters change
If a view has AutoFilter turned on, it shares its filter settings with other windows. For example, if you clear a filter from one view, all other views with AutoFilter turned on are also cleared of that filter. You can disable updates by turning AutoFilter off. However, if you have applied a filter to a view, any modifications you make to the applied filter will always affect the view, independent of the AutoFilter setting.
-
Click in the view for which you want to disable updates.
-
Right-click to display the shortcut menu, and then click AutoFilter.
Note To re-enable automatic updates to views, click AutoFilter on the view's shortcut menu again.