Round-Trip Engineering with Visual Modeler
Round-trip engineering, or code-to-model and model-to-code generation, takes two forms in Visual Modeler:
-
If you have a Visual Basic project but not a design model of your system, you reverse engineer a new model from the project (which you are going to do in the next exercise).
-
Having a model that is synchronized with your existing Visual Basic code, you round-trip engineer your model. Information entered into the code is generated into the model using the Reverse Engineering Wizard. Information entered into the model is generated into the code using the Code Generation Wizard.
Reverse Engineering a New Design Model
You will now generate a new design model from the Visual Basic source code of the order system.
To generate a model from the Visual Basic project:
-
Open the ordersys.vbp project in Microsoft Visual Basic (if it is not already open).
-
In Microsoft Visual Basic, choose Visual Modeler from the Add-Ins menu, and then click Reverse Engineering Wizard.
-
In the displayed Selection of Model dialog box, click New.
-
Visual Modeler is then started with a new model opened. Also, a Welcome dialog box for the Reverse Engineering Wizard is displayed. Click Next> after you have finished reading the text.
-
The Selection of Project Items dialog box is displayed.
-
Deselect Save model and project before reverse engineering. (By selecting this option, you can use the Revert to Last Saved command on the Tools menu to revert to the current version of the model and code after the reverse engineering process.)
-
Open the project items by clicking on the "+" signs, and take a look at their contents. Select the project items you want to reverse engineer:
-
Class modules — all of them
-
Module — Db
-
Form — dlg_Order
-
ActiveX Reference — DAO
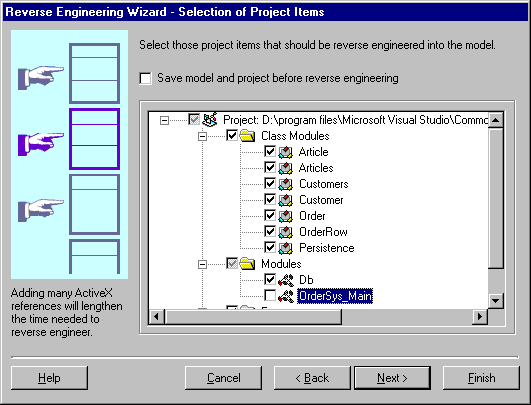
Note that some of the Visual Basic project items listed in the picture of the Selection of Project Items dialog box may not be available in your Visual Basic environment. The project in the picture is from Microsoft Visual Basic Enterprise Edition.
-
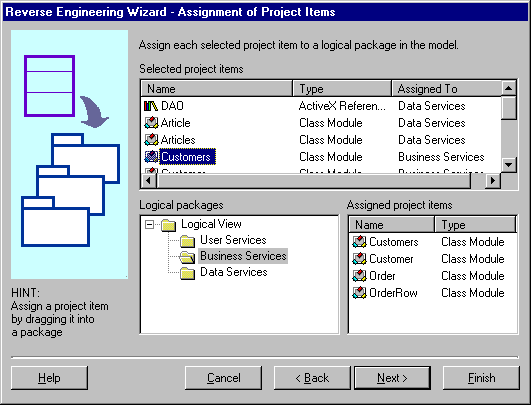
Click Next>. A new dialog box is displayed, where you can assign the selected project items to packages in the new design model. (You can also create new packages in this dialog box, but that is not part of this exercise.)
-
Assign dlg_Order to the User Services package by dragging and dropping it onto the User Services in the Logical packages list.
-
Assign Article, Articles, Db, Persistence and DAO to the Data Services package and the rest of the project items to the Business Services package. Take a look at the Assigned To field to make sure that all project items are assigned. A project item that is not assigned will be assigned by default to a package named Unassigned.
-
Click Next> to get a summary of what will be generated and estimation on how long it will take.
-
Click Finish to build the new model from the chosen code. When the generation is finished, take a look at the result on the Summary and Log tabs in the Summary dialog box. Then click Close. (You can access and save the log later, by choosing Log from the Window menu in Visual Modeler.)
Examining the Generated Model
Now you have reverse engineered the Visual Basic project for the order system, and you have a design model of the system.
To view the generated model:
-
Activate Visual Modeler.
-
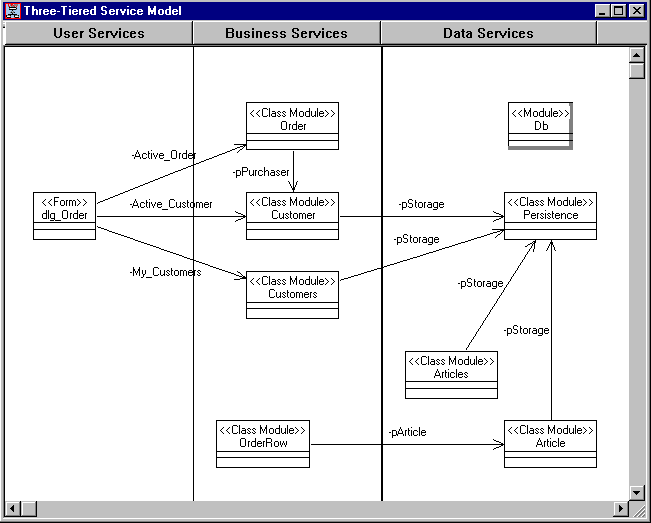
In the Component View, a component with the stereotype EXE, and with the same name as the corresponding project, has been created. On the Visual Basic tab of the component specification, you can see that the ProjectFile model property holds the name and location of the ordersys.vbp file. Also, the Realizes tab shows that all the reverse engineered classes have automatically been assigned to this component.
-
In the Logical View, note that for each selected project item, the corresponding classes have been generated into the correct service package.
-
Also note that each generated class has been inserted into the Package Overview diagram of the package where it belongs, as well as into its service tier in the Three-Tiered Service Model diagram.
-
Moreover, all relationships between the class modules in Visual Basic have become relationships between the corresponding classes in the design model. To avoid crossed association lines in the Three-Tiered Service Model diagram, you may have to move the classes in the diagram.
-
For the selected ActiveX component DAO, a package called DAO has been created. If you expand that package, you can see that interface classes have been generated for each of its interface elements. Note that the interfaces of a component belong to the logical view, but the actual component belongs to the component view. Thus, in the Component View, notice that a DAO component has been created.
Note If the generated relationships are not displayed in the diagram, click Filter Relationships on the Query menu. Then select all relationship types (which should already be done by default) and click OK.
Creating Classes and Associations in the Model
Now, you can practice the round-trip possibilities by creating a new business service class and an association in Visual Modeler and then updating the code with those changes.
To create and generate new model elements:
-
On the Tools menu, click Class Wizard.
-
Give the new class a name by typing "Invoice" in the name field. Click Next>. The Documentation dialog box opens.
-
Write a brief description of the new class. Click Next>. The Service Type dialog box opens.
-
Assign the new business class the appropriate tier, by selecting Business Services. Click Next>. The Inheritance dialog box opens.
-
Because no other class implements this class, make sure that No is selected. Click Next>. The Methods dialog box opens.
-
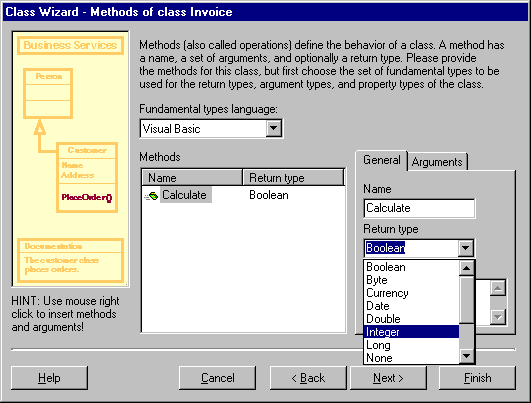
In the Methods list, click the right mouse button and select Insert. A new method is added to the new class. Give the new method a name by writing "Calculate" in the Name field on the General tab.
-
Make sure that Visual Basic is selected in the Fundamental Types Language field. If so, the methods, arguments, and properties of the class will get Visual Basic data types. Then define the method's return type by selecting Integer from the Return type combo box.
-
Click Next>. The Properties dialog box opens. In the Properties list, click the right mouse button and select Insert. Give the new property a name by writing "Number" in the Name field on the General tab. Define the return type by selecting Integer in the Type field.
-
Click Next>. A summary of the new class is displayed. Click Finish to create the class.
-
Activate the Three-Tiered Service Model diagram. As you can see, the new class has automatically been inserted into the appropriate tier.
-
Create a relationship between Invoice and Order by clicking the association symbol in the toolbox. The cursor turns into a plain arrow. Place the cursor on the Invoice class in the diagram. Press the mouse button and drag the association to Order. Release the button.
-
Name the new role of the Order class by right clicking on the Order side of the association and selecting Role Name from the menu. By default, the name of the new role becomes "theOrder". (You can also give the role a name in the specification dialog box for the relationship.)
Now you have created a new class with a property, a method, and a relationship. When you become familiar with the tool, you may choose to create classes, properties and methods directly in a diagram. To do that, place the cursor in the name field of the class and press the right mouse button. A pop-up menu appears, which contains the New Property and New Method commands. Here you can use inline editing to specify each new property and method, but you have to be familiar with the syntax.
Updating the Code from Changes in the Model
When you are satisfied with the changes in the model you are ready to generate code from the new Invoice class.
To generate code from a class:
-
First, you have to assign the new class to the component that implements this class. (Note that a class can be assigned to and implemented by several components.) Visual Modeler needs that information to know which Visual Basic project the class belongs to. To assign the new class to the OrderSystem component, drag OrderSystem from the component view in the browser and drop it on the Invoice class in the Three-Tiered Service Model diagram.
-
Open the specification of the Invoice class. On the Components tab, the check mark next to the OrderSystem component means that the class is assigned to that component. Close the specification.
-
In the Three-Tiered Service Model diagram, right-click on Invoice and choose Generate Code. (Click Next> if the Welcome dialog box is shown.)
-
The Select Classes dialog box is displayed, where you select the classes for which you want to generate code. Note that Invoice is already selected because you selected it before starting the Code Generation Wizard. Click Next>.
-
The Preview Classes dialog box is shown. Here you can ask for a code preview of each selected class. Because Invoice is a new class, you probably have to change the code generator's default mapping to Visual Basic code. Therefore, select Invoice and click Preview.
-
Get acquainted with the different preview dialog boxes in the Code Generation Wizard by clicking Next> and <Back. The Wizard shows the current model property settings for the class. These are stored in the specification of each class and shown on the Visual Basic tab in the specification dialog box. (Remember that you examined model properties in a previous exercise.) You are now going to change one of these settings from the Code Generation Wizard.
-
Go to the Role Options dialog box and select the association you previously created between Invoice and Order. In the text box at the bottom of the dialog box you can see the code that should be generated with the current setting.
-
Change the setting by, for example, selecting Property Get, which generates a Property Get procedure for the association. Note how the name of the generated variable is changed according to the naming conventions defined by the default values of the DataMemberName and NameIfUnlabeled model properties.

-
When you are satisfied with your preview and settings, click Finish and then click Next>.
-
The General Options dialog box is shown. Here you can instruct the code generator to insert debugging code and comments, among other things. Clear all options and click Next>.
-
The Finish dialog box is shown where you can see a summary of what will be generated. Now, click Finish to start the code generation.
-
Because you choose to synchronize manually, and because the code contains some project items that were not reverse engineered into the model, a Delete dialog box is shown. To keep the listed project items in the project, select <<All, and click OK.
-
When the code generation is completed a Summary dialog box is shown. Take a look at the result on the Summary and Log tabs, and then click Close.
-
Select the Invoice class. Press the right mouse button and choose Browse Code from the menu.
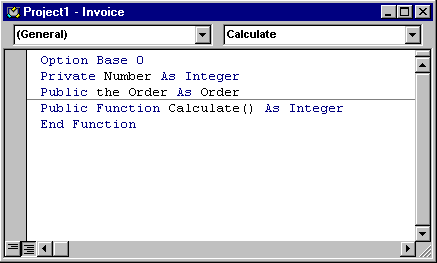
A Visual Basic class module called Invoice has now been created as you can see in the Microsoft Visual Basic window. Note how the property, method, and relationship were mapped to Visual Basic code.
Note For each generated project item, member, and method, Visual Modeler adds an identifier as a code annotation (for example "ModelID=3237F8CE0053"), which identifies the corresponding class, property, role, or method in the model. Those are not displayed in the code examples here.
Updating the Model from Changes in the Code
In the previous exercise, you practiced code generation from changes in the design model. Now, suppose that you have just created a new code class called dlg_OrderRow, and want to update the design model with the new class.
To reverse engineer a new project item:
-
In Visual Modeler, start reverse engineering by clicking Visual Basic on the Tools menu, and then select Reverse Engineering Wizard. If a Selection of Project dialog box is displayed, select the ordersys.vbp project and click OK. (Click Next> if a Welcome dialog box is shown.)
-
In the Selection of Project Items dialog box, select the dlg_OrderRow Visual Basic form. Deselect Save model and project before reverse engineering.
-
Click Next> and assign dlg_OrderRow to the User Services package.
-
Click Next> and take a look at the summary of what will be reverse engineered. Click Finish to update the new model with the new class.
-
When the Wizard is finished, the result is shown in a Summary dialog box. The Summary tab shows the effects of the reverse engineering, and the Log tab lists any warnings or errors.
-
Click Close and look for the new class in the browser and the Three-Tiered Service Model diagram. As you can see, a dlg_OrderRow class has been created and assigned to the OrderSystem component.
Browsing the Code and the Model
The Visual Modeler and Microsoft Visual Basic applications are tightly integrated-and not only with respect to code and class generation. You can also use each application to browse corresponding code or classes in the other tool.
To view the class module that corresponds to a selected design class:
-
Select the Order class in the Three-Tiered Service Model diagram.
-
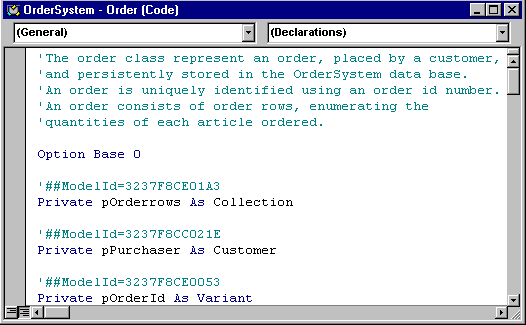
Select Source Code on the Browse menu. Microsoft Visual Basic is then activated and a window with the Order class module source code is opened.
To open a diagram where the design class that corresponds to the selected project item occurs:
-
Select the dlg_OrderRow form in Microsoft Visual Basic.
-
Click Visual Modeler on the Add-Ins menu, and then click Browse Class Diagram. If the project is related to none or several models, select one of the models in the displayed dialog box.
-
A dialog box with a list of the diagrams where the corresponding design class occurs is displayed. The corresponding design class is currently part of two diagrams: the Package Overview class diagram in the User Services package and the Three-Tiered Service Model diagram. To open and activate one of them, simply double-click on its name.
You have now completed the basic steps in using Visual Modeler. For complete information about the tool and round-trip engineering, please refer to the Visual Modeler online help.