The command method is useful when a transfer operation requires the user to navigate between source and destination. However, for many transfers, direct manipulation is a natural and quick method. In a direct manipulation transfer, the user selects and drags an object to the desired location, but because this method requires motor skills that may be difficult for some users to master, avoid using it as the exclusive transfer method. The best interfaces support the transfer command method for basic operations and direct manipulation transfer as a shortcut technique.
When a pen is being used as a pointing device, or when it drags an action handle, it follows the same conventions as dragging with mouse button 1. For pens with barrel buttons, use the barrel+drag action as the equivalent of dragging with mouse button 2. There is no keyboard interface for direct manipulation transfers.
You can support direct manipulation transfers to any visible object. The object (for example, a window or icon) need not be currently active. For example, the user can drop an object in an inactive window. The drop action activates the window. If an inactive object cannot accept a direct manipulation transfer, it (or its container) should provide feedback to the user.
How the transferred object is integrated and displayed in the drop destination is determined by the destination's context. A dropped object can be incorporated either as native data, an OLE object, a partial form of the object — such as its properties — or a transformed object. You determine whether to add to or replace an existing selection based on the context of the operation, using such factors as the formats available for the object, the destination's purpose, and any user-supplied information such as the specific location that the user drops or commands (or modes) that the user has selected. For example, an application can supply a particular type of tool for copying the properties of objects.
Default drag and drop transfers an object using mouse button 1. How the operation is interpreted is determined by what the destination defines as the appropriate default operation. As with the command method, the destination determines this based on information about the object (and the formats available for the object) and the context of the destination itself. Avoid defining a destructive operation as the default. When that is unavoidable, display a message box to confirm the intentions of the user.
Using this transfer technique, the user can directly transfer objects between documents defined by your application as well as to system resources, such as folders and printers. Support drag and drop following the same conventions the system supports: the user presses button 1 down on an object, moves the mouse while holding the button down, and then releases the button at the destination. For the pen, the destination is determined by the location where the user lifts the pen tip from the input surface.
The most common default transfer operation is Move, but the destination (dropped on object) can reinterpret the operation to be whatever is most appropriate. Therefore, you can define a default drag and drop operation to be another general transfer operation such as Copy or Link, a destination specific command such as Print or Send To, or even a specialized form of transfer such as Copy Properties.
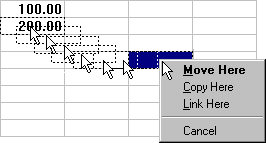
Nondefault drag and drop transfers an object using mouse button 2. In this case, rather than executing a default operation, the destination displays a pop-up menu when the user releases the mouse button, as shown in
Figure 5.16. The pop-up menu contains the appropriate transfer completion commands

Figure 5.16 A nondefault drag and drop operation
The destination always determines which transfer completion commands to include on the resulting pop-up menu, usually factoring in information about the object supplied by the source location.
The form for nondefault drag and drop transfer completion verbs follows similar conventions as the Paste command. Use the common transfer completion verbs, Move Here, Copy Here, and Link Here, when the object being transferred is native data of the destination. When it is not, include the type name. You can also display alternative completion verbs that communicate the context of the destination; for example, a printer displays a Print Here command. For commands that support only a partial aspect or a transformation of an object, use more descriptive indicators — for example, Copy Properties Here, or Transpose Here.
Use the following general form for nondefault drag and drop transfer commands.
[Command Name] [type name | object name] Here [as type name]
The following summarizes common forms for nondefault transfer completion commands.
|
Command |
Function |
|
Move Here |
Moves the selected object to the destination as native content (data). |
|
Copy Here |
Creates a copy of the selected object in the destination as native content. |
|
Link Here |
Creates a data link between the selected object and the destination. The original object's value is integrated or transformed as native data within the destination, but remains linked to the original object so that changes to it are reflected in the destination. |
|
Move [type name] Here |
Moves or copies the selected object as an OLE embedded object. The OLE embedded object is displayed in its content presentation and can be activated directly within the destination. |
|
Link [type name] Here |
Creates an OLE linked object displayed as a picture of the selected object. The representation is linked to the selected object so that any changes to the original object will be reflected in the destination. |
|
Move [type name] Here as Icon |
Moves or copies the selected object as an OLE embedded object and displays it as an icon. |
|
Create Shortcut Here |
Creates an OLE linked object to the selected object; displayed as a shortcut icon. The representation is linked to the selected object so that any changes to the original object will be reflected in the destination. |
Define and appropriately display one of the commands in the pop-up menu to be the default drag and drop command. This is the command that corresponds to the effect of dragging and dropping with mouse button 1.
Note 
For more information about how to display default menu commands, see Chapter 13, "Visual Design."
When a user drags and drops an object back on itself, interpret the action as cancellation of a direct manipulation transfer. Similarly, cancel the transfer if the user presses the ESC key during a drag transfer. In addition, include a Cancel command in the pop-up menu of a nondefault drag and drop action. When the user chooses this command, cancel the operation.
Because dragging performs both selection and transfer operations, provide a convention that allows the user to differentiate between these operations. The convention you use depends on what is most appropriate in the current context of the object, or you can provide specialized handles for selection or transfer. The most common technique uses the location of the pointer at the beginning of the drag operation. If the pointer is within an existing selection, interpret the drag to be a transfer operation. If the drag begins outside of an existing selection, on the background's white space, interpret the drag as a selection operation.
When the user drags and drops an object from one scrollable area (such as a window, pane, or list box) to another, some tasks may require transferring the object outside the boundary of the area. Other tasks may involve dragging the object to a location not currently in view. In this latter case, it is convenient to automatically scroll the area (also known as automatic scrolling or autoscroll) when the user drags the object to the edge of that scrollable area. You can accommodate both these behaviors by using the velocity of the dragging action. For example, if the user is dragging the object slowly at the edge of the scrollable area, you scroll the area; if the object is being dragged quickly, do not scroll.
To support this technique during a drag operation, you sample the pointer's position at the beginning of the drag each time the mouse moves, and on an application-set timer (every 100 milliseconds recommended). If you use OLE drag and drop support, you need not set a timer. Store each value in an array large enough to hold at least three samples, replacing existing samples with later ones. Then calculate the pointer's velocity based on at least the last two locations of the pointer.
To calculate the velocity, sum the distance between the points in each adjacent sample and divide the total by the sum of the time elapsed between samples. Distance is the absolute value of the difference between the x and y locations, or (abs(x1 - x2) + abs(y1 - y2)). Multiply this by 1024 and divide it by the elapsed time to produce the velocity. The 1024 multiplier prevents the loss of accuracy caused by integer division.
Note 
Distance as implemented in this algorithm is not true Cartesian distance. This implementation uses an approximation for purposes of efficiency, rather than using the square root of the sum of the squares, (sqrt((x1 - x2)^2 + (y1 - y2)^2)), which is more computationally expensive.
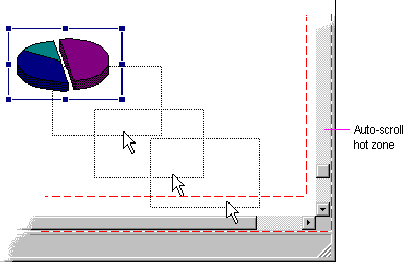
You also predefine a hot zone along the edges of the scrollable area and a scroll time-out value. Use twice the width of a vertical scroll bar or height of a horizontal scroll bar to determine the width of the hot zone.
During the drag operation, scroll the area if the following conditions are met: the user moves the pointer within the hot zone, the current velocity is below a certain threshold velocity, and the scrollable area is able to scroll in the direction associated with the hot zone it is in. The recommended threshold velocity is 20 pixels per second. These conventions are illustrated in
Figure 5.17.

Figure 5.17 Automatic scrolling based on velocity of dragging
The amount you scroll depends on the type of information and reasonable scrolling distance. For example, for text, you typically scroll vertically one line at a time. Consider using the same scrolling granularity that is provided for the scroll bar arrows.
Note 
For more information about scrolling, see Chapter 6, "Windows."
To support continuous scrolling, determine what the scroll frequency you want to support — for example, four lines per second. After using a velocity check to initiate auto-scrolling, set a timer — for example, 100 milliseconds. When the timer expires, determine how long it has been since the last time you scrolled. If the elapsed time is greater than your scrolling frequency, scroll another unit. If not, reset your timer and check again when the timer completes.