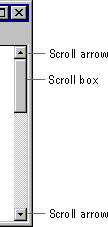
When the information viewed in a window exceeds the size of that window, the window should support scrolling. Scrolling enables the user to view portions of the object that are not currently visible in a window. Scrolling is commonly supported through the use of a scroll bar. A scroll bar is a rectangular control consisting of scroll arrows, a scroll box, and a scroll bar shaft, as shown in Figure 6.7.

Figure 6.7 Scroll bar and its components
You can include a vertical scroll bar, a horizontal scroll bar, or both. Align a scroll bar with the vertical or horizontal edge of the window orientation it supports. If the content is never scrollable in a particular direction, do not include a scroll bar for that direction.
Note 
Scroll bars are also available as separate window components. For more information about scroll bar controls, see Chapter 7, "Menus, Controls, and Toolbars."
The common practice is to display scroll bars if the view requires some scrolling under any circumstances. If the window becomes inactive or resized so that its content does not require scrolling, you should continue to display the scroll bars. While removing the scroll bars when the window is inactive potentially allows the display of more information and feedback about the state of the window, it also requires the user to explicitly activate the window to scroll. Consistently displaying scroll bars provides a more stable environment.
Scroll arrow buttons appear at each end of a scroll bar, pointing in opposite directions away from the center of the scroll bar. The scroll arrows point in the direction that the window "moves" over the data. When the user clicks (for pens, tapping the screen) a scroll arrow, the data in the window moves, revealing information in the direction of the arrow in appropriate increments. The granularity of the increment depends on the nature of the content and context, but it is typically based on the size of a standard element. For example, you can use one line of text for vertical scrolling, one row for spreadsheets. You can also use an increment based a fixed unit of measure. Whichever convention you choose, maintain the same scrolling increment throughout a window. The objective is to provide an increment that provides smooth but efficient scrolling. When a window cannot be scrolled any further in a particular direction, disable the scroll arrow corresponding to that direction.
Note 
The default system support for scroll bars does not disable the scroll arrow buttons when the region or area is no longer scrollable in this direction. However, it does provide support for you to disable the scroll arrow button under the appropriate conditions.
When scroll arrow buttons are pressed and held, they exhibit a special auto-repeat behavior. This action causes the window to continue scrolling in the associated direction as long as the pointer remains over the arrow button. If the pointer is moved off the arrow button while the user presses the mouse button, the auto-repeat behavior stops and does not continue unless the pointer is moved back over the arrow button (also when the pen tip is moved off the control).
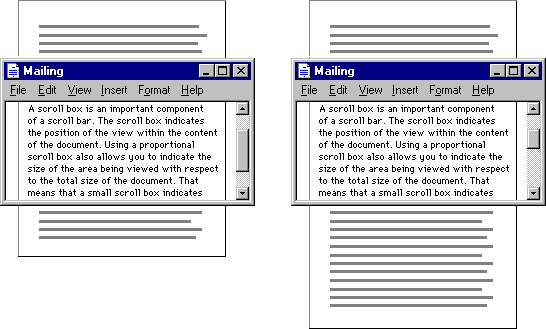
The scroll box, sometimes referred to as the elevator, thumb, or slider, moves along the scroll bar to indicate how far the visible portion is from the top (for vertical scroll bars) or from the left edge (for horizontal scroll bars). For example, if the current view is in the middle of a document, the scroll box in the vertical scroll bar is displayed in the middle of the scroll bar.
The size of the scroll box can vary to reflect the difference between what is visible in the window and the entire content of the file, as shown in
Figure 6.8.

Figure 6.8 Proportional relationship between scroll box and content
For example, if the content of the entire document is visible in a window, the scroll box extends the entire length of the scroll bar, and the scroll arrows are disabled. Make the minimum size of the scroll box no smaller than the width of a window's sizing border.
The user can also scroll a window by dragging the scroll box. Update the view continuously as the user moves the scroll box. If you cannot support scrolling at a reasonable speed, you can scroll the information at the end of the drag operation as an alternative.
If the user starts dragging the scroll box and then moves the pointer outside of the scroll bar, the scroll box returns to its original position. The distance the user can move the pointer off the scroll bar before the scroll box snaps back to its original position is proportional to the width of the scroll bar. If dragging ends at this point, the scroll action is canceled — that is, no scrolling occurs. However, if the user moves the pointer back within the scroll-sensitive area, the scroll box returns to tracking the pointer movement. This behavior allows the user to scroll without having to remain within the scroll bar and to selectively cancel the initiation of a drag-scroll operation.
Dragging the scroll box to the end of the scroll bar implies scrolling to the end of that dimension; this does not always mean that the area cannot be scrolled further. If your application's document structure extends beyond the data itself, you can interpret dragging the scroll box to the end of its scroll bar as moving to the end of the data rather than the end of the structure. For example, a typical spreadsheet exceeds the data in it — that is, the spreadsheet may have 65,000 rows, with data only in the first 50 rows. This means you can implement the scroll bar so that dragging the scroll box to the bottom of the vertical scroll bar scrolls to the last row containing data rather than the last row of the spreadsheet. The user can use the scroll arrow buttons to scroll further to the end of the structure. This situation also illustrates why disabling the scroll arrow buttons can provide important feedback so that the user can distinguish between scrolling to the end of data from scrolling to the end of the extent or structure. In the example of the spreadsheet, when the user drags the scroll box to the end of the scroll bar, the arrow would still be shown as enabled because the user can still scroll further, but it would be disabled when the user scrolls to the end of the spreadsheet.
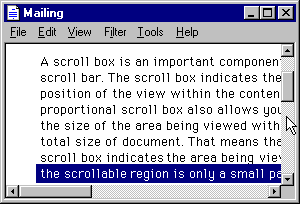
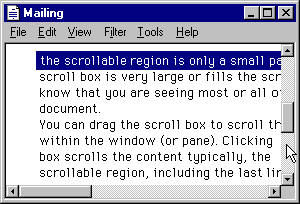
The scroll bar shaft not only provides a visual context for the scroll box, it also serves as part of the scrolling interface. Clicking in the scroll bar shaft should scroll the view an equivalent size of the visible area in the direction of the click. For example, if the user clicks in the shaft below the scroll box in a vertical scroll bar, scroll the view a distance equivalent to the height of the view. Where possible, allow overlap from the previous view, as shown in Figure 6.9. For example, if the user clicks below the scroll box, the bottom line becomes the top line of scrolled view. The same thing applies for clicking above the scroll box and horizontal scrolling. These conventions provide the user with a common reference point.


Figure 6.9 Scrolling with the scroll bar shaft by a screenful
Pressing and holding mouse button 1 with the pointer in the shaft auto-repeats the scrolling action. If the user moves the pointer outside the scroll-sensitive area while pressing the button, the scrolling action stops. The user can resume scrolling by moving the pointer back into the scroll bar area. (This behavior is similar to the effect of dragging the scroll box.)
The techniques previously summarized describe the explicit ways for scrolling. However, the user can also scroll as a secondary result of another user action. This type of scrolling is called automatic scrolling. The situations in which to support automatic scrolling are as follows:
Use navigation keys to support scrolling with the keyboard. When the user presses a navigation key, the cursor moves to the appropriate location. For example, in addition to moving the cursor, pressing arrow keys at the edge of a scrollable area scrolls in the corresponding direction. Similarly, the PAGE UP and PAGE DOWN keys are comparable to clicking in the scroll bar shaft, but they also move the cursor.
Optionally, you can use the SCROLL LOCK key to facilitate keyboard scrolling. In this case, when the SCROLL LOCK key is toggled on and the user presses a navigation key, scroll the view without affecting the cursor or selection.
It is sometimes convenient to locate controls or status bars adjacent to a scroll bar and position the end of the scroll bar to accommodate them. Take care when placing adjacent elements; too many can make it difficult for users to scroll, particularly if you reduce the scroll bar too much. If you need a large number of controls, consider using a conventional toolbar instead.
Note 
For more information about toolbars, see Chapter 7, "Menus, Controls, and Toolbars."