ADOCE enables you to export tables from a Windows CE–based device to a desktop computer. The Export from Mobile Device to Database dialog box gives you the option to choose which tables on the device to convert to an Access database.
To export an ADOCE database
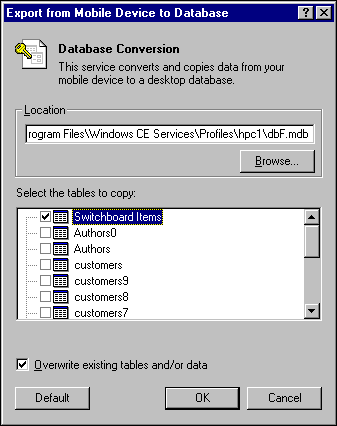
The Export from Mobile Device to Database dialog box appears, showing the ADOCE tables on the connected device.
You also can type the path and file name in the Location box. If the file does not exist, ADOCE creates it for you.
ADOCE puts all the selected tables in the same .mdb file.
The following screen shot shows the Export from Database to Mobile Device dialog box.
The following options are available in the Export from Mobile Device to Database dialog box:
This box specifies the Microsoft Access .mdb file in which to store selected tables. Type in a path and file name, or use the Browse button to select an existing file or change directories. The default database location and name is <Device Partner Folder>\Dbxx.mdb, where the number xx represents the next available number. If the file specified in the Location text box does not exist, ADOCE creates one.
This list box shows every table that ADOCE can read, except the ADOCE system tables. Select the check box by a table name to select it for conversion. ADOCE places the selected tables in the same .mdb file.
If you have tables in the selected database with the same name as tables in the list, selecting this check box causes the existing tables to be replaced with the newly converted ones. Clearing this check box causes the converter to generate an error if it finds a table with the same name. You cannot merge the data in an ADOCE table with existing data in an Access table.
Choose this button to select the default tables for conversion. ADOCE automatically selects all tables.
The OK button starts the conversion of the selected tables. The Cancel button quits the conversion.
To export data from a device into an ODBC data source
The Export from Mobile Device to Database dialog box appears.
The Choose Your New Database’s Filename dialog box appears.
For each .mdb file exported, the converter generates a log file named Ce2db.txt in the partner directory for the device, usually in C:\Program Files\Windows CE Services\Profiles\devicename.