Microsoft Corporation
March 3, 1997
This article describes how to get a Microsoft® Excel 97, Word 97, or PowerPoint® 97 Visual Basic® for Applications solution ready for distribution and how to package the solution for distribution using the Setup Wizard. Most of the article discusses the issues involved in preparing a solution for distribution—deciding how you want your solution to load, avoiding problematic references, and protecting your code.
Once you've created a solution, you face a series of decisions and tasks as you prepare the solution for distribution. Probably the first decision is simply how to package the project. Should it be distributed as a document, or, more commonly, as an add-in (or global template in Word)?
If you decide to distribute the solution as an add-in, it's important to pay attention to how and when the add-in will load. For example, should it load automatically at startup or only on demand?
Finally, chances are you'll want to protect your code and, of course, perform a final check to get rid of those last-minute bugs that always seem to appear just when you're ready to cut your disk.
When you write a solution using Visual Basic for Applications code, you write it in a project associated with a document (the term "document" is used generically in this paper to refer to an Microsoft Excel workbook, a PowerPoint presentation, or a Word document). When it's time to distribute the solution, you need to decide whether the user must have access to both the document and the code in the associated project or just to the code.
If you want to make both the document and the project available to the user, you simply distribute it as a document—again, this means as an Microsoft Excel workbook, a PowerPoint presentation, or a Word document. This is often the case when you write a vertical solution—that is, a very specific solution for a very specific user. For example, if you create an automated performance review form in Word, you want both the review document and the code that automates it to be available to the user.
If, on the other hand, you want to make only the project available to the user, you distribute it as an add-in (Microsoft Excel and PowerPoint) or a global template (Word).
Note Users can't get to the worksheets in an add-in, because when a workbook is made into an add-in, its worksheets are automatically hidden. Similarly, when a presentation is made into an add-in, its slides are automatically removed. For more information on what happens when a workbook or presentation is converted to an add-in, see the section "Save Your Solution as an Add-in or Global Template" later in this article.
You may decide not to give the user access to the document associated with a project, either because the document isn't of use to the user or because there's data in the document you don't want the user to be able to see or change. This is often the case when your solution contains procedures that extend and customize the standard feature set of an application—that is, procedures that are designed to have a broad application and to be independent of any specific document; the user only needs access to the code in the project, not to the associated document. For example, if you write procedures that automate common spreadsheet formatting tasks, the user will need access to them from any workbook, but won't need access to the specific workbook associated with the project where the code is stored.
Important Whether you distribute a solution as an add-in or template instead of as a document is a separate issue from whether you protect your code. See the section "Protect or Unprotect Your Code" later in this article for more information.
If you decide to distribute your solution as an add-in or global template, you'll probably want to control how it is loaded. The user can always load the add-in using the Templates and Add-Ins or Add-Ins dialog box from the Tools menu, but that's usually not the best solution. You can set an add-in or global template to load automatically at startup. Or, to avoid slowing down an application's startup, you can set an add-in or global template to load in response to a particular event or to the user choosing a command. You can also load an add-in or global template programmatically.
The features of an add-in become available to the user when the add-in is loaded. For example, when a global template is loaded, Word merges the template's menus, toolbars, AutoText entries, and macros into the Word environment. Because of this, you may want to load the add-in or global template when the user launches Word, Microsoft Excel, or PowerPoint.
To load add-ins or templates automatically when you start an application, you can place them in the Office Startup folder. The default Startup folder is located in Program Files\Microsoft Office\Office\Startup.
In Microsoft Excel, you can also place an add-in in the Xlstart folder or in the folder you designate as the alternate startup folder. To set the alternate startup folder, assign a path and folder name to the HKEY_CURRENT_USER\Software\Microsoft\Office\8.0\Excel\Microsoft Excel\AltStartup key in the Windows® registry.
In addition to storing the add-in in one of the startup folders described above, you can use the OPEN command in the Windows Registry to specify add-in files you want to load automatically when you start Microsoft Excel.
You must create one OPEN command in the registry key HKEY_CURRENT_USER\Software\Microsoft\Office\8.0\Excel\Microsoft Excel for each file you want to open at startup. If you want to open more than one file, append incremented numbers to consecutive OPEN commands. For example, use OPEN for the first file you want to open at startup, OPEN1 for the second, OPEN2 for the third, and so on.
The syntax for the OPEN command is as follows:
"OPEN =[/Switch] pathandfilename"
The available switches are /R and /F. The /R switch opens the file read-only. The /F switch is used for demand loading workbooks. Microsoft Excel only reads enough information from the add-in workbook file to reference the custom functions. The following is an example of an OPEN command:
HKEY_CURRENT_USER\Software\Microsoft\Office\8.0\Excel\Microsoft Excel\OPEN =/R "C:\OFFICE\OFFICE\LIBRARY\ANALYSIS\ANALYS32.XLL"
The OPEN command is provided for backward compatibility and is required for demand loading of function macros. Refer to the Init Commands and Init Menus settings information later in this paper for the new method.
Just as with Microsoft Excel, you can set values in the Windows registry to load add-ins automatically when you start Microsoft PowerPoint. You use different settings to do so, however.
If an add-in is to be loaded automatically when PowerPoint is launched, the name of an add-in file should be a subkey under either HKEY_CURRENT_USER or HKEY_LOCAL_MACHINE in the Windows Registry. The Path value for the key should be the location of the add-in. Set the AutoLoad value to 1 to load the add-in automatically at startup.
A Microsoft Excel or PowerPoint add-in that is loaded and registered during the current session of Microsoft Excel or PowerPoint will be automatically loaded the next time the application starts up.
When you load a global template in Word, it remains loaded for the current session, but is not automatically reloaded when you restart Word.
Note When you add add-ins to the list in the Add-Ins dialog box (using the Add New button) in Microsoft Excel or PowerPoint, they are registered under HKEY_CURRENT_USER. Hence, registered add-ins will only be available to the user that was logged onto the machine at the time when the add-in was added to the list.
You can programmatically install an add-in or global template using the Addins collection.
In Word or Microsoft Excel, set the Installed property of the Addin object to True to load the add-in or global template. The following example loads a global template named "Gallery.dot."
Addins("C:\Microsoft Office\Templates\Gallery.dot").Installed = True
In PowerPoint, set the Loaded property of the Addin object to True to load the add-in, and set the Registered property to True to register it. The following example loads and registers MyTools.ppa.
With Addins("C:\my documents\mytools.ppa")
    .Loaded = True
    .Registered = True
End With
If you want your add-in to load in response to a particular event, you can place the code that loads the add-in in an event procedure. For more information on events, see the Word or Microsoft Excel Visual Basic for Applications Help files.
Use the following sample command line, where path is the location of the file Add-in.dot, to install an add-in called Add-in.dot and run a Sub procedure called Main in the module named Add-inInstall:
WinWord "<Path>\Add-in.dot" /mAdd-inInstall
Word has a number of command line switches. The /m switch runs the code in the specified module. Note that there is no space after the "m". Note also that you don't specify the Main procedure; only a procedure named Main will run. If there is no procedure named Main, no code will run when the module is loaded. Here is an example Main procedure:
'Name the module Add-inInstall.
Option Explicit
Sub Main()
'Check to see if Add-In is loaded in Add-In list.

    Dim wkbAddin As Word.AddIn

    On Error GoTo Errorhandler
    Set wkbAddin = AddIns(ThisDocument.Name)
    If wkbAddin Is Nothing Then
        ' Add the template to the add-ins collection and install it.
        Set wkbAddin = AddIns.Add(ThisDocument.FullName, True)
    End If

    ' If template is the active document close it.
    If ThisDocument.Name = ActiveDocument.Name Then
        ' The Add-in should not be dirty.
        ThisDocument.Close
    End If

    Exit Sub
Errorhandler:

    ' Only ignore "Subscript out of range" errors.
    Select Case Err.Number
        Case 9, 5941
            Err.Clear
            Resume Next
        Case Else
            ' Assert the error when in Debug mode.
            #If DebugMode Then
                AssertError
            #End If
            ' Insert other error handling code here.
    End Select
End Sub
An add-in remains loaded until the end of the current session or until you unload it using Visual Basic for Applications code or using the Add-Ins or Templates and Add-ins dialog box from the Tools menu. Unloading an add-in conserves memory.
In Word or Microsoft Excel, set the Installed property of the Addin object to False to unload the add-in or global template. The following example unloads the global template named "Gallery.dot."
Addins("C:\Microsoft Office\Templates\Gallery.dot").Installed = False
In PowerPoint, set the Loaded property of the Addin object to False to unload the add-in, and set the Registered property to False to deregister it. The following example unloads MyTools.ppa.
Addins("C:\my documents\mytools.ppa").Loaded = False
Loading an add-in or template into memory at startup can significantly slow the time it takes Microsoft Excel, Word, or PowerPoint to load if the add-in is large. You can use demand loading to defer loading the add-in until the user invokes a command or a procedure in the add-in.
Wizards and utility add-ins that are initiated by a menu command are demand loaded automatically.
There are several other techniques for setting up demand loading that are specific to particular applications.
Note If you intend to use an add-in or template as a code library whose procedures will be called from other projects, you generally don't need to load it explicitly. Visual Basic will load the referenced add-in or template on demand, when a procedure is called that resides in the template.
Using explicit references in Microsoft Excel
The first method of demand loading is to use an explicit reference when assigning a macro name to the toolbar. The following line calls the subroutine MySub that resides in the ThisWorkbook module from the workbook (add-in) "C:\My Documents\MyTools.xla":
'C:\My Documents\MyTools.xla'!ThisWorkbook.MySub.
The add-in is loaded only when the macro is executed.
For solutions that are distributed using an installation program, see the section "Adding Menus and Submenus to Microsoft Excel without Loading an Add-In" later in this article for more details.
Demand loading function libraries in Microsoft Excel
If you are distributing a solution that contains a library of function macros, you may want to demand load these functions. You would also normally want the functions to be listed in the Functions Wizard. To demand load worksheet functions requires XLM macros. Typically, these macros are wrappers for Visual Basic functions.
When Microsoft Excel sees that an add-in is marked for demand load, it reads just the function macro headers from the file. The reason these function macros must be XLM is that Microsoft Excel can read the information without having to load Visual Basic for Applications. Visual Basic for Applications is not loaded until it is required.
To modify an add-in to take advantage of demand loading
a. In the cell below the function name, insert the Argument(Name_Text, Data_Type_ID) worksheet function.
b. Name_Text is the name of the parameter. Ideally, this should match the name of the Visual Basic for Applications function's parameter it is supposed to represent.
c. Data_Type_ID is the ID that determines what type of data Microsoft Excel accepts for the argument. This parameter is optional.
d. Repeat steps b, c and d for each parameter in the Visual Basic for Applications function.
e. If it is necessary to specify the result type of the function use the Result(Data_Type_ID) worksheet function.
f. The Return(value) worksheet function signals the end of the function macro.
g. Select all of the cells that contain the macro.
h. On the Insert menu, point to Name, and then click Define
i. Name the range the name of the function.
j. Select the Function radio button in the Macro group.
k. Click Add then click OK.
Here is an example of a Microsoft Excel 4 function macro that wraps a Visual Basic for Applications function:
MyFunction
=ARGUMENT("szArgOne")
=ARGUMENT("intArgTwo")
=RETURN(vMYFunction(szArgOne, intArgTwo))
Here's how the function itself would be set up:
Function vMYFunction(szArgOne as String, intArgTwo as Integer) As String
…
End Function
These steps make it possible for your add-in to be loaded on demand. Once the add-in is loaded, it is not removed from memory until the current instance of Microsoft Excel is terminated.
Microsoft Excel 97 has added two new registry keys, which are read at startup, and which create menu items that provide entry points into an add-in without having to load the add-in until a pertinent menu command is issued. These new keys are the Init Menus and the Init Commands registry keys. The Delete Commands key, which you can use to remove menu items, is also documented in this section.
The Init Menus key
The key HKEY_CURRENT_USER\Software\Microsoft\Office\8.0\Excel\Init Menus contains one string value for each menu that is added to a built-in menu bar. Each value name is a unique tag that identifies the menu item that is created. The string has the following syntax:
Value_name = Menu_bar_num,Menu_name,Menu_position,[Menu_parent]
| Argument | Description |
| menu_bar_num | Number of the built-in menu bar to which you want to add the menu. The menu bars change, depending on the type of sheet that is active in the workbook. The menu bar numbers are as follows: 3 Nil menu bar (no open workbooks) 10 Worksheet, dialog sheet, version 4.0 macro sheet 11 Chart sheet 12 Visual Basic module |
| menu_name | Name of the new menu. |
| menu_position | Position of the new menu on the menu bar. This may be the name of the menu after which you want to place the new menu, or a number indicating the menu's position from the left end of the menu bar. |
| menu_parent | <Optional> If defining a submenu, this is the menu name or number on the menu bar that will contain this new submenu. |
The Init Commands key
The HKEY_CURRENT_USER\Software\Microsoft\Office\8.0\Excel\Init Commands contains one string value for each command that's added to a menu. Each value name is a unique tag that identifies command that is added. The string has the following syntax:
Value_name = Menu_bar_num,Menu_name,Command_name,Macro,
Command_position,[Macro_key],[Status_text],[Help_reference]
| Argument | Description |
| menu_bar_num | Number of the built-in menu bar to which you want to add the menu. The menu bars change, depending on the type of sheet that is active in the workbook. The menu bar numbers are as follows: 10 Worksheet, dialog sheet, version 4.0 macro sheet 11 Chart sheet 12 Visual Basic module |
| menu_name | The name of the menu or submenu. Submenus are indicated by a "menu\submenu" string. The backslash delimits the menu name from the submenu name. The submenu must already exist or be declared in the Init Menu registry key. |
| command_name | Name of the new command. |
| macro | Reference to a procedure in an add-in workbook. Choosing the command opens the add-in and runs this procedure. The procedure should delete the command added by this registry key and then replace it with a command that runs a procedure that performs the command actions. |
| command_position | Position of the command on the menu. This may be the name of the command after which you want to place the new command, or a number indicating the command's position on the menu. If omitted, the command appears at the end of the menu. |
| macro_key | <Optional> Key assigned to the procedure, if any. |
| status_text | <Optional> Message to be displayed in the status bar when the command is selected. |
| help_reference | <Optional> Filename and topic number for a custom Help topic for the command. |
Delete Commands key
You can use the Delete Commands key to delete commands from built-in menus. The Add-In Manager (click Add-Ins on the Tools menu) reads and writes values in the Delete Commands key. The key contains one string value for each command that is deleted from a menu. Each value name is a unique tag that identifies the deleted command. The string has the following syntax:
Value_name = Menu_bar_num,Menu_name,Command_position
| Argument | Description |
| menu_bar_num | Number of the built-in menu bar to which you want to add the menu. The menu bars change, depending on the type of sheet that is active in the workbook. The menu bar numbers are as follows: 3 Nil menu bar (no open workbooks) 10 Worksheet, dialog sheet, version 4.0 macro sheet 11 Chart sheet 12 Visual Basic module |
| menu_name | Name of the new menu. |
| menu_position | Position of the command on the menu. This may be the name of the command or a number indicating the command's position on the menu. |
Caution! Don't delete the Exit command from the File menu unless you've created another way to quit Microsoft Excel!
To demand load a PowerPoint add-in, you have to create a DLL to add PowerPoint menu items and toolbars when PowerPoint is loaded; there is no other way to demand load an add-in in PowerPoint.
To add a DLL, you create a key with the name of the DLL add-in under the \Office\8.0\PowerPoint\DLL Addins\ key in the Windows Registry. Under the DLL add-in key, you have to add three named values: AutoLoad, InitFunction, and Path.
The DLL add-in would add the necessary menu items and toolbars and set the OnAction property of the menu toolbar item to the name of a fully qualified macro name in a Visual Basic for Applications add-in file (*.ppa, *.pwz).
To implement a demand loaded scheme, you need to use late bound code. In this situation, you're also responsible for opening and closing templates (see "Calling Routines Using Late Bound References" ).
You may want to write code that will execute when you load or unload an add-in. For example, when the add-in loads you may want to run a procedure that displays a toolbar whose buttons give the user easy access to procedures in the add-ins. Or you may want a procedure that removes the toolbar when the add-in is unloaded. Word, Microsoft Excel, and PowerPoint each give you a way to do this.
Microsoft Excel 97 has added the AddinInstall and AddinUninstall events, which are fired in an add-in when the user loads or unloads it. The events are fired whether the user loads or unloads the add-in using the Add-ins dialog box from the Tools menu or programmatically using the Installed property of the AddIn object. The AddinInstall and AddinUninstall events are the ideal place to add entries to the Init Menus and Init Commands registry keys.
You can use the Open event procedure of a workbook to handle registering the workbook and adding it to the Add-in dialog. In the following example, the AddinInstall and AddinUninstall event procedures contain trivial code instead of code to modify the Microsoft Excel environment, which they would normally contain.
Option Explicit

Private Sub Workbook_AddinInstall()
    ' Add code to customize the Microsoft Excel UI here.
    MsgBox "Addin Installed"
End Sub

Private Sub Workbook_AddinUninstall()
    ' Add code to remove customizations of the Microsoft Excel UI here.
    MsgBox "Addin Uninstalled"
End Sub

Private Sub Workbook_Open()
    '''Check to see if add-in is loaded in Microsoft Excel's AddIn list.
    Dim wkbAddIn As Excel.AddIn

    On Error GoTo Errorhandler
    Set wkbAddIn = AddIns(ThisWorkbook.Name)
    If wkbAddIn Is Nothing Then
        ' Setting the CopyFile argument to true will cause the add-in
        ' to be copied to the local harddisk if it is on a removeable
        ' medium.
        Set wkbAddIn = AddIns.Add(ThisWorkbook.FullName, True)
        ' The next line will cause the Workbook.AddInInstalled event
        ' to fire.
        wkbAddIn.Installed = True
    End If

    ' Initialize add-in here.

    Exit Sub
Errorhandler:

    ' Only ignore "Subscript out of range" errors.
    If Err.Number = 9 Then
        Err.Clear
        Resume Next
    Else
        ' Assert the error when in Debug mode.
        #If DebugMode Then
            AssertError
        #End If
        ' Insert other error handling code here.
    End If
End Sub
Instead of supporting events, as in Microsoft Excel, a PowerPoint add-in supports the Auto_Open Sub procedure, which runs when it is loaded, and the Auto_Close Sub procedure, which runs when it is unloaded.
Note The Auto_Open and Auto_Close procedures are only executed if they reside in a PowerPoint add-in file. If they reside within a presentation file (*.ppt), they are not executed when the presentation is loaded.
When you create a template in Word, you can create procedures named AutoExec and AutoExit, which run when the template is loaded or unloaded. For example, you can use AutoExec and AutoExit procedures to display or hide toolbars when a user loads or unloads the template.
You can also create AutoExec and AutoExit modules which each contain a Sub procedure named Main. The procedure called Main in the AutoExec module will run when the project is loaded, and the procedure called Main in the AutoExit module will run when the project is unloaded
Note If the file is opened as a document, the AutoExec macro or module does not execute. Instead, the AutoOpen procedure and/or Document_Open event procedure execute. For more information on Word document events, see "Using Events with the Document Object" in the Help file.
The following example initiates the monitoring of application events so that you can subsequently use the events of the Application object. The first two routines should be placed a class module named CAppEvents, and the last should be placed in a standard module named AutoExec. The Main Sub procedure in the AutoExec module, which is automatically called when the template that contains these modules is loaded into memory, instantiates the CAppEvents class defined in the class module. The Class_Initialize event sets the App variable to the Application object. Visual Basic will then run the DocumentChange event procedure whenever the active document changes.
' Class module named CAppEvents
Public WithEvents App As Word.Application

Private Sub Class_Initialize()
    ' Make the class self-initializing by connecting the object declared
    ' in the class module with the Application object.
    Set App = Application
End Sub

Private Sub App_DocumentChange()
    ' Display a message box with the active document name.
    If Documents.Count > 0 Then MsgBox ActiveDocument.Name
End Sub


' In a standard module named AutoExec
Global AppEvent As CAppEvents

Public Sub Main()
    ' Instantiate and initialize the CAppEvents class. This is all
    ' that is needed to have the above class work.
    Set AppEvent = New CAppEvents
End Sub
In Word, you may want to include code to manipulate an add-in in the document event procedures Open, Close, and New, which run when the global template is opened or closed as a document or when a new document is created based on it. You may also want to use the application event procedures Startup, Quit, and DocumentChange. Be aware that before you can use application events, you must create a new class module, declare an object of type Application using the WithEvents keyword, and instantiate the class. For more information on Word application and document events, look up "events" on the Index tab of Word Visual Basic for Applications online help.
Important If AutoClose, AutoNew or AutoOpen macros and corresponding event procedures exist in the same document, both the macros and the event procedures will execute.
Before you package your solution as an add-in or global template, check your code for potential trouble spots.
Remember that if the code in your add-in or global template code contains an explicit or implicit reference to the active workbook or document, it will to refer to whatever workbook or document happens to be active when the code in your add-in runs. If you want to make sure your code refers to the add-in or global template itself, use ThisWorkbook or ThisDocument.
For example, both of the following code samples call the worksheet named "Addin Definition" in whatever workbook happens to be active when the code runs. The first contains an explicit reference to the active workbook, using the property ActiveWorkbook. The second makes an implicit reference: because it doesn't explicitly refer to a specific workbook, the reference is assumed to be to the active workbook:
Sub ExplicitReference()
    Set rMnuTable = ActiveWorkbook.Worksheets("Addin Definition")._
                    Range("MenuDefinition")
    Add_Menu rMnuTable
End Sub

Sub ImplicitCode()
    Set rMnuTable = Worksheets("Addin Definition")._
                    Range("MenuDefinition")
    Add_Menu rMnuTable
End Sub
The following code uses the ThisWorkbook property to refer to the workbook in which the code is running—that is, the add-in workbook.
Sub CorrectCode()
    Set rMnuTable = ThisWorkbook.Worksheets("Addin Definition") _
.Range("MenuDefinition")
    Add_Menu rMnuTable
End Sub
If you want to call functions, subroutines, and classes that are in one project from another project, the calling project must have a reference to the called project. For example, if A.XLA is calling procedures in B.XLA, then you need a reference in A.XLA to B.XLA.
Note You cannot create references to PowerPoint presentations—you can only create references to PowerPoint add-ins. If you want to make the code in a presentation available to other presentations, save the presentation as an add-in, and create a reference to the add-in file.
Before you can create a reference to one project from another, you must make sure they have different names. You can view and change the default name of a project either in the Properties window or in the Project Name box of the Project Properties dialog box (right click on the project name in the Visual Basic environment, and click on the project's properties).
After you have given the projects distinct names, you can set a reference manually using the References dialog box from the Tools menu or programmatically, using the AddFromFile method of the References collection. The following line sets a reference from the active workbook to the project in the add-in MyTools.xla:
ActiveWorkbook.VBProject.References.AddFromFile "C:\Tools\MyTools.xla"
Note that before you can write code to set a reference in Microsoft Excel, Word, and PowerPoint, you must first set a reference to the Visual Basic for Applications Extensibility type library. This type library provides objects that you can use to work with a Visual Basic for Applications project programmatically.
Note The Auto_Open routine within a referenced add-in is not executed when it is loaded by reference from another add-in file or presentation.
When you save and distribute an add-in or template, the references that have been set for its project travel with it. However, if the add-ins or templates that are referenced aren't in the same location on the user's machine as they were on the solution developer's machine, the calling add-in may not be able to resolve its references. If the references cannot be resolved, an error occurs, and the solution won't execute.
In PowerPoint, Visual Basic tries to resolve the reference by looking for the referenced add-in only in the same folder as the calling presentation or add-in.
In Word and Microsoft Excel, Visual Basic tries to resolve the references by looking for the referenced file in the following locations:
In Microsoft Excel, Visual Basic also looks in the folders appended to the Addin Path registry value.
If the reference is not found after completing the above search, the execution of the solution is halted.
Here are a few methods you can use to resolve the reference issue.
This is the most common solution. It's very simple and least likely to fail.
Microsoft Excel 97 provides the HKEY_CURRENT_USER\Software\Microsoft\Office\8.0\Excel\Microsoft Excel\Add-in Path registry value, which points to folders where Microsoft Excel looks for add-ins. The Add-in Path value is a single string that consists of multiple paths delimited with semi-colons (;). When you install Microsoft Excel, the Setup program inserts paths to the Library, Analysis and Solver folders. Other setup programs may modify the "Add-in Path" value. All setup programs that write to this key must be polite and append entries. Uninstall programs that remove files and registry entries must only remove the portion of the Add-in Path value that applies to the application that is being uninstalled.
You can use the GetEnvironmentVariable and SetEnvironmentVariable API functions to append the solutions folder temporarily, or you can append it permanently writing to the Autoexec.bat Path statement. The following code example uses GetEnvironmentVariable and SetEnvironmentVariable to temporarily append the folder path to the Path environment variable:
Option Explicit

Private Declare Function GetEnvironmentVariable Lib "kernel32" _
        Alias "GetEnvironmentVariableA" (ByVal lpName As String, _
                                         ByVal lpBuffer As String, _
                                         ByVal nSize As Long) As Long

Private Declare Function SetEnvironmentVariable Lib "kernel32" _
      Alias "SetEnvironmentVariableA" (ByVal lpName As String, _
                                       ByVal lpValue As String) As Long
'AppWord is a user defined compile directive.
#If AppWord = True Then
Public Sub AutoExec()
    AppendEnvironmentPath ThisDocument
End Sub
#End If

'AppExcel is a user defined compile directive.
#If AppExcel = True Then
Public Sub Workbook_Open()
    AppendEnvironmentPath ThisWorkbook
End Sub
#End If

Private Sub AppendEnvironmentPath(ThisDocObject as Object)
    Const ENV_PATH As String = "Path"

    Dim iRet As Long
    Dim szPath As String

    szPath = String$(1024, 0)
    ' Retrieve the current environment setting.
    iRet = GetEnvironmentVariable(ENV_PATH, szPath, 1024)
    If iRet Then
        ' iRet contains the length of the returned string.
        ' trim any trailing characters.
        szPath = Mid$(szPath, 1, iRet)
        ' See if the templates path is included in the path statement.
        If InStr(1, szPath, ThisDocObject.Path, vbTextCompare) = 0 Then
            ' Path is not part of the environment.
            szPath = szPath & ";" & ThisDocument.Path
            iRet = SetEnvironmentVariable(ENV_PATH, szPath)
            If iRet = 0 Then
                ' Handle error here. Template path was not appended to
                 ' environment.
                Err.Raise vbObjectError + Err.LastDllError, _
                    ThisDocObject.Name & ".AppendEnvironmentPath", _
                   "Path environment was not set."
            End If
        End If
    Else
        ' should raise an error here. This should never happen ...
        Err.Raise vbObjectError + Err.LastDllError, ThisDocObject.Name &_
                ".AppendEnvironmentPath", "No path environment was found."
    End If
End Sub
This type of component is best suited for three-tier solutions. The reference broker could dynamically link the front-end component to backend components based on version, security level or other parameters determined by an administrator. This technique could be used to update components of a solution on the fly. This provides IS managers an easy way to maintain solutions on a WAN.
One way to determine whether a reference is valid, is to use the IsBroken property of the Reference object. For more information about using the IsBroken property, refer to online Help in the Office applications.
If you want to load an add-in file temporarily and execute a routine from the add-in, use Application.Run add-in or presentation file name!macro name (where Application represents the PowerPoint Application object) and then immediately unload the add-in. When Application.Run is executed, Microsoft PowerPoint will load the add-in and execute the specified macro. To immediately unload the add-in, set the Loaded property of the add-in to False.
Sub CallAddInMacro()
    Application.Run "d:\My Documents\MyAddIn.ppa!MyMacro"
    AddIns("MyAddIn").Loaded = False
End Sub
You can replace the last line of code with the following line:
AddIns(AddIns.Count).Loaded = False
You can call any public subroutine, function, property, or variable in the ThisDocument or ThisWorkbook class module of a document or workbook by using a late-bound reference to the associated Document or Workbook object. For example, the following statement sets an object variable to the Document object returned by the Open method and then calls the MySub routine in the ThisDocument class module of the document.
Dim objDoc as Object
Set objDoc = Documents.Open(szFileName)
objDoc.MySub
If the document represented by the objDoc variable didn't have a public subroutine called MySub in its ThisDocument class module, a runtime error would occur. You can only call code in the ThisDocument or ThisWorkbook class module this way. If you want to call code in other modules, classes, and forms of the project using this method, you can write wrappers in the ThisDocument or ThisWorkbook class module to access the other .
Note This technique does not work in Microsoft PowerPoint because no events are defined for a PowerPoint presentation and there is therefore no ThisPresentation class module in a PowerPoint project.
Setting the IsAddin property does not protect your source code. To protect your code, check Lock project for viewing and enter a password on the Protection tab of the project name Properties dialog box from the Tools menu. If you enter a password without checking Lock project for viewing, users can view your code, but they can't open the project name Properties dialog box unless they know the password. After you set the password for the project, save the project by clicking Save on the File menu of the Visual Basic Editor.
To unprotect your code, right-click the project name, click project name Properties, enter the project password, and clear Lock project for viewing and enter a password on the Protection tab of the project name Properties dialog box.
The procedure for creating an add-in varies in each Office application. In Microsoft Excel and PowerPoint, you save a file in a format specific to add-ins. In Word, you can save a document as a template (.dot) file.
When you turn a workbook into an add-in, worksheets in the workbook are hidden, and subroutines in the add-in project are hidden from the user (the routines don't appear in the Macros dialog box).
To create a Microsoft Excel add-in, set the IsAddIn property to True for the workbook that contains your code. One way to do this is to save a copy of the workbook that includes the Visual Basic project as a Microsoft Excel add-in. To do this, select the Microsoft Excel add-in file type (.xla) in the Save As dialog box from the File menu.
You can also set the property manually in the Visual Basic Editor. To do this, select "ThisWorkbook" in the Visual Basic Project Explorer. Now set the IsAddIn property in the Properties Window to True. When the IsAddIn property is True, the workbook is hidden in Microsoft Excel.
You can also set this property programmatically:
Note If you need to edit the workbook elements after creating the add-in, set the IsAddIn property to False. The workbook will become visible and editable. When you are done editing the add-in, set the IsAddin property to True, and save the workbook using the Save command on the File menu in the Visual Basic Editor.
When you save a copy of a presentation as an add-in, all slides in the presentation are discarded, and only the Visual Basic project associated with the presentation is compiled and stored in the newly created PowerPoint add-in (*.ppa) file. Subroutines in the add-in are hidden from the user (they don't appear in the Macros dialog box).
Before you save a presentation as an add-in, save it as a presentation (a .ppt file). Then, to create a PowerPoint add-in, save a copy of the presentation as a PowerPoint add-in. To do this, click Microsoft PowerPoint Add-In (*.ppa) in the Save As Type box in the Save As dialog box (File menu).
If you need to make changes to an add-in, modify copy of the presentation that has been saved as a .ppt file, and then create a new .ppa file from it.
Word does not support a separate add-in file format in the same way as Microsoft Excel and PowerPoint. A global template, or a template that has been loaded into memory so that its macro routines are available from any document, is the Word equivalent to Microsoft Excel and PowerPoint add-ins.
To create a global template in Word, from the File menu click Save As and, in the Save As Type box, click Document Template (*.dot).
Debugging add-ins and templates in Office 97 can be as simple as unprotecting the project and running the code.
To debug a Microsoft Excel 97 add-in while it is loaded, simply unprotect the Visual Basic for Applications project.
Note If you need to see the workbook while you are debugging the project, set the IsAddIn property to False.
In Microsoft PowerPoint 97, the process for testing, debugging and editing the contents of an add-in involves setting a registry value in the Windows Registry. By default, Microsoft PowerPoint does not display loaded add-ins in the Visual Basic Project Explorer. However, PowerPoint provides a value in the Windows Registry under the following key for solution providers to debug their add-ins:
HKEY_CURRENT_USER\Software\Microsoft\Office\8.0\PowerPoint\Options
Under this key, set the value of DebugAddins to 1. The next time Microsoft PowerPoint is launched, all loaded Visual Basic for Applications add-ins will be displayed in the Project Explorer in the Visual Basic Editor. You can then unprotect the project if necessary, expand the project, set breakpoints and step through your add-in code.
Setting the DebugAddins value to 1 also allows you to set breakpoints and step through the macro you have assigned to an action in a slide show using the Action Setting dialog box from the Slide Show menu. If DebugAddins is set to 0, the breakpoints are not honored.
In Microsoft Word 97, the process for testing, debugging and editing a template is much the same as it was in previous versions of Word. Open the global template, unprotect the project if necessary, and run the appropriate subroutine. You may want to minimize the template in the application workspace.
Your custom solution can be composed of many files. For example, it can contain a Microsoft Access database, a Word template, a Microsoft Excel workbook, and various ActiveX™ controls.
When you distribute a custom solution, you should make sure that the appropriate files are copied to the user's system, registry entries are created if necessary, and a shortcut to the custom application is created if needed.
The Microsoft Office Developer's Edition includes a Setup Wizard you can use to create a Setup program that users can run to install the files for your custom solution on their systems. The Setup Wizard displays a series of dialog boxes that prompt you for information about your custom solution. When you finish responding to all the dialog boxes, the wizard creates a set of folders, known as disk images, on your hard disk. These folders contain your custom Setup program and the files needed for your custom solution. You can then copy the contents of the folders to floppy disks, a network location, or a compact disc.
Depending on the settings you specify when you run the Setup Wizard, the Setup program for your custom solution can:
This section demonstrates how to run the Setup wizard to create a custom setup program. The sample solution used contains three files: a document describing the application, an Microsoft Excel add-in that is run from a menu command, and an Microsoft Excel add-in that contains demand loaded worksheet functions.
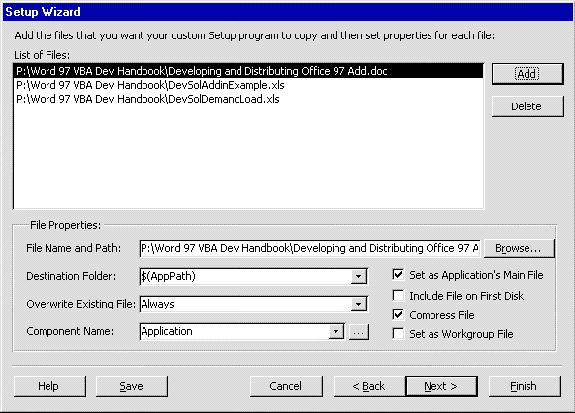
When you run the Setup Wizard, you first list the files that you want your custom Setup program to copy. The wizard provides an Add button that you can use to add files to a List of Files to Copy list box. The first file added should be the main file of the application. In the solution shown, the main application file is the document.
Figure 1. The Setup wizard
After adding the main file, add all other files you want to distribute with your custom solution. If you used any additional ActiveX controls on forms or documents, be sure to include the .ocx file in the list of files to copy.
The Setup Wizard contains three destination folder roots: the Application path, Windows path and Windows System path. The Application path, $(AppPath), is defined by the user at installation time. Components such as ActiveX controls that are used only by the solution should be installed into the application folder. Shared components are best installed in the Windows System folder, $(WinSysPath).
Note The reason to keep ActiveX components that are not shared (not used by other applications) with the application is to prevent any file naming conflicts from occurring. Clients of the ActiveX control use the registry to find and load the control. The ActiveX technology uses a GUID (Globally Unique Identifiers) to guarantee that the interfaces defined in the registry are unique to the control.
Paths can be appended to a root path. For example a destination folder $(AppPath)/Data would be the "Data" subfolder where the user chose to install the application.
You can group the files in your solution into components. This can be useful if you have different levels of users who require different components. For example, you can define a Help component that includes all the .hlp files for your custom solution. A user can choose whether to include the Help component when running your Setup program.
To define a component, click the ellipses (. . .) button next to the Component Name list box on the second screen of the Setup Wizard. The Components Builder dialog box enables you to add and delete component names. To define which files you want to include with each component, select a file under List of File Names in the Component Name list box, and then select the component in which you want to include the file.
The sample solution has only the Application component group, which is required for all installations.
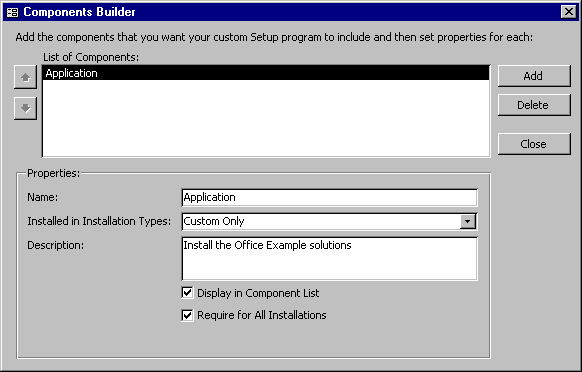
Figure 2. The component builder
Clicking Next will display the Add Shortcuts panel, where you can add shortcuts for you solution. For the sample solution shown, a shortcut is added to the documentation file.
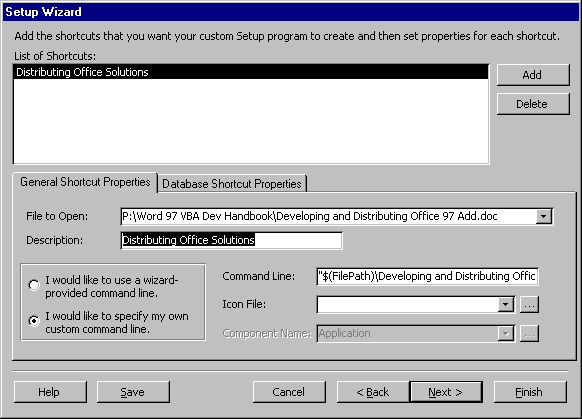
Figure 3. Adding shortcuts with the Setup wizard
Clicking Next will display the Add Registry values panel. For Microsoft Excel add-ins, this is an important step. Here you can add menus, and commands and load add-ins without ever having to load Microsoft Excel. The following steps demonstrate adding a command called "Example Macro. . ." to the Microsoft Excel Tools menu via the registry.
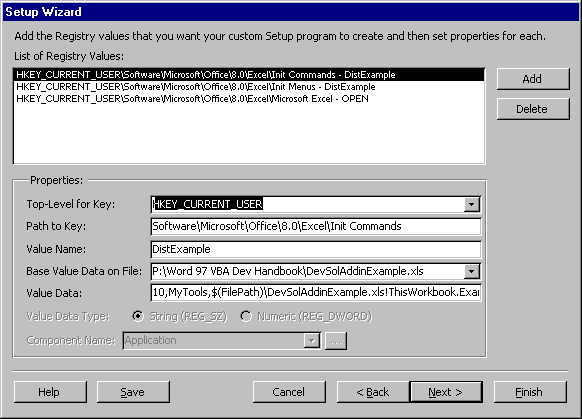
Figure 4. Adding registry values with the Setup wizard
Gathering information from the user or environment might best be done by running a program after the Setup program is finished. This could be done by opening up a Word or Microsoft Excel document and using the Open event handler to execute a Visual Basic for Applications macro. Frequently it is easier for Word or Microsoft Excel to do this type of setup than a setup tool. In the Execute Application panel in the Setup Wizard, select the document or file that should open after the setup completes.
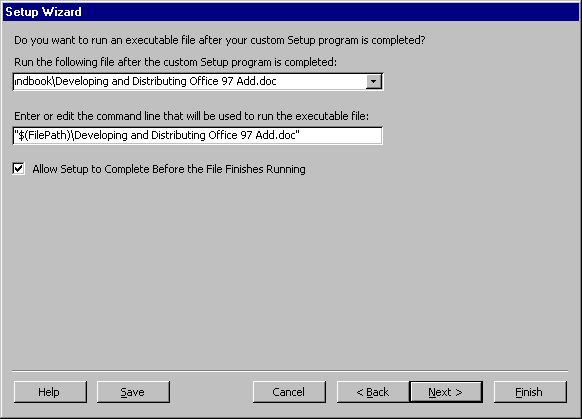
Figure 5. Setting which application will open after custom Setup is complete
After completing the information on the type of installation, you want to build, click Finish to complete the wizard.
After the Setup Wizard finishes creating a distribution disk set for your add-in, you should test the Setup program. The test system should have the minimum installation of each target OS and minimum installation of Office. Developers commonly have a complete installation of Office and don't realize that a solution they have created may depend on a component that is not included with a typical Office installation.
If you are targeting an international market, test your solution with international versions of the target OS and Office applications. Most international issues can be solved by changing the International settings in the Control Panel to those of the appropriate country. For more information on international issues, see the Readme document that ships with the Setup Wizard. It is more common for Control Panel settings to bring out bugs in your code than the language of the OS.
Setup should be tested from floppy disk images, CD-ROM, the local hard disk, and the network. Testing across the network should include both mapped drives and UNC connections.
Microsoft Office should be installed in path configurations different from that of the developer who created the solution. The locations for key features such as templates, startup directories, and workgroup information files should be changed to non-default settings.