| Microsoft Access 2000: Building Applications with Forms and Reports |
CHAPTER 1
After you become familiar with the Microsoft® Access interface and learn how to create tables, queries, forms, reports, and data access pages, you can make your database easier to use by tying these objects together in an application. This chapter explains what an Access application is and presents an overview of the steps required to build one, either with the Database Wizard or on your own. When you finish reading this chapter, you'll be ready to create your first Access application.
Chapter Contents
What Is a Microsoft Access Application?
Creating an Application with the Database Wizard
Creating an Application on Your Own
Designing a Startup Form
Connecting Your Application's Objects
Command Bars: Menu Bars, Toolbars, and Shortcut Menus
Setting Startup Options
Making Key Assignments
People use a database to perform data management tasks, such as storing, retrieving, and analyzing data about orders and customers. An Access application is made up of the same objects as an Access database—tables, queries, forms, reports, data access pages, macros, and modules. The objects are stored in one or more Access database (.mdb) files. What makes an application different from a database is that the objects are tied together into a coherent system. An application organizes related tasks so that the user can focus on the job at hand, not on how the application works or on the program used to develop the application.

The keys to a Access application are its objects, their properties, and the events that occur on forms. Here's how it works:
An application consists of objects Your application is made up of objects that users see and use directly (forms, reports, and data access pages) and supporting objects that control how the forms, reports, and data access pages work (tables, queries, macros, and modules). You build the forms and other objects in their respective Design views.
Objects have properties you can set You set objects' properties to make them look and behave the way you want. For example, all forms have a DefaultView property that specifies whether a form should appear in Form or Datasheet view. Once you set the property, the form opens automatically in the correct view. By setting properties, you make your objects behave more intelligently.
Forms respond automatically to events When people use the forms in your application, their actions—changing data in a field, clicking a command button, moving the mouse—are recognized by Access as events. Access responds to these events automatically. For example, when a user changes the data in a text box, Access checks to make sure that the data is the correct data type. When a user clicks a command button, Access displays the button so it appears pressed in.
You can add your own, custom response to an event You can use either a macro or an event procedure to add the response you want to an event. An event procedure is a Visual Basic® for Applications (VBA) procedure you write that's attached to a form, report, or control; Access runs it when a specified event occurs. You specify in the event procedure or macro what you want to take place when the event occurs. For example, you can change object properties, open or close objects, or manipulate data. You use event properties to determine whether Access runs a macro or an event procedure in response to an event. For example, to have a macro run in response to a command button's Click event, you set the button's OnClick event property to the name of the macro.
You can extend VBA with external libraries In addition to writing your own event procedures, you can use VBA to call external procedures in Microsoft Access library databases (MDAs) and in dynamic-link libraries (DLLs). For example, you can enable or disable menu commands by calling functions in the DLLs that are part of Microsoft® Windows®.
See Also For more information about external libraries, see Chapter 10, "The Windows API and Other Dynamic-Link Libraries" and Chapter 11, "Add-ins, Template, Wizards, and Libraries", in the Microsoft Office 2000/Visual Basic Programmer's Guide (Microsoft Press, 1999). You can also find this guide in the Office Developer Documentation section of the Microsoft Developer Network (MSDN) Online Library.
The following illustration shows the building blocks of an Access application, starting at the top with the elements you work with most frequently.

If you've developed database applications using other products, you may expect to write a Main program in the VBA language that makes your application work. The Main program would be the application's brain; you'd use it to tell the objects how to appear and react, and how to process the data, much as the manager of an office delegates different projects.
With Access, the objects manage themselves by responding to events that occur within your application. There is no Main program. For example, suppose you want something to happen when the user clicks a button. You don't need code that checks to see whether the user clicks the button. You attach the code to the button so it's run when the Click event occurs. When the event occurs, Access runs your code automatically.
The easiest way to create many common applications is with the Database Wizard. With the Database Wizard, you can choose from a variety of templates for applications that can help you with such tasks as entering orders, tracking business contacts, and controlling inventory. The Database Wizard asks you questions about the application you want to create, and then creates all objects in the application for you.
To create an application with the Database Wizard
The Database Wizard creates your application's tables, forms, and reports, adding VBA event procedures to some of the forms. In addition, it creates a Switchboard form that guides users through the application, helping them navigate by clicking buttons on the form.
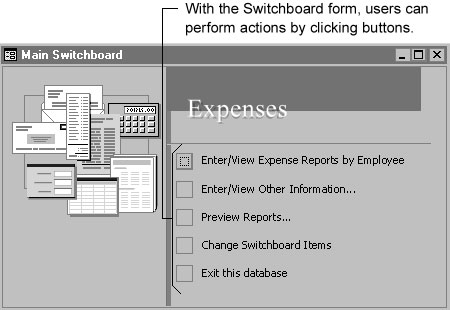
After you've created an application with the Database Wizard, you can customize it to meet your needs. For example, you can add VBA event procedures to the application's forms, or you can add forms, reports, and data access pages to supplement the objects the Database Wizard creates.
If you add forms, reports, or data access pages to the application, you'll want to include them on the Switchboard form so users can access them easily. You can add, rename, or delete items on the application's Switchboard form by using the Switchboard Manager database utility.
To customize the Switchboard form created by the Database Wizard
Note The Change Switchboard Items button on the default Switchboard form created by the Database Wizard runs the Switchboard Manager database utility. If you want to remove this button, you can run the Switchboard Manager from the Database Utilities submenu (Tools menu). Always use the Switchboard Manager to modify the Switchboard form created by the Database Wizard, rather than modifying the form in Design view. The Switchboard form works by using entries in the Switchboard Items table that describe what the buttons on the form display and do; if you make design changes to the Switchboard form, the application may no longer work.
However, if you want to use the tables, forms, and reports in a database you created with the Database Wizard, but want to change the way the application starts, you can create your own startup form to replace the one the Database Wizard creates. For more information, see "Designing a Startup Form" later in this chapter.
If the Database Wizard doesn't offer the type of application you want, or if you've already created database objects you want to transform into an application, you can build an application on your own. Begin by creating tables, and then create other objects in the order that feels most natural to you. Here's one approach that works well:
Step One: Plan the tables and relationships Before you begin creating actual objects, take time to plan the tables and relationships you need for your application. Analyze your data and break it down into distinct tables. You can find good examples in the Northwind sample application, or in a database you create with the Database Wizard.
Step Two: Create the tables and add a few records of sample data to each table You can create tables by using the Table Wizard, or by typing either in a datasheet or in table Design view. To ease data entry between related tables, add Lookup fields to tables on the "many" side of one-to-many relationships when you create the tables. After your table structure is complete, entering sample data makes it easier for you to see whether your forms and reports display the data you want.
Step Three: Create one of the forms in your application Start with a form that's used to enter most of the data in the application. You can use a form wizard to create the form for you, then you can modify the design or layout of the form that the wizard creates.
Step Four: Add the features you need to make the form work Create the macros, event procedures, or functions you need to support the form.

Step Five: Add other forms, reports, and data access pages When the first form stores and displays data the way you want it to, start adding other forms, reports, and data access pages. Work on one object at a time, testing its features until you know it works correctly before going on to the next object.
Step Six: Connect the objects with buttons, hyperlinks, menus, and toolbars Provide a path for users to navigate through your application. Add command buttons, hyperlinks, custom menus, and custom toolbars to your forms, and add macros or VBA code to respond to your users' input. You may want to add pop-up forms that act as dialog boxes to collect input from your users.
Step Seven: Designate a startup form and put the final touches on your application In this final step, designate the form that appears when the user starts your application and specify other options such as the caption that appears in the title bar.
In an Access application, forms aren't just screens for entering and editing data—they make up most of your application's interface. To your users, forms are the entire application. By building your application around forms, you can control the flow of your application through the events that occur on the form.
Forms provide an additional behind-the-scenes benefit when you use macros or event procedures to tie your objects together. In addition to using forms as your application's interface, you can use fields on hidden forms to store and pass values from form to form or from operation to operation. For example, suppose you want to provide your users with the ability to enter a range of dates in a dialog box and then print a series of reports based on that range of dates. The dialog box is a form that you create. When the user clicks OK in the dialog box, you hide the form rather than close it. Now the dates that the user enters are available to the macro or code that prints each of the reports.
See Also For an example of hiding a dialog box, see Chapter 3, "Using Forms to Collect, Filter, and Display Information."
One effective approach to organizing and presenting tasks in an application is to use a startup form as a control center for the application. The startup form provides navigation to all tasks; it's the first form you see when you start the application. One example of this type of form is the Switchboard form that the Database Wizard creates. In an application you create from scratch, however, you have more flexibility in how your application starts.
When designing a startup form, try to bring your users' primary tasks as close to the surface of the application as possible. For example, if your application focuses on one task, you could use a form for that particular task as your startup form. The Orders sample application is a good example of such an application. Its startup form is the Orders form. Sales representatives can complete their primary task and navigate to related tasks from this form.

To see this form, open the Orders sample application (Orders.mdb), located on the Microsoft Developer Network (MSDN) Online Web site. You can download the Orders sample application and associated Help files from the Microsoft Developer Network (MSDN) Online Web site.
If, in contrast, your application contains numerous forms, reports, and data access pages, and you can't predict which one a user would want to use first, you can start the application by displaying a form that acts more like a switchboard. This type of form often uses command buttons to group related objects and tasks.
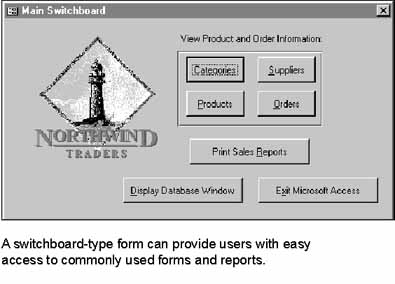
To see this form, open the Northwind application in the Samples subfolder of the Office folder.
The Developer Solutions sample application, which shows different ways to address common application design issues, has another type of startup form. Its startup form is a navigation tool you use to find the solution you want.
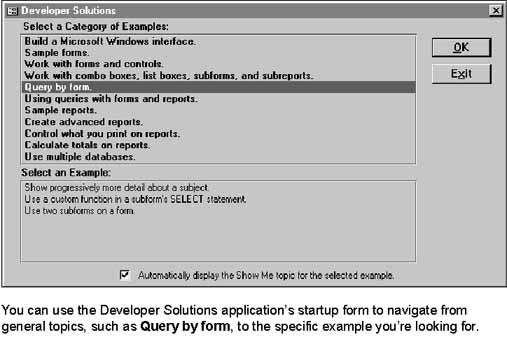
To see this form, open the Developer Solutions sample application (Solutions9.mdb), located in the Microsoft Office 2000/Visual Basic Programmer's Guide CD (Microsoft Press, 1999), and Microsoft Office 2000 Developer. You can download the Developer Solutions sample application and associated Help files from the Microsoft Developer Network (MSDN) Online Web site.
These are only a few of many possible approaches you can use for an application's startup form. After you devise a plan that will help your users navigate between forms and tasks in your application, and after you design your startup form, you're ready to define how you want the application to start.
See Also For information about specifying a startup form, see "Setting Startup Options" later in this chapter.
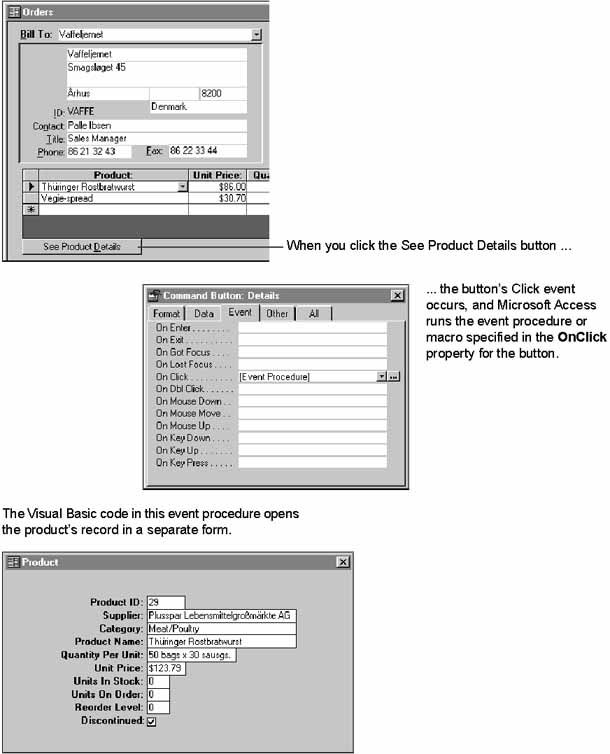
Simply getting the individual objects in your application up and running isn't enough. You need to connect the dots—tie the objects in your application together into a coherent system that's designed for the particular tasks your users are trying to accomplish. You connect the dots by running macros or event procedures in response to the events that occur on the forms or reports in your application.
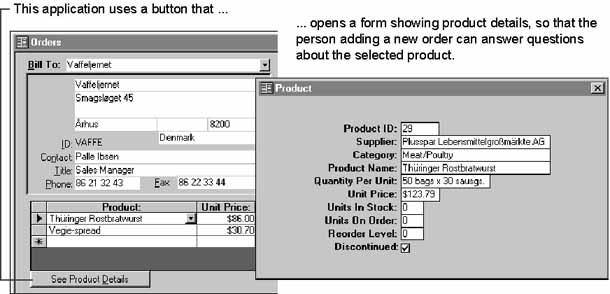
The following illustrations show how you can tie separate objects together into a custom system for entering orders. In the illustrated application, the Orders form is the startup form. When you start the application, the Orders form opens automatically. People who take orders can do all their tasks with this one form.
In database applications, you often need to automate bulk updates of records—in order to delete and archive inactive customer records, for example. If you're an experienced application developer, you may have found that operations like this can require writing many lines of code. But in an Access application, you can usually manipulate sets of records more easily with action queries than with code. The action queries—make-table, update, append, and delete—are often the most efficient way to change data. Running a predefined delete query, for example, is a much more efficient way to remove a lot of records than looping through records in a VBA procedure. You can define the query graphically in Design view, and then run it from the Database window. You can also write a macro that uses only two actions—SetWarnings and OpenQuery—to run the query. Then you can attach the macro to a menu command or a command button, or specify it as the event property setting for any event that occurs on a form.
See Also For information about how to create action queries that manipulate sets of records, type action queries in the Office Assistant or on the Answer Wizard tab in the Help window, and then click Search.
The preceding section showed that you can tie objects together not only by using one object to open another, but also by passing data from one object to the next. For example, when you click the Print Invoice button on the toolbar in the Orders sample application, you want the order displayed in the Orders form to be selected in the PrintInvoiceDialog form.
How do you do it? Using a macro or an event procedure, you identify the value you want to pass from the open object—usually the value of a control on a form. Because you may have many forms open at one time in your application, Access requires a specific syntax structure to identify the control that contains the value you want.
Tip When you name the tables, fields, and other objects in your database, keep in mind that you'll use these names to refer to the objects elsewhere in your application. Although descriptive names for objects with spaces are easier to recognize than more compact names, they can be difficult to use in expressions, SQL statements, and VBA code. If you are creating a database that uses these advanced features, you may want to use short, consistent names that don't contain spaces and are easier to remember and type—for example, field names such as LastName and Phone.
To refer to an object or a value, you start with an object or a collection of objects and identify each element in turn. A collection groups objects, such as the forms or controls in the current database, as shown in the following illustration.
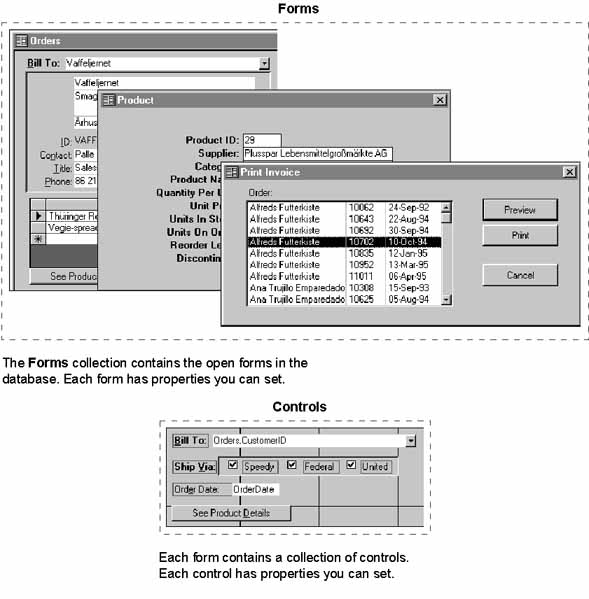
To refer to an element of a collection, such as the Forms collection, use the ! operator. To refer to the Orders form, for example, use the following expression:
Forms!Orders
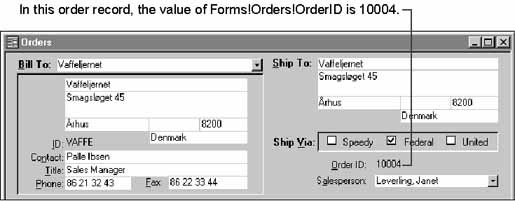
Each form contains a collection of controls. To refer to the OrderID control on the Orders form, for example, use the following expression:
Forms!Orders!OrderID
You refer to a control to get, set, or pass its value.
To refer to a property, use the . (dot) operator before the property name. You use this operator before properties, methods, actions, and collections. For example, to refer to the Visible property of the Orders form, use the following expression:
Forms!Orders.Visible
To refer to the OrderID control's Visible property on the Orders form, use the following expression:
Forms!Orders!OrderID.Visible
Tip If you want help referring to an object or property, use the Expression Builder. With the Expression Builder, you can simply select the object you want from a list, and the Expression Builder writes the reference for you with all the operators in the correct places. To display the Expression Builder, right-click where you want to enter the expression, and then click Build on the shortcut menu.
See Also For information about objects and collections, see Chapter 4, "Working with Objects and Collections."
As an application developer, you determine how people navigate through your applications and complete their tasks. Navigating in an Access application usually means moving from control to control within a form or switching between forms.
Navigation within a form Within a form, navigation from control to control should follow the natural flow of the task—your users shouldn't have to bounce from the top of the form to the bottom and then back to the top again in order to complete one task. Group controls logically so that users can focus on one area of the form at a time. Define how a user moves from control to control on a form with the keyboard by setting the AutoTab, TabStop, and TabIndex properties. If controls are used to find or filter records, place them in the form header or footer to show they're separate from the other fields in the current record.

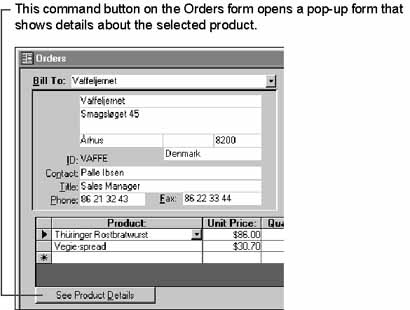
Navigation from one form to another form and completing tasks Nothing says you must use one approach over another to navigate from form to form or to complete a task; however, it's a good idea to provide your users with ways to navigate that are common to other Windows-based applications. It's also a good idea to be consistent within your application—to do similar tasks on different forms in similar ways. Here are some common navigation devices used in Windows-based applications:
See Also For information about creating a button with a wizard, type Command Button Wizard in the Office Assistant or on the Answer Wizard tab in the Help window, and then click Search.
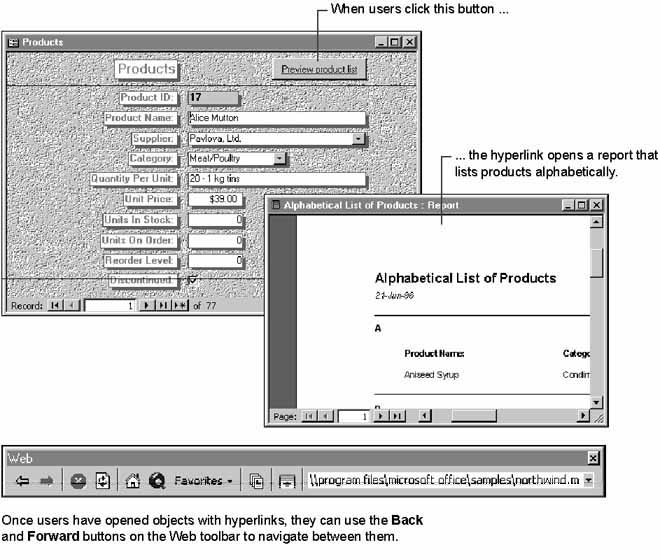
See Also For information about creating a hyperlink, type hyperlinks in the Office Assistant or on the Answer Wizard tab in the Help window, and then click Search.
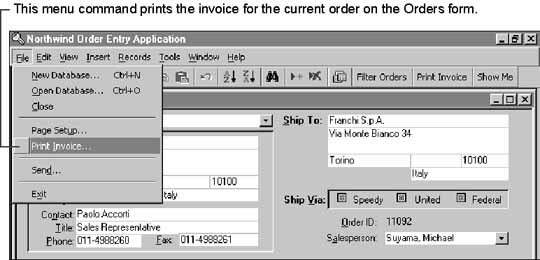
See Also For more information about creating a menu bar, see "Creating New Menu Bars, Toolbars, and Shortcut Menus" later in this chapter.

See Also For information about creating a toolbar and custom buttons, see "Creating New Menu Bars, Toolbars, and Shortcut Menus" later in this chapter.
See Also For information about making key assignments, see "Making Key Assignments" later in this chapter.
In Access, the internal workings of menu bars, shortcut menus, and toolbars are unified into a single object called a command bar. Because they share the same underlying technology, you have more flexibility when you customize existing Microsoft Access menu bars, toolbars, and shortcut menus, and when you create new ones for your application.
Menu bars and toolbars are two ways to present commands on command bars: a menu bar typically presents drop-down menus of commands as text, and a toolbar typically presents commands as buttons. A shortcut menu is a subset of a menu bar, presenting one menu of commands when a user right-clicks most objects and controls in Access. You can create new shortcut menus and associate them with the forms, reports, or controls in your application.

Because menu bars, toolbars, and shortcut menus share the same internal workings, you can use most of the same controls on all three. For example, in addition to their typical controls, a top-level menu bar can use buttons, a drop-down menu can use combo box controls, and a toolbar can use drop-down menu buttons that display text-only commands. In this respect, command bars can be too flexible. Avoid confusing the users of your application by putting menu bar and toolbar controls in unusual locations or configurations. Instead, model your custom command bars after the ones used in Access.
The simplest way to work with command bars is by using the Customize dialog box (View menu, Toolbars submenu). You can use the Customize dialog box to customize existing command bars or to create new ones. New command bars can contain existing commands or new commands that run the event procedures or macros you define.
By default, users can customize command bars. Users can also make menu bars and toolbars free-standing by dragging them into the work area, or they can dock them to the sides or the bottom of the work area. In addition, users can resize or hide menu bars and toolbars. You can prevent users from customizing all command bars in your application in the Startup dialog box (Tools menu). You can prevent users from customizing, moving, or resizing an individual menu bar or toolbar by setting options in the Toolbar Properties dialog box, which is available from the Customize dialog box.
You can also use the objects, methods, and properties of the CommandBars collection in VBA code to create and work with command bars.
See Also For more information, see "Working with Command Bars in Code" later in this chapter.
Changes to existing command bars are always stored in the Windows Registry in the \HKEY_CURRENT_USER\Software\Microsoft\Office\9.0\Access\Settings \CommandBars key. When you create a new command bar, it is saved in a system table in the current database and is only available in that database. However, if you create an add-in database and store new command bars in it, they are available from any installation of Access that has the add-in installed.
Once you have customized an existing menu bar or toolbar, or created a new one, you can attach it to a form or report by specifying it in the MenuBar or Toolbar property for the form or report. To attach a shortcut menu to a form, report, or control, specify it in the ShortcutMenuBar property for the form, report, or control. You can also specify a global menu bar or a global shortcut menu to be available throughout your application by using the Startup dialog box (Tools menu).
Note Versions previous to Microsoft Access 97 use the AddMenu and DoMenuItem actions in macros to create custom menu bars and shortcut menus and to carry out standard Microsoft Access menu commands. If you convert a database created in these previous versions to Microsoft Access 97 or later, the macros that contain the AddMenu and DoMenuItem actions will still run; however, the later versions convert DoMenuItem actions in the macros to the new RunCommand action.
See Also For more information about the RunCommand action, type RunCommand action in the Office Assistant or on the Answer Wizard tab in the Help window, and then click Search.
Although these menu bar macros created with a version previous to Microsoft Access 97 will run from the forms, reports, or controls they are attached to, they won't be available in the Customize dialog box. However, you can create a Microsoft Access 97 or later–style menu bar or shortcut menu from a menu bar macro created in a previous version of Access.
See Also For more information about how to do this, type macros in the Office Assistant or on the Answer Wizard tab in the Help window, and then click Search.
You create all command bars, whether they are menu bars, toolbars, or shortcut menus, by using the Customize dialog box (View menu, Toolbars submenu). You create the different kinds of command bars by setting their properties and, if necessary, by setting properties for the commands within them to control how they appear and behave. The following procedures show how to create new menu bars, toolbars, and shortcut menus.
The first step in creating a new menu bar, toolbar, or shortcut menu is to create and name an empty command bar, set its type, and set other properties that control how it can be used.
To create an empty command bar and set its properties
Access creates an empty, floating command bar, which you can specify to be a toolbar, menu bar, or shortcut menu.
Note The Popup setting of the Type property is used for a shortcut menu because in the command bar object model, menus (on both menu bars and toolbars), submenus, and shortcut menus are all of this type. However, if a command bar has its Type property set to Popup, the Customize dialog box user interface only allows you to work with it as a shortcut menu. Additionally, as soon as you set a new command bar's Type property to Popup, it disappears because a shortcut menu can't display as free-standing. To add commands to your custom shortcut menu, you must display it. For more information, see "Adding Menus and Submenus to Command Bars" later in this chapter.
| To | Click |
| Allow users to dock the menu bar or toolbar both horizontally and vertically | Allow Any |
| Prevent users from changing how the menu bar or toolbar is docked | Can't Change |
| Allow users to dock the menu bar or toolbar horizontally only | No Vertical |
| Allow users to dock the menu bar or toolbar vertically only | No Horizontal |
| To | Clear this check box |
| Prevent users from making changes to the command bar by using the Customize dialog box | Allow Customizing |
| Prevent the new command bar from appearing on the Toolbars submenu (View menu) | Show On Toolbars Menu |
| To | Clear this check box |
| Prevent users from changing how a menu bar or toolbar is docked | Allow Moving |
| Prevent users from showing or hiding the menu bar or toolbar | Allow Showing/Hiding |
| Prevent users from resizing the menu bar or toolbar | Allow Resizing |
At this point, you have an empty command bar of the type you specified in step 5. If you created a menu bar, you need to add menus to it and then add commands to those menus. If you created a shortcut menu, you need to add commands to it. If you created a toolbar, you need to add buttons or other controls to it.
If you are creating a menu bar, you must add and name top-level menus, and then add commands to those menus. If you want an additional menu to open from a menu command, you can add a submenu to it. You can also add menus and submenus to toolbars, and submenus to shortcut menus.
Note In versions previous to Microsoft Access 97, you had to add a single top-level menu to create a shortcut menu. This is not necessary in Microsoft Access 97 or later.
To add a menu or submenu to a command bar
Note To display a custom shortcut menu, select the Shortcut Menu check box in the Toolbars list of the Customize dialog box. On the Shortcut Menu toolbar, click Custom and then click the name of your custom shortcut menu.
New Menu appears in the Commands box.
Tip You can create an access key for your menu names so that users can access your menus with the keyboard. To do so, type an ampersand (&) in front of the letter you want to use. For example, to use F as the access key for a menu named File, type &File. The F in your menu name is underlined and users can open the menu by pressing ALT+F.
See Also For more information about the settings in the Control Properties dialog box, see "Setting Properties for Command Bar Controls" later this chapter.
Once you have added all the menus and submenus to your command bar, you have the basic framework to contain the commands that you want to be available. If you are creating a menu bar, you have top-level menus and perhaps some submenus. If you are creating a toolbar, you may have added top-level menu buttons and possibly submenus within them. If you are creating a shortcut menu, you may have added submenus. The next step is to add commands to your menus and submenus, or buttons that carry out commands to your toolbar.
By using the Customize dialog box, you can add any existing Microsoft Access menu command, toolbar button, or other control to your new command bar. This includes all standard Microsoft Access menu commands and toolbar buttons, as well as drop-down combo box controls, such as the Font box, and special formatting controls, such as the Fill/Back Color and Special Effect controls.
To add an existing Microsoft Access menu command, button, or other control
Note You can add an entire menu of commands at once by using the commands in the Built-in Menus category. However, in most cases you shouldn't do this, because a menu created with the Built-in Menus category functions as a pointer to the corresponding menu on the built-in menu bar of the current installation of Access. Any subsequent changes you make to the custom menu are also made to the built-in menu. For example, if you add the entire File menu by using the Built-in Menus category and then delete the New Database command from that menu on your custom command bar, the New Database command is also deleted from the File menu of the built-in menu. Additionally, even if this is what you want to happen, if you copy your database and custom command bar to another computer, the changes you made to the commands on a menu created by using the Built-in Menus category are not copied because these menus only function as a pointer to the built-in menus of the current installation. To reliably create a copy of an entire built-in menu or a subset of that menu, first create a menu by using the New Menu category as described in the previous procedure, and then add individual commands from the built-in menu you want to copy as described in the following steps.
To add the command or control to a menu or submenu, drag it and hold the mouse over the menu or submenu name until it drops down, and then drag the command or control where you want it on the menu or submenu and release the mouse.
Note If you place the command or control in the wrong location, you can drag it to the correct location.
See Also For more information, see "Working with Button Images on Command Bars" and "Setting Properties for Command Bar Controls" later in this chapter.
There are three ways to add menu commands and buttons that perform custom actions to a command bar. You can:
To create a command or button that opens a table, query, form, report, or data access page, drag the name of the database object from the appropriate category in the Customize dialog box to your command bar.
This method is equivalent to opening the object from the Database window; you can't specify additional parameters such as the mode in which Access opens the object, and you can't perform other actions when opening the object. If you want to specify additional parameters or perform a series of actions when opening an object, you must create a macro or a VBA Function procedure and add it to your menu or toolbar, as described later in this section.
To add a custom command or button that opens a database object
To add the command that opens the object to a menu or submenu, drag it and hold the mouse over the menu or submenu name until it drops down, and then drag the command where you want it on the menu or submenu and release the mouse.
Note If you place the command in the wrong location, you can drag it to the correct location.
See Also For more information, see "Working with Button Images on Command Bars" and "Setting Properties for Command Bar Controls" later in this chapter.
To create a command or button that runs a macro, create the macro, and then drag its name from the Customize dialog box to your command bar. For example, you can create a macro that uses the OpenForm action to open a form and set the Data Mode argument to Add. Add the macro to a menu, and when a user clicks the custom command, Access runs the macro, opening a blank form ready to add a new record.
To add a custom command or button that runs a macro
See Also For information about creating macros, type "macro" in the Office Assistant or on the Answer Wizard tab in the Help window, and then click Search.
To add a command that runs the macro to a menu or submenu, drag it and hold the mouse over the menu or submenu name until it drops down, and then drag the command or control where you want it on the menu or submenu and release the mouse.
Note If you place the command in the wrong location, you can drag it to the correct location.
See Also For more information, see "Working with Button Images on Command Bars" and "Setting Properties for Command Bar Controls" later in this chapter.
For the greatest flexibility, you can create a VBA Function procedure and run it from a menu command or toolbar button. To do so, add the Custom command to your command bar, and then customize it to run your Function procedure.
Note You can run only VBA Function procedures from a command bar, not Sub procedures.
To add a custom command or button that runs a VBA Function procedure
See Also For information about creating Function procedures, type "procedures" in the Office Assistant or on the Answer Wizard tab in the Help window, and then click Search.
Access displays the Control Properties dialog box.
Tip You can create an access key for your command so that users can access it with the keyboard. To do so, type an ampersand (&) in front of the letter you want to use. For example, to use I as the access key for a Print Invoice command, type Print &Invoice. The I in your command name is underlined and users can carry out the command by pressing ALT+I.
See Also For more information, see "Working with Button Images on Command Bars" and "Setting Properties for Command Bar Controls" later in this chapter.
Most Microsoft Access command bar controls have a button image that is displayed when the control is on a toolbar, and sometimes appears next to the control when it's on a menu. You can customize these button images by:
Whether a control appears with a button image, text, or both is determined by the setting of the control's Style property and by whether the control is on a toolbar or a menu. The following table describes how the Style property works.
Note A control's Caption property text is identical to the text in the Name box on the shortcut menu that appears when you right-click a control while the Customize dialog box is open.
| Style property setting | What appears on a menu | What appears on a toolbar |
| Default Style | Button image and Caption property text | Button image only |
| Text Only (In Menus) | Caption property text only | Button image only |
| Text Only (Always) | Caption property text only | Caption property text only |
| Image And Text | Button image and Caption property text | Button image and Caption property text |
Note By default, some Microsoft Access command bar controls don't have a button image associated with them and won't display an image regardless of the Style property setting. However, you can add an image by using one of the methods described in the following procedure. Also, some Microsoft Access command bar controls have their Style property set to Text Only (In Menus) by default so that they don't display their image on menus. If you want to display the image on menus, set the Style property to Default Style.
See Also For information about setting the Style property and other command bar control properties, see "Setting Properties for Command Bar Controls" later in this chapter.
To customize a button image on a command bar control
| To | Do this |
| Use a predefined button image | Right-click the control, point to Change Button Image, and then click the image you want. |
| Copy and paste another control's button image | Right-click the control that has the image you want to use, and then click Copy Button Image. Right-click the control whose image you are customizing, and then click Paste Button Image. |
| Copy and paste an image from a graphics program | Open the image you want to copy in a graphics program. Select and copy the image (preferably a 16 x 16 pixel image or portion). Switch back to Access. Right-click the control, and then click Paste Button Image. |
| Edit the control's current button image | Right-click the control, and then click Edit Button Image. In the Button Editor dialog box, you can change the color and shape of the image, adjust the image's position on the control, and preview your changes to the image. When you have finished editing the button image, click OK. |
| Reset a control to use its original button image | Right-click the control and then click Reset Button Image. |
Access provides some additional menu and control properties that you can use to further customize menus, menu commands, and toolbar buttons. You set each of these properties in the Control Properties dialog box.
Note Depending on the kind of control you're working with, some properties will not be available.
To set control properties for a menu, a menu command, or a toolbar button
| Property | Description |
| Caption | The name that is displayed for the command. This is identical to the text entered in the Name box on a menu or control's shortcut menu. |
| Shortcut Text | The text that is displayed next to a menu command and that indicates its shortcut key; for example, CTRL+P.
This property only creates display text to prompt the user. To define the shortcut key, you must create an AutoKeys macro as described in "Making Key Assignments" later in this chapter. |
| ToolTip | The text of the ToolTip that appears when a user rests the pointer on the control. If this setting is blank, Access uses the text from the Caption property as the ToolTip. |
| On Action | The name of a macro or VBA Function procedure that runs when a user clicks the control. When using a Function procedure, you must enter the name of procedure as an expression, using the syntax =functionname(). |
| Style | Controls how a command is displayed. The Style property settings are also available from a control's shortcut menu.
See Also For information about the Style property, see "Working with Button Images on Command Bars" earlier in this chapter. |
| Help File | The help file that contains the What's This Tip topic specified by the Help ContextID property. |
| Help ContextID | The context ID of the topic to display as a What's This Tip for this command. |
| Parameter | An optional string associated with the control that your application can reference or set. For example, the VBA Function procedure specified in the On Action property can refer to the Parameter property to determine how it works, or the Parameter property can be used to store information about the control, much like the Tag property. The Parameter property isn't generally used by built-in menu and toolbar controls. However, the Parameter property for a menu command or toolbar button used to add an ActiveX® control is set to the ActiveX control's class identifier(CLSID), which is the Registry value that uniquely identifies that control. If you delete or modify the CLSID, the command or button won't work. Similarly, the Parameter property for a menu command or toolbar button used to open a particular database object is set to the name of the object. |
| Tag | An optional string that can be used later in event procedures. |
| Begin A Group | Select this check box to indicate the beginning of a group of controls. On menus, a separator bar appears above a command that has this property set. On toolbars, a vertical separator bar appears in front of the command. If you resize a floating toolbar and the entire group of controls doesn't fit on the current line, the whole group is bumped to a new line. |
You can also set and read each of the properties in VBA code. Most of the corresponding VBA property names are the same as those listed in the preceding table, although the words are concatenated; for example, ShortcutText property. There are two exceptions: the VBA properties that correspond to the ToolTip and Begin A Group properties in the Control Properties dialog box are ToolTipText and BeginGroup.
See Also For more information about creating and customizing command bars, type toolbars or menus in the Office Assistant or on the Answer Wizard tab in the Help window, and then click Search.
If you want to use the custom command bars from one application in another application, you can import them. You cannot import a single custom command bar; you must import all the custom command bars in an application. However, Access doesn't import command bars that have the same name as existing command bars.
To import all custom command bars from another application
You can use custom menu bars and shortcut menus in your application in three ways:
The easiest way to create a menu bar that's attached to a form or report is to create a new menu bar and then specify that menu bar in the form or report's MenuBar property, so Access displays the menu bar whenever the form or report is active.
To attach a custom menu bar to a form or report
You can attach the same menu bar to more than one form or report.
You can attach custom shortcut menus to a form, a control on a form, or a report. After you create the shortcut menu, set the ShortcutMenuBar property for the form, control, or report to the name of the shortcut menu. Access displays the custom shortcut menu whenever a user right-clicks the form, control, or report.
To attach a custom shortcut menu to a form, a control on a form, or a report
You can attach the same shortcut menu to more than one form, control, or report.
You can specify a menu bar to use throughout your application by using the Startup dialog box.
To specify a global menu bar to display when your application starts
The next time you start your application, Access displays your custom menu bar instead of the default menu bar.
You can change the global menu bar while your application is running, without having to restart your computer. To do so, set the MenuBar property of the Application object to the name of the menu bar.
See Also For more information about specifying global menu bars in VBA, type MenuBar property in the Office Assistant or on the Answer Wizard tab in the Help window, and then click Search.
You can use one or more custom toolbars in an application. Create the toolbars you want, and then use the appropriate method to display your custom toolbars:
When using the Orders application, Northwind sales representatives want to click a button on the toolbar to print the invoice for the current order. You can create a custom toolbar for the Orders form with a button that prints invoices, and use the custom toolbar instead of the built-in toolbar.
Step One: Create the custom toolbar Create a custom toolbar for the Orders form that includes a button that runs the PrintInvoice macro, as well as any other commands you want to provide, such as the Cut, Copy, and Paste commands in the Edit category of the Customize dialog box (View menu, Toolbars submenu). Name this toolbar Orders Form Toolbar.
Note The custom toolbar attached to the Orders form in the Orders sample application includes a Design View button. You can use this button to easily switch between Form view and Design view while you're looking at the sample application. However, if you don't want users to switch to Design view in your own application, don't put the Design View button on your custom toolbars.
Step Two: Set the form's Toolbar property to the name of the custom toolbar Open the Orders form in Design view, open the property sheet for the form, and then enter Orders Form Toolbar in the Toolbar property box.
Note There is no need to create event procedures for the Activate and Deactivate events of the form to show and hide toolbars as was required in previous versions of Access. Setting the Toolbar property to a custom toolbar automatically hides the built-in Form View toolbar when your form is opened, and hides your custom toolbar when a user closes the form or switches to another form.
You can control whether users can add or remove commands on all of the menus and toolbars in your application.
To prevent users from customizing all command bars in an application
The next time your application starts, users won't be able to add or delete menu or toolbar commands. However, users will still be able to move and resize toolbars.
Note If you want to prevent users from customizing an individual command bar, you can clear the Allow Customizing check box in the Toolbar Properties dialog box. For more information, see "Creating New Command Bars and Setting Their Properties" earlier in this chapter.
You can work with menu bars, toolbars, and shortcut menus in VBA code by using the properties and methods of the CommandBars collection and the objects associated with it. In the command bars object model, each menu is a CommandBar object. This is true of menus and submenus on all three types of command bars. For example, to refer to the Tools menu on the standard menu bar, use the following statement:
CommandBars!Tools
The following code uses the Add method and several command bar control properties to add a new, hidden Print Invoice command to the bottom of the Tools menu.
Private Sub AddInvoiceCommand()

   Dim cbBar As CommandBar
   Dim ctlCommand As CommandBarControl

On Error GoTo ErrorHandler

   ' Set a reference to the Tools menu.
   Set cbBar = CommandBars!Tools

   ' Create new CommandBarControl object on the Tools menu
   ' and set a reference to it.
   Set ctlCommand = cbBar.Controls.Add(Type:=msoControlButton)

   ' Set properties of the new command.
   With ctlCommand
      .BeginGroup = True
      .Caption = "Pri&nt Invoice"
      .FaceID = 0
      .OnAction = "=PrintInvoice()"
      .Visible = False
   End With

   Exit Sub

ErrorHandler:
   MsgBox "Error #: " & Err.Number & vbCrLf & vbCrLf & Err.Description
End Sub
You refer to a command bar control by name within a command bar's Controls collection. You must use the exact case and characters specified for the command's Caption property, but you can omit the ampersand (&) that designates the command's access key. For example, to use the Execute method to carry out the Options command on the Tools menu, you use the following statement:
CommandBars!Tools.Controls![Options...].Execute
To refer to a command on a submenu, you refer to the submenu as a member of the Controls collection of the menu that contains it. For example, to use the Execute method to carry out the Add-in Manager command on the Add-ins submenu, which is on the Tools menu, you use the following statement:
CommandBars!Tools.Controls![Add-ins].Controls![Add-in Manager].Execute
The following code makes the hidden Print Invoice command created with the AddInvoiceCommand Sub procedure visible.
Private Sub ShowInvoiceCommand()

   Dim cbBar As CommandBar
   Dim ctlCommand As CommandBarControl

On Error GoTo ErrorHandler

   ' Set a reference to the Tools menu.
   Set cbBar = CommandBars!Tools

   ' Set a reference to the control.
   Set ctlCommand = cbBar.Controls![Print Invoice]

   ' Make the control visible.
   ctlCommand.Visible = True

   Exit Sub

ErrorHandler:
   MsgBox "Error #: " & Err.Number & vbCrLf & vbCrLf & Err.Description
End Sub
See Also
After you've created a startup form for your application, and menu bars and toolbars to help users navigate, you're ready to tell Access to use them when the application starts.
To control how your application looks and behaves when users start it, use the Startup command on the Tools menu. For example, you can use the options in the Startup dialog box to open the application's startup form, hide the Database window, and display a custom menu bar each time the application starts. You can also prevent changes to menus and toolbars, and prevent the use of special keystrokes used to show the Database window, the Immediate window, or to pause execution (F11 or ALT+F1, CTRL+G, CTRL+F11, and CTRL+BREAK).
To set startup options for an application
The next time you open the database, Access uses your startup settings.
Note You can also change startup settings while your application is running by setting properties of the current database. For more information, type startup options in the Office Assistant or on the Answer Wizard tab in the Help window, and then click Search.
To prevent users from bypassing the settings in the Startup dialog box by holding down the SHIFT key as your application opens, set the AllowBypassKey property to False in VBA. Alternatively, you can establish user-level security and then make sure only members of the Admins group have Administer permission for a database.
See Also For more information about these security options, type AllowBypassKey property in the Office Assistant or on the Answer Wizard tab in the Help window, and then click Search.
Example: Setting How an Application Starts
When Northwind sales representatives start the day, the first thing they do is enter new orders in the database. You start the Orders application with the Orders form open for data entry. In addition, you hide the Database window because you don't want the sales representatives to see the tables, queries, macros, and modules that make up your application.
On the Tools menu, click Startup, and then set options as shown in the following illustration.
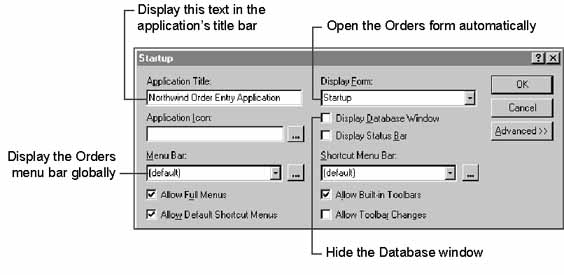
To make your application easier to start, you can create a Windows shortcut icon that opens Access and starts your application at the same time. This way, users of your application don't have to start Access first.
When you create a shortcut, you can also specify additional startup options for Access and your application. You do this by adding command-line options to the Windows shortcut you create. For example, you can use the /Excl option to specify that your application's database should be opened for exclusive access.
To create a shortcut to start your application
For example, the following command line starts Access and opens the Northwind database for exclusive access:
"C:\Program Files\Microsoft Office\Office\MSAccess.exe" "C:\Program Files\Microsoft Office\Office\Samples\Northwind.mdb" /Excl
After you create a shortcut, you can rename it, put it on your desktop or in a folder, or add it to the Start menu.
See Also For information about other command-line options, type command line in the Office Assistant or on the Answer Wizard tab in the Help window, and then click Search. For more information about shortcuts, search the Windows 95 or later Help index for shortcuts.
Tip When you use a shortcut to open Access and your application at the same time, you can also provide a bitmap to display in place of the standard Microsoft Access splash screen. To provide a custom splash screen, create a bitmap (.bmp) file with the same name as your application and place it in the same folder as your application's database. For example, if you want the shortcut above to display a custom splash screen, place a bitmap file called Northwind in the same folder as the Northwind database.
You can assign actions to key combinations by using a special key assignment macro. For example, suppose you frequently print the currently selected record. You can assign this task to a key combination, such as CTRL+R. Then, whenever you want to print the current record—no matter what form is active—you can just press CTRL+R. You can make as many key assignments as you want in your application.
When you press a key combination in an open database, Access looks for a key assignment macro called AutoKeys. If it finds a macro that assigns actions to the key combination you pressed, Access carries out the actions.
Tip For even greater control over keystrokes, you can use a form or control's KeyDown or KeyPress events to check which key the user pressed and respond appropriately. Use these events, in conjunction with the KeyPreview property, when you want to have different key assignments for each form or control in your application. For more information, see Chapter 5, "Responding to Events."
To assign a set of actions to a key combination
Note You use a special syntax (the VBA SendKeys statement syntax) to specify the key combination. For a full description and examples of the SendKeys statement syntax, type SendKeys statement in the Microsoft Visual Basic Office Assistant or on the Answer Wizard tab in the Help window, and then click Search.
Access makes the key assignment immediately. When you press the key combination, Access carries out the actions.
If you want the key assignment to be active only under certain conditions, enter an expression that specifies the conditions in the Condition column. To display the Condition column, click Conditions on the toolbar.
If you want to make several key assignments at once, create a macro for each key combination. Put the macros in a macro group named AutoKeys.
The following table gives the SendKeys syntax for some commonly used key combinations.
| SendKeys syntax example | Key combination |
| ^A or ^4 | CTRL+ any letter or number key |
| {F1} | F1 (or other function key) |
| ^{F1} | CTRL+F1 (or other function key) |
| +{F1} | SHIFT+F1 (or other function key) |
| %+{ F1} | ALT+SHIFT+F1 (or other function key) |
Note If you assign a set of actions to a key combination that is already being used by Access (for example, CTRL+C for Copy), the actions that you assign to this key combination in the key assignment macro replace the Access key assignment in all Access windows in the current database. If you have a custom menu command that you want associated with a key combination, you must define the key combination in the AutoKeys macro group. You can display text for the key combination with the menu command by specifying its ShortcutText property.
Northwind sales representatives frequently want to print the current record in either the Orders form or the ProductsPopup form. You can provide a convenient way for them to perform this task without having to go through the selection and print procedures each time: Assign these actions to the CTRL+R key combination.
Create a macro named AutoKeys. Type ^R (the VBA SendKeys statement syntax for CTRL+R) in the Macro Name column, then select the RunMacro action and enter the PrintCurrentRecord macro as the action argument. (The Orders database includes the PrintCurrentRecord macro, which selects and then prints the current record. You can see how this macro works by opening it in Design view; then you can import the macro into your database if you want.)
If the user presses CTRL+R when the active window is not a form, such as while viewing a report in Print Preview, Access displays an error message indicating that there is no current record. You can enter a condition to ensure that the key assignment is in effect only when a form is the active window.
The UtilityFunctions module in the Orders database includes a VBA function named IsForm that you can use to check whether the active window is a form.
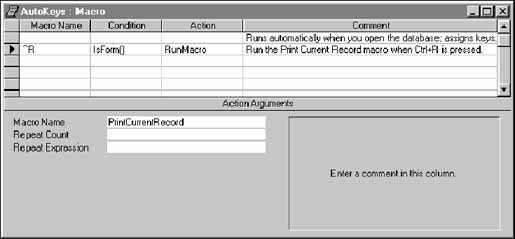
If the active window is a form, the IsForm function returns a value of -1, which means the condition is true. If the form isn't open, the function returns a value of 0, which means the condition is false.
See Also For information about how to write and use VBA functions, see Chapter 2, "Introducing Visual Basic for Applications."
Save the AutoKeys macro. Whenever a form is the active window, pressing CTRL+R now runs the PrintCurrentRecord macro, which selects and prints the current record. This key assignment is in effect every time you open the Orders database.