| Microsoft Access 2000: Building Applications with Forms and Reports |
CHAPTER 3
Forms that work well with each other make your application easy to use. This chapter presents a variety of techniques you can use to automate your forms and to make individual forms work together as a unified application.
Chapter Contents
Customizing a Command Button Created with a Wizard
Assigning Values to Controls and Properties at Run Time
Using Pop-up Forms and Dialog Boxes
Filtering and Sorting Data in Forms and Reports
Populating Controls on a Form
Adding a Row to a Combo Box List
Using the Tab Control to Organize Forms
What's Next?
Using the Command Button Wizard is a great way to create most general-purpose command buttons on your forms. However, a command button created with the wizard may not do exactly what you want it to do. Rather than creating a command button from scratch, you can use the Command Button Wizard to create the button and an event procedure for its Click event, and then customize the way the button works by editing the event procedure. For example, you can use the Command Button Wizard to create a button that opens a form, and then you can edit the event procedure so that it opens the form for read-only access instead of for editing data.
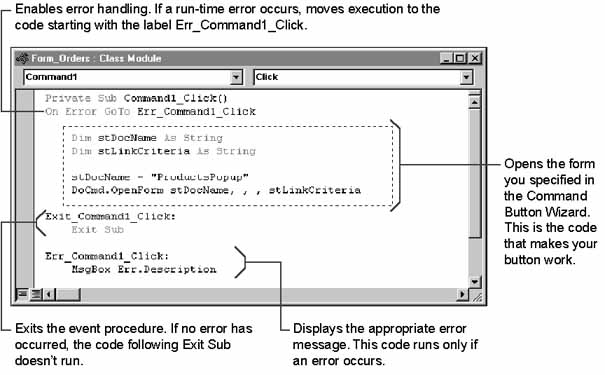
The event procedure that the Command Button Wizard creates includes simple Visual Basic® for Applications (VBA) statements that perform the action you specify. In addition, the wizard adds a simple method of error handling to respond appropriately to run-time errors. If an error occurs, the error-handling code displays the Microsoft® Access error message and then exits the event procedure. The following illustration shows the event procedure the Command Button Wizard creates for a command button that opens a form.

To change or enhance the way the button works, you edit the lines of code that are highlighted in the previous illustration. Unless you want to change the way the event procedure handles errors, you don't need to edit any other lines in the procedure.
See Also For more information about error handling in VBA, see Chapter 8, "Error Handling and Debugging", in the Microsoft Office 2000/Visual Basic Programmer's Guide (Microsoft Press, 1999). You can also find this guide in the Office Developer Documentation section of the Microsoft Developer Network (MSDN) Online Library.
You may have noticed that the Command Button Wizard's event procedure uses a Dim statement to declare a variable that holds the name of the form the event procedure opens. A variable is a placeholder that temporarily stores data, such as the name of an object or the value in a field, while your procedure runs. Once you declare a variable and assign it a value, you can use the variable throughout your procedure to refer to the value.
' Creates a variable that can hold a string value.
Dim strDocName As String
strDocName = "ProductsPopup"      ' Assigns the form name to it.
DoCmd.OpenForm strDocName         ' Opens the ProductsPopup form.
You don't have to use a variable to open a form. The following line of code performs the exact same action as the previous three lines.
DoCmd.OpenForm "ProductsPopup"
If you refer to a form only once in a procedure, it's probably easiest to just use the form name directly, as in the preceding line of code. Use a variable when you want to perform more than one operation on an object. In these cases, using a variable makes your code easier to write and maintain. If you want to change the form that the procedure opens, for example, you just change the form name once in the statement that assigns it to the variable.
See Also For more information about creating and using variables, see Chapter 3, "Writing Solid Code," or Chapter 7, "Getting the Most Out of Visual Basic for Applications," in the Microsoft Office 2000/Visual Basic Programmer's Guide (Microsoft Press, 1999). You can also find this guide in the Office Developer Documentation section of the Microsoft Developer Network (MSDN) Online Library.
Customers sometimes ask Northwind sales representatives for further information about a product on their order. You can provide a command button on the Orders form to open a pop-up form that shows details about the product selected in the Orders subform.
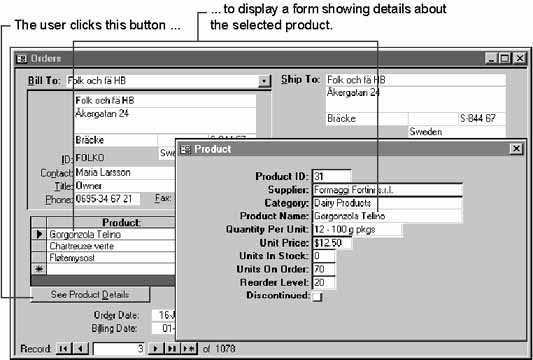
Step One: Create the button that opens the form The Orders sample application includes a form named ProductsPopup that displays details about Northwind products. You can open the Orders form in Design view and use the Command Button Wizard to add a command button named Details that opens the ProductsPopup form. The Command Button Wizard creates the command button and writes an event procedure for the command button's Click event. You can download the Orders sample application and associated Help files from the Microsoft Developer Network (MSDN) Online Web site.
However, the pop-up form displays details about a value on the subform, not the main form. Because the wizard can't filter based on a subform value, you'll need to modify the command button's event procedure yourself so the pop-up form shows information from the correct product.
See Also For more information about creating the ProductsPopup form, see "Using Pop-up Forms and Dialog Boxes" later in this chapter.
Step Two: Open the event procedure In Design view, right-click the command button and then click Build Event on the shortcut menu. Access opens the form module and displays the button's Click event procedure.
Step Three: Change the code so it filters records You want to filter the records in the ProductsPopup form to show the record whose ProductID is equal to the ProductID of the current record in the Orders subform. To do this, you need to apply a filter to the form when you open it.
The Command Button Wizard automatically creates a variable in the Click event procedure that makes it easy for you to set a filter for the form you're opening. The following line of code sets the strLinkCriteria variable to the appropriate filter string.
strLinkCriteria = "ProductID = Forms!Orders!OrdersSubform!ProductID"
Add this line of code to the Click event procedure that opens the form, as shown in the following example:
Dim strDocName As String
Dim strLinkCriteria As String

strDocName = "ProductsPopup"
strLinkCriteria = "ProductID = Forms!Orders!OrdersSubform!ProductID"
DoCmd.OpenForm strDocName, , , strLinkCriteria
This event procedure passes the filter string you added (strLinkCriteria) as the wherecondition argument of the OpenForm method that opens the form. Access then automatically sets a filter on the ProductsPopup form and makes the form display the correct record.
Compile your edited code and test it to make sure it works as expected. Now when you click the command button on the Orders form, the ProductsPopup form opens, showing values in the record for the current product in the Orders subform.
Note When the Details_Click event procedure opens the ProductsPopup form, the ProductsPopup form becomes the active form. In addition to the code that opens the ProductsPopup form, the Details_Click event procedure contains code that moves the focus from the pop-up form to the Orders form, so that sales representatives can continue filling out the order without having to click the Orders form. This code uses the SetFocus method, first to set the focus to the Orders form, and then to set the focus to the Orders subform rather than to the Details command button (the last control on the form to have the focus). To see this code, open the Orders form in Design view. Right-click the Details command button, and then click Build Event on the shortcut menu.
You can keep the ProductsPopup form synchronized with the Orders form, so that when you move from record to record in the Orders subform, the ProductsPopup form always shows details about the current product in the subform. To do this, write an event procedure for the subform's Current event that sets the pop-up form's Filter property. (You can also do this by writing a macro you specify as the subform's OnCurrent event property setting.)
To see this event procedure in the Orders sample application, look at the Form_Current event procedure for the Orders subform. Open the Orders subform in Design view, and then click Code on the View menu to open its form module. In the Object box, click Form, and then click Current in the Procedure box.
See Also For more information about keeping two forms synchronized, see "Synchronizing Records by Changing the Filter" later in this chapter.
By assigning values to controls and properties on a form or report while your application is running, you can make your forms and reports more responsive to your users' needs.
See Also To find out whether you can set a particular property at run time, type the name of the property in the Office Assistant or on the Answer Wizard tab in the Help window, and then click Search.
For example, after a user selects a customer for an order, you may want to fill in the controls that contain the shipping address with the customer's address. You do this by assigning values to the shipping controls. Or you may want to disable some controls on the form in response to values the user enters in other controls. You do this by setting the Enabled property of each control to False when the user enters the values.
In a macro, use the SetValue action, as shown in the following illustrations.

If the control to which you assign a value is located on a form or report other than the one that runs the macro, you must enter its full identifier as the Item argument.
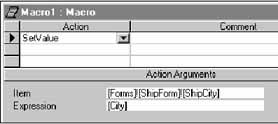
If you want to use VBA to assign a value to a control or property, use a simple assignment statement. To refer to a control that is located on the form or report from which you're running the event procedure, you don't need to use its full identifier.
ShipCity = City
Details.Enabled = False
To refer to a control on a different form or report, use its full identifier.
Forms!ShipForm!ShipCity = City
Note Although property names with more than one word appear in the property sheet with spaces between words, you must concatenate them when you refer to them in VBA. For example, to refer to the RecordSource property, which appears in the property sheet as RecordSource, you would use the following line of code:
Forms!Orders.RecordSource = "OrdersQuery"
As described previously in this chapter, the Orders form in the Orders sample application includes a command button named Details that opens the ProductsPopup form. This pop-up form shows details about the current product in the Orders subform. The Details button works fine as long as the ProductID field in the current record of the subform contains a value. But if the user clicks in the new record of the Orders subform or starts a new order, then the wherecondition argument in the button's DoCmd.OpenForm statement returns no record, and the ProductsPopup form opens with no record in it. To avoid having the ProductsPopup form show no information, you can disable the Details button when there's no value in the ProductID field for the current record of the subform, and enable it when there is a value in the ProductID field.
For example, the Current event of the Orders subform occurs when the Orders form first opens, every time the focus moves from one record to another on the subform, and every time you requery the subform. You can write an event procedure for the Current event that disables the Details button when there's no value in the ProductID field for the current record of the subform, and enables it when there is one.
Private Sub Form_Current()

On Error GoTo ErrorHandler

' Use the Me property so Access can resolve references.
    If IsNull(Me!ProductID) Then
        Me.Parent!Details.Enabled = False
    ElseIf Me.Parent!OrdersSubform.Enabled = False Then
        Me.Parent!Details.Enabled = False
    Else
         Me.Parent!Details.Enabled = True
    End If

    Exit Sub

ErrorHandler:
    If Err.Number = 2452 Then
    ' This form was opened from the Database window,
    ' so ignore this error.
        Err.Number = 0
        Resume Next
    Else
        ' Unknown error occurred.
        MsgBox "Error#:  " & Err.Number & vbCrLf & vbCrLf & Err.Description
    End If
End Sub
The statements in this event procedure use the Parent property of the Orders subform to refer to the Orders form. If there's no value in the ProductID field in the subform, the first statement sets the Enabled property of the Details button on the Orders form to False (the same as No in the property sheet). If there is a value in the field, the second statement sets the Enabled property to True (the same as Yes in the property sheet).
When you use the Parent property to refer to the main form from an event procedure attached to a subform, the code runs only when the main form is open. If you open the subform by itself as a separate form, the code that refers to the main form doesn't work.
Note As described previously in this chapter, the Form_Current event procedure for the Orders subform also contains code that updates the record values in the ProductsPopup form to match the current record in the subform.
You can use pop-up forms and dialog boxes in your application to:
A pop-up form stays on top of other open forms, even when another form is active. For example, the property sheet in form Design view is a pop-up form. Another example of a pop-up form is the ProductsPopup form in the Orders sample application, which is discussed earlier in this chapter.
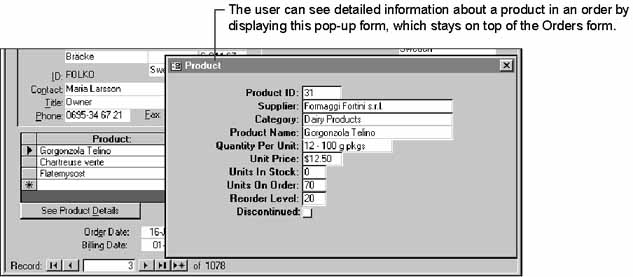
The ProductsPopup form is modeless, which means you can access other objects and menu commands in Access while the form is open and make them active. In contrast, a modal pop-up form prevents you from accessing other Microsoft Access objects or menu commands until you close or hide the form. Use a modeless pop-up form when you want the user to be able to shift the focus between the pop-up form and other elements of the user interface without having to close the pop-up form. For example, use a modeless pop-up form if you want to be able to view information about the pop-up form while accessing menu commands and toolbar buttons.
A familiar example of a modal pop-up form is a dialog box. For example, the PrintInvoiceDialog form is a dialog box in the Orders sample application that prompts the user to specify an order invoice to print.
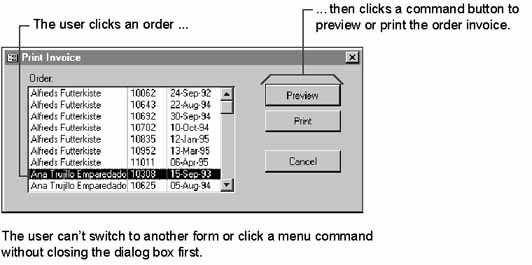
Use a dialog box (a modal pop-up form) when you want the user to close the dialog box or respond to its message before proceeding, such as when you collect information your application needs to complete an operation.
To create a modeless pop-up form
To create a modal pop-up form (such as a dialog box)
Note You use the BorderStyle property to set the style of the border for a pop-up form or dialog box. To display a dialog box with a typical thick border that has no Minimize and Maximize buttons, set the BorderStyle property to Dialog. For more information about the different border styles you can use, type BorderStyle property in the Office Assistant or on the Answer Wizard tab in the Help window, and then click Search. For information about the interaction between the BorderStyle, MinMaxButtons, and ControlBox properties when creating pop-up forms and dialog boxes, type pop-up forms in the Office Assistant or on the Answer Wizard tab in the Help window, and then click Search.
You can also open any form as a dialog box by setting the windowmode argument of the OpenForm method to acDialog (or in a macro, by setting the Window Mode argument of the OpenForm action to Dialog). The following line of code opens a dialog box named FilterDialog:
DoCmd.OpenForm "FilterDialog", windowmode:=acDialog
When you use this technique, Access suspends execution of the code or macro until the dialog box form is hidden or closed.
See Also For more information about the windowmode argument of the OpenForm method or action, type OpenForm in the Office Assistant or on the Answer Wizard tab in the Help window, and then click Search.
Tip If you simply want to display a short message to the user or prompt the user for short text input, the easiest approach is to use a message box or input box instead of a pop-up form. For more information about displaying a message in a message box, see "Using a Message Box to Display a Message" later in this chapter. For more information about displaying an input box to prompt the user for text input, type InputBox function in the Office Assistant or on the Answer Wizard tab in the Help window, and then click Search.
The Orders form in the Orders sample application includes a command button named Details that opens a form showing details about the current product in the subform.
See Also For information about creating the Details command button, see the example "Customizing a Command Button That Opens a Form" earlier in this chapter.
Because you want users to be able to continue filling out an order while answering customers' questions about the product, you need the form opened by the Details button to stay on top of the Orders form.

Step One: Create the pop-up form Use the Form Wizard to create the pop-up form, specifying the product, supplier, and category information you want to display. Name the form ProductsPopup.
Step Two: Set the form's properties Open the form in Design view and set properties to make the form look and work like a dialog box. The following table shows the property settings for the form.
| Property | Setting | Comment |
| AllowDeletions | No | Prevents users from deleting records. |
| AllowAdditions | No | Prevents users from adding new records. |
| RecordsetType | Snapshot | Prevents users from modifying product information about the form. |
| ScrollBars | Neither | Because the form always shows one entire record, scroll bars aren't needed. |
| RecordSelectors | No | Not needed. |
| NavigationButtons | No | Not needed. |
| AutoCenter | Yes | Centers the dialog box on the screen. |
| PopUp | Yes | Keeps the form on top. |
| Modal | No | Allows users to work with other objects while the form is open. |
| BorderStyle | Dialog | Displays the form as a dialog box. |
| MinMaxButtons | None | Not needed. |
| ShortcutMenu | No | Because users can't edit data on this form, a shortcut menu isn't needed. |
Note Menu commands the user chooses when a pop-up form is open don't apply to the pop-up form. For example, when the ProductsPopup form is open on top of the Orders form, menu commands can perform operations on the Orders form and its data, but they don't affect the ProductsPopup form. A pop-up form can't have a custom menu bar associated with it.
You use a dialog box in your application to display important messages or to collect information your application needs to complete an operation. Typically, the user responds to a dialog box by providing information and then closing the dialog box by clicking a command button labeled OK or Cancel. For dialog boxes that give the user more than one choice, you can use command buttons with captions that indicate what action each button takes.
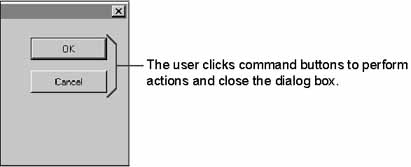
You can make your dialog box easier to use with the keyboard by specifying default and cancel buttons:
The default button is chosen when the user presses ENTER without first clicking a different button. To specify the default button for a dialog box, set the button's Default property to Yes in the property sheet (or to True in VBA). Only one command button on a form can have its Default property set to Yes. It's a good idea to choose a button that won't cause a problem if the user presses ENTER by accident. For example, in a dialog box that deletes data, it's safer to make the default button Cancel rather than OK.
Tip When a user clicks a command button in a dialog box, you often want to hide the dialog box without closing it. That way, you can use the values entered in the dialog box to complete the actions the command button performs. To hide a dialog box, set the form's Visible property to False. After your macro or event procedure has completed the actions that use the information from the dialog box, you can use the Close method or action to close the dialog box.
Northwind sales representatives frequently print an invoice for an order immediately after taking the order. You can create a dialog box to make it easier for the sales representatives to print the invoice.
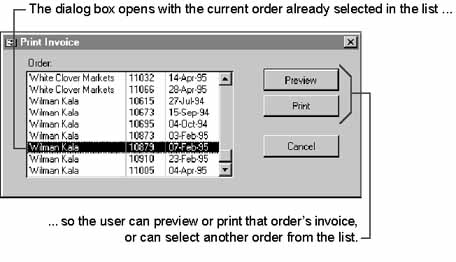
Users open the dialog box using a button on a custom toolbar attached to the Orders form.
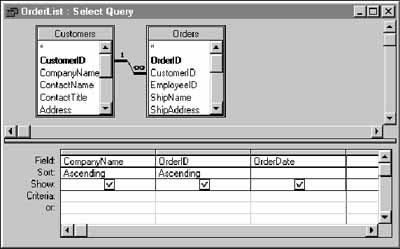
Step One: Create the query for the list box If the list box will display values from more than one table, you must first create a query that displays the appropriate rows. Create a query called OrderList that includes three fields from the Customers and Orders tables, as shown in the following illustration.
Step Two: Create the dialog box and the list box Create a blank form and add an unbound list box to it using the List Box Wizard. Specify the OrderList query as the row source for the list box, and include all three fields as columns in the list box. Select OrderID as the list box's bound column. Adjust the column widths so the data in all three columns is visible at the same time. The List Box Wizard creates the list box and sets its properties. The following table shows some of the properties for the list box in the Orders sample application.
| Property | Setting |
| RowSourceType | Table/Query |
| RowSource | OrderList |
| ColumnCount | 3 |
| ColumnWidths | 1.25 in;0.5 in;0.5 in. (3.18 cm;1.27 cm;1.27 cm) |
| BoundColumn | 2 |
| Width | 2.6 in. (6.6 cm) |
Step Three: Create buttons for the dialog box Add three command buttons to the form using the Command Button Wizard: a Preview button, a Print button, and a Cancel button. For the first button, tell the wizard that you want it to preview the Invoice report. Tell the wizard to display the text "Preview"—instead of a picture—on the button. Follow the same steps to create a Print button that prints the report and a Cancel button that closes the form.
Step Four: Modify the event procedures that the wizard creates When the user chooses to preview or print the report, you want to hide the dialog box before opening the report. Additionally, you want the report to print only the record the user selects in the dialog box.
Open the event procedures for the Preview and Print buttons. In the procedures, hide the dialog box by setting its Visible property to False. To filter records in the report so only the selected record is included, pass the criteria identifying the record in the wherecondition argument of the OpenReport method.
See Also For more information about filtering records, see "Filtering and Sorting Data in Forms and Reports" later in this chapter.
The event procedure for the Preview command button with the new lines of code is:
Private Sub Preview_Click()
' Hide PrintInvoiceDialog form and preview Invoice report.

    Dim strDocName As String
    Dim strLinkCriteria As String

On Error GoTo ErrorHandler

    If IsNull(OrderID) Then
        MsgBox "Please click an order in the list.", vbInformation
    Else
        Me.Visible = False
        strDocName = "Invoice"
        strLinkCriteria = "OrderID = " & OrderID
        DoCmd.OpenReport strDocName, acViewPreview, strLinkCriteria
    End If

    Exit Sub

ErrorHandler:
    MsgBox "Error#:  " & Err.Number & vbCrLf & Err.Description
End Sub
The event procedure for the Print command button is identical, except that it passes the acViewNormal constant (instead of acViewPreview) to the OpenReport method.
Note If you prefer, you can use macros instead of event procedures to make the dialog box work. In the macros for the Preview and Print buttons, use the SetValue action to set the dialog box's Visible property to No, and use the OpenReport action to preview or print the report, setting the Where Condition argument as follows:
OrderID = Forms!PrintInvoiceDialog!OrderID
In the macro for the Cancel button, use the Close action to close the dialog box. In the macro for the list box's DblClick event, use the RunMacro action to run the Preview button's macro.
Step Five: Set properties to make the form behave like a dialog box Set the form's PopUp and Modal properties to Yes, and then save the form with the name PrintInvoiceDialog.
The following table shows some of the property settings for the form.
| Property | Setting | Comment |
| ScrollBars | Neither | Not needed. |
| RecordSelectors | No | Not needed. |
| NavigationButtons | No | Not needed. |
| AutoCenter | Yes | Centers the dialog box on the screen. |
| PopUp | Yes | Keeps the form on top. |
| Modal | Yes | Prevents users from working with other objects while the dialog box is visible. |
| BorderStyle | Dialog | Displays the form with thick borders that can't be resized and with no Minimize or Maximize buttons. (This is the standard border style for a dialog box.) |
| MinMaxButtons | None | Not needed. |
| ShortcutMenu | No | Not needed. |
Step Six: Create the macro that opens the dialog box Create a macro to open the dialog box. Add two actions to it: an OpenForm action that opens the PrintInvoiceDialog form, and a SetValue action that sets the OrderID list box on the form to the ID number of the current order on the Orders form. Save the macro with the settings as shown in the following illustration, and name it PrintInvoice.
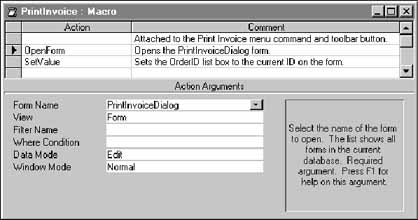
The arguments for the SetValue action are:
| Argument | Setting |
| Item | [Forms]![PrintInvoiceDialog]![OrderID] |
| Expression | [Forms]![Orders]![OrderID] |
Step Seven: Add a toolbar button to run the macro Create a custom toolbar for the Orders form, and add a button that runs the PrintInvoice macro.

When a user clicks the button, the macro opens the dialog box. If you want, you can also include the Print Invoice command on a custom menu bar for the form. To see an example of a custom menu bar, use the Customize dialog box (View menu, Toolbars submenu) to view the OrdersMenuBar toolbar in the Orders sample application.
See Also For more information about creating custom menus and toolbars, see Chapter 1, "Creating an Application."
Tip To make the dialog box even easier to use, you can write an event procedure that lets users double-click an order in the list box to choose the order and the Preview button at the same time. To do this, write an event procedure for the list box's DblClick event that calls the Preview command button's Click event procedure, as follows:
     Private Sub OrderID_DblClick(Cancel As Integer)
         Preview_Click
     End Sub
When you want to display a brief message such as an error, warning, or alert, you can use a predefined dialog box called a message box. You specify the message to display and when the message box is to appear. The following illustration shows a typical message box.

Note When a user has the Office Assistant displayed, message box information displays in a speech balloon associated with the Assistant. If the Office Assistant is hidden or wasn't installed, a message box displays as a dialog box, as shown in the preceding illustration.
You can use an action or a function to display a message box. The following table describes each method.
| Use this | To |
| MsgBox action | Display a message in a message box using a macro. |
| MsgBox function | Display a message in a message box using VBA. It can return a value to VBA indicating which command button a user has clicked. |
To display the message box in the previous illustration using a macro, you add a MsgBox action to the macro and set the arguments as shown in the following table.
| Argument | Setting |
| Message | The order is saved. |
| Beep | Yes |
| Type | None |
| Title | Save Order |
To display the same message with VBA, use the following code:
MsgBox "The order is saved.", , "Save Order"
See Also For more information about the MsgBox action or function, type MsgBox action in the Office Assistant or on the Answer Wizard tab in the Help window, or type MsgBox function in the Microsoft Visual Basic Office Assistant or on the Answer Wizard tab in the Help window, and then click Search.
You can display your message on two or more lines in a message box and specify where you want a new line to start. To do this when you're using the MsgBox function in VBA code, use the vbCrLf constant where you want the new line to start. The vbCrLf constant is equivalent to the concatenation of the special characters for a carriage return and line feed, Chr(13) and Chr(10).
For example, to use the MsgBox function to display "New Product:" on one line and "Enter a 5-digit Product ID" on the next line, you use the following code:
MsgBox "New Product:" & vbCrLf & "Enter a 5-digit Product ID"
However, when you're using the MsgBox action in a macro, you must concatenate the special characters for carriage return and line feed into the message expression. For example, to produce the same result, you enter the following expression in the Message argument of a MsgBox action:
= "New Product: " & Chr(13) & Chr(10) & "Enter a 5-digit Product ID" One of the most important functions of a database application is to make it easy for users to find the data they need to use or change. For example, in the Orders sample application, users need a way to find existing orders easily. Access provides powerful tools for users to find, filter, and sort records. Depending on your users' needs, you can allow them to use existing tools, or provide your own ways to accomplish these tasks.
This section describes the following approaches to filtering and sorting data in your application:
Using Standard Filter and Sort Commands If you make the Filter By Selection, Filter By Form, and Sort commands available on your application's forms, users can easily filter and sort records themselves. If you want, you can customize these features by responding to events.
Opening a Form or Report with a Filter You can use a number of methods to open forms or reports in your application so that they show a subset of records.
Changing the Filter or Sort Order of a Form or Report After a form or report is open, you can change the filter or sort order in code, or apply or remove the filter.
If you have special needs for finding and filtering data in your application, you may want to provide your own filtering interface. In this case, you'll use a combination of the previous techniques, creating your own forms where users can specify the records they want to see. For example, you may know that there are only a few fields the user wants to filter on. By displaying your own form, you can provide a straightforward interface for filtering on important fields while ignoring others.
Unless you set properties or change menus and toolbars to make them unavailable, the following filter and sort commands are available on the Records menu and the toolbar in Form view:
Using these commands, users of your application can easily filter and sort records themselves. When a user applies a filter or sort order using these commands, Access sets the Filter, FilterOn, OrderBy, and OrderByOn properties for the form accordingly, and requeries records on the form.
Note When a user changes the filter or sort order of a form and then closes the form, Access saves this information. The last sort order saved is reapplied automatically the next time the form is opened, and the user can reapply the last filter saved by clicking the Apply Filter button.
See Also For more information about the Filter By Selection, Filter By Form, or Advanced Filter/Sort commands, type the name of the command in the Office Assistant or on the Answer Wizard tab in the Help window, and then click Search.
In some cases, you don't want users of your application to filter records. To disable the standard filtering commands on a form, set the AllowFilters property to No.
If you want to disable sorting, or if you want to disable some filtering features while allowing others, create custom menu bars and toolbars for your form that include the commands and buttons you want and leave off the ones you don't want to make available.
See Also For more information about custom menu bars and toolbars, see Chapter 1, "Creating an Application."
If you want to change the way that standard filtering and sorting commands work, you can write event procedures for the Filter and ApplyFilter events. For example, you may want to display a message each time a user uses the Filter By Form or the Advanced Filter/Sort command for a form to remind the user to specify criteria and then apply the filter.
If you want to display a message or take other action when a user uses the Filter By Form or Advanced Filter/Sort command, write an event procedure for the Filter event. To help you respond to each command, the Filter event procedure has a FilterType argument that tells you which of these commands was selected.
If you want to cancel the filtering command the user chose, you can set the Cancel argument for the event procedure to True.
The following event procedure compares the FilterType argument to the acFilterByForm and acFilterAdvanced constants to display a different message to the user depending on which filtering command was chosen.
Private Sub Form_Filter(Cancel As Integer, FilterType As Integer)

   Dim strMessage As String

On Error GoTo ErrorHandler

   Select Case FilterType
      Case acFilterByForm
         strMessage = "Specify the records you want to see by choosing "
         strMessage = strMessage & "from the lists, then click Apply Filter."

      Case acFilterAdvanced
         strMessage = "Drag fields to the filter design grid, specify "
         strMessage = strMessage & "criteria and sort order, then click "
         strMessage = strMessage & "Apply Filter."
   End Select

   MsgBox strMessage               ' Display the message.

   Exit Sub

ErrorHandler:
   MsgBox "Error #: " & Err.Number & vbCrLf & vbCrLf & Err.Description
End Sub
If you want to display a message or take other action when a user applies or changes a filter, write an event procedure for the ApplyFilter event. This event occurs whenever a user chooses the Apply Filter/Sort, Remove Filter/Sort, or Filter By Selection command, and whenever the user closes the Filter window without applying the filter. The ApplyFilter event procedure has an ApplyType argument that tells you which of these actions was taken so you can respond in different ways.
If you want to cancel the filtering command the user chose, you can set the Cancel argument for the event procedure to True, and the filter won't be applied.
The following event procedure displays a message if the user is applying a filter. The message shows the setting of the Filter property and gives the user a chance to cancel the operation.
Private Sub Form_ApplyFilter(Cancel As Integer, ApplyType As Integer)

   Dim strMessage As String
   Dim intResponse As Integer

On Error GoTo ErrorHandler

   If ApplyType = acApplyFilter Then
      strMessage = "You've chosen to filter for the following criteria:"
      strMessage = strMessage & vbCrLf & Me.Filter
   End If

   ' Display the message box and get an OK or Cancel response.
   intResponse = MsgBox(strMessage, vbOkCancel + vbQuestion)
   If intResponse = vbCancel Then Cancel = True

   Exit Sub

ErrorHandler:
   MsgBox "Error #: " & Err.Number & vbCrLf & vbCrLf & Err.Description
End Sub
See Also For more information about arguments for the Filter events, type Filter event or ApplyFilter event in the Office Assistant or on the Answer Wizard tab in the Help window, and then click Search. For more information about events, see Chapter 5, "Responding to Events."
When a Northwind sales representative starts the Orders application, the Orders form opens for data entry (no existing records are available). To find an existing order in the database, the employee clicks the Filter Orders button on the Orders toolbar.
You want the filtering interface on the Orders form to be as straightforward as possible. Because most fields aren't appropriate for setting criteria, you don't want the employee to worry about them. To make them less obtrusive, you can disable all the fields except those you expect a user to set criteria for.
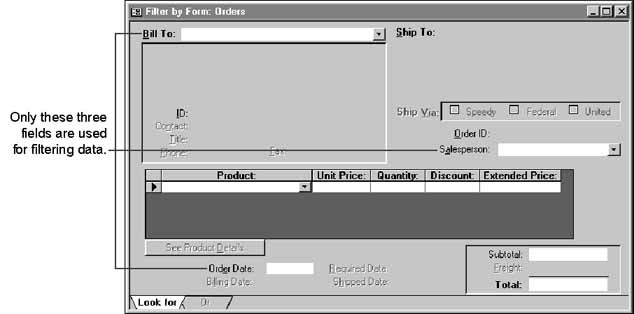
The Filter event procedure for the Orders form disables all but three fields (BillTo, EmployeeID, and OrderDate).
Private Sub Form_Filter(Cancel As Integer, FilterType As Integer)

On Error GoTo ErrorHandler

    ' Disable Form Design view toolbar button.
    CommandBars("Orders Form Toolbar").Controls("View").Enabled = False

    ' If Filter By Form, disable all but three fields.
    Forms!EventHistory.ShowEvent "Form_Filter"

    If FilterType = acFilterByForm Then
        BillTo.SetFocus
        CustomerID.Locked = False
        CustomerID.Enabled = False
        CompanyName.Enabled = False
        ContactName.Enabled = False
        ContactTitle.Enabled = False
        Address.Enabled = False
        City.Enabled = False
        Region.Enabled = False
        PostalCode.Enabled = False
        Country.Enabled = False
        ContactName.Enabled = False
        ContactTitle.Enabled = False
        Phone.Enabled = False
        Fax.Enabled = False
        ShowEventsSubform.Enabled = False
        ShowEventsSubform.Locked = True
        ShipName.Enabled = False
        ShipAddress.Enabled = False
        ShipCity.Enabled = False
        ShipRegion.Enabled = False
        ShipCountry.Enabled = False
        ShipPostalCode.Enabled = False
        ShipVia.Enabled = False
        ShippedDate.Enabled = False
        RequiredDate.Enabled = False
        BillingDate.Enabled = False
        Subtotal.Enabled = False
        Freight.Enabled = False
    End If

    Exit Sub

ErrorHandler:
    MsgBox "Error#:  " & Err.Number & vbCrLf & Err.Description
End Sub
If you set properties in the Filter event procedure, be sure to reset them in the ApplyFilter event procedure.
Private Sub Form_ApplyFilter(Cancel As Integer, ApplyType As Integer)

On Error GoTo ErrorHandler

    ' Enable Form Design view toolbar button.
    CommandBars("Orders Form Toolbar").Controls("View").Enabled = True

    ' Renable fields after filtering.
    OrdersSubform.Enabled = True
    OrdersSubform.Locked = False
    ShipName.Enabled = True
    ShipAddress.Enabled = True
    ShipCity.Enabled = True
    ShipRegion.Enabled = True
    ShipCountry.Enabled = True
    ShipPostalCode.Enabled = True
    ShipVia.Enabled = True
    ShippedDate.Enabled = True
    RequiredDate.Enabled = True
    BillingDate.Enabled = True
    Subtotal.Enabled = True
    Freight.Enabled = True
    BillTo.SetFocus
    Me!OrdersSubform.Enabled = True
    Me!OrdersSubform.Locked = False

    Exit Sub

ErrorHandler:
    MsgBox "Error#:  " & Err.Number & vbCrLf & Err.Description
End Sub
You can control whether text boxes on a form display suggested values in drop-down combo boxes in the Filter By Form window. For example, if you have a large set of records or if your data is stored on a network, you may want to prevent Access from running queries to fill all the lists. By default, Filter By Form displays lists of values for indexed and non-indexed fields if the record source for the form is in the current database or a linked table, but doesn't display them if the record source is a linked Open Database Connectivity (ODBC) database. To change this behavior, set the FilterLookup property for the text box in form Design view, or set Filter By Form options on the Edit/Find tab of the Options dialog box (Tools menu).
See Also For more information about Filter By Form, type filter by form in the Office Assistant or on the Answer Wizard tab in the Help window, and then click Search.
When you use VBA code or a macro to open a form or report, you may want to specify which records to display. This is especially useful for reports, because users can't directly filter records in a report.
When your application provides a customized way for users to open a form or print a report, you can specify the records to display in the form or report in several ways. A common approach is to display a custom dialog box where the user enters criteria for the form or report's underlying query. To get the criteria, you refer to the controls in the dialog box. The following sections describe three ways you can use criteria entered in a custom dialog box to filter records.
The wherecondition argument of the OpenForm or OpenReport method or action is the simplest way to get criteria in situations where a user is providing only one value. For example, the PrintInvoiceDialog form in the Orders sample application prompts users to select an OrderID for the invoice they want to print. If you're using an event procedure, you can apply a filter that displays only one record by adding an argument to the OpenReport method, as shown in the following line of code:
DoCmd.OpenReport "Invoice", acViewPreview, , "OrderID = " & OrderID
The "OrderID = " in the filter expression refers to the OrderID field in the Invoice report's underlying query. The OrderID on the right side of the expression refers to the value the user selected from the OrderID list box in the dialog box. The expression concatenates the two, causing the report to include only the invoice for the record the user selected.
See Also For more information about the PrintInvoiceDialog form, see the example "Creating a Dialog Box to Print Invoices" earlier in this chapter.
Note If you're using a macro, you can use the following Where Condition argument in the OpenReport action that prints the report.
OrderID = [Forms]![PrintInvoiceDialog]![OrderID]
The wherecondition argument is applied only by the event procedure or macro specified for the OnClick event of the button that runs the OpenForm or OpenReport method or action. This gives you the flexibility of using any number of different dialog boxes to open the same form or report and applying different sets of criteria depending on what the user wants to do. For example, the user may want to print an invoice for a certain customer or view orders only for a certain product. If users open the form or report in the Database window rather than through your dialog box, however, no criteria are applied to the query and all its records are displayed or printed. To prevent this, you can hide the Database window by clearing the Display Database Window check box in the Startup dialog box (Tools menu).
See Also For more information about Startup options, see "Setting Startup Options" in Chapter 1, "Creating an Application."
You can use the wherecondition argument to set criteria for more than one field, but if you do, the argument setting quickly becomes long and complicated. In those situations, specifying criteria in a query may be easier.
A separate query, sometimes called a filter query, can refer to the controls on your dialog box to get its criteria. Using this approach, you filter the records in a form or report by setting the filtername argument of the OpenForm or OpenReport method or action to the name of the filter query you create. The filter query must include all the tables in the record source of the form or report you're opening. Additionally, the filter query must either include all the fields in the form or report you're opening, or you must set its OutputAllFields property to Yes.
For example, to create a filter query for the Invoice report, make a copy of the report's underlying query and save it under another name. Then, add criteria to the OrderID field in the filter query that refers to the control on the dialog box. (If the filter query's OutputAllFields property is set to Yes, this is the only field you need to include in the filter query as long as you include all the tables that contain fields on the report.)
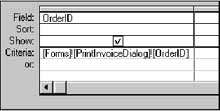
After you create and save the query you'll use as a filter, set the filtername argument of the OpenReport method or action to the name of the filter query. The filtername argument applies the specified filter query each time the OpenReport method or action runs.
Using a query as a filter to set the criteria has advantages similar to using the wherecondition argument of the OpenForm or OpenReport method or action. A filter query gives you the same flexibility of using more than one dialog box to open the same form or report and applying different sets of criteria depending on what a user wants to do. If users open the form or report in the Database window rather than through your dialog box, however, no criteria are applied to the query and all its records are displayed or printed. To prevent this, you can hide the Database window by clearing the Display Database Window check box in the Startup dialog box (Tools menu).
See Also For more information about Startup options, see "Setting Startup Options" in Chapter 1, "Creating an Application."
You can also refer to the dialog box controls directly in the form or report's underlying query instead of through the arguments of the OpenForm or OpenReport method or action. For example, instead of referring to the control on the PrintInvoiceDialog form in a filter query's criteria as shown in the previous illustration, you can set the exact same criteria in the Invoice report's underlying query, Invoices.
Using this approach, the OpenForm or OpenReport method or action requires no wherecondition or filtername argument. Instead, each time you open a form or report, its underlying query looks for the dialog box to get its criteria. However, if a user opens the form or report in the Database window rather than through your dialog box, Access displays a parameter box prompting the user for the dialog box value. To prevent this, you can hide the Database window by clearing the Display Database Window check box in the Startup dialog box (Tools menu).
See Also For more information about Startup options, see "Setting Startup Options" in Chapter 1, "Creating an Application."
After a form or report is open, you can change the filter or sort order in response to users' actions by setting form and report properties in VBA code or in macros. For example, you may want to provide a menu command or a toolbar button that users can use to change the records that are displayed. Or you may have an option group control on a form that users can use to select from common sorting options.
To set the filter of a form or report, set its Filter property to the appropriate wherecondition argument, and then set the FilterOn property to True. To set the sort order, set the OrderBy property to the field or fields you want to sort on, and then set the OrderByOn property to True. If a filter or sort order is already applied on a form, you can change it simply by setting the Filter or OrderBy properties.
When you apply or change the filter or sort order by setting these properties, Access automatically requeries the records in the form or report. For example, the following code changes the sort order of a form based on a user's selection in an option group:
Private Sub SortOptionGrp_AfterUpdate()

   Const conName = 0
   Const conDate = 1

On Error GoTo ErrorHandler

   Select Case SortOptionGrp
      Case conName
         Me.OrderBy = "LastName, FirstName"      ' Sort by two fields.
      Case conDate
         Me.OrderBy = "HireDate DESC"         ' Sort by descending date.
   End Select

   Me.OrderByOn = True                        ' Apply the sort order.

   Exit Sub

ErrorHandler:
   MsgBox "Error #: " & Err.Number & vbCrLf & vbCrLf & Err.Description
End Sub
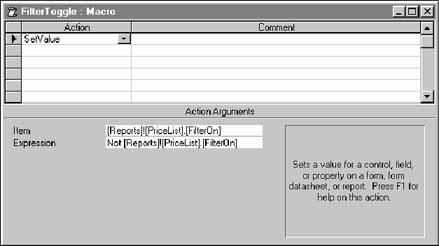
Whether the filter and sort order get set in code or by the user, you can apply or remove them by setting the FilterOn and OrderByOn properties to True or False. For example, you could add a button to a report's custom toolbar that runs the following macro to apply or remove a filter you specified when opening the report.
The Orders sample application controls which record appears in the ProductsPopup form by setting the form's Filter property. You can keep the ProductsPopup form synchronized with the Orders form; this will make sure the ProductsPopup form always shows details about the current product when you move from record to record in the Orders subform.
To do this, write an event procedure for the subform's Current event that sets the pop-up form's Filter property. (You can also do this by writing a macro you specify as the subform's OnCurrent event property setting.) The following code example shows the event procedure for the Current event of the Orders subform. This event procedure uses the IsLoaded function from the UtilityFunctions module that is included with the Orders sample application.
Private Sub Form_Current()
' Manage ProductsPopup form and Details command button
' as user moves from record to record on subform.

    Dim strFilter As String

On Error GoTo ErrorHandler

    ' If ProductsPopup form is loaded, update its data to show
    ' details of the product in the current subform record.
    If IsLoaded("ProductsPopup") Then

        ' If there's no current product record, display a blank popup
        ' window; otherwise filter to show the current product.
        If IsNull(ProductID) Then
            strFilter = "ProductID = 0"
        Else
            strFilter = "ProductID = " & ProductID
        End If

        Forms!ProductsPopup.Filter = strFilter
        Forms!Orders.SetFocus                ' Set focus back to subform
        Forms!Orders!OrdersSubform.SetFocus  ' on Orders form.
    End If

    Exit Sub

ErrorHandler:
    If Err.Number = 2452 Then
        ' This form was opened from the Database window,
        ' so ignore this error.
        Err.Number = 0
        Resume Next
    Else
        ' Unknown error occurred.
        MsgBox "Error#:  " & Err.Number & vbCrLf & vbCrLf & Err.Description
    End If
End Sub
Each time a user changes records in the subform, the procedure resets the Filter property of the pop-up form, causing it to display the corresponding record.
You can populate (fill in) and update the value of controls on a form while the user is using the form in one of two ways. You can either assign values to the controls in a macro or event procedure, or you can have Access look up the values and display them automatically using AutoLookup.
You assign a value to a control when you want to give a control either the same value as another control or field, or a value derived from another control or field.
You use AutoLookup when you want a form to display related values from a table that's on the "one" side of a one-to-many relationship with the form's primary table. For example, the Orders form is used to add new orders to the Orders table. It also displays values from the Customers table, which is on the "one" side of a one-to-many relationship with the Orders table. When you include the fields from the Customers table in the Order form's underlying record source or query, Access automatically displays the correct customer information when you select the customer for the current order.
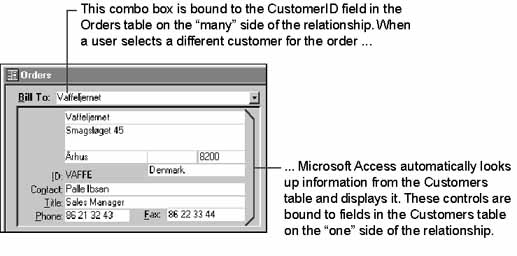
The following examples illustrate the two ways of populating controls on a form. The first example shows two event procedures that assign values to controls: one that takes values from one set of controls and assigns them to another set of controls, and another that looks up a value in a related table and assigns the value to a control. The second example shows how to set up a form that uses AutoLookup to display related data from a table underlying the form.
The Orders table in the Orders sample application includes fields for the shipping address, which is often (but not always) the same as the billing address. You can automatically fill in the shipping controls with a customer's billing address by assigning them the same value as the corresponding billing controls.
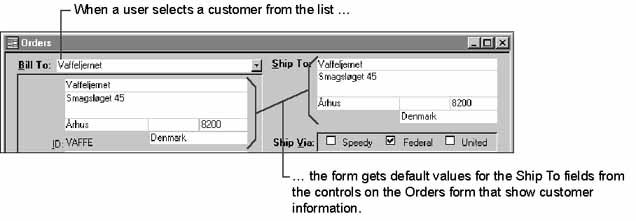
Step One: Assign a control the value from another control To assign the values, you write an event procedure for the AfterUpdate event of the BillTo combo box. In the combo box's property sheet, select the AfterUpdate property, and then click the Build button beside the property. In the Choose Builder dialog box, double-click Code Builder. Access opens the form module and displays a template for the control's AfterUpdate event procedure. Enter the following code in the AfterUpdate event procedure template:
Private Sub BillTo_AfterUpdate()
' Enable customer controls and update ShipTo controls
' with new customer information.

On Error GoTo ErrorHandler

    Forms!EventHistory.ShowEvent "BillTo_AfterUpdate"

    CustomerID.Enabled = True
    CustomerID.Locked = True
    CompanyName.Enabled = True
    Address.Enabled = True
    City.Enabled = True
    Region.Enabled = True
    PostalCode.Enabled = True
    Country.Enabled = True
    ContactName.Enabled = True
    ContactTitle.Enabled = True
    Phone.Enabled = True
    Fax.Enabled = True

    ShipName = CompanyName
    ShipAddress = Address
    ShipCity = City
    ShipRegion = Region
    ShipPostalCode = PostalCode
    ShipCountry = Country

    ' Enable the subform for data input.
    Me!ShowEventsSubform.Enabled = True
    Me!ShowEventsSubform.Locked = False

    Exit Sub

ErrorHandler:
    MsgBox "Error#:  " & Err.Number & vbCrLf & Err.Description
End Sub
The references on the left side of the statements are the names of shipping controls. The references on the right side of the statements are the names of billing controls, which are bound to fields in the Customers table. Each time the user selects a customer for the order from the combo box, this event procedure fills in the shipping controls with the new customer information from the billing controls.
Note In addition to setting the values in the shipping controls, the BillTo_AfterUpdate event procedure in the Orders sample application sets the Enabled property of the customer information controls to Yes, so sales representatives can update the customer's address or other information. In the Form_Current event procedure for the Orders form, these controls are disabled if the user is in a new record; the sales representative must select a customer before editing the customer information controls.
Step Two: Assign a control a value from a table The UnitPrice control in the Orders subform is bound to the UnitPrice field in the Order Details table. Once the user selects a product, you want to fill in the UnitPrice control in the subform with the current value from the Products table.

Because the UnitPrice field in the Products table isn't on the form or in its record source, you can't refer to it directly. Instead, you can use the DLookup function to look up the value in the Products table and assign it to the UnitPrice control in the subform. Use the following event procedure for the AfterUpdate event of the ProductID control on the subform:
Private Sub ProductID_AfterUpdate()
   .
   .
   .
' Evaluate filter before it's passed to DLookup function.
    strFilter = "ProductID = " & Me!ProductID
' Look up product's unit price and assign it to the UnitPrice control.
    Me!UnitPrice = DLookup("UnitPrice", "Products", strFilter)
   .
   .
   .
End Sub
The DLookup function has three arguments. The first specifies the field you're looking up (UnitPrice); the second specifies the table (Products); and the third specifies which value to find (the value for the record where the ProductID is the same as the ProductID on the current record in the Orders subform).
Note Because each call to the DLookup function causes Access to run a query, you may want to limit how often you use it. You can often avoid using the DLookup function by including the field you want to look up in the underlying query or record source for the form or report. In the previous example, you could include the UnitPrice field from the Products table in the record source for the subform. Because it would involve joining the two tables, this strategy would cause the subform to open more slowly; however, it would allow you to look up the UnitPrice value much more quickly and easily than with the DLookup function.
See Also For more information about the DLookup function, type DLookup function in the Office Assistant or on the Answer Wizard tab in the Help window, and then click Search.
The Orders form in the Orders sample application displays the customer's billing address and contact information, which is stored in the Customers table. By including the fields from the Customers table in the underlying record source for the Orders form, you can have the billing information fill in automatically when the user selects the customer from the BillTo combo box.
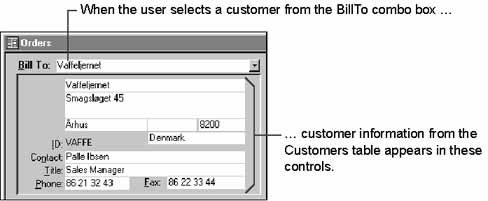
If the Orders and Customers tables are set up correctly, it's easy to create this type of form with the Form Wizard. Because the Orders table includes a Lookup field that relates data in the two tables, the Form Wizard sets up the lookup automatically. When the wizard adds the CustomerID Lookup field to the form, it creates a combo box control that displays the customer's name, but is bound to the CustomerID field in the Orders table.
When you create the form, just tell the Form Wizard to include all fields in both the Orders and Customers tables.
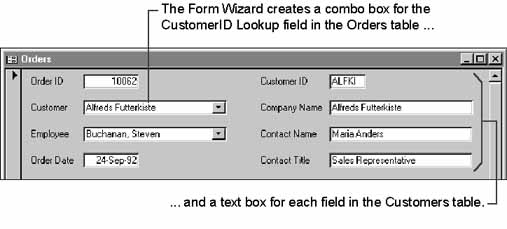
After you create the form with the Form Wizard, resize and arrange the fields as you see fit. Additionally, rename the CustomerID Lookup field (and its label) to BillTo, so you can distinguish it from the CustomerID field bound to the Customers table.
Because the Customers table is on the "one" side of the one-to-many relationship between the Customers and Orders tables, you don't have to do anything special to make the text boxes display the information from the Customers table. When the user picks a customer from the combo box, which is bound to the CustomerID field in the Orders table, Access uses AutoLookup to automatically look up the information in the Customers table and display it in the text boxes. If users change the data in the customer fields, their changes are saved in the Customers table when they save the order.
Because all the customer fields are included on the Orders form, users can add or modify customer information directly on the Orders form, without having to go to a separate Customers form.
See Also For information about how to enable users to add a new customer to the Customers table using the Orders form, see the example "Adding a Row to the Combo Box's List on the Orders Form" later in this chapter.
Note To create this form without the Form Wizard, create a query that includes all the fields from the Orders and Customers tables. Then, create a form based on the query and add the fields from both tables.
Additionally, you can use AutoLookup even if you don't have a Lookup field in the underlying table by adding a combo box bound to the CustomerID field in the Orders table, and then setting its properties so that it displays customer names.
See Also For more information about creating a Lookup field in a table, type Lookup fields in the Office Assistant or on the Answer Wizard tab in the Help window, and then click Search.
Combo boxes are commonly used to display a list of values in a table or query for a user to select from. By responding to the NotInList event, you can provide a way for the user to add values that aren't in the list.
Often the value displayed in a combo box is looked up from a record in a related table. Because the list is derived from a table or query, you must provide a way for the user to enter a new record in the underlying table. Then you can use the Requery method to requery the list, so it contains the new value.
When a user types a value in a combo box that isn't in the list, the NotInList event of the combo box occurs as long as the combo box's LimitToList property is set to Yes, or a column other than the combo box's bound column is displayed in the box. You can write an event procedure for the NotInList event that provides a way for the user to add a new record to the table that supplies the list's values. The NotInList event procedure includes a string argument named NewData that Access uses to pass the text the user enters to the event procedure.
The NotInList event procedure also has a Response argument where you tell Access what to do after the procedure runs. Depending on what action you take in the event procedure, you set the Response argument to one of three predefined constant values:
For example, the following event procedure asks the user whether to add a value to a list, adds the value, then uses the Response argument to tell Access to requery the list:
Private Sub ShipperID_NotInList(NewData As String, Response As Integer)

   Dim dbsOrders As DAO.Database
   Dim rstShippers As DAO.Recordset
   Dim intAnswer As Integer

On Error GoTo ErrorHandler

   intAnswer = MsgBox("Add " & NewData & " to the list of shippers?", _
      vbQuestion + vbYesNo)

   If intAnswer = vbYes Then

      ' Add shipper stored in NewData argument to the Shippers table.
      Set dbsOrders = CurrentDb
      Set rstShippers = dbsOrders.OpenRecordset("Shippers")
      rstShippers.AddNew
      rstShippers!CompanyName = NewData
      rstShippers.Update

      Response = acDataErrAdded         ' Requery the combo box list.
   Else
      Response = acDataErrDisplay         ' Require the user to select
                                       ' an existing shipper.
   End If

   rstShippers.Close
   dbsOrders.Close

   Set rstShippers = Nothing
   Set dbsOrders = Nothing

   Exit Sub

ErrorHandler:
   MsgBox "Error #: " & Err.Number & vbCrLf & vbCrLf & Err.Description
End Sub
See Also For more information about the NotInList event, type NotInList event in the Office Assistant or on the Answer Wizard tab in the Help window, and then click Search.
When taking a new order in the Orders sample application, a user, typically a sales representative, starts by looking up the customer in the BillTo combo box at the top of the Orders form. If the customer is new and doesn't appear in the list, the user needs a way to add the customer to the Customers table and update the combo box so it displays the new customer in the list.
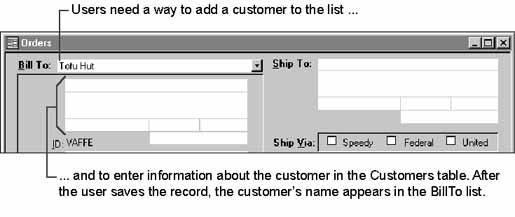
You can let the user add a new customer by simply typing the new customer's name in the combo box. To do this, write an event procedure for the NotInList event of the combo box.
Step One: Write the event procedure for adding a new customer This event procedure asks for confirmation that the user wants to add a new customer (and hasn't just typed the name of an existing customer incorrectly), and then provides a way to do it.
The following code example shows the event procedure. An explanation of what it does follows the code example.
Private Sub BillTo_NotInList(NewData As String, Response As Integer)
' Allows user to add a new customer by typing the customer's name
' in the BillTo combo box.

    Dim intNewCustomer As Integer
    Dim strTitle As String
    Dim intMsgDialog As Integer
    Dim strMsg As String

    Const conClrWhite = 16777215
    Const conNormal = 1

On Error GoTo ErrorHandler

    ' Check if user has already selected a customer.
    If IsNull(CustomerID) Then

        ' Display message box asking if the user wants to add a new
        ' customer.
        strTitle = "Customer Not in List"
        strMsg = "Do you want to add a new customer?"
        intMsgDialog = vbYesNo + vbQuestion
        intNewCustomer = MsgBox(strMsg, intMsgDialog, strTitle)

        If intNewCustomer = vbYes Then

            ' Remove text user entered from the combo box and assign
            ' it to the CompanyName control and the ShipName control.
            BillTo.Undo
            CompanyName.Enabled = True
            CompanyName = NewData
            ShipName = NewData

            ' Enable and move focus to CustomerID.
            CustomerID.Enabled = True
            CustomerID.Locked = False
            CustomerID.BackColor = conClrWhite
            CustomerID.BorderStyle = conNormal
            CustomerID.SetFocus

            ' Enable the other customer information controls.
            Address.Enabled = True
            City.Enabled = True
            Region.Enabled = True
            City.Enabled = True
            PostalCode.Enabled = True
            Country.Enabled = True
            ContactName.Enabled = True
            ContactTitle.Enabled = True
            Phone.Enabled = True
            Fax.Enabled = True

            MsgBox "Enter the new customer's ID, address, and" & _
                   "contact information."

            ' Continue without displaying default error message.
            Response = acDataErrContinue
        Else
            ' Display the default error message.
            Response = acDataErrDisplay
            BillTo.Undo
        End If

    Else
        ' User has already picked a customer;
        ' display a message and undo the field.
        strMsg = "To modify this customer's company name, edit " & _
                 "the name in the "
        strMsg = strMsg & "box below the Bill To combo box. To " & _
                 "add a new customer, "
        strMsg = strMsg & "click 'Undo Current Field/Record' on the " & _
                          "Edit menu and then type the "
        strMsg = strMsg & "new company name in the Bill To combo box."
        MsgBox strMsg, vbInformation
        BillTo.Undo
        ' Continue without displaying default error message.
        Response = acDataErrContinue
    End If

    Exit Sub

ErrorHandler:
    MsgBox "Error#:  " & Err.Number & vbCrLf & vbCrLf & Err.Description
End Sub

Private Sub CustomerID_Exit(Cancel As Integer)

On Error GoTo ErrorHandler

    ' If CompanyName text box has a value, CustomerID text box
    ' must also have a value.
    If Not IsNull(CompanyName) And IsNull(CustomerID) Then
        MsgBox "You must enter a 5-character Customer ID.", vbInformation
        Cancel = True
    End If

    Exit Sub

ErrorHandler:
    MsgBox "Error#:  " & Err.Number & vbCrLf & Err.Description
End Sub
In this code, you use the MsgBox function to ask if the user wants to add a new customer. If the user chooses Yes, the event procedure uses the Undo method to remove the text from the combo box. It then uses the NewData argument to assign the text the user entered in the combo box to the CompanyName control and the ShipName control. With the value cleared from the combo box, you can move the focus down to the customer controls.
Because the user can't use the Orders form to change the CustomerID for an existing customer, the CustomerID control is normally locked, disabled, and displayed with a background that matches the form's background, so it doesn't look like a control the user can edit. Now that the user is entering a new customer, your code unlocks and enables the control, and displays it with a white background and borders. It also enables the other customer information controls. An event procedure for the form's AfterUpdate event, which occurs after the record is saved, locks and disables the CustomerID control again, and displays it without a white background.
Note In the Orders form in the Orders sample application, all the fields from the Customers table are located on the Orders form, so users can add a complete record for a new customer directly in the fields on the Orders form. If you don't want to include all the fields from the underlying table on your form, you can still let users add a new record to it. When the user wants to add a row to a combo box, display a separate form with all the fields from the underlying table on it. After the user saves and closes this separate form, you can requery the combo box so the new item appears in its list. For an example of this approach, see the Developer Solutions sample application. You can download the Developer Solutions sample application and associated Help files from the Microsoft Developer Network (MSDN) Online Web site.
Step Two: Write the event procedure that updates the combo box Your NotInList event procedure lets the user add a new customer and a new order at the same time. Once the order is saved and the new customer record is in the Customers table, you can update the BillTo combo box so it includes the new customer. You do this by writing an event procedure for the form's AfterUpdate event that requeries the combo box using the Requery method, as follows:
Private Sub Form_AfterUpdate()
   BillTo.Requery
End Sub
Tip If your combo box list includes a large number of rows, requerying the list every time you save a record may slow down your form's performance. In this case, you can improve performance by opening a separate form for the user to add a new customer, and then requerying the combo box only when the customer information about the separate form is saved.
You can use a tab control to present several pages of information about a single form. A tab control is useful when your form contains information that can be sorted into two or more categories. For example, the Employees form in the Northwind sample application uses a tab control to display two pages of information about employees.
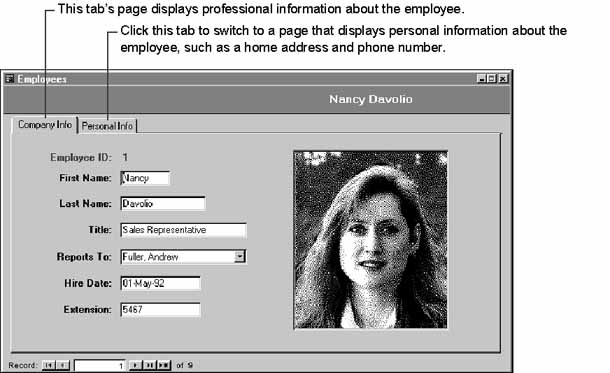
The tab control provides a user interface similar to Microsoft® Windows® tabbed dialog boxes. Users switch between pages by clicking the corresponding tab on the top of the page.
You add a tab control to a form in much the same way as you add other controls, except that each page on a tab control contains other controls. A tab control can't contain other tab controls, but it's possible to have two or more separate tab controls on a form.
Note When you add a tab control to a form, Access assigns default values to the Name property for each page: Page1 and Page2. Each page in a tab control is treated as a separate control on the form, and every control must have a unique value for its Name property. For this reason, if you add a second tab control to a form, Access won't assign Page1 as the default value for the Name property of the first page in the second tab control, or allow you to change the value to Page1. For the same reason, no other control on the same form can have its Name property set to Page1. However, you can use the same text on more than one page's tab by setting the page's Caption property.
To add a tab control to a form
Access adds a tab control with two pages. The Page1 tab is on top.
Note You can also copy controls from another part of a form or from another page and paste them onto a tab control page. However, you can't drag controls from another part of a form or from another page.
| To | Do this |
| Change the name of a tab | Right-click the tab whose name you want to change, click Properties on the shortcut menu, and then specify a new name in the Caption property. If you don't specify a name in the Caption property, Access uses the text in the Name property. |
| Add or delete pages, or change the page order of tabs | Right-click the tab, and then click Insert Page, Delete Page, or Page Order on the shortcut menu.
You can also insert a page by copying and pasting an existing page. This copies the entire page, including the controls on it. You can also delete a page by clicking the page, and then pressing DELETE. |
| Change the tab order of controls on a page | Right-click the page and click Tab Order on the shortcut menu. |
| Change the font name, font size, or font style (weight, italic, and/or underline) of all pages | Right-click the border of the tab control, click Properties on the shortcut menu, and then set the appropriate properties. The property settings you select apply to the fonts on all pages of the tab control.
Note The font color is determined by the Color setting for 3D Objects specified on the Appearance tab of the Display Properties dialog box, which is available from Windows Control Panel. |
Note Access won't crop controls when you size the tab control. You may need to move controls before you make the tab control smaller.
You can further customize how a tab control and its pages look and work by setting their properties. Tab control properties affect the way the tab control as a whole looks and works, and in many cases apply to all the pages within the control. For example, you can set the TabFixedHeight and TabFixedWidth properties to set the size of all tabs on a tab control. You can set most tab control properties in the tab control property sheet; however, some properties can only be set or referenced by using VBA. To display the tab control property sheet, right-click the border of the tab control and click Properties on the shortcut menu.
See Also For information about tab control properties that are only available by using VBA, see "Referring to Tab Control Objects in Visual Basic" later in this section.
The following table lists the most commonly used tab control properties. For information about other properties, press F1 when the insertion point is in the property box.
| Tab control property | Description |
| MultiRow | Specifies whether a tab control can have more than one row of tabs. If the MultiRow property is set to No, Access truncates the tabs if they exceed the width of the tab control and adds a scroll bar. The default setting is No. |
| BackStyle | Specifies whether the pages in the tab control are transparent. When set to Normal, the color of pages is determined by the 3D Objects color specified on the Appearance tab of the Display Properties dialog box, which is available from Windows Control Panel. When set to Transparent, the color of pages is determined by the BackColor property of the detail section and the Picture property of the form (if any) showing through them. The tabs in a tab control are always solid and use the 3D Objects color set in the Windows Control Panel. The default setting is Normal. |
| Style | Specifies what to display at the top of the tab control. You can display tabs, command buttons (in the same positions as tabs), or nothing. The default setting is Tabs.
You may want to display nothing if you want to use command buttons on the form outside the tab control to determine which page has the focus. To do this, set the tab control's Style property to None. Then add an event procedure to the button's OnClick event that sets the tab control's Value property to the page you want to display. See Also For information about how to do this, see "Referring to and Changing the Current Page" later in this section. |
| TabFixedHeight | Specifies the height of tabs in inches. When set to 0, each tab is tall enough to fit its contents. The minimum height is .05 inches. The default setting is 0. |
| TabFixedWidth | Specifies the width of tabs in inches. When set to 0, each tab is wide enough to fit its contents and, if there is more than one row of tabs, the width of each tab is increased so that each row of tabs spans the width of the tab control. If the setting is greater than 0, all tabs have an identical width as specified by this property. The minimum width is 0.5 inches. The default setting is 0. |
In addition to the properties that apply to the tab control as a whole, there are also properties that apply to individual pages. Tab control page properties affect the way a page looks and works. All tab control page properties can be set in the page property sheet. To display the page property sheet, right-click the tab, and then click Properties on the shortcut menu.
The following table lists the most commonly used tab control page properties. For information about other properties, press F1 when the insertion point is in the property box.
| Tab control page property | Description |
| Name | Specifies the name of the page. Use this name when referring to a tab control page in VBA. The default name is Page1 for the first page, Page2 for the second page, and so on. |
| Caption | Specifies the display text that appears on a tab. If you don't specify a name in the Caption property, Access uses the text in the Name property. |
| Picture | Use to add a graphic to a tab. The graphic is displayed to the left of the tab name specified in the Caption property. If you want to display only a picture and no name, enter a space in the Caption property. |
If you're going to use a tab control in a custom dialog box, you may want to set additional properties so that your form looks and works like a Windows dialog box.
See Also For more information about making a form look and work like a dialog box, see "Using Pop-up Forms and Dialog Boxes" earlier in this chapter.
In most ways, a tab control works like other controls on a form and can be referred to as a member of a form's Controls collection. For example, to refer to a tab control named TabControl1 on a form named Form1, you can use the following expression:
Form1.Controls!TabControl1
However, because the Controls collection is the default collection of the Form object, you don't have to explicitly refer to the Controls collection. That is, you can omit the reference to the Controls collection from the expression, like this:
Form1!TabControl1
A tab control contains one or more pages. Each page in a tab control is referenced as a member of the tab control's Pages collection. Each page in the Pages collection can be referred to by either its PageIndex property setting (which reflects the page's position in the collection starting with 0), or by the page's Name property setting. There is no default collection for the TabControl object, so when referring to items in the Pages collection by their index value, or to properties of the Pages collection, you must explicitly refer to the Pages collection.
For example, to change the value of the Caption property for the first page of a tab control named TabControl1 by referring to its index value in the Pages collection, you can use the following statement:
TabControl1.Pages(0).Caption = "First Page"
Because each page is a member of the form's Controls collection, you can refer to a page solely by its Name property without referring to the tab control's name or its Pages collection. For example, to change the value of the Caption property of a page with its Name property set to Page1, use the following statement:
Page1.Caption = "First Page"
Note If a user or code changes a page's PageIndex property, the reference to the page's index and the page's position in the page order change. In this case, if you want to maintain an absolute reference to a page, refer to the page's Name property.
The Pages collection has one property, Count, that returns the number of pages in a tab control. Note that this property is not a property of the tab control itself, but of its Pages collection, so you must explicitly refer to the collection. For example, to determine the number of pages in TabControl1, use the following statement:
TabControl1.Pages.Count
A tab control's default property is Value, which returns an integer that identifies the current page: 0 for the first page, 1 for the second page, and so on. The Value property is only available in VBA code or in expressions. By reading the Value property at run time, you can determine which page is currently on top. For example, the following statement returns the value for the current page of TabControl1:
TabControl1.Value
Note Because the Value property is the default property for a tab control, you don't have to refer to it explicitly. For this reason, you could omit .Value from the preceding example.
Setting a tab control's Value property at run time changes the focus to the specified page, making it the current page. For example, the following statement moves the focus to the third page of TabControl1:
TabControl1 = 2
This is useful if you set a tab control's Style property to None (which displays no tabs) and want to use command buttons on the form to determine which page has the focus. To use a command button to display a page, add an event procedure to the button's OnClick event that sets the tab control's Value property to the integer that identifies the appropriate page.
By using the Value property with the Pages collection, you can set properties at run time for the page that is on top. For example, you can hide the current page and all of its controls by setting the page's Visible property to False. The following statement hides the current page of TabControl1:
TabControl1.Pages(TabControl1).Visible = False
Each page in a tab control also has a PageIndex property that specifies the position of a page within the Pages collection using the same numbering sequence as the tab control's Value property: 0 for the first page, 1 for the second page, and so on. Setting the value of a page's PageIndex property changes the order in which pages appear in the tab control. For example, if you wanted to make a page named Page1 the second page, you'd use the following statement:
Page1.PageIndex = 1
The PageIndex property is more typically set at design time in a page's property sheet. You can also set the page order by right-clicking the border of a tab control and then clicking Page Order on the shortcut menu.
The controls you place on a tab control page are part of the same collection as all controls on the form. For this reason, each control on a tab control page must have a name that's unique with respect to all other controls on the same form. You can refer to controls on a tab control page by using the same syntax used for controls on a form without a tab control. For example, a fully qualified reference to the HomePhone text box on the Personal Info tab of the Employees form in the Northwind sample application would read as follows.
Forms!Employees!HomePhone
Because each control on a form has its own Controls collection, you can also refer to the controls on a tab control as members of its Controls collection. For example, the following code enumerates (lists) all the controls on the tab control of the Employees form in the Northwind sample application. Because the EmployeeName text box in the header section of the form is not a member of this collection, it isn't listed.
Sub ListTabControlControls()

   Dim tabCtl As TabControl
   Dim ctlCurrent As Control

On Error GoTo ErrorHandler

   ' Return reference to tab control on Employees form.
   Set tabCtl = Forms!Employees!TabCtl0

   ' List all controls on the tab control in the Debug window.
   For Each ctlCurrent In tabCtl
      Debug.Print ctlCurrent.Name
   Next ctlCurrent

   Set tabCtl = Nothing
   Set ctlCurrent = Nothing

   Exit Sub

ErrorHandler:
   MsgBox "Error #: " & Err.Number & vbCrLf & vbCrLf & Err.Description
End Sub
Additionally, each page on a tab control has its own Controls collection. By using a page's Controls collection, you can refer to controls on each page. The following code enumerates the controls for each page of the tab control on the Employees form in the Northwind sample application.
Sub ListPageControls()

   Dim tabCtl As TabControl
   Dim pagCurrent As Page
   Dim ctlCurrent As Control
   Dim intPageNum As Integer

On Error GoTo ErrorHandler

   ' Return reference to tab control on Employees form.
   Set tabCtl = Forms!Employees!TabCtl0

   ' List all controls for each page on the tab control in the
   ' Debug window.
   For Each pagCurrent In tabCtl.Pages
      intPageNum = intPageNum + 1
      Debug.Print "Page " & intPageNum & " Controls:"
      For Each ctlCurrent In pagCurrent.Controls
         Debug.Print ctlCurrent.Name
      Next ctlCurrent
      Debug.Print
   Next pagCurrent

   Set tabCtl = Nothing
   Set ctlCurrent = Nothing
   Set pagCurrent = Nothing

   Exit Sub

ErrorHandler:
   MsgBox "Error #: " & Err.Number & vbCrLf & vbCrLf & Err.Description
End Sub
See Also For more information about referring to objects, see "Referring to Objects and Their Values" in Chapter 1, "Creating an Application." For more information about working with objects and collections in VBA, see Chapter 4, "Working with Objects and Collections."
Chapters 1 through 3 of this book explain the basics of building applications in Access. But these three chapters can only touch the surface of what you can do to create powerful, easy-to-use applications using Access. The following table shows where you can go from here for more information.
| Task | Resource |
| Explore further the power of VBA. | Chapters 4 and 5. Also, for complete reference information about properties, actions, functions, events, objects, the VBA language, and so forth, click Microsoft Access Help (Help Menu), click the Contents tab, and then double-click the appropriate language reference book.
Tip Click the Show button if necessary to display the left pane in the Help window. |
| Read more on application development. | Chapters 6 through 10 include information about working with sets of records in VBA, optimizing and delivering your application, using ActiveX controls, creating wizards, builders, and menu add-ins, and developing internet applications.
The Microsoft Office 2000/Visual Basic Programmer's Guide (Microsoft Press, 1999) includes more information about creating multiuser applications, communicating with other applications, using library databases and dynamic-link libraries, and securing your application. You can also find this guide in the Office Developer Documentation section of the Microsoft Developer Network (MSDN) Online Library. |
| Find out how to fill a list in a list box or combo box using a VBA function. | Type combo boxes in the Office Assistant or on the Answer Wizard tab in the Help window, and then click Search. |
| Use the Column property of a list box or combo box to refer to the value in a column other than the bound column. | Type Column property in the Office Assistant or on the Answer Wizard tab in the Help window, and then click Search. |
| Use the SysCmd function to display a progress meter or your text in the status bar, to find out the information about Access and its associated files, or to find out the status of the current object. | Type SysCmd in the Office Assistant or on the Answer Wizard tab in the Help window, and then click Search. |
| See other examples of common features you may want to use in your application and the steps for creating them. | Open the Developer Solutions sample application (Solutions9.mdb) included with the Microsoft Office 2000/Visual Basic Programmer's Guide. |