| Microsoft Access 2000: Building Applications with Forms and Reports |
CHAPTER 7
When your application performs at its best, your users get more work done with less frustration. As you create larger and more sophisticated applications, the amount of memory your applications use and the speed with which they run become more significant. You may decide you need to optimize your application by making it smaller and by speeding up calculations and displays. This chapter presents optimization techniques you can use to make your application smaller and faster.
See Also For more information about improving performance, type optimization in the Office Assistant or on the Answer Wizard tab in the Help window, and then click Search. For information about the performance of client/server applications, see Chapter 16, “Multiuser Database Solutions,” in the Microsoft Office 2000/Visual Basic Programmer's Guide (Microsoft Press, 1999). You can also find this guide in the Office Developer Documentation section of the Microsoft Developer Network (MSDN) Online Library.
Chapter Contents
Optimizing Your Microsoft Access Environment
Adjusting Windows Registry Settings to Improve Performance
Using the Performance Analyzer
Optimizing Data Retrieval and Updates
Speeding Up the Start of Your Application
Designing Forms and Reports for Speed
Additional Tips for Fast Code
Minimizing Stack Usage
Compiling and Saving Your Code Ahead of Time
The faster Microsoft® Access runs, the faster your application runs, too. You can significantly improve your application’s performance by making sure that Access has the memory it requires and that it uses memory efficiently for the types of operations your application performs. This is true whether your application runs under full Access or as an Access run-time application.
This section suggests ways to configure your computer and Access for best use of memory. If you don’t control the configuration of your application users’ computers, you may want to pass some of these suggestions on to them when you deliver your application.
Because database operations are faster when Access can perform them in random-access memory (RAM), the performance of Access depends largely on the amount of RAM available. To run by itself, Access requires a minimum of 12 megabytes (MB) of RAM for Microsoft® Windows®, or 16 MB of RAM for Microsoft® Windows NT® Workstation. The amount of memory Access needs to run at top speed depends on a variety of factors, such as how many other applications are running at the same time and what types of operations your application performs. When other applications are competing for memory, you can usually improve performance significantly by running with more than the required amount. Similarly, if your Access application uses Automation to work with another application’s objects, you can improve the performance of your application by running with more RAM. When running with 32 MB or more of RAM, you may be able to increase performance by adjusting the MaxBufferSize setting in the Windows Registry. Make sure that you aren’t using any of your RAM for a RAM drive.
See Also For more information about the MaxBufferSize setting, see “MaxBufferSize” later in this chapter.
With virtual memory, an application sees a large, continuous block of primary memory (RAM) that, in reality, is a much smaller block of primary memory supplemented by secondary memory (such as a hard disk). To temporarily free up space in RAM, blocks of data (called pages) are moved between RAM and a swap file located on the hard disk.
By default, the Windows 98 swap file is dynamic, so it can shrink or grow based on available disk space and the operations performed on the system. Also, the swap file can occupy a fragmented region of the hard disk with no substantial performance penalty. A dynamic swap file is usually the most efficient use of resources. The simplest way to ensure high virtual memory performance is to make sure that the disk containing the swap file has ample free space so that the swap file size can shrink and grow as needed.
In Windows 3.x, enhancing performance by changing virtual memory settings was quite common. Because the Windows 98 swap file is dynamic, the need to change virtual memory settings is less common. However, in some situations adjusting virtual memory settings can improve performance. If you’ve already tried deleting unnecessary files, and you still have a performance problem, try changing the Windows 98 default virtual memory settings.
If you have more than one drive available, you may get better performance if you specify that Windows locate the swap file on a drive other than the default in the following cases:
You also may get better performance if you specify the minimum disk space available for virtual memory to be at least 25 MB minus available RAM. For example, if your computer has 12 MB of RAM, you should specify at least 13 MB of virtual memory. You may want to specify more if you are running several large applications.
See Also For information about changing Windows 98 virtual memory settings, type virtual memory settings in the Office Assistant or on the Answer Wizard tab in the Help window, and then click Search.
Each time you add or update data, your database grows. But when you delete data, the database doesn’t automatically get smaller. Access makes empty data pages available for reuse after you close a database, so the next time you open the database they are available to be filled with new records. If left unused, empty data pages remain in the database until you compact it. Compacting the database frees unused disk space, makes all data pages contiguous, and, if a primary key is defined for a table, saves its records in primary key order. For databases in which records are frequently added, deleted, and updated, you should compact frequently. Access has a new option to compact the database when it is closed. In addition, the function of compact and repair have been combined.
Note If your database is a replica, you must compact it twice to reclaim all available space. Additionally, if your database is the Design Master in a replica set, you must take certain precautions when compacting it to prevent it from losing its Design Master status. For more information about replication, see Chapter 16, “Multiuser Database Solutions,” in the Microsoft Office 2000/Visual Basic Programmer's Guide (Microsoft Press, 1999). You can also find this guide in the Office Developer Documentation section of the Microsoft Developer Network (MSDN) Online Library.
See Also For more information about compacting databases, see “Compacting a Database,” in Chapter 8, “Delivering Your Application.”
In addition, you should occasionally use a utility such as the Windows Disk Defragmenter to defragment the hard disk after you compact it. This increases efficiency by making your database file contiguous on the hard disk.
If you have a wallpaper (full-screen background) bitmap on your Windows desktop and don’t have memory to spare, replace your wallpaper with a solid color or pattern bitmap, or don’t use a bitmap.
Settings in the Engines subkey of the Windows Registry control how the Microsoft Jet database engine uses memory and performs other aspects of its operations. Microsoft Jet automatically provides default settings that usually give the best performance for most common database operations. However, depending on what kind of operations your application performs and how much memory is available at any given time, you may be able to improve performance by adjusting Windows Registry settings.
Keep in mind that the optimum value for a setting can change from computer to computer, and can change depending on how much memory is available, the kind of operation the user is performing, or the level of activity in the database at any given time. Using a system and working environment that’s as much like your typical user’s system as possible, experiment with these settings to find out what works best.
The default values for these Microsoft Jet settings are written in the \HKEY_LOCAL_MACHINE\SOFTWARE\Microsoft\Jet\4.0\Engines\Jet 4.0 subkey of the Windows Registry when Access is installed. Changes made to settings in this subkey may affect other applications that use the Jet 4.0 database engine, such as Microsoft Visual Basic® for Applications (VBA), version 6.0 or Microsoft Excel 2000. To make changes that only affect Microsoft Access 2000, create a Jet 4.0 subkey below the \HKEY_LOCAL_MACHINE\SOFTWARE\Microsoft\Office\9.0\Access\Jet\4.0\Engines subkey where you can add values for any default setting you want to override.
If you want changes to Microsoft Jet settings to affect only your application or your session of Access, you can create a custom set of Registry subkeys, called a user profile, that contains settings to override default Registry settings. You use the /profile command-line option when starting Access to specify the user profile you want your application to use.
See Also For information about user profiles or changing Microsoft Access Registry settings, type user profiles or Registry in the Office Assistant or on the Answer Wizard tab in the Help window, and then click Search.
Tip You can also change most of these settings by using the SetOption method of the DBEngine object in Data Access Objects (DAO) code. Using the SetOption method, you can change these settings “on the fly” while your application is running. For example, you may want to change the SharedAsyncDelay and PageTimeout settings to low values to increase performance when your application performs operations on one record at a time or is using controls bound to data, but increase these values when performing bulk operations such as update and delete queries or transactions on large numbers of records. Changing Microsoft Jet settings by using the SetOption method doesn’t affect the values stored in the Windows Registry. Changes made with the SetOption method are only in effect for the current instance of the DBEngine object. For more information about the SetOption method, type SetOption method in the Office Assistant or on the Answer Wizard tab in the Help window, and then click Search.
The following sections discuss the Windows Registry settings you can adjust to improve performance.
A thread is a software process running independently on a multitasking operating system such as Windows 98 or Windows NT Workstation. For example, the ability to use multiple threads allows you to run a communications software program to download a file at the same time as you use your word processor to edit a document. Microsoft Jet uses threads internally to enhance performance and provide background services such as read-ahead caching, write-behind caching (transaction commit), cache maintenance, and the detection of changes made to shared databases. By default, Microsoft Jet uses up to a maximum of three threads. You may want to try increasing the Threads setting if a large number of actions are performed in your application, or if it contains a large number of linked tables.
Microsoft Jet reads and writes data in 2K pages, placing the data in a temporary holding area called the buffer as required by its operations. By default, when performing operations that add, delete, or update records and that aren’t part of an explicit transaction, Microsoft Jet automatically performs internal transactions that group changes to records and temporarily saves them in the buffer. After a specified time, or when the size specified by the MaxBufferSize setting is exceeded, it then writes the data as a chunk to the database. This minimizes the time spent reading and writing data to the database. Additionally, Microsoft Jet can minimize the time spent reading data for tables, queries, forms, or reports by reading available data from its buffer.
See Also For information about other settings that regulate the management of transactions, see “ImplicitCommitSync,” “ExclusiveAsyncDelay,” and “SharedAsyncDelay” later in this section.
The MaxBufferSize setting specifies a “high water mark” for the size of the buffer that Microsoft Jet uses to work with records in memory, measured in kilobytes. Microsoft Jet can temporarily exceed the MaxBufferSize. As soon as it does, however, it starts a background thread to write data to the database to bring the buffer’s size down to the specified “high water mark.”
By default, Microsoft Jet allocates memory for its internal buffer on an as-needed basis up to the MaxBufferSize. The default value written in the Windows Registry for the MaxBufferSize setting when Access is installed is 0, which indicates that Microsoft Jet calculates the setting based on the following formula:
((Total RAM in K - 12,288)/4 + 512K)
For example, on a system with 32 MB of RAM (32,768K), Microsoft Jet uses a MaxBufferSize setting of 5,632 KB.
You can override the default calculated setting by specifying a different MaxBufferSize value. This sets a new “high water mark.” The minimum value that Microsoft Jet uses by default is 512K, but you can specify a value as low as 128K. However, setting the MaxBufferSize to a value less than 512K is not recommended for Access applications because it can seriously degrade performance.
For computers with 16 MB or less of installed RAM, there is generally no need to override the calculated setting. For computers with 32 MB of RAM, you may see some performance improvement when specifying a larger MaxBufferSize if no other applications are running at the same time as Access. For example, tests have shown performance improvements in applications that perform large transactions when a MaxBufferSize as large as 8 MB is specified.
Specifying a MaxBufferSize larger than 8 MB hasn’t been found to increase performance. Setting a value too high can degrade performance due to the added CPU overhead needed to manage the cache, and due to the fact that the operating system may start swapping Microsoft Jet’s cache to disk as virtual memory.
Note When specifying a MaxBufferSize setting that is larger than the default, you should also increase the SharedAsyncDelay setting to increase the time that data is held in the buffer. If you don’t increase the SharedAsyncDelay setting, Microsoft Jet writes the contents of its buffer to the database before it has had time to utilize the additional memory you specified. For more information about the SharedAsyncDelay setting, see “SharedAsyncDelay” later in this section.
The UserCommitSync setting determines whether changes made as part of an explicit transaction (a change made to data by using the BeginTrans, CommitTrans, and Rollback methods) are written to the database in synchronous mode or asynchronous mode. In synchronous mode, Microsoft Jet doesn’t return control to the application code until the changes made by the CommitTrans method are written to the database. In asynchronous mode, Microsoft Jet stores the changes in its memory buffer, returns control to the application code immediately, and then writes the changes to the database in a background thread. Microsoft Jet begins writing the changes either after a specified period of time (determined by the FlushTransactionTimeout setting, or by the SharedAsyncDelay or ExclusiveAsyncDelay settings described later in this section) or when the MaxBufferSize is exceeded. The default UserCommitSync setting is Yes, which specifies synchronous mode. It is not recommended that you change this setting because in asynchronous mode, there is no guarantee that information has been written to disk before your code proceeds to the next command.
Note If you’ve used explicit transactions to improve performance in previous versions of Access, you no longer need to do so. For more information, see “Using Transactions to Update Records” later in this chapter.
See Also For more information about transactions, see “Microsoft Jet Transactions,” in Chapter 6, “Working with Records and Fields.”
By default, when performing operations that add, delete, or update records outside of explicit transactions, Microsoft Jet automatically performs internal transactions that temporarily save data in its memory buffer, and then later write the data as a chunk to the disk. The ImplicitCommitSync setting determines whether changes made by using these automatic internal transactions are written to the database in synchronous mode or asynchronous mode. The default setting is No, which specifies that these changes are written to the database in asynchronous mode; this provides the best performance. If you want internal transactions to be written to the database in synchronous mode, change the ImplicitCommitSync setting to Yes. If you change the setting to Yes, you get behavior similar to Microsoft Jet versions 2.x and earlier when you weren’t employing explicit transactions. However, doing so can also impair performance considerably, so it is not recommended that you change this setting.
The FlushTransactionTimeout setting determines Microsoft Jet’s method of performing asynchronous writes to a database file. The FlushTransactionTimeout setting is the number of milliseconds after which Microsoft Jet starts writing database changes to disk from its cache. Changes are written to disk after the specified amount of time has expired and if no new pages have been added to the cache during that interval. The only exception is if the size of the cache exceeds the MaxBufferSize setting, at which point the cache starts asynchronous writes regardless of whether the time has expired. The default setting is 500 milliseconds. The only reason to increase the value of the FlushTransactionTimeout setting is if the database is being updated over a slow wide area network (WAN) or local area network (LAN) connection. Increasing this value for databases being updated over fast WAN and typical LAN connections does not improve performance.
The FlushTransactionTimeout setting overrides both the ExclusiveAsyncDelay and SharedAsyncDelay Registry settings, and is the preferred method of determining how Microsoft Jet performs asynchronous writes to a database file. To enable the ExclusiveAsyncDelay and SharedAsyncDelay settings, you must set the FlushTransactionTimeout entry to a value of 0.
The ExclusiveAsyncDelay setting is the maximum time that can pass before asynchronous mode changes start to be written to a database that’s opened exclusively. The default setting is 2,000 milliseconds. Decrease this setting if you want to be sure that changes are written to your database more frequently, but note that this decreases overall performance. Because the default setting is already quite long, increasing this setting doesn’t improve performance in most cases. However, if your system has 32 MB of RAM or more and you have specified a large MaxBufferSize, you may see some performance improvement if you increase this setting. By default, this setting is disabled by the FlushTransactionTimeout setting.
The SharedAsyncDelay setting is the maximum time that can pass before asynchronous mode changes start to be written to a database that’s opened in shared mode. The default setting is 0 milliseconds. Note that this produces a small delay before changes are made available to other users. Increasing this value enhances performance in shared databases because there are fewer disk writes. However, it may reduce the overall concurrency because pages are locked while they are in the buffer waiting to be written to the database. If your application performs operations that affect many records, increase this setting to give Microsoft Jet additional time to temporarily save additions, deletions, and updates in its buffer before it writes them to the database. This applies whether your application uses action queries, DAO code, ActiveX® Data Object (ADO) code, or SQL statements to add, delete, or update records. By default, this setting is disabled by the FlushTransactionTimeout setting.
The PageTimeout setting determines how long Microsoft Jet waits before checking to see if other users have made changes to the database. If changes have been made, Microsoft Jet refreshes the data in its memory buffer.
Note This action is equivalent to pressing F9 while viewing a table or query in Access, or using the Refresh method in DAO or ADO code.
The default PageTimeout setting is 5,000 milliseconds. Decreasing this setting increases the amount of time spent reading from the disk, thus impairing performance, but can make the data available to the user more current. The Refresh Interval setting on the Advanced tab of the Options dialog box (Tools menu) in Access overrides the PageTimeout setting.
Tip You can override the PageTimeout setting and refresh the cache by using the dbRefreshCache argument of the Idle method in DAO code. This allows users to see other users’ changes immediately. For more information about the Idle method, type Idle method in the Office Assistant or on the Answer Wizard tab in the Help window, and then click Search.
If Access tries to place a lock on a page in a shared database and a message that locking has failed is returned, the LockDelay setting determines how long it waits before it retries. If the time it takes to return the message exceeds the LockDelay setting, there is no delay. The default setting is 100 milliseconds. On systems that don’t manage lock retries themselves, such as Windows 95 peer-to-peer networking, the LockDelay setting prevents Microsoft Jet from performing repeated retries over a short period of time. If you are using such a system, the default setting is usually sufficient to reduce the number of lock requests sent across the network, which frees up network bandwidth for other purposes. If your application or its users frequently lock a large number of records, you may want to try increasing this setting to further reduce the number of lock requests being sent across the network. If you are using a server-based networking system that manages lock retries itself, such as Microsoft® Windows NT® Server or Novell® NetWare®, there is no need to change this setting.
The MaxLocksPerFile setting determines the maximum number of locks that Microsoft Jet places against a file. The default setting is 9,500 locks. If the number of locks required to perform a transaction exceeds the MaxLocksPerFile setting, the transaction commits (writes) the data that has locks associated with it, frees the locks, and then continues processing the transaction. If the maximum number of locks a server can handle is less than the MaxLocksPerFile setting, the server returns an error message or appears to hang when performing a large transaction. If this occurs, you should decrease the MaxLocksPerFile setting. A Novell server can be configured to perform a maximum of 10,000 locks per connection. A Novell server connection can include more than one database, so it’s possible to exceed the maximum number of available locks if you are using more than one database at a time.
Long value (LV) pages store data in fields with Memo, OLE object, and Hyperlink data types, as well as the data that defines forms, reports, and modules. When a database is open in shared mode, the size of the database increases when data, forms, reports, and modules are deleted or changed in such a way that the current LV page must be discarded and replaced with a new LV page. Sometimes a new LV page is needed to prevent errors for other users who may still be using the object or data in its original form.
The RecycleLVs setting determines when discarded LV pages become available for reuse. The default RecycleLVs setting is 0, which specifies that discarded LV pages continue to occupy space in the database and only become available for reuse after the last user closes the database. You can change the RecycleLVs setting to 1 so that discarded LV pages become available for reuse after Microsoft Jet determines that there’s only one user in the database in shared mode and that new LV data has been added to the database. Note that setting RecycleLVs to 1 slows down performance somewhat. Therefore, this is primarily useful when you are creating or modifying forms, reports, and modules because it minimizes the need to compact the database.
When a database is open in exclusive mode, the RecycleLVs setting has no effect: discarded LV pages become available for reuse immediately. In both exclusive mode and shared mode, discarded LV pages are reused only when new LV data needs to be written to the database. To remove discarded LV pages before that time, you must compact the database.
You use the Performance Analyzer to improve the performance of your application by optimizing either your entire database or a single object in your database. Depending on the level of optimization you choose, the Performance Analyzer can do something as simple as adding an index to a field, or it can perform complex operations such as converting an OLE object on a form to an image.
To use the Performance Analyzer
The Performance Analyzer lists three kinds of analysis results: Recommendations, Suggestions, and Ideas. When you click an item in the Analysis Results list, the Analysis Notes box displays information about the proposed optimization. Suggestion optimizations have potential tradeoffs that you should consider before performing them. To view a description of the tradeoffs, click a Suggestion optimization in the Analysis Results box, and then read the information in the Analysis Notes box.
You must perform Idea optimizations yourself. To perform an Idea optimization, click that optimization, and then follow the instructions in the Analysis Notes box.
Because retrieving and updating data are the main operations of most database applications, performing these operations quickly speeds up the entire application. This section offers suggestions for designing the most efficient tables and queries and for writing code that updates records quickly.
See Also For information about optimizing data retrieval and updates in client/server applications, see Chapter 16, “Multiuser Database Solutions,” in the Microsoft Office 2000/Visual Basic Programmer's Guide (Microsoft Press, 1999). You can also find this guide in the Office Developer Documentation section of the Microsoft Developer Network (MSDN) Online Library.
A well-designed database is a prerequisite for fast data retrieval and updates. Take time to plan the design of your database carefully. Determine which tables, fields, and relationships your database needs to operate efficiently and accurately.
If existing tables in your database contain redundant data, you can split the data into related tables so that you can store data more efficiently. This process is called normalization. You can use the Table Analyzer Wizard to manually normalize your tables, or you can have the wizard do this for you automatically.
See Also For information about how to determine which tables, fields, and relationships belong in your database, type database design in the Office Assistant or on the Answer Wizard tab in the Help window, and then click Search. For more information about using the Table Analyzer Wizard, see “Using the Table Analyzer Wizard” later in this chapter.
You can save space in your database and improve join operations by choosing appropriate data types for fields. When defining a field, choose the smallest data type that’s appropriate for the data in the field. Also, give fields you use in joins the same or compatible data types.
See Also For more information about data types, type data types in the Office Assistant or on the Answer Wizard tab in the Help window, and then click Search. For information about the size of data types, type fields, size in the Office Assistant or on the Answer Wizard tab in the Help window, and then click Search.
An index helps Access find and sort records faster. You can make dramatic improvements in the speed of queries by indexing fields on both sides of joins, or by creating a relationship between those fields and indexing any field used to set criteria for the query. Finding records through the Find dialog box (Edit menu) is also much faster when searching an indexed field.
See Also For information about query optimization, type optimize performance in the Office Assistant or on the Answer Wizard tab in the Help window, and then click Search.
Note Microsoft Jet can use a descending index to optimize a query as long as criteria on the indexed field uses an equal sign (=) as the comparison operator. If the index is descending and the comparison operator is something other than an equal sign, the index won’t be used. Ascending indexes (the default) can always be used to optimize a query.
Indexes take up space on your hard disk and slow down the adding, deleting, and updating of records. In most situations, the speed advantages for data retrieval outweigh these disadvantages. If your application updates data very frequently or if you have disk space constraints, you may want to limit indexes; otherwise, use them generously. Make sure to create a primary key or unique index if the data in a field or combination of fields uniquely identifies the records in a table.
If you use multiple-field indexes, Access can optimize queries that join multiple fields from one table to multiple fields in another table (such as LastName, FirstName in one table to LastName, FirstName in another table) or that search for values in multiple fields. When joining or searching in individual fields, use a single-field index on each field.
If you use criteria on a field in a multiple-field index, the criteria must apply to the first field or fields in the index in order for Microsoft Jet to use the index to optimize the query. For example, if you have a multiple-field index on the two fields LastName and FirstName used in a join to the LastName and FirstName fields in another table, Microsoft Jet can use the multiple-field index to optimize the query when you have criteria on LastName only, or on LastName and FirstName, but not if the criterion is on FirstName only. If the criterion is on FirstName only, you must add a single-field index on FirstName to optimize the query. The simplest approach is to add multiple-field indexes to fields used in multiple-field joins and also add a single-field index to any field on which you use criteria to restrict the values in the field. You can add both a multiple-field index and a single-field index to the same field.
If you use criteria to restrict the values in a field used in a join, test whether the query runs faster with the criteria placed on the “one” side or the “many” side of the join. In some queries, you get faster performance by adding the criteria to the field on the “one” side of the join instead of the “many” side.
When Access processes sums and other aggregate functions in a query, you can make the query more efficient by grouping the records effectively. For example:
See Also For information about the First function , type First function in the Office Assistant or on the Answer Wizard tab in the Help window, and then click Search.
Instead of using domain aggregate functions, such as the DLookup function, in a query, add the table referred to in the DLookup function to the query or create a subquery to access the table’s data.
When using the Count function to calculate the number of records returned by a query, use the syntax Count(*) instead of Count([fieldname]). Count(*) is faster because it doesn’t have to check for Null values in the specified field.
If you add a query that contains a calculated field to another query, the expression in the calculated field slows performance in the top-level query. For example, suppose this is Query1:
SELECT Format$(Field1) As TempField FROM Table1
Query1 is nested in the following query, Query2:
SELECT * FROM Query1 Where TempField = 100
When you nest Query1 in Query2, the expression Format$(Field1) in Query1 slows performance in Query2. For best performance, use calculated fields only in the top-level query of nested queries. If that’s not practical, use a calculated control on the form or report that’s based on the query to show the result of the expression instead of nesting the query.
After you save a query, Microsoft Jet recompiles the query the next time the query runs. On slower computers, this takes much longer than running the compiled query. (The query regains its usual speed after being compiled.) To make your application’s queries run as fast as possible the first time through, make sure that all its queries are compiled when you deliver it. To compile a query, run it by opening it in Datasheet view and closing it without resaving the query.
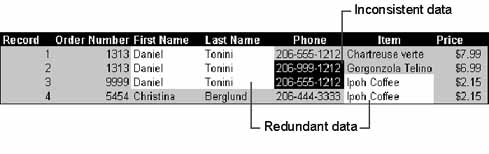
If your database has a table that contains a great deal of duplicate information in one or more fields, you can use the Table Analyzer Wizard to split the data into smaller related tables so that you can store data more efficiently. This process is called normalization. After identifying the data that can be moved to smaller tables, the Table Analyzer Wizard identifies a unique value within each new table to use as a primary key, or if no such value exists, creates an incrementing AutoNumber field to use as the primary key. It creates foreign key fields and uses them with the primary keys to create a relationships between the new tables. Finally, the wizard searches through your data, identifies any values that appear to be inconsistent, and prompts you to choose the correct value.
For example, the following illustration shows a single table that contains redundant and inconsistent data.
When you run the Table Analyzer Wizard to normalize this table, it creates a set of related tables, such as those shown in the following illustration.
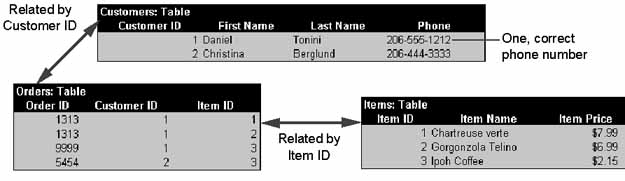
Using the Table Analyzer Wizard, you can either specify the tables you want to create or have Access normalize your tables automatically.
To use the Table Analyzer Wizard
In the last screen, you can create a query to view all the information from the split tables in a single datasheet.
See Also For more information about database design and relationships, type database design and relationships in the Office Assistant or on the Answer Wizard tab in the Help window, and then click Search.
In Microsoft Access versions 2.0 and earlier, it was recommended that you always use transactions to improve performance when you add, delete, or change a set of records in code. In Microsoft Access 95, Microsoft Access 97, and Microsoft Access 2000, you should only use explicit transactions in situations where you may need to roll back changes. Microsoft Jet can now automatically perform internal transactions to improve performance whenever it adds, deletes, or changes records. Microsoft Jet manages this process dynamically and, in nearly all cases, produces better performance than using explicit transactions.
See Also For information about Windows Registry settings that affect internal and explicit transactions, see “Adjusting Windows Registry Settings to Improve Performance” earlier in this chapter. For more information about transactions, see “Microsoft Jet Transactions,” in Chapter 6, “Working with Records and Fields.”
First impressions are important. The first impression your application makes depends, in part, on how long it takes to display the first form. You can use the following techniques to speed up the start of your application.
If your startup form calls procedures in several modules, then all of those modules are loaded when your application starts up, and that takes time. Put any procedures that your startup form calls in a single form module; your startup form shouldn’t call procedures in standard modules.
Because the amount of time required to load a form is directly related to the size and complexity of the form and its code, simplify your startup form to make sure it’s displayed as soon as possible after your application starts. For the highest level of performance, don’t use any code in your startup form.
See Also For more information about simplifying your forms’ design and reducing the amount of code in your forms, see “Optimizing Form Loading and Paging” later in this chapter.
VBA loads an ActiveX control at the same time it loads the form using the ActiveX control. Using ActiveX controls, formerly called OLE controls or custom controls, on a form increases the time it takes to load and display the form. VBA can load and display your startup form more quickly if it doesn’t include ActiveX controls. Typically, the startup form is a simple About dialog box, an introductory screen, or a Logon dialog box.
Most interaction between the user and your application happens through forms and reports. Each open form or report in your application uses memory and requires some disk activity. This section contains suggestions on how you can design and manage forms and reports so your application runs faster.
The following tips can reduce the amount of time the user spends waiting for a form to load and to switch between pages.
The number and type of controls on a form can greatly affect the time it takes for the form to load. To make your forms load more quickly:
A form without a form module loads more quickly and occupies less disk space than one with a form module. To make your forms load more quickly, find alternatives to using event procedures in your forms and remove any existing form modules that you can.
There are several alternatives to using event procedures in your forms and controls. For example, suppose your application uses a switchboard form exclusively to navigate to other forms. When you design your switchboard form, instead of using command buttons with event procedures, you can use command buttons with macros. You can also use labels, text boxes, or command buttons that navigate to objects by using hyperlinks.
See Also For more information about hyperlinks, see Chapter 10, “Developing Applications for the Internet and the World Wide Web” or type hyperlinks in the Office Assistant or on the Answer Wizard tab in the Help window, and then click Search.
Note If a form and its controls don’t use event procedures, the form doesn’t need a form module. If a form currently contains event procedures, and you remove all event procedure code from that form, the empty form module isn’t deleted automatically. If you want to delete the empty form module, you must do so manually by setting the form’s HasModule property to No. You don’t need to do this for forms that have never had any code because when you create a new form, the HasModule property is set to No by default and a form module isn’t created for the form.
You can still use code with a form that has no form module by using an expression to call a Function procedure from a standard module. To do this, define a Function procedure in a standard module and then call that Function procedure from an event property of the form or a control. For example, to open a Data Entry form when a user clicks a command button, type the following expression in the OnClick event property setting in the command button’s property sheet:
=OpenDataEntry()
Note You can’t use Sub procedures to do this, because they can’t be called using an expression.
If you call a Function procedure from a standard module by using an expression, the form opens more quickly because the module isn’t loaded into memory when the form is opened. However, the standard module takes time to load into memory the first time an expression calls a Function procedure from it.
A saved query gives better performance than an SQL SELECT statement. Therefore, you should use saved queries for RecordSource and RowSource property settings.
See Also For more information about the RecordSource and RowSource properties, type the name of the property in the Office Assistant or on the Answer Wizard tab in the Help window, and then click Search.
If an unbound object frame doesn’t need to be activated, use an image control instead of an unbound object frame control to display a bitmap. Object frame controls are actual windows and use significant system resources; an image control doesn’t use nearly as many resources.
If you have existing unbound object frame controls containing bitmaps that don’t need to be activated, you can greatly reduce a form’s load time by converting them to image controls.
To convert an unbound object frame containing a bitmap to an image control
Access converts the unbound object frame to an image control. The bitmap remains on the form, but you can’t open the application used to create the bitmap from the form; therefore, you can’t edit the image.
Also, avoid using bitmaps that were created from large palettes or that contain many colors because they take longer to load and use more memory.
When the user activates an unbound OLE object, information about the object is stored in RAM. This memory isn’t released until the form closes. To minimize the performance impact of unbound OLE objects, design your application so that forms that contain such objects close when they aren’t being used, such as when the focus shifts to another form. In addition, if you want to display an object—such as part of a Microsoft Excel worksheet—but you don’t want the user to be able to edit the object, set the control’s Enabled property to False. That way, the user can’t activate the object.
If your application uses multiple-page forms, initialize and prepare only the first page when the form opens. Don’t spend time preparing pages or data structures until the user moves to the page that contains them. If a subform, list box, or ActiveX control takes a long time to fill, wait until the user goes to that page before setting the ControlSource or RowSource property.
When Access loads a form with a subform, it’s actually loading two forms into memory. To speed up the form’s load time, use a list box, a combo box, or a form based on a query that contains all of the fields that you want to display.
To help your forms load more quickly, set the RowSource property of your list boxes and combo boxes to a query that includes only fields from the record source that are absolutely necessary. Create an index for the first field displayed in the list box or combo box, and any other fields that are used for criteria.
The bound column in your list box or combo box should have the Text data type, not a numeric data type. To find a match in the list, Access needs to convert a numeric value to text in order to do the character-by-character match. If it already has a Text data type, this conversion isn’t necessary.
If you don’t need Access to automatically fill in the text box portion of your combo box with a value that matches the characters your user types, set the AutoExpand property to No.
For a complex form that the user opens frequently, consider moving some of the form’s code into a standard module. This reduces the time it takes to load the form.
If you use many forms on a frequent basis, you may want to open and hide all forms when your application opens. To open the forms, you can add VBA code to the startup form’s Open event procedure. To hide the forms, use the OpenForm action and set the Window Mode argument to Hidden. Then, instead of having your application open each form when the user needs it, set the form’s Visible property to True. When the user finishes with a form, set its Visible property to False. While this technique slows startup because your application opens all its forms at that time, it can improve performance after startup considerably.
See Also For more information about using event procedures, see Chapter 2, “Introducing Visual Basic for Applications.” For more information about setting a form’s properties while it’s being used, see Chapter 3, “Using Forms to Collect, Filter, and Display Information.”
Note Remember that any reference to properties, methods, or controls on a form, or to a form variable declared with the New keyword, causes VBA to load the form. For more information about the New keyword, type New keyword in the Office Assistant or on the Answer Wizard tab in the Help window, and then click Search.
If your application uses data that’s shared over a network, split the application into two database files—a back-end database that contains all the tables, and a front-end database that contains all the other objects in your application and that links to the tables in the back-end database. Store the back-end database on the network server, and distribute copies of the front-end database to your users so that each user has a local copy. Local forms and reports open faster and reduce network traffic.
Note You can use the Database Splitter Wizard to separate your tables from the other objects in your database. For information about using this wizard, see “Separating Your Application’s Tables from Its Other Objects,” in Chapter 8, “Delivering Your Application.”
The following section suggests ways you can speed up common operations on forms and reports and provide feedback to the user during long operations.
Setting a property in code always uses processor time. You may want to check the value of a property before you set it in code because it may already be set to the value you want.
If you’re updating data in a form or control, use the Requery method rather than the Requery action to update the data. The Requery method’s performance is significantly better than the Requery action’s performance.
Access treats lines, bordered controls, and opaque controls on a form or report as individual bitmaps. Forms and reports that contain these or other graphic objects can print more slowly than forms and reports without graphic objects. For faster printing on nonlaser printers, delete some or all of the graphic objects from the form or report. For faster printing on a laser printer, be sure the form or report’s FastLaserPrinting property is set to Yes.
When performing time-consuming operations, give the user visual feedback that something is happening. Use the Hourglass method or action to display the hourglass, or create a progress meter to keep the user informed of the operation’s progress.
See Also For information about displaying a progress meter, type SysCmd function in the Office Assistant or on the Answer Wizard tab in the Help window, and then click Search.
In general, you can do more to improve the speed of your code by choosing more efficient algorithms than by implementing particular coding “tricks.” However, certain techniques can help you write more efficient code. This section gives tips you can use to speed up your code.
If you refer more than once to the value of a property or control on a form, or to a DAO object or its property, create object variables and refer to the variables rather than using full identifiers. This approach is especially effective for speeding up a looping operation on a series of properties, controls, or objects.
When you make form references within an event procedure, use the Me keyword to refer to the form. This restricts the search for the form to the instance of the form in which code is currently running.
If your code has strings or numbers that don’t change, declare them as constants instead of variables. Using constants makes your application run faster. Constants also make your code more readable and easier to maintain. Constants are resolved once when your program is compiled, with the appropriate value written into the code. With variables, on the other hand, each time the application runs and finds a variable, it needs to get the current value of the variable. Whenever possible, use the intrinsic constants listed in the Object Browser rather than creating your own.
See Also For information about constants, see Chapter 3, "Writing Solid Code," and Chapter 7, “Getting the Most Out of Visual Basic for Applications,” in the Microsoft Office 2000/Visual Basic Programmer's Guide (Microsoft Press, 1999). You can also find this guide in the Office Developer Documentation section of the Microsoft Developer Network (MSDN) Online Library.
Avoid using the immediate Ilf function if either of the return expressions takes a long time to evaluate. When you use the immediate Ilf function, Access always evaluates both expressions, even though it returns only one of them. It’s often more efficient to replace the Ilf function with an If...Then...Else statement block.
References to objects and their methods and properties are resolved either when an application is compiled or when it runs. To improve execution speed when working with Automation objects, instead of using a Variant data type or the generic Object data type, declare objects as they are listed in the Classes box in the Object Browser. This ensures that VBA recognizes the specific type of object you’re referencing, allowing the reference to be resolved at compile time.
See Also For information about object types and on using the Object Browser, see Chapter 4, “Working with Objects and Collections.”
Use the Integer or Long data type for math when the size and type of numbers permit. The Variant data type, though more flexible, uses more memory and processor time as it translates between data types. The following table ranks the numeric data types by calculation speed.
| Numeric data types | Speed |
| Integer, Long | Fastest |
| Single, Double | Next-to-fastest |
| Currency | Next-to-slowest |
| Variant | Slowest |
See Also For more information about data types, see Chapter 7, “Getting the Most Out of Visual Basic for Applications,” in the Microsoft Office 2000/Visual Basic Programmer's Guide (Microsoft Press, 1999). You can also find this guide in the Office Developer Documentation section of the Microsoft Developer Network (MSDN) Online Library.
Some functions have two versions, one that returns a Variant data type (for example, the Str function) and one that returns a String data type (for example, the Str$ function). Use string functions when working with strings. Your operations run faster when you use string functions because Access doesn’t need to perform type conversions.
See Also For more information about string functions, type returning strings in the Office Assistant or on the Answer Wizard tab in the Help window, and then click Search.
Consider using dynamic arrays instead of fixed-size arrays because you can reclaim memory when you no longer need the data in a dynamic array. Use either the Erase statement or the ReDim statement with the Preserve keyword to discard unneeded data and reclaim the memory used by the array. For example, you can reclaim the memory used by a dynamic array by using the Erase statement, as follows:
Erase intArray
While the Erase statement completely eliminates the array, the ReDim statement used with the Preserve keyword makes the array smaller without losing its contents.
ReDim Preserve intArray(10, conNewUpperBound)
Erasing a fixed-size array doesn’t reclaim the memory for the array; it simply clears out the values of each element of the array. If each element was a string, or a Variant data type containing a string or an array, then erasing the array would reclaim the memory from those strings or Variant data types, not the memory for the array itself.
Although using procedures makes your code more modular, performing each procedure call always involves some additional work and time. If you have a loop that calls a procedure many times, you can eliminate this overhead by removing the procedure call and placing the body of the procedure directly inline within the loop. If you place the same code inline in several loops, however, the duplicate code increases the size of your application. It also increases the chance that you won’t remember to update each section of duplicate code when you make changes.
When locating records that satisfy a specified criteria, the Find methods are much more efficient than the Seek method when used on a field that is indexed.
See Also For information about the Find methods, see “Finding a Record in a Dynaset- or Snapshot-Type Recordset Object” in Chapter 6, “Working with Records and Fields.”
Use bookmarks instead of the FindNext method or some other means to return to a particular record. By using the Bookmark property, you can write a procedure to find a target record, store its bookmark value in a variable, move to other records, and return to the original record by referring to the bookmark.
See Also For more information about the Bookmark property, type Bookmark property in the Office Assistant or on the Answer Wizard tab in the Help window, and then click Search.
If your application includes add-ins and doesn’t need to write to them, load the add-in databases for read-only access rather than for read/write permission. The read-only database loads and runs faster because a locking information (.ldb) file doesn’t need to be maintained.
See Also For information about working with add-ins, see Chapter 11, “Add-ins, Templates, Wizards, and Libraries,” in the Microsoft Office 2000/Visual Basic Programmer's Guide (Microsoft Press, 1999). You can also find this guide in the Office Developer Documentation section of the Microsoft Developer Network (MSDN) Online Library.
While your application runs, each called procedure is placed in its own public block of memory. Access incurs some overhead when creating and managing these blocks. You can reduce some of this overhead by combining short procedures into larger procedures and by consolidating your procedures into fewer modules. Keep in mind that using larger procedures in fewer modules makes your code more difficult to debug and maintain.
VBA loads modules on demand—that is, it loads a module into memory only when your code calls one of the procedures in that module. If you never call a procedure in a particular module, VBA never loads that module. Place related procedures in the same module so that VBA only needs to load that module.
As you develop and modify your applications, you may leave behind dead code—entire procedures that are not called from anywhere in your code. You may also have declared variables that are no longer used. Consider reviewing your code to find and remove unused procedures and variables; for example, Debug.Print statements.
To search for references to a particular variable, use the Find command (Edit menu). Or, if you have Option Explicit statements in each of your modules, you can quickly discover if a variable is used in your application by removing its declaration and running the application. If the variable is used, VBA generates an error. If you don’t see an error, the variable was not used.
If your application has places in which the contents of a string variable or a Variant data type containing a string isn’t needed, assign a zero-length string ("") to that variable. If you no longer need an object variable, set that variable to the Nothing keyword to reclaim the memory used by the object reference.
Note You can also use compiler directives and conditional compilation to ignore portions of code based on constant values that you specify. For more information, see Chapter 8, “Error Handling and Debugging,” in the Microsoft Office 2000/Visual Basic Programmer's Guide (Microsoft Press, 1999). You can also find this guide in the Office Developer Documentation section of the Microsoft Developer Network (MSDN) Online Library.
Comments in code use memory. If your application contains many lines of commented code, consider stripping the comments from your code in the delivered application. Before delivering the application, save the code to a text file, make a copy of the text file and strip out the comments. Then load the stripped code back into your application. Retain the text file that contains the commented code for your reference and future development work.
If it is appropriate for the situation your application will be used in, consider saving your application as an MDE file. Saving a database containing code as an MDE file removes the source code from the file and provides some additional optimization of memory use.
See Also For more information about MDE files, see “Saving Your Application as an MDE File,” in Chapter 18, “Securing Access Databases,” in the Microsoft Office 2000/Visual Basic Programmer's Guide (Microsoft Press, 1999). You can also find this guide in the Office Developer Documentation section of the Microsoft Developer Network (MSDN) Online Library.
Compile your modules before saving them and before delivering your application. This decreases the time it takes to load the module when your application calls a procedure that resides there. To compile all procedures in all modules in the current database, click Compile on the Debug menu in the Code window.
Like most programming languages, VBA uses a stack to preserve your local variables and arguments during procedure calls. The maximum size of the stack is fixed and cannot be changed. VBA uses some of this space for purposes such as storing intermediate values when evaluating expressions; this makes the actual size of the stack available to your code smaller.
On both Windows 98 and Windows NT platforms, stack size grows dynamically up to a limit of about 1 MB as needed. For this reason, running out of stack space occurs much less frequently than in previous versions of Windows. The remaining stack space should be adequate for most purposes. However, if your procedures call procedures that call other procedures, and you declare many large local variables and arguments in each procedure, you may run out of stack space. The following sections describe techniques for minimizing the amount of space your application uses on the stack.
One of the most common reasons for running out of stack space is unbounded recursion—a procedure that calls itself repeatedly until the stack is exhausted. In VBA, this is often the result of a cascading event (such as changing the Text property in the Change event for a text box). When you encounter an “Out of stack space” error, look for cascading events first before you try to reduce the amount of stack space your code uses. To examine the sequence of procedure calls that led to the “Out of stack space” error, use the Calls dialog box (View menu).
See Also For more information about error handling, see Chapter 8, “Error Handling and Debugging,” in the Microsoft Office 2000/Visual Basic Programmer's Guide (Microsoft Press, 1999). You can also find this guide in the Office Developer Documentation section of the Microsoft Developer Network (MSDN) Online Library.
Every nonstatic local string variable uses some space on the stack. How you declare a string variable determines how much stack memory VBA must allocate for it. The following table summarizes how much memory is allocated for different types of nonstatic string variables, and how that allocation is distributed between stack memory and the remaining large pool of memory referred to as heap memory.
| String variable type | Stack usage | Heap usage |
| Local, fixed-length strings 64 characters or less | 2 bytes for each character in the string | None |
| Local, fixed-length strings 65 characters or more | 4-byte pointer to the variable in heap memory | 2 bytes for each character in the string |
| Local, variable-length strings | 4-byte pointer to the variable in heap memory | Variable, depending on the length of the string |
Note How memory is allocated for fixed-length string variables may change in later versions of Access. As a result, you may need to reevaluate decisions made on basis of the information in this table.
If you are using a large number of fixed-length strings 64 characters in length or less, you can reduce stack usage by replacing them with local, variable-length strings or by making the fixed-length strings static.
See Also For information about the consequences of declaring static variables, see “Declare Procedures or Local Variables with the Static Keyword” later in this section.
Another way to reduce stack memory usage is to manage string variables by using an array. VBA uses only a 4-byte pointer on the stack for each array.
If you continue to run out of stack space after trying different methods of declaring local variables, consider using module-level variables instead of passing local values as arguments to procedures. However, keep in mind that this makes your code more difficult to maintain, modify, and debug.
The Variant data type is larger than any of the other data types, so it uses more of the stack when you use it for local variables and arguments.
If you aren’t calling a procedure recursively and continue to run out of stack space, consider declaring the procedure with the Static keyword. This places all of the procedure’s local variables in regular memory rather than on the stack. However, this technique has its disadvantages. Because static variables are never discarded, they use memory in your application as long as it is running. Also, because static variables are not reset to their initial values each time the procedure is called, the code in the procedure must be carefully written to handle this. If you don’t want to declare the entire procedure with the Static keyword, consider using the Static keyword to declare some of the local variables.
The code in all modules is saved as source code and compiled code. Source code consists of the VBA code you write in text form including declarations, procedure names, variable names, comments, blank lines, and spaces. Access converts the source code you write through a process called compiling into a form that it uses to run your application. If you don’t explicitly compile your code by using the Compile command (Debug menu), Access must compile your code and load it into memory once for every user of your database. To avoid this, you should compile and save your code when you are ready to distribute your application to users, and before you do any performance testing with your application.
To compile and save the code in all modules in your application
Tip Only use the Compile command when you are ready to distribute your application or check its performance. While you are developing your application, it will become decompiled (lose its fully compiled state) frequently. As a result, using the Compile command during development wastes time.
If you or the users of your application make certain changes to it, some of your application’s code may become decompiled, which means that Access must recompile those portions before running them.
Any of the following actions made to objects within a compiled database can decompile some of the code in your database:
If the users of your application don’t need to perform these actions, you can ensure that your application runs as efficiently as possible by compiling your application with the Compile command before you deliver it and after you make any subsequent changes to it. To prevent users from making changes that decompile the code in your application after you deliver it, you can save it as an MDE file, or establish user-level security.
See Also For more information about MDE files and user-level security, see Chapter 18, “Securing Access Databases,” in the Microsoft Office 2000/Visual Basic Programmer's Guide (Microsoft Press, 1999). You can also find this guide in the Office Developer Documentation section of the Microsoft Developer Network (MSDN) Online Library.
If your users are likely to decompile your application’s code, and if a significant portion of your code resides in standard modules, you can improve your application’s performance by moving your standard modules to a library database. Then, establish a reference from your application to the new library database. Now when users open a form containing decompiled code, your application only needs to compile that code and can quickly open the library database containing the fully compiled code from your standard modules. Also, users can add new forms and reports without decompiling the code in the library database. Establishing a reference to a library database creates some additional memory overhead, so this method is most effective for applications with a significant amount of standard module code.
See Also For more information about library databases, see Chapter 10, “The Windows API and Other Dynamic-Link Libraries,” in the Microsoft Office 2000/Visual Basic Programmer's Guide (Microsoft Press, 1999). You can also find this guide in the Office Developer Documentation section of the Microsoft Developer Network (MSDN) Online Library.
In Microsoft Access 95, the following actions decompiled the code in a database:
This occurred because in Microsoft Access 95, the name of the database was used as the VBA for Applications project name. The project name was used to identify all the compiled code in a database. In Microsoft Access 95, performing any action that changed the name of a database containing compiled code effectively changed the name of the project and decompiled the code.
These same changes do not decompile code in Microsoft Access 97 or 2000 databases because you can explicitly give your application a project name. To give your application a new project name, click Properties on the Tools menu of the Microsoft Visual Basic editor, and then type the name in the Project Name box. By default, when you create a new database, Microsoft Access 2000 uses the name of the database for the project name. Whether you specify a custom project name or accept the default project name, if you perform any action that changes the name of the database, the project name doesn’t change and cause code to be decompiled. However, if you compile your application, and then change the project name by using the Project Name box in the Project Properties dialog box, your code is decompiled.