Checking In Library Items
To see the CML application's check-in page, administrators click the Check In Materials link on Menu.asp, which launches Checkin.asp. For an administrator to check in an item, two pieces of information must be entered on this page:
- The library item's barcode, which uniquely specifies the item. When checking an item in, only bar codes that have already been added to the database are allowed. Checking in an item is simpler if the item is at hand so that the bar code is visible.
- The location to which the item is being returned. Usually this is the library, but you can change the default location on the Application Settings screen.

Note All library items should have UPC bar codes (for use by magnetic scanners).The item's bar code is represented alphanumerically by the barcode field in the item table in the FmLib database. Do not confuse a library item's ISBN number with its bar code.
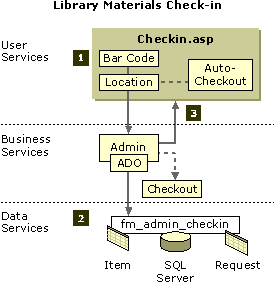
The Check-in Process

These steps are performed when items are checked in:
- Using the frmCheckin form on the Checkin.asp page, the administrator enters the bar code and the return location of the item being checked in. Optionally, the auto-checkout box can be selected.
- Items are checked in with the fm_admin_checkin stored procedure. This is called from the Checkin method of the Admin object. If auto-checkout is selected, the checked-in item will be automatically assigned to the next request in the queue.
- Confirmation (with checkout details) is returned to the client for display.
About Auto-Checkout
Administrators check library items in one at a time. When checking in each item, the administrator can choose to use the auto-checkout feature. This feature lets the administrator, while still on the check-in screen, check out any item for which a request exists. This gives added flexibility to the Admin user interface. To invoke auto-checkout, the administrator selects a check box on the Check In Materials page.


