This section discusses how to configure properties for network adapter drivers.
Important
If you add a new network adapter after Windows 95 is installed, you should use the Add New Hardware option in Control Panel to install the correct driver for the adapter.
When you use the Add New Hardware option, be sure to choose Detection for determining the correct driver and resource assignment. You should configure network adapter drivers manually only after you have tried all detection and automatic configuration methods.
If you experience problems with settings for a network adapter, you should begin troubleshooting by removing the network adapter driver in the Network option in Control Panel. Then use the Add New Hardware option to reinstall support for the network adapter, using detection to ensure that Windows 95 determines the correct adapter driver and standard settings for that network adapter.

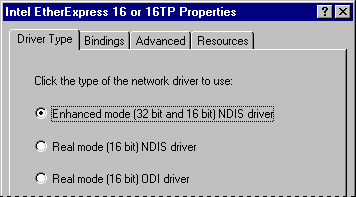
Network adapter driver type | Description |
Enhanced mode (32-bit and 16-bit) NDIS driver | Installs an NDIS 3.1-compliant driver. This is the preferred driver type for use with 32-bit, protected-mode network clients. |
Real-mode NDIS driver | Installs an NDIS 2.x-compliant driver. |
Real-mode (16-bit) ODI driver | Installs a real-mode driver created to support ODI for Windows 3.1 on NetWare networks. |
For a protocol to communicate with each network adapter on your computer, the network adapter driver must be bound to the protocol. The bindings define the relationships between networking software components. Windows 95 automatically binds the appropriate protocols to the network adapter.
You can change the bindings, for example, if you do not want to use a specific protocol with a particular network adapter. Or, as another example, if the computer is on a local area network and is also connected to the enterprise internetwork, you might not want the computer's shared resources to be seen on the internetwork. In that case, you can disable the binding between the related protocol and the adapter that connects the computer to the internetwork.
In the list, the protocols that are bound to the selected adapter are checked. If a particular protocol does not appear in the list, check that it is installed correctly by returning to the Configuration properties dialog box and reinstalling it.
Windows 95 can determine hardware settings for most network adapters. For this reason, the recommended method for installing or configuring network adapter drivers is to use the Add New Hardware option in Control Panel, using detection to determine the correct driver and resource settings. You should accept the proposed settings unless you are absolutely sure they are incorrect.
Most devices cannot share IRQ settings, memory buffer addresses, or ROM addresses. Where possible, Windows 95 identifies and resolves conflicts. However, if one of the supported devices does not seem to work, the problem may be the particular hardware configuration. To make sure there are no conflicts among network adapters or other peripherals, or between the system board and adapters, check the settings in Device Manager, as described in Chapter 19, "Devices."
Sometimes settings for network adapters are set with software, sometimes with jumpers or switches on the hardware (refer to your hardware documentation for specific details). If settings for a network adapter can be configured through software, you can configure settings using the Network option in Control Panel.

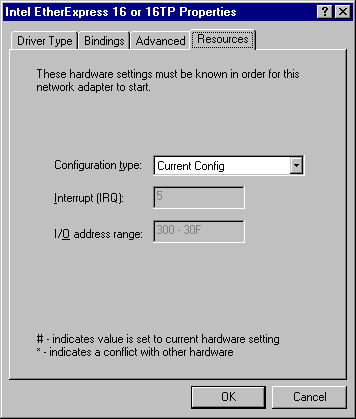
The settings available depend on the type of network adapter. For example, for Intel adapters, you cannot set the IRQ using the adapter's properties. The following table describes a few typical settings.
Examples of Hardware Resource Settings for Network Adapter
Setting type | Description |
I/O Address Range | Specifies the reserved memory address range (as a hexadecimal value) that the adapter can use for temporary storage of I/O data. |
Interrupt (IRQ) | Specifies the hardware line over which the device can send interrupts (requests for service) to the computer's CPU. |
Memory Address | Specifies the base memory address (as a hexadecimal value) used by this network adapter. This number must match the adapter's memory address settings, as specified in the documentation for the adapter. |
Each alternate Configuration Type that might be listed in the Resources properties for a network adapter refers to a possible hardware configuration for the adapter (rather than software settings for the driver) as defined by the manufacturer.
If you must set the configuration manually, use the settings prescribed in the documentation provided by the manufacturer to set Resources and Advanced properties using the Network option in Control Panel.
The following table describes the network adapters that have alternate Configuration Types under Windows 95. For more information about these configurations, see the documentation from the hardware manufacturer.
Network adapter | Alternate Configuration Types |
3Com® EtherLink II®-16 | Memory Mapped (RAM), Programmed I/O (PIO) |
DEC™ Etherworks™ 3 | 2K (option 0), 32K (option 1), 64K (option 2) |
HP® ISA | Memory Mapped (RAM), Programmed I/O (PIO) |
NE2000+ | Can use shared RAM (memory-mapped), but this mode is not supported under Windows 95 |
Proteon 1390, 1392, 1392+ | Memory Mapped (RAM), Programmed I/O (PIO) |
For legacy network adapters, the settings that appear in the Resources properties are only some possible settings for the adapter driver, but many adapters have additional settings that can be programmed by running a configuration utility from the adapter manufacturer or by setting jumpers on the adapter itself. Although some of these settings do not appear in the adapter's properties, the resources used could cause conflicts with other system components.
This also means that configuring most legacy network adapters in Windows 95 consists only of specifying the preprogrammed values for the adapter hardware. Changing values for most network adapters by setting properties in Windows 95 does not reprogram the adapter itself. You can verify hardware settings for network adapters only by running the hardware configuration program to view settings, or by checking how the jumpers are set on the adapter itself.
For some legacy adapters, it is possible that the adapter uses resources not listed with the Resource properties. For these adapters, the NDIS driver determines the resource settings directly from the adapter itself. Even though these resources do not appear in the list, they can still conflict with other devices. For example, the resource list for the IBM Token Ring adapter shows only the I/O settings, but this adapter also uses IRQ and Memory resources.
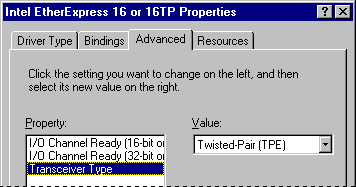
The options available in the Advanced properties vary, depending on the type of network adapter. For information about specific settings that appear for a selected network adapter, see the documentation provided by the manufacturer for the adapter and driver. The manufacturer can also provide guidelines for when to change the default values for advanced configuration options.
This example shows the advanced options for an Intel EtherExpress network adapter.

The following examples show some typical settings for general types of network adapters. Network adapters that use the new, fast Ethernet technology might have many more settings. Examples of such adapters include SMC EtherPower 10/100 (9332) PCI Ethernet Adapter, DEC Etherworks 435, and Intel EtherExpress PRO/100. For an explanation of specific settings for a network adapter, see the documentation provided by the adapter manufacturer.
Example setting | Description |
For Ethernet adapters: | |
Transceiver Type | The transceiver is the device that connects a computer to the network, defined as one of the following values: Thick Net, for an AUI or DEC/Intel/Xerox (DIX) connection. Thin Net, for a BNC or coaxial (COAX) connection. Twisted Pair, for a TPE connection. |
For token ring adapters: | |
I/O Port Base Address | This value specifies the base memory address used by the adapter. To set the I/O address of an IBM 4/16 token ring adapter, select either Primary (A20) or Secondary (A24) for this value. In this case, the driver ignores the I/O settings in the Resource properties. |
Network Address | By default, Windows 95 hardware detection uses the address burned into the adapter. To use another network address, type the network address in hexadecimal form, in the format XX-XX-XX-XX-XX-XX; for example, 01-02-03-4E-2D-1F. |
Ring Speed | The ring speed is 4 or 16 megabits per second (MBS), and is set by changing a jumper on the adapter or by running the adapter's configuration utility. For example, for an Intel TokenExpress 16/4 adapter, this is set on the adapter itself. The value in Windows 95 should match the physical or software setting. |