Configuring TCP/IP Settings Manually
If you cannot use DHCP for automatic configuration, the network administrator must provide values so that individual users can configure TCP/IP manually. Or, if custom setup scripts are used to install Windows 95, the correct values can be defined in the setup script. The required values include the following:
- The IP address and subnet mask for each network adapter installed on the computer.
- The IP address for the default gateways (IP routers).
- Whether the computer will use Domain Name System (DNS) and, if so, the IP addresses of the DNS servers on the internetwork.
- WINS server addresses, if WINS servers are available on the network.
The following procedure describes the basic configuration options for TCP/IP. If you want to configure the computer to use WINS or DNS for name resolution, see the procedures in "Using WINS for Name Resolution" later in this chapter and "Using DNS for Name Resolution" later in this chapter.
To configure the TCP/IP protocol manually
- In the Network option in Control Panel, double-click Microsoft TCP/IP in the list of installed components.
Note If your computer has multiple network adapters, the list includes an instance of TCP/IP for each network adapter. You must configure each adapter with its own IP address, subnet mask, and gateway. All other settings apply system-wide.
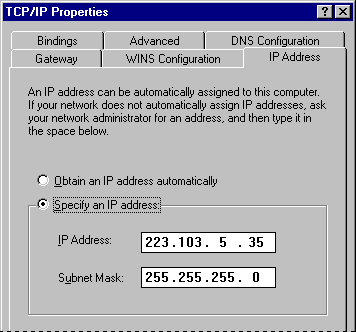
- In Microsoft TCP/IP properties, click the IP Address tab.

- Click the option named Specify An IP Address.
- Type an IP address and subnet mask in the respective boxes.
The network administrator must provide these values for individual users, based on the network ID and the host ID plan for your site.
- The value in the IP Address box identifies the IP address for the local computer or, if more than one network adapter is installed, for the network adapter selected in the Configuration dialog box.
- The value in the Subnet Mask box identifies the network membership and its host ID for the selected network adapter. The subnet mask defaults to an appropriate value, as shown in the following list.
Address class | Range of first octet in the IP address | Subnet mask |
Class A | 1–126 | 255.0.0.0 |
Class B | 128–191 | 255.255.0.0 |
Class C | 192–223 | 255.255.255.0 |
- To view or specify which network clients are bound to the TCP/IP protocol, click the Bindings tab.
- To keep a network client from using the TCP/IP protocol, make sure the checkmark beside the client name is cleared.
- If the network client for which you want to use TCP/IP does not appear in this list, that client might not be installed properly. Return to the Configuration dialog box and reinstall that network client.
Note The only network client provided with Windows 95 that can use Microsoft TCP/IP is Client for Microsoft Networks. Client for NetWare Networks does not use Microsoft TCP/IP.
NetWare/IP from Novell allows the NCP request to be sent over an IP header. You can use NetWare/IP only with a Novell-provided, real-mode client.
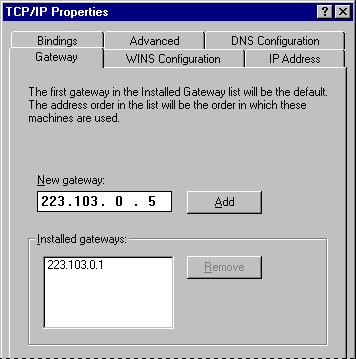
- Click the Gateway tab. Type at least one IP address for the default gateway (IP router) on the network, and then click Add.

- To specify an IP address for an additional gateway, type the IP address in the New Gateway box, and then click the Add button.
The first gateway in the list is the default gateway. Gateway addresses can be prioritized by dragging the IP address in the list of installed gateways. Windows 95 attempts to connect to other gateways only if the primary gateway is unavailable.
- Click OK, and then restart the computer for changes to take effect.
If you are using Dial-Up Networking to connect to the Internet, you can manually configure DNS and IP addresses for each connection that you define. For more information about defining IP addresses for each connection and about IP addresses on TCP/IP networks, see Chapter 30, "Internet Access." For more information about TCP/IP Registry entries, see Chapter 30, "Internet Access."

