You can also remotely administer computers running Windows 95 by using other system management tools provided by Microsoft or by other vendors. The following list shows some of the system management tools that you can use to manage computers running Windows 95:
For networks that use SNMP for system management, Windows 95 includes an SNMP agent which conforms to the SNMP version 1 specification. This agent allows you to monitor, from an SNMP console, remote connections to computers running Windows 95. After this agent is installed, you do not need to make any other modifications to client computers to use SNMP.
The SNMP agent is implemented as a Win32-based service and works using Windows Sockets over both TCP/IP and IPX/SPX. The extension agents are implemented as Win32 DLLs. (For more information about writing SNMP MIBs under Windows 95, see the Microsoft Win32 Software Development Kit.)
The configuration information for the RFC 1156 extension agent is placed in the Registry under the following key:
Hkey_Local_Machine\System\CurrentControlSet\Services\SNMP\ParametersIf you are prompted to specify the location of additional files, specify the path to the Windows 95 source files on a shared network directory or on the Windows 95 compact disc.
For information about installing the Microsoft SNMP agent by using custom setup scripts, see Chapter 5, "Custom, Automated, and Push Installations."
When the computer is restarted after the SNMP agent is installed, SNMP automatically starts in an MS-DOS window. You can minimize this window to keep it out of the way while working.
Policy | Description |
Communities | Specifies one or more groups of hosts to which this computer belongs for purposes of administration using the SNMP service. These are the communities that are allowed to query the SNMP agent. |
Permitted Managers | Specifies IP or IPX addresses allowed to obtain information from an SNMP agent. If this policy is not checked, any SNMP console can query the agent. |
Traps for Public Community | Specifies trap destinations, or IP or IPX addresses of hosts in the public community to which you want the SNMP service to send traps. |
Internet MIB (RFC 1156) | Allows you to specify the contact name and location if you are using Internet MIB. |
If you want to configure the Windows 95 SNMP agent to send traps to a community other than the public community, you must either edit the Registry directly or add a new system policy.
To create a string value, click the new key, click the Edit menu, point to New, and then click New String. Type the value name, and then press enter.
To specify the value data, click the value name, click the Edit menu, and then click Modify. In the Value Data box, type the value data, and then click OK.
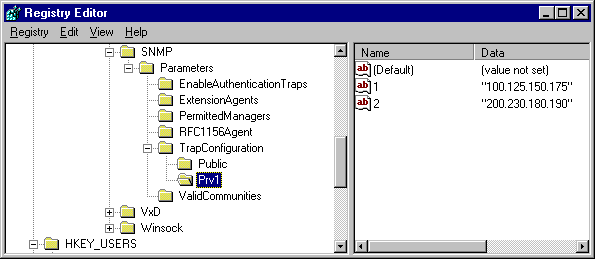
The following illustration shows an example of what the Registry should look like after adding a new community named Prv1.

The following shows the complete syntax for this entry:
Note The Registry key and value names are case-sensitive. Also, the Registry key name (System\...Name Of New Community) must be one continuous line in the ADMIN.ADM file.
For example, the following adds a policy for a community named Prv1:
POLICY "Traps for Prv1 Community"
   KEYNAME
System\CurrentControlSet\Services\SNMP\Parameters\TrapConfiguration\Prv1
   PART !!Traps_PublicListbox LISTBOX
   VALUEPREFIX ""
   END PART
END POLICY
After editing and saving ADMIN.ADM, you can see this new policy by running System Policy Editor and selecting the Computer policy under Network named SNMP. You can use this policy exactly as you would use the policy named Traps For Public Community.