A major difference in printing between Windows 3.1 and Windows NT is the move from tray-based printing to forms-based printing. Before the growth of personal computer networks, applications could assume that their target print device was connected directly to the computer. This implied that human users could see what media was loaded in each tray of the print device, and could easily change that media configuration. In a networked environment, these assumptions no longer hold. Print devices are increasingly located beyond the users' line-of-sight, and one user cannot change the print device's media without disrupting other users' work.
Forms-based printing offers a solution. Under this model, the print server administrator configures the Windows NT print server, defining what form is currently loaded in each paper source. A form in Windows NT consists of a paper size, margin settings, and a name. Windows-based applications running on a Windows NT-based computer let the user choose the form they want, rather than choosing a tray. When the application prints, the print job requests a specific form rather than a specific tray. The Windows NT print server checks the form-to-tray assignments, and causes the print device to feed paper from the correct tray.
This simplifies printing from the user's perspective. For instance, if a particular print device has multiple trays, and one holds Letter paper and another holds A4 paper, a user on the network can send print jobs requesting either of these forms, and they get the right output. Note that the user does not need to know which tray their form is loaded in, so print server administrators can put the forms in whichever trays they want. Also, the user does not need to know how many trays the print device has, or what those trays are named. All the user needs to know is the name of the form they want to use, and Windows NT takes care of the details.
Through Print Manager, you can define new forms and add them to the print server's database. For example, you could create a form called Customer Receipt Form that uses Letter-size paper and nonstandard margins. You can create multiple forms that use the same paper size, or the same margins, or both.
To create a new form or alter an existing form, choose Forms from the Printer menu in Print Manager. The Forms dialog box appears.

Using the Forms dialog box, anyone with Full Control privilege can add a form and specify the paper size and image area. Forms information is stored per server, not per printer. To create a new form, first select an existing form, and then select any of the Form Description fields. Change its value, and then select Add.
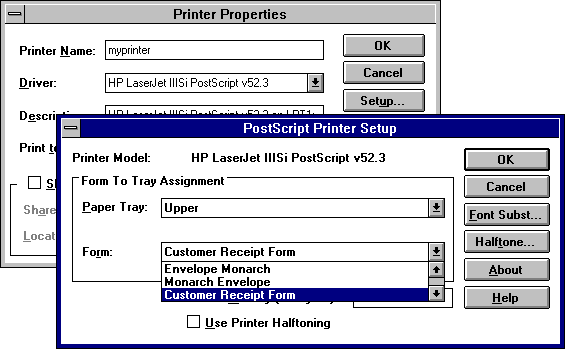
On a per-printer basis, you can use the Printer Properties dialog box to specify the paper tray in which your form is located. The Form drop-down list in this dialog box includes only those forms that can be used by your printer; form sizes your printer cannot accommodate are not listed.
Note that the following dialog boxes do not specify the default form; instead, they define the current mapping of forms to paper sources. If you want to set the default form, choose the Details button in Printer Properties, and then choose Job Defaults. Then, define the default form in the Form field.

Hint If you want to use an odd-sized form with your printer, specify Manual Feed in the Paper Tray box.
Users who want to print a document can select the new form from the list shown in the application's Print Setup dialog box. The spooler remembers which paper tray contains that form and includes that information in the instructions passed to the print device.
Windows-based applications can use different forms within a document. For example, you might use an envelope for the first page, Letterhead for the second page, and Letter for the third and following pages.