After the SNMP service software is installed on your computer, you must configure it with valid information for SNMP to operate.
To configure the SNMP Service
1. Double-click the Network icon in Control Panel to display the Network Settings dialog box.
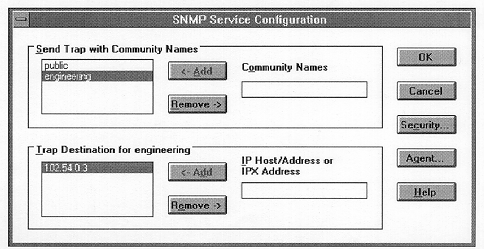
2. In the Installed Network Software list box, select SNMP Service, and click the Configure button. The SNMP Service Configuration dialog box appears.
3. To identify each community to which you want this computer to send traps, type the name in the Community Names box. After typing each name, choose the Add button to move the name to the Send Traps With Community Names list on the left.
You might want to use SNMP for statistics, but may not care about identifying communities or traps. In this case, you can specify the "public" community name when you configure the SNMP service.
To delete an entry in the list, select it and choose the Remove button.
Note
Community names are case sensitive.
4. To specify hosts for each community you send traps to, after you have added the community and while it is still highlighted, type the hosts in the IP Host/Address Or IPX Address box. Then choose the Add button to move the host name, IP address, or IPX address to the Trap Destination for the selected community list on the left.
You can enter a host name, its IP address, or its IPX address.
Enter each IP address as four octets, AAA.BBB.CCC.DDD. You do not need to enter leading zeroes.
Enter each IPX address in 8.12 format, XXXXXXXX.YYYYYYYYYYYY, where X represents the network number and Y represents the network address of the computer.
To delete an entry in the list, select it and choose the Remove button.
5. To enable additional security for the SNMP service, choose the Security button. Continue with the configuration procedure, as described in the next section, "Configuring SNMP Security."
6. To specify Agent information (comments about the user, location, and services), choose the Agent button. Continue with the configuration procedure, as described in "Configuring SNMP Agent Information" later in this chapter.
7. When you have completed all procedures, choose the OK button. When the Network Settings dialog box reappears, choose the OK button.
The Microsoft SNMP service has been configured and is ready to start. It is not necessary to restart the computer.
SNMP security allows you to specify the communities and hosts a computer will accept requests from, and to specify whether to send an authentication trap when an unauthorized community or host requests information.
To configure SNMP security
1. Double-click the Network icon in Control Panel to display the Network Settings dialog box.
2. In the Installed Network Software list box, select SNMP Service, and click the Configure button. The SNMP Service Configuration dialog box appears.
3. In the SNMP Service Configuration dialog box, choose the Security button.
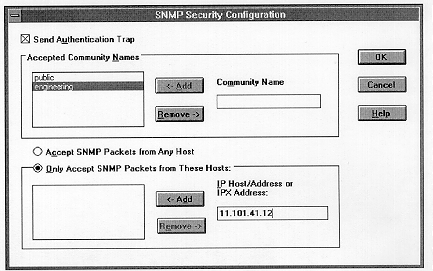
4. If you want to send a trap for failed authentications, select the Send Authentication Trap check box in the SNMP Security Configuration dialog box.
5. In the Community Name box, type the community names from which you will accept requests. Choose the Add button after typing each name to move the name to the Accepted Community Names list on the left.
A host must belong to a community that appears on this list for the SNMP agent to accept requests from that host. Typically, all hosts belong to public, which is the standard name for the common community of all hosts.
To delete an entry in the list, select it and choose the Remove button.
6. Select an option to specify whether to accept SNMP packets from any host or from only specified hosts.
Note
The earlier section "Configuring SNMP" describes the format for IP and IPX addresses.
7. Choose the OK button. The SNMP Service Configuration dialog box reappears.
To specify Agent information (comments about the user, location, and services), choose the Agent button. Continue with the configuration procedure, as described in the next section.
8. After you complete all procedures, choose the OK button. When the Network Settings dialog box reappears, choose the OK button.
The Microsoft SNMP service and SNMP security have been configured and are ready to start. You do not need to restart the computer.
SNMP agent information allows you to specify comments about the user and the physical location of the computer, and to indicate the types of service to report. The types of service that can be reported are based on the computer's configuration.
To configure SNMP agent information
1. Double-click the Network icon in Control Panel to display the Network Settings dialog box.
2. In the Installed Network Software list box, select SNMP Service, and click the Configure button. The SNMP Service Configuration dialog box appears.
3. In the SNMP Service Configuration dialog box, choose the Agent button to display the SNMP Agent dialog box.
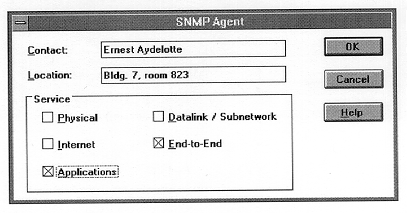
4. Type the computer user's name in the Contact box and the computer's physical location in the Location box. These entries cannot include embedded control characters.
5. Select the services to report in the Service box. Check all boxes that indicate network capabilities provided by your Windows NT computer. SNMP must have this information to manage the enabled services.
Service Option | Select this option if this Windows NT computer: |
Physical | Manages any physical TCP/IP device, such as a repeater. |
Datalink/Subnetwork | Manages a TCP/IP subnetwork or datalink, such as a bridge. |
Internet | Acts as an IP gateway. |
End-to-End | Acts as an IP host. This option should be selected for all Windows NT installations. |
Applications | Includes any applications that use TCP/IP, such as electronic mail. This option should be selected for all Windows NT installations. |
Note
If you have installed additional TCP/IP services, such as a bridge or router, you should consult RFC 1213 for additional information.
6. Choose the OK button.
7. When the SNMP Service Configuration dialog box reappears, choose the OK button. When the Network Settings dialog box reappears, choose the OK button.
SNMP is now ready to operate without restarting the computer.