Building Samples Using Developer Studio 5.0
Each sample included with the Microsoft® DirectX® Software Development Kit includes a makefile that you can use to build the sample from the command line. You can then run the sample to see what it does. When you find a sample that interests you, you might want to explore further and step through the code yourself. If you want to build and debug samples (or your own code) using Microsoft Developer Studio™, you will want to create a project within Developer Studio. This article discusses how to create a project in Developer Studio version 5.0. The project file must include the necessary source files and libraries, and Developer Studio must be configured with the correct library and include paths so that the compiler can locate the required library and header files.
Note See the readme.txt file in the DirectX SDK Samples directory for information about building samples from the command line.
This article contains the following sections.
Tools Options
You must specify where the header and library files from the DirectX SDK are located when using Developer Studio. These settings are global within Developer Studio and do not need to be repeated for each project.
Perform the following steps to add the DirectX SDK header and library directories to the include and library file search paths.
- Within Developer Studio, choose Options from the Tools menu.
- Select the Directories tab.
- In the Show Directories for dialog box, choose Include files.
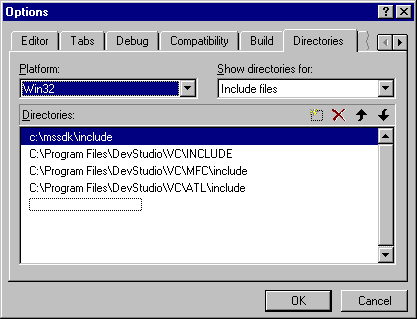
- Double-click the dotted rectangle below the list of directories and type in the full path for your DirectX SDK include directory. You can also press the "..." (browse) button that appears on the right side of the entry field when you select the rectangle and then navigate to the correct directory. By default, the header (include) files are installed in c:\mssdk\include.
- Press the enter key to complete the entry, re-select the new entry if necessary, and then press the Move Item Up button
 repeatedly to move the directory up one position at a time, to the top of the directory list. Placing the directory at the top of the list ensures that the DirectX files will come first in the search path and will be used in case of duplicate file names.
The following screen shot shows the Directories tab of the Tools Options dialog box with the default include directory at the top of the directory list.

- After you have added the include directory, add the library directory. In the Show directories for dialog box, choose Library files.
- Double-click the dotted rectangle below the list of directories and type in the full path (or use the "..." (browse) button to select a path) for your DirectX SDK library directory. By default, the library files are installed in c:\mssdk\lib.
- Press the enter key to complete the entry, re-select the new entry if necessary, and then press the Move Item Up button repeatedly to move the directory up one position at a time, to the top of the directory list.
Creating a New Project
Perform the following steps to create a new project.
- Choose New from Developer Studio's File menu.
- Select the Projects tab.
- Select the appropriate project type. "Win32® Application" is appropriate for Windows® applications.
- Type in a project name.
- Edit the path for project location to point to your desired location, or use the "..." (browse) button to navigate to that directory. Note that the project name is appended to this path.
Project Settings
This section discusses how to add the appropriate libaries to your project and how to set the working directory. Open a project in Developer Studio before proceeding.
Adding Libraries
- Choose Settings from Developer Studio's Project menu.
- Select the Link tab.
- Choose General from the Category dialog box.
- Choose All Configurations from the Settings For dialog box.
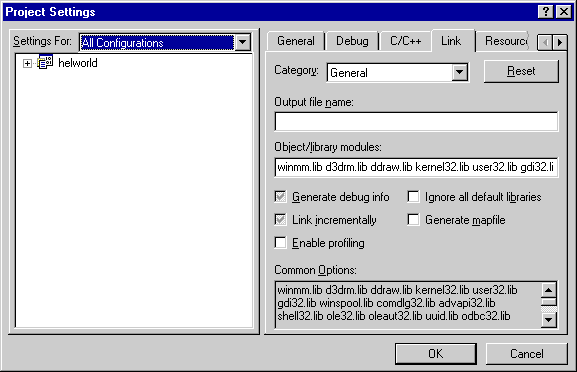
- In the Object/library modules edit control, type the names of the libraries your project requires. You will typically put those libraries at the beginning of the list so definitions will be picked up first from those core libraries.
The required libraries vary from project to project, depending on the technology the code uses. If in doubt about the libraries required for a particular sample, search the makefile in that sample's directory and include the same library list. The following table lists the most commonly used libraries included with the DirectX SDK. The Winmm.lib library included with the Platform SDK includes additional multimedia functionality as well.
DirectDraw ddraw.lib Direct3D Retained Mode d3drm.lib DirectSound dsound.lib DirectPlay dplayx.lib DirectInput dinput.lib For example, the Tex1 sample's makefile lists ddraw.lib and d3drm.lib because it uses Microsoft DirectDraw® and Direct3D® Retained Mode.
The following screen shot shows the Link tab of the Project Settings dialog box. It specifies the settings for all configurations and adds multimedia and DirectX libraries to the beginning of Developer Studio's default Object/library modules list.

Setting the Working Directory
You might need to set the working directory to make sure your program can find certain files. For example, you might need to load an image from the directory in which your program resides. By default, Developer Studio sets the current working directory to the directory in which it resides, rather than to the directory containing your program.
Perform the following steps to set the working directory.
- Choose Settings from Developer Studio's Project menu.
- Select the Debug tab.
- Choose the appropriate configuration ("All Configurations" or "Win32 Debug", for example) from the Settings For dialog box.
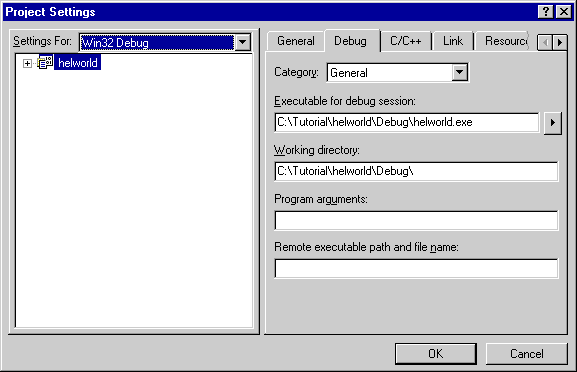
- Type the full path to your desired working directory in the Working directory edit control.
The following screen shot shows the Debug tab of the Project Settings dialog box. It specifies a working directory for the Win32 Debug configuration.

Adding Files to the Project
Perform the following steps to add any required files to your project. Open a project in Developer Studio before proceeding.
- Choose Add To Project from Developer Studio's Project menu.
- If you are creating a new file, select New, select the type of file, and specify a file name.
- If you are opening an existing file, select Files and select the file you want to add to the project.
- Repeat the previous steps until you have added all required source files (such as .cpp or .c), resource files (such as .rc), and any other necessary files.
- Choose Save All from Developer Studio's File menu to save all files including source code, project files, and the workspace.
 Top of Page
© 2000 Microsoft and/or its suppliers. All rights reserved. Terms of Use.