How Transforms Work
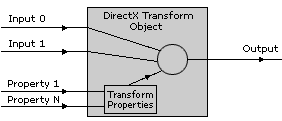
In a general sense, each transform is a set of rules for how to produce one graphic output. The design of a generic transform is shown in the following illustration.

Typically, a transform has one or several inputs that are used to produce the output graphics. Some transforms even have optional inputs and produce different effects based on how many inputs are defined. It is also possible for a transform to have no inputs.
Transforms can have a number of properties that determine how to process the inputs. In many cases, changing the values of these properties enables you to produce drastically different output with the same input.
Transforms are categorized by the following two types of output.
- Image transforms: The transform output is an image stored in a DXSurface object.
- Three-dimensional (3-D) transforms: The transform output is a Direct3DRMMeshBuilder3 object defined in Microsoft® Direct3D® Retained Mode.
For more information, see the following sections.
Transform Properties
Each transform has a number of properties that control how the output is produced. The effect of each property on the output is controlled by changing a value associated with the property. Some are generic properties for all transforms, which are part of the Microsoft DirectX® Transform code framework. The rest are referred to as "custom properties," which are specific to a particular transform.
The most commonly used generic property is Progress. It is used for all transforms that make smooth transitions from one state to another. The value for Progress can range from 0.0 to 1.0, determining what fraction of the transition should be reflected in the transform output. By looping over steadily changing values for Progress and producing output at each step, the transition can appear to be a repeating animation.
There are a number of other generic properties that can control transform output. The Duration property stores how long a transition from Progress = 0.0 to Progress = 1.0 should take. Some transforms support the Quality property, which determines quality or resolution of the output. Note that though these generic properties are available for all transforms, not all transforms make use of them.
The custom properties of a transform depend on the type of effect a transform produces. These are listed for each transform in the Transform Reference section. Examples of transforms and their custom properties are shown at the end of this article.
How to Use Transforms
You typically follow four steps in the process of using a transform.
- Create the transform: Use C++ with a Component Object Model (COM) interface called a IDXTransformFactory.
- Define inputs and outputs: Load into memory or create input images or meshes, if the transform uses them. After creating an output object of the correct type, pass pointers to these objects to the IDXTransform::Setup method.
- Set the values for transform properties. This is done with two implied access methods for each property: put_Property and get_Property. For example, a custom property named MyProperty could be set with put_MyProperty and retrieved with get_MyProperty. There are also put_Progress and get_Progress methods for transforms that support IDXEffect.
- Call the IDXTransform::Execute method, which processes the inputs according to the transform properties and produces the output.
These steps are covered in more detail in the Using Transforms in C++ article.
Transform Examples
The following are some examples of transforms included with this Software Development Kit (SDK), their custom properties, and the output they produce. To see what these and other transforms look like, see the Transform Demos. For reference information about these and other included transforms, see the Transform Reference.
Pixelate Transform
At Progress = 0.0, the input and output images are the same. By increasing the value of Progress, you can reduce the number of output pixels until the original image is barely recognizable. By looping over different values for this property over time, you can create an animation of the transition from an unaltered image to a highly pixelated one.
This transform supports one custom property, MaxBoxSize, which determines the size of the largest pixel at Progress = 1.0, measured in pixels of the input image. You can set this property's value from 2 through 50. A large MaxBoxSize (50) produces only a few pixels of output at Progress = 1.0, while a small MaxBoxSize (2) produces only a slight change from the input image.
The Pixelate transform can optionally take two input images. In this case, the result at Progress = 0.0 is Image A, and the result at Progress = 1.0 is Image B. At Progress = 0.5, the pixelated version of Image A changes to the pixelated version of Image B, producing a smooth transition between the images as Progress increases.
Explode Transform

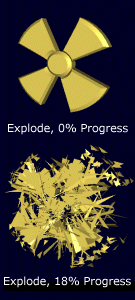
The Explode transform is an example of a 3-D transform that uses a mesh input to produce a mesh output. Once again, the Progress property controls the development of the output.
This transform simulates an explosion by breaking the input mesh into polygons and moving each polygon away from the center of the object. At Progress = 0.0, the output mesh and input mesh are the same. At Progress = 1.0, the polygons are spread throughout the surrounding 3-D volume, each with a different orientation than before.
Explode has five custom properties. PositionJump controls how quickly each polygon jumps out from the center. The FinalVelocity specifies how quickly the polygons are moving immediately after the explosion. For larger values, the polygons will be farther apart at Progress = 1.0. The DecayTime determines how long it takes after the explosion for the moving polygons to slow down to the FinalVelocity. A Boolean Tumble property controls whether the polygons tumble as they move. If TRUE, the MaxRotations controls the number of times each polygon rotates from the start of the explosion to Progress = 1.0.
HeightField Transform

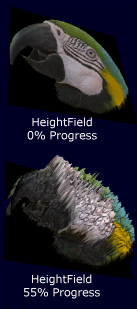
The HeightField transform is an example of how a two-dimensional (2-D) image can be turned into a 3-D mesh. It takes an image as an input and uses it as a texture for a 3-D rectangular plane. It then adds vertices to this plane that form the terrain of the output surface. The transform determines the height of each vertex from the plane by averaging the three RGB color values of the pixel corresponding to that vertex and mapping that brightness to the height. This makes brighter colors appear higher above the plane than darker ones. All heights are scaled by the Progress value, so in an animation, the surface can seem to grow out of the image.
The HeightField transform has two custom properties. The Depth controls how high above the plane the surface can be displaced. Depth accepts negative values, which produce depressions instead of spikes. The Samples property
specifies the number of vertices to use for each row and column of the resulting surface. The higher the value of Samples, the more jagged the surface will appear.
Gradient Transform
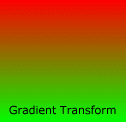
The Gradient transform sample included with the SDK has no inputs and one output. The result is an image that gradually transitions from one color to another. For this transform, the output image is determined solely from the custom properties set by the user.
 You can set the StartColor and EndColor properties, as well as a GradientType that is either horizontal or vertical. The GradientWidth and GradientHeight specify the surface dimensions in pixels.
Note that this transform does not have a Progress property; the output is produced in a single step by the call to Execute.
 Top of Page
© 2000 Microsoft and/or its suppliers. All rights reserved. Terms of Use.