Photoshop Adapter for Transforms
The Photoshop Adapter enables you use transforms from within Adobe Photoshop. You can apply a transform as a filter to a Photoshop image or layer, or to a selected area within an image. Most transforms with a category identifier of CATID_DXImageTransform are supported.
To install the adapter, first quit all running copies of Photoshop. Copy the Pstrans.8bf file from the DirectX Media SDK \bin folder (Dxmedia\bin by default) to your Photoshop Filters folder. For Photoshop 5.0, this is usually the Plug-ins\Filters folder found in your Photoshop folder. If you don't have a Filters folder, you can place it in the Plugins folder. Once this file has been copied to the correct folder, the adapter should show up as a Photoshop filter.
This article contains the following sections.
- Using the Photoshop Adapter
- Transform Selector and Proxy Image
- Transform Progress
- Properties
- Background
- For More Information
Using the Photoshop Adapter
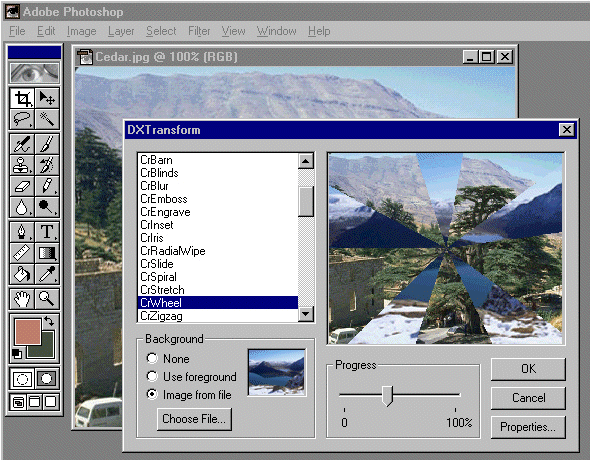
In Photoshop, on the Filter menu, click Microsoft, and then click DXTransforms. This displays the DXTransform dialog box.

Transform Selector and Proxy Image
The transform selector is a scrolling list that contains entries for all the transforms on your system that are supported by the Photoshop Adapter. Choose a transform from this list by selecting the one you want to use. As you adjust the transform parameters, the proxy image will be continually updated to show the results of your actions. After you are satisfied with the appearance of your image, click the OK button to accept the result into your Photoshop image. If you click the Cancel button, your Photoshop image will be unchanged.
Transform Progress
If you choose a transform that supports the IDXEffect interface, the Transform Progress slider will appear in the dialog box. By moving this slider from 0 through 100 percent, you can modify the effect of the transform on your image. This slider will change the progressive display or intensity of the effect. If the selected transform does not support IDXEffect, the Transform Progress slider will not be displayed.
Properties
If you choose a transform that has a property page, the Properties button will appear in the dialog box. When you click this button, a property dialog box will appear that will enable you to change the properties of the current transform. When you click the OK button in the dialog box, the resulting property changes will be visible in the proxy image. If the selected transform does not have a property page, the Properties button will not be displayed.
Background
If you choose a transform that supports two input images, the Background area of the dialog box will be displayed. This area enables you to change the background image that will be used as the second input to the transform (the current Photoshop image or selection is the foreground image, which is used as the first input to the transform). The Background area contains three radio buttons.
- None — When this radio button is selected, the background is black.
- Use Foreground — When this radio button is selected, the current Photoshop image or selection is used as both the background and foreground for the transform.
- Import File — When this radio button is selected, the background will be imported from an image file. To specify the file to import, click the Choose File button that appears when this radio button is selected. The following image file formats are supported: .JPEG, PNG, .GIF and .BMP.
If you select a background image that is larger than the Photoshop selection in either dimension, the background image is scaled and centered within the foreground image. If the aspect ratio of the background image differs from the foreground image, a check box is displayed that enables you to specify whether the background image will maintain its existing aspect ratio, or whether it will be stretched to fit exactly within the dimensions of the foreground image.
If the selected transform does not have a second input, the Background area will not be displayed.
For More Information
The Photoshop Adapter was developed for Microsoft DirectX™ Transform by Crawford Software Design. For updates and more information on the <electricFX>™ interface design tools for DirectX Media, see ![]() www.electricfx.com.
www.electricfx.com.
 Top of Page
© 2000 Microsoft and/or its suppliers. All rights reserved. Terms of Use.