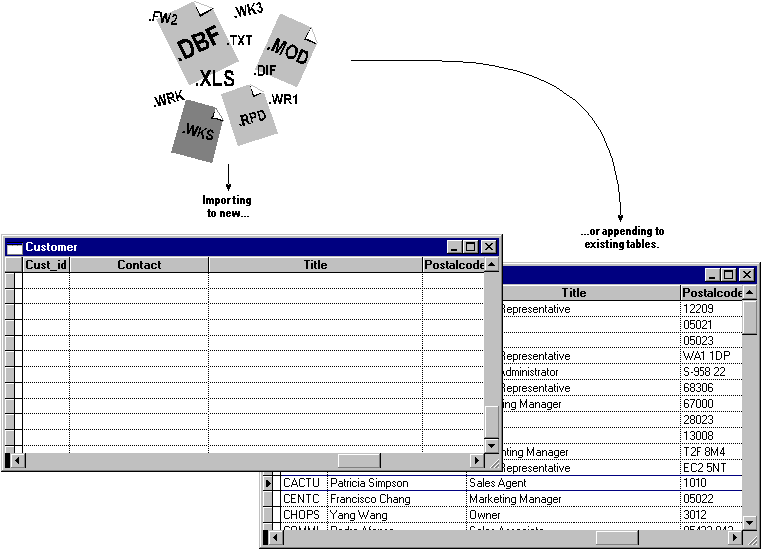
You can copy data between Visual FoxPro and other applications by importing to and exporting from Visual FoxPro. The data can be in any one of a variety of text, spreadsheet, and table file formats. You can create a new Visual FoxPro table, add to an existing Visual FoxPro table, or copy data to a different file type.
For more ways to share data with other applications, see Chapter 10, Sharing Information with Other Applications.”
This chapter discusses:
You can choose from three ways to copy data from outside of Visual FoxPro:
When you import or append data, you bring the data from another application into Visual FoxPro. When you export data, you send data from a Visual FoxPro table to a file type used by another application. These methods allow you to copy and use, rather than link or share, the data. If you prefer to create links between applications, see Chapter 10, Sharing Information with Other Applications.
Importing and appending data to Visual FoxPro tables
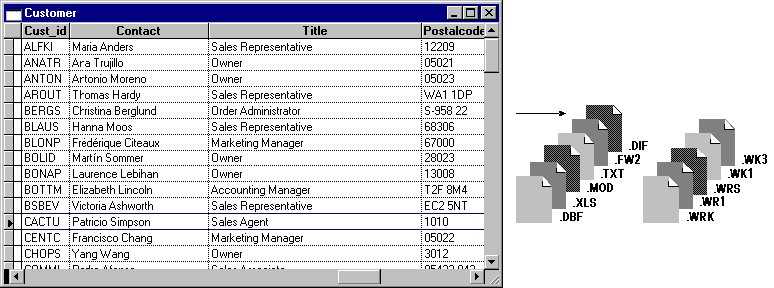
When you import data, you copy data from a source file, create a new table, and populate the table with the file’s data. For example, you can import the data from a dBASE table to create a Visual FoxPro table. After importing a file, you can use it like any other Visual FoxPro table.
When you append data, you add the source data to a Visual FoxPro table after the last record in the table. You can specify fields to import and select records that meet a condition in an expression. After appending from the file, you can view and edit the records in the Visual FoxPro table.
When you export, you copy data from a Visual FoxPro table into a new file formatted for use in another application. For example, you can export Visual FoxPro data to a Microsoft Excel worksheet file.
Exporting data from Visual FoxPro
You select the source and destination files. You can also specify fields to export, set the scope of records to export, and select records that meet a condition.
If you want to import from your source file, you can either let Visual FoxPro define the structure of the new table or use the Import Wizard to specify its structure. Visual FoxPro uses the field order in the source file to define the structure of the destination table. If you want to define the structure, you can modify the file in the source application or use the Import Wizard.
If you no longer have access to the application that supports the source file and you want to change the order or data type of the fields, you can import the source file, then create a query that outputs the fields in the order you want to another new table. For more information, see Chapter 4, Retrieving Data.
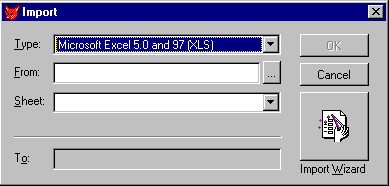
When you import a file, you must choose the file type you want to import and specify the source file and destination table names.
The following table lists the file types you can import into Visual FoxPro:
| File Type | File Extension | Description |
| Microsoft® Excel | xls | A Microsoft Excel (versions 2.0, 3.0, 4.0, 5.0, and 97) worksheet format. The column cells become fields, and rows become records. |
| Lotus 1-2-3 | wks wk1 wk3 |
A Lotus 1-2-3 spreadsheet for releases 1-A, 2.x, and 3.x. The column cells become fields and rows become records. |
| Borland Paradox | db | A Paradox table for versions 3.5 and 4.0. |
If you want to use tables from a previous version of FoxPro or use dBASE files, you can open and use them without importing. Visual FoxPro will ask if you want to convert the table to Visual FoxPro 6.0. Once you convert a table from a previous version, this table cannot be opened in the previous version.
For more information on importing files, see the IMPORT command.
For considerations which affect importing Microsoft Excel, Lotus, and Microsoft Access data, see Choosing a File Type to Import earlier in this chapter.
The Import Wizard helps you to create a new table from your source file. The wizard asks you a series of questions, imports the file based on your answers, and allows you to control how the new table is structured.
To import a file with the Import Wizard
You can import data from a table or spreadsheet format using the source file’s structure to define the new table.
To import data to a new table
Import dialog box
Visual FoxPro creates a new table using the source file.
If you want to import to a new table from a text file without using the Import Wizard, you need to create a new table with fields that match the order, data type, and width of the fields in the text file and then append the text to the new table.
After importing the file, you can add the new table to the database of your choice. For more information, see Chapter 3, Collecting Tables into a Database. You can also modify the new table using the Table Designer. For more information about modifying a table, see Chapter 2, Creating Tables and Indexes.
When you import spreadsheet data, Visual FoxPro uses the first row in your Lotus 1-2-3 spreadsheet to determine the data types of the fields in the new table. If the first row has literal text headings for each column, all the fields in the table will be character fields, even if the rest of the rows contain numeric data.
To make sure fields have the appropriate data type
Caution If your worksheet is from version 2.x or 3.x (file extension .wk1 or .wk3) and has columns with more than eight or nine characters, Visual FoxPro truncates character fields to nine characters for version 2.x worksheets and eight characters for version 3.x. To prevent truncated fields in your table, you can use the Import Wizard or create a Visual FoxPro table, then append records from the worksheet.
Lotus stores dates as the non-negative number of days from January 1, 1900. If the new table does not have the correct data type, you can translate the Lotus date fields in Visual FoxPro.
If Lotus date fields imported incorrectly, you can translate them by adding the Julian date for January 1, 1900 (the value 2415019) to the date value in the field.
To translate Lotus date fields
REPLACE ALL NewDateField ;
    WITH CTOD(SYS(10,OldDateField+2415019))
-or-
If the date was imported as a character value, use the following command to copy the date to the new field:
REPLACE ALL NewField ;
    WITH CTOD(SYS(10,VAL(OldField)+2415019))
When you import worksheet data, Visual FoxPro uses the first row in your Microsoft Excel worksheet to determine the data types of the fields in the new table. If the first row has literal text headings for each column, all the fields in the table will be character fields, even if the rest of the rows contain numeric data.
To make sure fields have the appropriate data type
Caution If a field in your Microsoft Excel worksheet has a field length of 255, that field is truncated to 254 when it is imported to a Visual FoxPro table.
You can add your text, spreadsheet, or table data to an existing Visual FoxPro table. By default, Visual FoxPro uses the file type to map the source fields to the destination table. You can also select fields and records to append. If you want to control the field mapping, you can use the Import Wizard, but field selection and logical expression options are not available.
The following table lists the file types you can append to Visual FoxPro:
| File Type | File Extension | Description |
| Table | dbf | A FoxPro® table from a database outside the current database or a dBASE file. |
| Tab delimited | txt | A text file with a tab separating each field. |
| Comma delimited | txt | A text file with a comma separating each field. |
| Space delimited | txt | A text file with one space separating each field. |
| System Data Format | sdf | A text file with fixed length records ending with a carriage return and line feed. |
| Microsoft Excel | xls | A Microsoft Excel (versions 2.0, 3.0, 4.0, 5.0, and 97) worksheet format. The column cells become fields and rows become records. |
| Lotus 1-2-3 | wks wk1 wk3 |
A Lotus 1-2-3 spreadsheet for releases 1-A, 2.x, and 3.x. The column cells become fields and rows become records. |
| Borland Paradox | db | A Paradox table for versions 3.5 and 4.0. |
For more information on appending files, see the APPEND FROM command.
The Import Wizard asks you a series of questions and appends the data from the source file based on your answers. Using the wizard, you can choose to map the source fields to the destination fields by changing the column numbers.
To append from a file with the Import Wizard
You can add records to the active table from another file. By default, Visual FoxPro adds all of the records and fields to the table. Using Append From options, you can specify fields or select records. For more information about field and record selection, see the sections Selecting Fields to Append and Selecting Records to Append, later in this chapter.
To append data
Append From dialog box
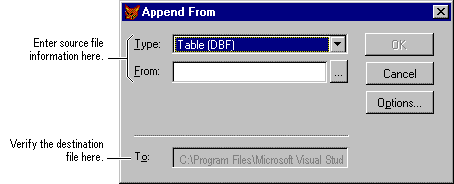
Tip If the table name is not correct, choose Cancel, and then open the correct destination table. The To box shows the table active at the time you selected the Append From command.
Visual FoxPro adds the records to the table.
You may want to append only certain fields from your source file. You can select the fields to include in the Append From process.
To select fields to append
Append From Options dialog box

Field Picker dialog box
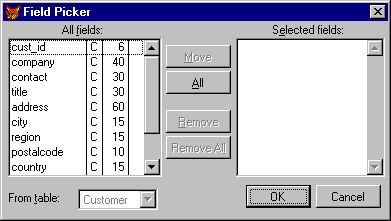
The fields you select appear in the Selected Fields box.
If you only want to append certain records, you can use a FOR expression. Visual FoxPro uses the expression to search the entire file and append only records that match the expression you provide. The fields you specify in the FOR expression must exist in both the source and destination files.
To select records to append
Note You do not need to enter the command FOR because it is implied. For example, type customer.country = "Canada" to append only Canadian information.
If you append from a text file, Visual FoxPro assumes your fields are separated by commas and that each character field is enclosed by quotation marks. If you have set the decimal point character to display as a comma, numeric and currency data might be parsed into separate fields.
If you changed the Visual FoxPro decimal point character to a comma, numeric and currency data might be parsed into separate fields when you append or export the data. For example, Visual FoxPro would translate the value 100,00 into two fields because it appears to be delimited with a comma. Choose one of two methods to make sure the comma is properly translated:
If you want to append from a text file, change the field separators to tabs, then use the APPEND FROM command with the keywords DELIMITED WITH TAB.
If you want to change the decimal point character to a period before appending text files, you can change the character back to a comma after you append the file.
To change the decimal point character
SET POINT TO
SET POINT TO ','
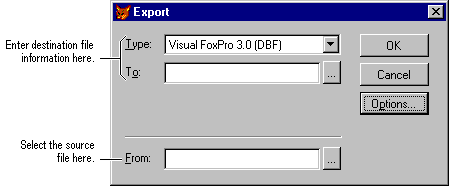
You can export data from your Visual FoxPro tables to text files, spreadsheets, or tables used in other applications. The exporting process requires a source table and the destination’s file type and name. If you want, you can select which fields and record to export. You can use the new file in any application that supports the file type you select.
The following table lists the file types you can export from Visual FoxPro:
| File Type | File Extension | Description |
| Tabs delimited | txt | A text file with a tab separating each field. |
| Comma delimited | txt | A text file with a comma separating each field. |
| Spaces delimited | txt | A text file with one space separating each field. |
| System Data Format | sdf | A text file with fixed length records ending with a carriage return and line feed. |
| Table | dbf | A Visual FoxPro, FoxPro, FoxBASE+®, dBASE, or Paradox 3.5 or 4.0 table. |
| Microsoft Excel | xls | A Microsoft Excel (versions 2.0, 3.0, 4.0, 5.0, and 97) worksheet format. The column cells become fields and rows become records. |
| Lotus 1-2-3 | wks wk1 |
A Lotus 1-2-3 spreadsheet for releases 1-A, 2.x, and 3.x. The column cells become fields and rows become records. |
For more information on exporting, see the COPY TO command.
You can copy all of the fields and records from your Visual FoxPro table to a new file or you can copy only the fields and records you select.
To export data
Export dialog box

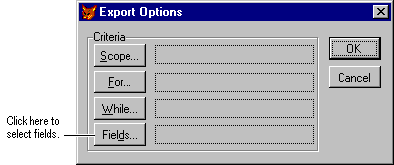
By default, Visual FoxPro exports all of the fields in the source table to the destination file. You can select which fields to export by using the Export Options dialog box.
To select fields to export
Export dialog box
Export Options dialog box
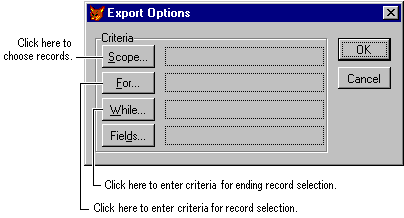
When you export data, you might want to limit the number of records that are copied to the new file by providing selection criteria. You can:
You can use any combination of these options. The WHILE expression overrides the other criteria.
One way you can limit the number of records is to specify a quantity or range of records. Using the Scope option, you can export a single record or a group of records positioned sequentially in the file.
Note The active index and the current record pointer affect the results of the scope options Next and Rest. For example, the next record in a table indexed by last name is probably different than one in a table indexed by state. This does not affect the Record option because the number for a record does not change when the table is indexed.
To export a limited number of records
Export Options dialog box
Scope dialog box
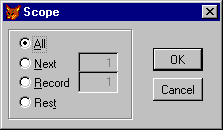
| To export | Choose |
| Every record from the source file | All |
| A range of records starting with current record | Next |
| A specific record by number | Record |
| The current record plus all of those after it to the end of the file | Rest |
Visual FoxPro exports records within the scope you select.
If the records you want to export are not sequential within the table, you can build a logical expression that specifies the selection criteria a record must meet to be exported. For example, you can choose to export all records with a particular value in a field.
To enter criteria for exporting records
Note You do not need to include the FOR command in the expression. For example, type customer.country = "Canada" to export only Canadian data.
Visual FoxPro evaluates all of the records and exports those that match the condition in the expression.
When exporting, you can specify a condition that must be met to continue evaluating and selecting records. You enter this condition as a WHILE expression.
As long as the WHILE expression remains true, Visual FoxPro processes the source table. After finding a record that does not meet the condition, Visual FoxPro ends the evaluation process and exports the selected records. This option allows you to export records based on information outside of the values contained in the fields.
Tip If you use a WHILE expression on a file that has not been indexed, the export process may end before evaluating all of the appropriate records. Before performing the export procedure, be sure the source table has the appropriate index active for the WHILE expression you want to use.
To enter criteria for ending record export
Note You do not need to include the WHILE command in the statement. For example, type sales > 1000 to see only sales above one thousand dollars.
Visual FoxPro exports the records it evaluates while the expression is true.
If you export to a text file, Visual FoxPro assumes that your fields are separated by commas and that each character field is enclosed by quotation marks. If you have set the decimal point character to display as a comma, numeric and currency data might be parsed into separate fields.
To export to a text file, use the COPY TO command with the appropriate DELIMITED clause as shown in the following table:
| For these separators | Use this DELIMITED clause |
| Commas between fields and quotation marks enclosing character fields | DELIMITED |
| Character fields enclosed by a character other than quotation marks | DELIMITED WITH delimiter |
| Tabs between fields | DELIMITED WITH TAB |
| Spaces between the fields | DELIMITED WITH BLANK1 |
1 Date and times separated by a space will be parsed as two fields with these keywords
If you changed the Visual FoxPro decimal point character to a comma, numeric and currency data might be parsed into separate fields when you append or export the data. For example, Visual FoxPro would translate the value 100,00 into two fields because it appears to be delimited with a comma. Choose one of two methods to make sure the comma is properly translated:
If you want to export the text, use the COPY TO command with the keywords DELIMITED WITH TAB.
If you want to change the decimal point character to a period before exporting text files, you can change the character back to a comma after you export the file.
To change the decimal point character
SET POINT TO
SET POINT TO ','