|
| ||
|
| ||
Joannie Kervran
Producer
Microsoft Corporation
June 8, 1998
Web convention says you can learn how to build a home page by looking at someone else's code. But when you select Source from your browser's View menu, that code looks like an impenetrable jungle. Feeling lost? Take a deep breath. The basic HTML building blocks are easier than you think.
Browsers display Web pages by interpreting Hypertext Markup Language, or HTML. That's a lot of the mess you see when you look at source code. A basic Web page starts with an <HTML> tag. At the end of the page is a corresponding </HTML> closing tag (the slash means it closes the HTML).
This idea of opening and closing tags is key to understanding HTML, as well as some of the more complicated territories beyond: Everything nests. Each new set of tags must fit neatly within the previous set, like Russian matryoshka dolls, those boxes inside boxes inside boxes.
Within your <HTML> and </HTML> tags, you will need to nest some other elements. Start with a set of <HEAD></HEAD> tags. Inside them, nest <TITLE> and </TITLE> tags. The text you place between the opening and closing TITLE tags will show up in the browser's title bar. So a simple Web page might look like this:
The code:
<HTML> <HEAD> <TITLE>My Jungle Home Page</TITLE> </HEAD> </HTML> |
What it looks like: |
You've just built your first Web page, and I'll bet you haven't broken a sweat.
Add a <BODY> tag after </HEAD> (the closing HEAD tag), and place its corresponding </BODY> tag just above the </HTML> tag. The <BODY> tag supports a number of elements, including margins, background color (BGCOLOR), and colors for text and links.
The HTML Elements Reference will become your good friend. Put it in your Favorites. Refer to it often. The MSDN Online Web Workshop is chock full of such help. All you need to do is look, and the reference is a great place to start.
Between the <BODY> and </BODY> tags, you can type just about anything:
The code:<HTML> <HEAD> <TITLE>My Jungle Home Page</TITLE> </HEAD> <BODY> The scariest jungle: Follow the map to see lions and tigers and bears. Oh, my! </BODY> </HTML>
What it looks like:
Now, we'll move on to the good stuff. You can control how the text looks by adding heading and font tags. HTML currently supports six heading levels:
A piece of cake! Font tags offer a wider range of possibilities: FONT FACE, COLOR, and SIZE (1-7).
FONT SIZE=1
FONT SIZE=2
FONT SIZE=3
FONT SIZE=4
FONT SIZE=5
FONT SIZE=6
FONT SIZE=7
Using the tags <B></B> makes text bold; <I></I> will display text in italics. You can also use <STRONG></STRONG> for bold and <EM></EM> for italic, but the results may differ depending on the browser. Remember that the font sizes don't map to point sizes, but you can specify point sizes by using Cascading Style Sheets (CSS).
For more information about color, see the Color section in the Design area. Be sure to visit Robert Hess's Safety Palette Color Picker page, which provides a quick way to select colors, and gives you the hexadecimal value -- such as "#339966" in the example below:
The code:
<FONT FACE="ARIAL" SIZE=2 COLOR="#339966"> <H1>The Scariest Jungle</H1> </FONT> <FONT FACE="ARIAL" SIZE=2> Follow the map to see <I>lions</I> and <I>tigers</I> and <I>bears</I>. <B>Oh, my!</B> </FONT> |
What it looks like:
The Scariest JungleFollow the map to see lions and tigers and bears. Oh, my! |
You can separate text into paragraphs or insert line breaks by using <P> and <BR> tags, as in the following example:
The code:
<FONT FACE="ARIAL" SIZE=2 COLOR="#339966"> <H1>The Scariest Jungle</H1> </FONT> <FONT FACE="ARIAL" SIZE=2> Follow the map to see <I>lions</I> and <I>tigers</I> and <I>bears</I>. <P><B>Oh, my!</B> </FONT> |
What it looks like:
The Scariest JungleFollow the map to see lions and tigers and bears.Oh, my! |
You can also modify text using CSS. The MSDN Online Web Workshop hosts some excellent articles on CSS -- ranging from introductory to advanced.
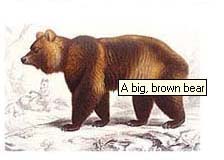
You can add an image -- a graphic or a photograph -- using the <IMG> tag. First, you need to specify the image source, which consists of its filename and the path to that file. For each image, you can specify height and width by entering those values (measured in pixels), choose to have a border, and provide ALT text for people who won't be able to see your image -- people with low vision, and those who turn off graphics to reduce download time. The ALT text will appear in place of the graphic, or when the user moves the mouse over the graphic.
Now your page might look like this.
The code:
<HTML> <HEAD> <TITLE>My Jungle Home Page</TITLE> </HEAD> <BODY> <FONT FACE="ARIAL" SIZE=2 COLOR="#339966"> <H1>The Scariest Jungle</H1> </FONT> <FONT FACE="ARIAL" SIZE=2> Follow the map to see <I>lions</I> and <I>tigers</I> and <I>bears</I>. <P> <IMG SRC="/workshop/author/html/bear.jpg" WIDTH="201" HEIGHT="132" BORDER=0 ALT="A big, brown bear"> <P><B>Oh, my!</B> </FONT> </BODY> </HTML> |
What it looks like:
The Scariest JungleFollow the map to see lions and tigers and bears.
Oh, my! |
Lists aren't quite as threatening as lions and tigers. If you want to present some of your information in a bulleted list, you can use <UL> and <LI> tags.
<UL> <LI> Lions <LI> Tigers <LI> Bears </UL> |
|
The <UL> tag is called a BLOCK element, which means you don't even need a <P> after </UL>. It's built in. The same is true of <OL>, used for a numbered list.
<OL> <LI> Stop <LI> Look <LI> Listen </OL> |
|
To present content in a table, you use tags for the table, table headings (optional), each row of the table (for example, Lions 6), and table data -- or the cells in your table (for example, Lions). The codes used for these elements are <TABLE> for the table, <TH> for table headings (<TH> tags automatically bold the text inside them), <TR> for table rows, and <TD> for each cell.
<TABLE> <TR> <TH>Beasts</TH> <TH>Number</TH> </TR> <TR> <TD>Lions</TD> <TD>6</TD> </TR> <TR> <TD>Tigers</TD> <TD>2</TD> </TR> <TR> <TD>Bears</TD> <TD>3</TD> </TR> </TABLE> |
|
Notice how these tags nest within each other. If you present text within your table, and you want it to look a certain way, you need to nest <FONT> tags within each <TD>. Notice the difference between the following and previous tables:
<TABLE> <TR> <TH><FONT FACE="COMIC SANS MS" SIZE=2>Beasts</FONT></TH> <TH><FONT FACE="COMIC SANS MS" SIZE=2>Number</FONT></TH> </TR> <TR> <TD><FONT FACE="COMIC SANS MS" SIZE=2>Lions</FONT></TD> <TD><FONT FACE="COMIC SANS MS" SIZE=2>6</FONT></TD> </TR> <TR> <TD><FONT FACE="COMIC SANS MS" SIZE=2>Tigers</FONT></TD> <TD><FONT FACE="COMIC SANS MS" SIZE=2>2</FONT></TD> </TR> <TR> <TD><FONT FACE="COMIC SANS MS" SIZE=2>Bears</FONT></TD> <TD><FONT FACE="COMIC SANS MS" SIZE=2>3</FONT></TD> </TR> </TABLE> |
|
If you don't want to type all those <FONT> tags, you can go with the browser's default font settings, or use Cascading Style Sheets. See the articles below for more information.
Each of the tags supports a number of attributes. To the <TABLE> tag, you can add values for CELLPADDING, CELLSPACING, WIDTH, and BORDER. You can do a lot of tricky things with tables. You can even use them to structure your page layout. For example, you could lay your page out this way
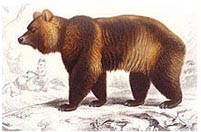 |
The Scariest Jungle
|
using this code:
<TABLE BORDER=0>
<TR>
<TD VALIGN="TOP">
<IMG SRC="/workshop/author/html/bear.jpg" WIDTH="201"
HEIGHT="132"
  BORDER=0 ALT="A big, brown bear">
</TD>
<TD VALIGN="TOP">
<FONT FACE="ARIAL" SIZE=2 COLOR="#339966">
<H1>The Scariest Jungle</H1>
</FONT>
  <TABLE BORDER=0>
  <TR>
  <TD VALIGN="TOP"><FONT FACE="VERDANA, ARIAL">
  Follow the map to see
  </FONT></TD>
  <TD VALIGN="TOP"><FONT FACE="VERDANA, ARIAL">
  <UL>
  <LI><I>lions</I>

  <LI><I>tigers</I>

  <LI><I>bears</I>
  </UL>
  </FONT></TD>
  </TR>
  </TABLE>
</TD>
</TR>
</TABLE>
That's how I've displayed the much of the code and examples in this article. For more information, see the following resources:
The next important question is where you want to lead your users. You need links to navigate users to other places within your site, and possibly to other sites as well. A link employs an anchor tag (<A>), which surrounds the text or image you want users to click. When tagged properly, the text inside the link is said to be "hot," and will appear underlined or otherwise highlighted in the user's browser.
<A
HREF="">Lions</A>
Nothing hard about that. Now you've been able to create your first Web pages. Have fun with them: Change a font size or color, or a heading. Then save the file and open it in your Web browser. Instant gratification. Your text is now blue; your headings, stupendous.
Planning and building an entire site is a bit trickier. The MSDN Online Web Workshop provides articles on planning a Web site, including So You Want to Build a Web Site?, and Mary Haggard's series of For Starters articles.
Here are some additional resources. Remember the HTML Reference and MSDN Online Web Workshop -- where you want to go when you need an answer.
Frequently Asked Questions About HTML Coding for Internet Explorer 3.0
HTML Authoring: Tips, Tricks, and Secrets
Made for Each Other? Making Your Site Browser Compatible
Web Men Talking (monthly MSDN Online Voices column tackling the tough questions, and covering some basics)
Color Section Table of Contents
The Safety Palette Color Picker
Internet Explorer Multimedia Gallery
Did you find this material useful? Gripes? Compliments? Suggestions for other articles? Write us!
© 1999 Microsoft Corporation. All rights reserved. Terms of use.