The workflow process is a series of tasks or actions, the order in which they must be performed, permissions defining who can perform them, and script that is executed for each action.
In its simplest form, the workflow process automates and enforces the order of the tasks in the process. For example, a user creates a new issue and assigns it to another user, who then resolves the issue and assigns it back to the original user, who then can close the issue. By defining the order of the tasks in the workflow process, the team solution can ensure an issue is resolved before it is closed.
The Workflow Process pane contains four tabs: General, Design, Shared Script, and Permissions. Working in concert with a series of wizards, the workflow process options make it possible for you to view and modify general information about a workflow process, modify a workflow diagram, create sub procedures and functions and assign them to workflow actions, and set row permissions on workflow states.
For more information about how to add workflow to your solution, see Building a Workflow Process in the Access Workflow Designer Developer's Guide.
The General tab of the Workflow Process pane makes it possible for you to create, view, and modify details of your workflow process. You can name a workflow process, see the tables involved with the workflow process, and set certain options for the workflow, such as whether the workflow process is available.
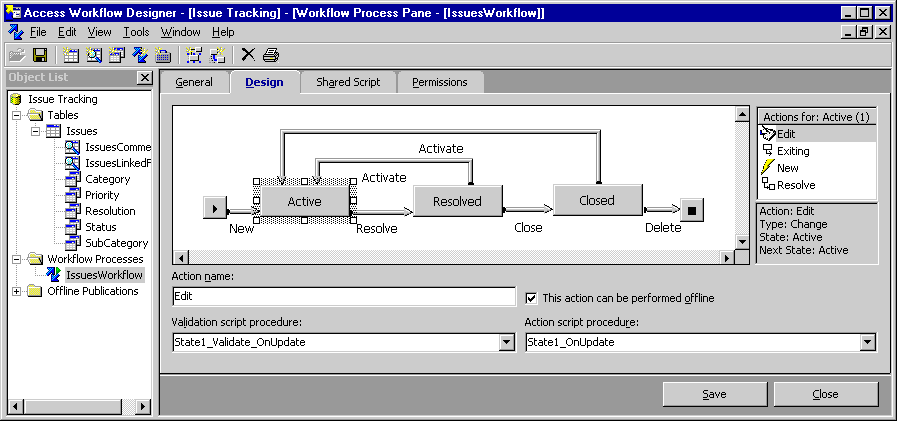
The Design tab is divided into three working sections: the workflow diagram area, the Actions for area, and the Action name and script procedure area.
The workflow diagram area displays a graphical view of the workflow process states and actions. The workflow diagram shows a node for each workflow state and a line for each action.
When you select a state, it is highlighted, and its properties are displayed in the Action for area. This section of the pane displays transition-actions as well as the state-actions allowed for that particular state.
When you select an action in the Action for area, it is highlighted and its properties are displayed in the lower part of the Workflow Process pane. The information displayed includes the action name, which you can change, and the validation and action script procedures that associate code with workflow actions.
You can also designate whether it is permissible to perform an action while offline.
To create your business rules, you may want to add script to the workflow process. Adding script to the workflow process makes it possible for you to create conditional transitions, automatic user notifications, and action validations.
Access Workflow Designer tools help you to add script to workflow actions. Once you have created a workflow process, you can add script to workflow actions and transitions using the Design and Shared Script tabs on the Workflow Process pane.

For each workflow action on the Active state, there are two script procedures executed whenever an action is performed. The validation script procedure is the first event to be fired. Next, if the validation is successful, the action script procedure is fired. The validation script procedure is always a function, the value of which determines whether or not the action or transition is allowed.
To change the default script procedure, you can click the drop-down arrow and select an alternate procedure stored in the shared script module.
On the Shared Script tab of the Workflow Process pane shown here, you can view the script associated with these script procedures. The easiest way to view script associated with an action is to double-click the action in the Actions for list.
For more information about adding script to workflow actions, see Scripting Workflow Actions in the Access Workflow Designer Developer's Guide.
The last tab of the workflow process panes is the Permissions tab. This tab displays a grid view of each state, its actions, and all database roles.
Assigning permissions to roles rather than directly to users is the preferred method for setting up database security. It is far easier to maintain and makes it easier to save your solution as a template. When you save a solution as a template, you do not want to have specific user security set up, because these users may change or have different permissions in various solutions.