This Windows NT–based utility enables you to save, restore, find, examine, and change data on the disk. DiskProbe gives an administrator access to every byte on the physical disk without regard to access privilege, and with it you can change any part of the disk. It is your responsibility to make sure that you have backups of the disk.
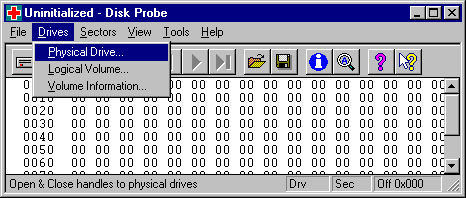
After starting DiskProbe, as shown in Figure 22.2, you use the Drives menu to open a physical disk or a logical drive.

Figure 22.2 Opening a disk by using DiskProbe
Clicking Physical Drive on the Drives menu opens the entire physical disk. You can access any sector on the disk. When you read or write sectors, the sector number is the absolute sector from the beginning of the disk.
Clicking Logical Volume on the Drives menu opens the logical drive associated with a drive letter. Sector numbers are relative to the start of the logical drive, and you can only access sectors within the range of the logical drive. You cannot use DiskProbe to access a network drive.
When you have opened either a disk by clicking either Physical Drive or Logical Volume, you can get information about the characteristics of the disk by clicking Volume Information on the Drives menu. You get the same information regardless of how you opened the disk. This information is the same as what you see if you run the DiskMap utility for this disk. You can use this information if you need to repair the Partition Table. Here is an example:
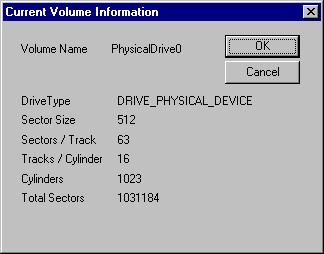
Whenever you use DiskProbe to read a sector, it displays the sector number of the first sector it read in the title bar. It also displays the sector number of the sector you are currently viewing in the status bar. This information is useful if you have read more than one sector.
When you are first using DiskProbe, or are looking at information in an extended partition, it is recommended that you write down the sector number for the start of each partition and logical drive. You should also write down the sector number of the Partition Boot Sector partition or logical drive. You can produce a hardcopy of the disk configuration by using the DiskMap utility, which is described earlier in this chapter.
If your disk has volume sets or an extended partition, remembering which partition or logical drive you are looking at can become difficult. You can always start over by reading sector 0, which reads the Partition Table for the disk.
Note
In the DiskProbe utility, sectors are numbered starting from zero.
The location of some system information on NTFS volumes is different, depending on which version of Windows NT was used to format the volume. For example, Windows NT 4.0 writes a backup of the Partition Boot Sector for the volume at the end of the volume. Earlier versions of Windows NT put the backup at the center of the volume.
For more information about DiskProbe, see Dskprobe.hlp and Rktools.hlp on the Windows NT Workstation Resource Kit CD.
Although DiskProbe and Disk Administrator both provide you with information about the organization of your hard disks, each utility has additional functionality. Disk Administrator enables you to configure and format your disks. DiskProbe enables you to save and change the data on the disk.
Disk Administrator shows you, for each disk, the size and organization of:
When displaying information about stripe sets and volume sets, both DiskProbe and Disk Administrator read the HKEY_LOCAL_MACHINE\SYSTEM\DISK Registry subkey to determine which disks contain the members of the volumes.
When you view the Partition Table, DiskProbe enables you to determine the starting and ending location of primary partitions, logical drives, and volume sets.
DiskProbe simply displays the information that it finds in each Partition Table, it is up to you to understand how the individual entries in the Partition Table relate to what you have configured on your disks. If your configuration contains extended partitions, you might find it easier to understand the DiskProbe information if you print a screen shot of the Disk Administrator display (by pressing ALT+Print Screen, pasting the screen shot into Paint or a document, and then printing the picture or document). The section "Walking an Extended Partition," presented later in this chapter, contains an example of the Disk Administrator and DiskProbe information for an extended partition.
Note
Because both DiskProbe and Disk Administrator can modify the Partition Table, and DiskProbe enables you to directly modify any sector on a disk, you should never have both of these utilities open at the same time. When you are using DiskProbe, you should also be very cautious about running any other programs. DiskProbe writes directly to the disk without using the file cache, the NTFS log file, or any file system device drivers.
The Master Boot Record on the hard disk that you use to start your computer is the most important sector on the disk. The Master Boot Record on other disks is not as critical. However, if the partition information in the other Master Boot Records is not correct, you might not be able to access partitions on those disks.
For an example of a Master Boot Record, see Chapter 17, "Disk and File System Basics."
1. In the Resource Kit folder, double-click the DiskProbe icon.
2. On the Drives menu, click Physical Drive. You will see the Open Physical Drive dialog box, which is shown in the following figure.
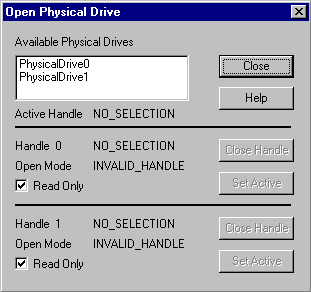
The Available Physical Drives are listed as PhysicalDriven, where n=0 for the first hard disk. Double-click the disk that contains the Master Boot Record you want to save. You should always save the Master Boot Record on the startup disk. In the case of an x86-based computer, the startup disk is usually PhysicalDrive0.
When you have more than one disk, you should back up the Master Boot Record on each disk, since it contains the Partition Table for that disk.
3. In the Handle 0 group box, click Set Active. Click Close.
4. On the Sectors menu, click Read to open the Sector Range dialog box, which is shown in the figure below. Set Starting Sector to 0 and Number of Sectors to 1. Click Read.
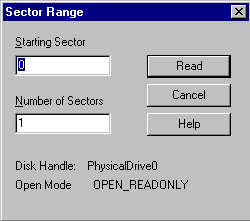
Make sure that the sector you read looks like a Master Boot Record, as described in Chapter 17, "Disk and File System Basics."
5. On the File menu, click Save As. Enter the filename. Consider saving the file to the Emergency Repair Disk, the Windows NT startup floppy disk, or the MS-DOS bootable floppy disk. You can save it on more than one disk. If you have more than one disk whose Master Boot Record you are baking up, using a filename such as Mbrdiskn.dsk can help you remember which file corresponds to which disk.
1. In the Resource Kit folder, double-click the DiskProbe icon.
2. On the File menu, click Open. Enter the filename and open the file. Verify that the file looks like a Master Boot Record and that it is 512 bytes. DiskProbe displays a message if the size of the file you open is not a multiple of 512.
3. On the Drives menu, click Physical Drive. The Available Physical Drives are listed as PhysicalDriven, where n=0 for the first hard disk. Double-click the disk that contains the Master Boot Record you want to restore.
4. In the Handle 0 group box, clear the Read Only check box, and click Set Active. Click Close.
5. On the Sectors menu, click Write to open the Write Sector dialog box. Set Starting sector to write data to 0. Click Write it.
6. DiskProbe displays a message box so you can verify the information.
The Master Boot Record is the first sector on each hard disk. The first step in troubleshooting Partition Table problems should be to read the Master Boot Record and look at the Partition Table. The description in this section applies to viewing the Partition Table in the Master Boot Record. See "Walking an Extended Partition," presented later in this chapter, for information about finding the Partition Table for an extended partition.
1. Read the Master Boot Record by using steps 1 through 4 in the procedure for backing up the Master Boot Record, given earlier in this chapter.
2. On the View menu, click Partition Table to see the information displayed in a user-friendly manner. You will see a screen like the following:
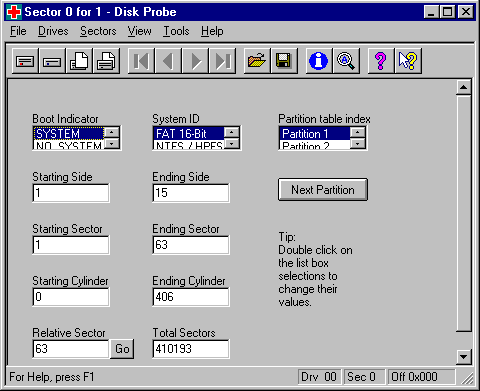
Figure 22.3 DiskProbe Partition Table view
DiskProbe makes it easy for you to look at the information for each partition. In the Partition table index list box, double-click the partition number for which you want to see the Partition Table entry.
Click the Next Partition button to see the information in the first sector of the next partition. For a primary partition, clicking the Next Partition button reads the Partition Boot Sector of the next partition. When the next partition is an extended partition, clicking Next Partition reads the Partition Table sector for the first logical drive in the extended partition.
For a primary partition, clicking the Go button next to the Relative Sector field reads the Partition Boot Sector for the current partition. When the System ID field is EXTENDED, clicking the Go button reads the Partition Table for the next logical drive in the extended partition.
If you make changes to the Partition Table, you must explicitly write the sector to disk by clicking Write on the Sectors menu.
When you are viewing the information for an extended partition in the Partition Table area of the Master Boot Record, the Total Sectors field is the total size of the extended partition, which is usually larger than the size of the first logical drive in the partition.
If the disk has an extended partition, finding the information for each logical drive is more complicated than just looking at the Partition Table in the Master Boot Record, but DiskProbe does the work for you. "Logical Disks and Extended Partitions," within Chapter 17 describes the organization of an extended partition.
Information for the logical drives in an extended partition is basically chained from one logical drive to the next. The term walking an extended partition means that utilities like DiskProbe and DiskMap use the information defined for one logical drive in the chain to find the next logical drive in the chain. Knowing how to walk an extended partition is necessary if one of the links in the chain becomes corrupted, and you want to try to repair it.
The description in this section applies when you are viewing the Partition Table information in the first sector of each logical drive.
To help make the descriptions easier to understand, following is a screen shot from Disk Administrator, and the information from DiskProbe for the extended partition shown in the screen shot. The extended partition includes volume set E, logical drives I and K, and 4 MB of unused space between E and L. This example is the same disk configuration used in the section "DiskMap — Display a Map of the Disk," presented earlier in this chapter.

Note
This example is for illustration purposes, and is not a good organization for the disk, because the free space at the end of the primary partition is unusable. This is because you can have only four partition table entries in the Master Boot Record. In this example, primary partitions C, D, and L each use one entry. The extended partition, which includes volume set E, logical drives I and K, and the free space between E and K, uses the other entry. Disk Administrator displays an error message if you try to use any of the area after drive L to create a partition or extend an NTFS logical drive.
The distinction between the two areas of free space is that the one on the left is free space within an extended partition, while the free space on the right, which has a different background pattern, is not a part of any partition.
To walk the extended partition in this example, start with the information for partition 3 in the Partition Table on relative sector 0. Partition 3 points you to the first logical drive in the extended partition. By following the links in the Partition Table entry for each logical drive, you can find the information for all of the logical drives.
The next table identifies which sectors contain information about the extended partition and the logical drives. The table also describes which buttons to click to walk the extended partition.
Relative sector | Contents |
0 | Partition 3 of the Master Boot Record contains an EXTENDED entry, which is the information about the first part of volume set E. Click Go when viewing partition 3 to read the Partition Table for the first part of volume set E. |
819504 | Partition 1 describes the first part of volume set E. Partition 2 is an EXTENDED entry with the information for logical drive I. Click Next Partition when viewing partition 1 to read the Partition Table for logical drive I. |
839664 | Partition 1 describes logical drive I, Partition 2 is an EXTENDED entry with the information for logical drive K. Click Next Partition when viewing partition 1 to read the Partition Table for logical drive K. |
855792 | Partition 1 describes logical drive K. Partition 2 is an EXTENDED entry with the information for the second part of volume set E. Click Next Partition when viewing partition 1 to read the Partition Table for the second part of volume set E. |
879984 | Partition 1 describes the second part of volume set E. Partition 2 is all zeroes (end of the extended partition). |
The next table shows the information in Partition 3 of the Master Boot Record and each of the Partition 1 entries for the extended partition.
Field Name | Master Boot Record entry |
|
|
| Second part of E (16 MB) | |
System ID | EXTENDED | NTFS FT | FAT | NTFS | NTFS FT | |
Boot Indicator | NO_ SYSTEM | NO_ SYSTEM | NO_ SYSTEM | NO_ SYSTEM | NO_ SYSTEM | |
Start Head | 1 | 1 | 1 | 1 | 1 | |
End Head | 15 | 15 | 15 | 15 | 15 | |
Start Sector | 1 | 1 | 1 | 1 | 1 | |
End Sector | 63 | 63 | 63 | 63 | 63 | |
Start Cylinder | 813 | 813 | 833 | 849 | 873 | |
End Cylinder | 914 | 832 | 848 | 872 | 905 | |
Relative Sector | 819504 | 63 | 63 | 63 | 63 | |
Total Sectors | 102816 | 20097 | 16065 | 24129 | 33201 | |
When the System ID field for a Partition 2 in an extended partition contains the value EXTENDED, double-click Partition 1 in the Partition table index list box, and then click Next Partition to read the first sector of the next logical drive. The only information in the first sector of a logical drive is a Partition Table, which has two entries. The Partition 1 entry contains information about the current logical drive, and the Partition 2 entry is the information for the next logical drive in the extended partition. The System ID for each Partition 2 entry should be EXTENDED unless you are at the end of the extended partition.
The next screen shot shows the Partition Table entry for the first part of volume set E; the Partition Table is located at relative sector 819504.
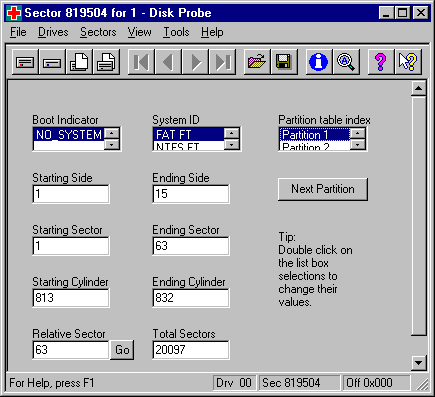
When the System ID field contains any value except EXTENDED or UNKNOWN, clicking the Go button next to the Relative Sector field reads the Partition Boot Sector for the logical drive.
To view the information for Partition 2 (the next logical volume), double-click Partition 2 or click Next Partition while viewing the information for Partition 1.
The Relative Sector field for each Partition 2 entry in an extended partition is the offset from the beginning of the extended partition, not the offset from the beginning of the Partition Table associated with the Partition 1 entry. Therefore, do not use the Go button to try to read the Partition Boot Sector for Partition 2.
Note
Sometimes, the System ID byte for NTFS volume sets and stripe sets does not have the correct value. It should be 0x87, which DiskProbe displays as NTFS FT. Instead, it might be 0x86, which DiskProbe displays as FAT FT. Windows NT uses information in the Partition Boot Sector to determine which file system to use, so this incorrect value causes no problems, although it can be confusing to a person trying to understand the data on the disk. To be certain which file system is being used for a volume, look at the Partition Boot Sector.
You can use DiskProbe to view the information in Partition Boot Sectors. You see a formatted view of the information in the BIOS Parameter Block and the Extended BIOS Parameter Block. For a description of these structures, see "Partition Boot Sector," in Chapter 17, "Disk and File System Basics."
1. In the Resource Kit folder, double-click the DiskProbe icon.
2. On the Drives menu, click Logical Volume. In the Logical Volumes list box of the Open Logical Volume dialog box, double-click the drive letter for the volume whose Partition Boot Sector you want to read.
3. In the Handle 0 group box, click Set Active. Click OK.
4. On the Sectors menu, click Read to display the Read Sectors dialog box. Set Starting Sector to 0 and Number of Sectors to 1.
5. On the View menu, click NTFS Bootsector or FAT Bootsector to see the information.
The next screen shot shows the NTFS Bootsector view of primary partition D for the disk configuration shown in Figure 22.1.
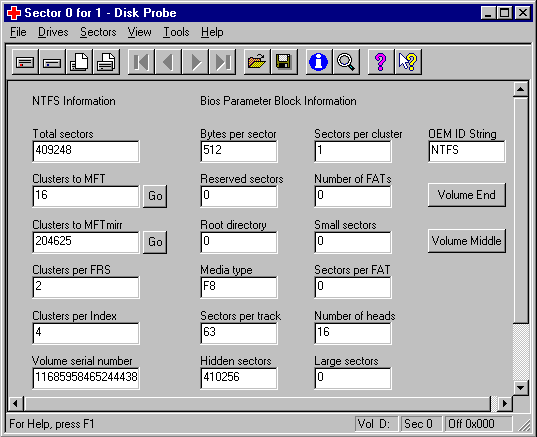
When viewing an NTFS Partition Boot Sector, there are Go buttons next to the fields Clusters to MFT and Clusters to MFT mirr. When you click one of these buttons, it reads the first sector of the MFT or the MFT mirror, respectively. For information about these structures, see "Master File Table (MFT) and NTFS System Files" in Chapter 17, "Disk and File System Basics."
Windows NT writes a backup of the NTFS Partition Boot Sector at the logical center of the volume (Windows NT version 3.51 and earlier) or the end of the volume (Windows NT 4.0). You can use the Volume Middle and Volume End buttons to read the backup Partition Boot Sector. However, there are some situations, when using Windows NT version 3.51 or earlier, where the backup Partition Boot Sector does not get written in the correct location:
View the sector you read to make sure it looks like an NTFS Partition Boot Sector, and that the information in it is accurate for the volume.
When viewing a FAT Partition Boot Sector, there is also a Volume End button, but there is no backup of the FAT Partition Boot Sector on the volume. If you are trying to find where volumes begin and end so you can repair a Partition Table, you can use the Volume End button for both FAT and NTFS primary partitions and logical drives to read what should be the sector immediately before the beginning of the next primary partition or logical drive.
Note
If you are viewing a backup NTFS Partition Boot Sector, do not use the Go, Volume End, or Volume Middle buttons. These buttons read the correct sectors only when you are viewing the Partition Boot Sector at the beginning of the volume.
The Partition Boot Sector contains information that the file system uses to access the volume. On x86-based computers, the Master Boot Record uses the Partition Boot Sector on the system partition to load the operating system kernel files, or in the case of Windows NT, the boot loader.
For examples of a Partition Boot Sector for a FAT and an NTFS volume, see Chapter 17, "Disk and File System Basics."
There are several procedures that you can use, depending on whether you are backing up or restoring the Partition Boot Sector for:
You can open the disk to read the Partition Boot Sector by using either Physical Drive or Logical Volume on the Drives menu. When you use Physical Drive, you have to read the Partition Table to find the address of the Partition Boot Sector. When you use Logical Volume, you read the Partition Boot Sector by reading sector 0 of the logical drive. You cannot read the Master Boot Record when you use Logical Volume.
1. Read the Partition Table and view it by using the procedure in "Displaying and Using the Partition Table," presented earlier in this section.
2. In the Partition table index list box, double-click the partition number for the Partition Boot Sector that you want to save. For instance, to save the Partition Boot Sector for the system partition, double-click the partition number that has the Boot Indicator set to SYSTEM.
3. To read the Partition Boot Sector, click the Go button next to the Relative Sector field. On the View menu, click NTFS BootSector or FAT BootSector to see the information displayed appropriately. Make sure that the sector you just read looks like a Partition Boot Sector, as described in Chapter 17, "Disk and File System Basics."
4. On the File menu, click Save As. Enter the filename. Consider saving the file to the Emergency Repair Disk, the Windows NT startup floppy disk, or the MS-DOS bootable floppy disk. You can save it to more than one disk. When you are saving a Partition Boot Sector, using a name such as PBSssssssssDISKn.dsk, where ssssssss is the relative sector of the Partition Boot Sector and n is the disk number, can help you remember what the file contains.
1. In the Resource Kit folder, double-click the DiskProbe icon.
2. On the Drives menu, click Logical Volume. In the Logical Volumes list box, double-click the drive letter for the volume whose Partition Boot Sector you want to save.
3. In the Handle 0 group box, click Set Active. Close the dialog box.
4. On the Sectors menu, click Read. Set Starting Sector to 0 and Number of Sectors to 1. Make sure that the sector you read looks like a Partition Boot Sector, as described in Chapter 17, "Disk and File System Basics."
5. On the File menu, click Save As. Enter the filename. Consider saving the file to the Emergency Repair Disk, the Windows NT startup floppy disk, or the MS-DOS bootable floppy disk. You can save it to more than one disk. When you are saving a Partition Boot Sector in this manner, using a name such as PBSdDSKn.dsk, where d is the drive letter of the logical drive, and n is the disk number, can help you remember what the file contains. Using a name such as this assumes that you will not be changing drive letters.
1. Read the Partition Table and view it by using the procedure in "Displaying the Partition Table," presented earlier in this section.
2. In the Partition table index list box, double-click the partition number for the extended partition, and then click Go. Doing this reads the first Partition Table entry in the extended partition.
3. You can walk the extended partition to find the logical drive whose Partition Boot Sector you want to back up. When you walk the extended partition, view the information for Partition 1 and click Go to read the Partition Boot Sector. You can use the Search function on the Tools menu to find each Partition Boot Sector. See "Finding a Partition Boot Sector," presented later in this chapter, for information about finding these disk sectors.
You can also print a map of the disk by using the DiskMap utility, which provides you with the address of the Partition Table entry for each logical drive. You can then use DiskProbe to read the first sector of the logical drive whose Partition Boot Sector you want to back up, and use the Go button to read the Partition Boot Sector.
Once you have read a Partition Boot Sector, on the View menu, click NTFS BootSector or FAT BootSector to see the information displayed appropriately. Make sure that the sector you just read looks like a Partition Boot Sector, as described in Chapter 17, "Disk and File System Basics."
4. On the File menu, click Save As. Enter the filename. Consider saving the file to the Emergency Repair Disk, the Windows NT startup floppy disk, or the MS-DOS bootable floppy disk. When you are saving a Partition Boot Sector, using a name such as PBSssssssssDISKn.dsk, where ssssssss is the relative sector of the Partition Boot Sector and n is the disk number, can help you remember what all of the files contain.
1. In the Resource Kit folder, double-click the DiskProbe icon.
2. On the Drives menu, click Physical Drive. In the Available Physical Drives group box, the disks are listed as PhysicalDriven, where n=0 for the first hard disk. Double-click the disk that contains the Partition Boot Sector that you want to replace.
3. In the Handle 0 group box, clear the Read Only check box, click Set Active, and click Close.
4. If you know the address of the sector you need to write, skip to step 6. To use DiskProbe to compute the sector, first read the Partition Table and view it by using the procedure in "Displaying and Using the Partition Table," presented earlier in this section. Figure 22-3 shows the DiskProbe Partition Table view.
5. In the Partition table index list box, double-click the partition number for the Partition Boot Sector that you want to replace. For example, to view information about the Partition Boot Sector for the system partition, double-click the partition number that has the Boot Indicator set to SYSTEM.
The Relative Sector field contains the sector number for the Partition Boot Sector. Write down this number.
6. On the File menu, click Open, and enter the filename of the file that contains the Partition Boot Sector. Open the file. Verify that it looks like a Partition Boot Sector.
7. On the Sectors menu, click Write to display the Write Sector dialog box. In the Starting sector to write data, enter the sector number from step 5 (or that you already know is the correct sector). Click the option button for the disk to which you want to write the sector. Click Write it.
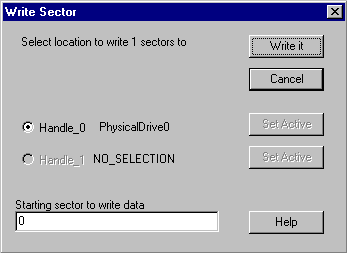
8. DiskProbe displays a message box so you can verify the information.
1. In the Resource Kit folder, double-click the DiskProbe icon.
2. On the Drives menu, click Logical Volume. In the Logical Volumes list box of the Open Logical Volume dialog box, double-click the logical drive whose Partition Boot Sector you want to restore.
3. In the Handle 0 group box, clear Read Only, click Set Active, and click Close.
4. On the File menu, click Open, and enter the filename of the file that contains the Partition Boot Sector. Open the file. Verify that it looks like a Partition Boot Sector and is 512 bytes. DiskProbe displays an error if the file size is not a multiple of 512.
5. On the Sectors menu, click Write to display the Write Sector dialog box. In the Starting sector to write data, enter 0 for the Starting sector to write data. Click Write it.
6. DiskProbe displays a message box so you can verify the information.
1. If you know the address of the Partition Boot Sector that you want to restore (which you would know if the sector number is part of the filename), follow the procedure for restoring the Partition Boot Sector (given earlier in this chapter) for a primary partition, skipping steps 4 and 5. You are done.
If you do not know the address, you can find it by walking the extended partition. Follow steps 1 through 3 in the procedure for backing up the Partition Boot Sector for an extended partition (given earlier in this chapter). Even though the Partition Boot Sector that you read is the one you want to replace, when you read it, DiskProbe displays its relative sector number. Write down this number.
You can also calculate the address of the Partition Boot Sector by using a DiskMap output for the disk. The sector number for a Partition Boot Sector is the address of the EBR for the logical drive + the Relative Sector value.
2. In the Handle 0 group box of the Open Physical Drive dialog box, be sure that Read Only is cleared.
3. On the File menu, click Open, and enter the filename of the file that contains the Partition Boot Sector. Open the file. Verify that it looks like a Partition Boot Sector.
4. On the Sectors menu, click Write to display the Write Sector dialog box. In the Starting sector to write data, enter the sector number that you found in step 1. Click the option button for the disk to which you want to write the sector. Click Write it.
5. DiskProbe displays a message box so you can verify the information.
If you formatted an NTFS volume when running Windows NT version 4.0, a backup of the Partition Boot Sector for NTFS volume is located at the end of the volume. Earlier versions of Windows NT put the backup at the center of the volume. If you did not make a backup of the Partition Boot Sector, you can find the backup sector and copy it to the first sector of the volume.
1. In the Resource Kit folder, double-click the DiskProbe icon.
2. "Finding a Partition Boot Sector," presented later in this chapter, describes different methods for finding the Partition Boot Sector. When you find a Partition Boot Sector within the boundaries of an NTFS volume, make sure that the data are reasonable for the volume. If you have deleted volumes, or extended an NTFS volume set, there might be old, invalid, Partition Boot Sectors on the disk. Save the backup to a disk.
3. Close any handles that you opened to find the backup.
4. On the Drives menu, click Logical Volume. Click the Close Handle button for any drives or logical volumes that are currently open. In the Logical Volumes list box of the Open Logical Volume dialog box, double-click the logical drive whose Partition Boot Sector you want to restore.
5. In the Handle 0 group box, clear Read Only and click Set Active. Click OK.
6. On the File menu, click Open, and enter the name of the file you copied to disk in step 2. Open the file.
7. On the Sectors menu, click Write to display the Write Sector dialog box. Since you are going to be writing to relative sector 0, make sure that the active handle is a drive letter, not PhysicalDriven. Enter 0 for the Starting sector to write data. Click Write it.
8. DiskProbe displays a message box so you can verify the information.
This section discusses some approaches for finding primary partitions and logical drives on your disk in order to repair the Partition Table, which is discussed in "Editing and Repairing the Partition Table," presented later in this chapter.
When you are looking for Partition Boot Sectors in order to repair the Partition Table, you know that some information is wrong or missing. Therefore, you need to verify that the information you use to find a Partition Boot Sector, or a Partition Table in an extended partition, is accurate. For example, if you use the Number of Sectors field for one primary partition to calculate the location of the Partition Boot Sector for the next partition, make sure that there is a valid Partition Boot Sector at that sector.
The easiest way to find the start of a primary partition is to find the Partition Boot Sector for the partition. For an extended partition, subtract the sectors per track from the address of the Partition Boot Sector to find the Partition Table entry for the logical drive.
The Partition Boot Sector for the first partition on your hard disk is always the first sector on head 1 of cylinder 0. Because disks typically have 32 or 63 sectors per track, you can usually find the Partition Boot Sector for the first partition at either relative sector 32 or relative sector 63. You can get the sectors-per-track information by clicking Volume Information on the Drives menu.
If you think that the relative sector field for a primary partition or logical drive is correct, you can read the sector by clicking Go when you are viewing its information to see if the sector looks like a Partition Boot Sector.
There is also a Total Sectors field on the Partition Table view. If you think this field is accurate, you can use this value to calculate the start of the next primary partition or logical drive.
The FAT and NTFS Partition Boot Sectors each have a field that contains the total number of sectors. If you already know or have found the start of a primary partition or logical drive, you can add the number of sectors to the starting sector to find the start of the next partition or logical drive. For an NTFS Partition Boot Sector, on the View menu, click NTFS BootSector. The Total sectors field contains the value you want. For a FAT volume, on the View menu, click FAT Bootsector. If the size of the primary partition or logical drive fits in 16 bits, the Small sectors field contains the size. Otherwise, the size is in the Large sectors field.
You can also use DiskProbe to search for Partition Boot Sectors. As you find each one, write down its location, and use the Partition Table view in DiskProbe to enter the information.
There are three situations in which you can find a Partition Boot Sector that is not at the beginning of a volume. You need to know about these other Partition Boot Sectors so you do not use the information about where these Partition Boot Sectors are located to repair the Partition Table.
1. In the Resource Kit folder, double-click the DiskProbe icon.
2. On the Drives menu, click Physical Drive. The Available Physical Drives in the Open Physical Drive dialog box are listed as PhysicalDriven, where n=0 for the first hard disk. Double-click the disk that you want to open, click Set Active, and click Close.
3. On the Tools menu, click Search. The information that you search for depends upon whether you want to find a FAT or an NTFS Partition Boot Sector. If you check the Search at offset check box and specify an Offset in hex at which to search for a specific value, the search runs much faster than searching each entire sector. You can search the entire disk if you do not change the default values in the First sector to search and Last sector to search fields.
This is an example of a search for an NTFS Partition Boot Sector.
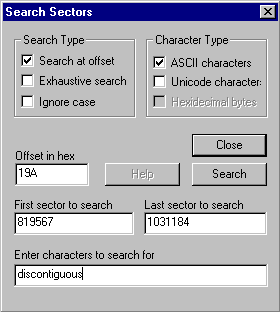
Note The contents of the Partition Boot Sector for an NTFS volume are slightly different, depending on whether you formatted the volume when running Windows NT version 4.0 or earlier versions of Windows NT. If you specify a value in the Offset in hex field, you might need to search at a different offset depending on the data you are searching for, and which version of Windows NT you used to format the volume. For example, the string "discontinguous" starts at location 19A when you use Windows NT version 4.0 to format the volume. But discontinguous is at hex location 195 if you formatted the volume when running Windows NT version 3.5. The string "NTFS" starts at offset 3 regardless of the version of Windows NT that you used to format the volume. If you don't know which version of Windows NT was used to format a volume, search for NTFS. Note that DiskProbe will find matches in sectors that are not Partition Boot Sectors.
4. If DiskProbe finds a match, it displays the address of the sector, as the following shows:
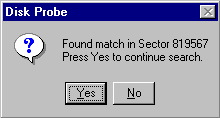
Be sure to verify that each sector DiskProbe finds is really a Partition Boot Sector. The View menu enables you to look at the data as bytes or formatted as an NTFS or a FAT Partition Boot Sector.
You can use DiskProbe to display and change your Partition Table. Repairing a damaged Partition Table is risky, and should never be attempted by a user not familiar with the procedure. If all of the partitions on the disk are primary partitions, the repair process is much simpler than if you have an extended partition, volume sets, or stripe sets.
If the wrong partition is set as the system partition, or you do not have a system partition on the disk, you can use DiskProbe to set the Boot Indicator field for the correct partition.
Note
The system partition is always a primary partition.
1. View the Partition Table by using the procedure described in "Displaying and Using the Partition Table," presented earlier in this chapter.
2. Double-click each partition number in the Partition table index list box to determine which one is the system partition, or that none is set as the system partition. The partition that has the Boot Indicator field set to SYSTEM is the system partition.
3. To clear the Boot Indicator field for a partition, double-click its partition number, double-click NOSYSTEM in the Boot Indicator list box.
4. To set the system partition, double-click its partition number, and double-click SYSTEM in the Boot Indicator list box.
5. Make sure that the disk is in read/write mode. On the Drives menu, click Physical Drive to see the Open Physical Drive dialog box. Clear the Read Only check box, if it is checked. Click Close.
6. On the Sectors menu, click Write, and enter 0 in Starting sector to write to. Click Write it.
7. DiskProbe displays a message box so you can verify the information.
When you create a volume set or stripe set, Windows NT sets the FT bit of the System ID byte in the Partition Table. This bit indicates that Windows NT needs to use the Registry subkey HKEY_LOCAL_MACHINE\SYSTEM\DISK to know how to find all of the members of the volume. Because volume sets and stripe sets cannot be accessed without the DISK subkey, they can only be accessed by Windows NT. In a dual-boot configuration, the other operating system cannot use a partition with the FT bit set.
In general, you should use Disk Administrator, and not DiskProbe, to change the value of this field. You might want to set or clear the FT flag to test a recovery procedure, but be sure to have a backup of the Registry and the data on the partition before you do so.
1. View the Partition Table by using the procedure described in "Displaying and Using the Partition Table," presented earlier in this chapter.
2. Double-click the partition number in the Partition table index list box for which you want to change the value of the FT flag.
3. If you want to remove the FT flag from a FAT partition, you need to figure out whether the partition should be FAT 12 bit, FAT 16 bit, or FAT Large. See the section titled "System ID Field," in Chapter 17, "Disk Management Basics," for information about the types of FAT partitions. Double-click either FAT 12 bit, FAT 16 bit, or FAT Large in the System ID field.
4. If you want to remove the FT flag from a NTFS partition, double-click NTFS in the System ID field.
5. Make sure that the disk is in read/write mode. On the Drives menu, click Physical Drive to see the Open Physical drives dialog box. Clear the Read Only check box, if it is checked. Click Close.
6. On the Sectors menu, click Write, and enter 0 in Starting sector to write to. Click Write it.
7. DiskProbe displays a message box so you can verify the information.
When you have found the Partition Boot Sectors, you can calculate all of the information for the Partition Table entries. If you do not know the values for the number of heads, number of sectors per track, or number of cylinders for the disk, open a handle by clicking either Physical Drive or Logical Volume on the Drives menu, and then click Volume Information on the Drives menu.
If none of the information in your Partition Table is correct, you might be safer to try to do a complete backup of the volumes. It might even be faster to backup and restore the data instead of repairing the Partition Table. You can then recreate the volumes, reformat your hard disk, and restore all of the data.
Note
If a primary partition or logical drive extends beyond cylinder 1023, set the Starting and Ending Sector, Head, and Cylinder fields to the maximum values. Maximum values indicate to Windows NT that it needs to use the information in the Partition Boot Sector to know how to access the volume. Remember that your system and boot partitions should not go beyond cylinder 1023 if you have set up your computer to dual-boot MS-DOS or Windows 95.
1. For primary partitions, view the Partition Table by using the procedure described in "Displaying and Using the Partition Table," presented earlier in this section. For an extended partition, the section "Walking an Extended Partition," presented earlier in this chapter, describes finding the Partition Table entry for each logical drive.
2. Double-click the partition number for which you want to change information. Enter the new values.
3. Make sure that the disk is in read/write mode. On the Drives menu, click Physical Drive to see the Open Physical Drive dialog box. Clear the Read Only check box, if it is checked. Click Close.
4. On the Sectors menu, click Write, and enter the sector number of the Partition Table that you read in step 1. If you are changing information for primary partitions, the sector number is 0. Click Write it.
5. DiskProbe displays a message box so you can verify the information.