At Terra Flora, the NetWare servers in the California domain named CANW312DPT01 and CANW312DPT02 will be added to the Windows NT California domain. In this way, users set up in the Windows NT directory database can be copied to the NetWare servers and will remain synchronized.
When a NetWare server is added to a Windows NT domain, user and group accounts are copied from the server to the domain. Those accounts, along with original Windows NT Server accounts, are then copied back to the NetWare server. From then on, the accounts are maintained on the domain, and account changes are automatically copied to the NetWare servers in the domain.
Note
For compatibility, Directory Service Manager for NetWare cannot propagate more than 2,000 accounts to a NetWare server. If you try to propagate too many accounts to a NetWare server, you will be prompted to propagate fewer groups.
To ensure that the addition of a NetWare server to a domain for management goes smoothly, do the following before adding the server:
Use NetWare utilities to back up the NetWare server's bindery.
Check user names on the NetWare server and the Windows NT Server domain. If any are identical, unless you rename the NetWare user account, the rights and permissions of the NetWare user account will be granted to the existing Windows NT Server account. For more information about renaming user accounts, see the section "Using a Mapping File to Rename User Accounts" in Chapter 7, "Administering Directory Service Manager for NetWare," in the Services for NetWare Administrator's Guide.
If multiple NetWare servers are being added to the domain, check whether any users have accounts on multiple NetWare servers with different user names. If so, choose the name you want the user to have on the domain, and then transfer the other accounts to that user name. For more information, see the section "Using a Mapping File to Rename User Accounts" in Chapter 7, "Administering Directory Service Manager for NetWare," in the Services for NetWare Administrator's Guide.
Check the account policies of the domain to make sure they are acceptable. After a NetWare server is added, these policies will affect user logons to the NetWare server.
Note
To maintain password history, set the domain's password uniqueness to remember passwords, and then set the number of passwords to eight or more. If the limit is less than eight, password history affects only logons to servers running Windows NT Server, not to NetWare servers.
If the File and Print Services for NetWare product was previously installed on the primary domain controller, reset the passwords of any user accounts that were NetWare-enabled before DSMN was installed. DSMN cannot read these existing passwords.
To enable previously NetWare-enabled users to be copied to NetWare servers, create a batch file that calls the net user command for each user and resets the password. For the most security, you can use the /rand option to randomly generate new passwords for these users.
Perform a trial run of the addition, and then carefully examine the report it generates to make sure that the results are what you want.
For details on any of the preceding steps, see Chapter 7, "Administering Directory Service Manager for NetWare," in the Services for NetWare Administrator's Guide.
After the preceding steps are complete, you are ready to add the NetWare server to the Windows NT domain, where it will be managed by using Windows NT Server administrative tools.
To add a NetWare server to be managed in a domain
1. In Synchronization Manager, click Add Server to Manage on the NetWare Server menu.
2. Enter the name of the NetWare server, and then click OK.
3. Type the user name and password to be used to connect to the NetWare server, and then click OK.
The user name must have Supervisor privileges on the NetWare server.
4. Select options in the Propagate NetWare Accounts to Windows NT Domain dialog box to specify how you want NetWare user accounts copied to the domain.
To use a mapping file, click Use Mapping File. To create the mapping file, type a new file name in the File box, and then click Edit. For details on how to use a mapping file, see Chapter 7, "Administering Directory Service Manager for NetWare" in the Services for NetWare Administrator's Guide.
To specify users, groups, and passwords, click Ignore Mapping File.

5. Click Trial Run.
This optional but recommended step generates a report that shows which user and group accounts will be successfully propagated, as well as new user passwords.
6. Click OK to add the server.
7. Click Yes to continue if you have already backed up the bindery of the NetWare server. Otherwise, click No and then back up the bindery before adding the server.
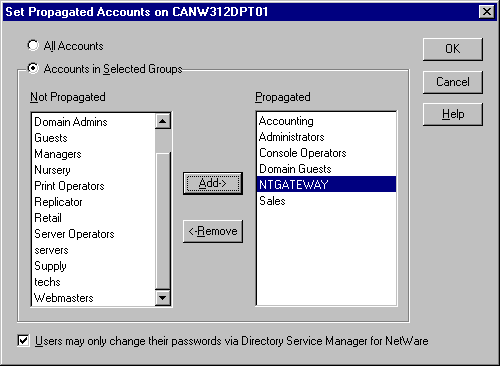
8. In the Set Propagated Accounts on [Server] dialog box, click the option to propagate either all groups (and their members) or only some groups back to the NetWare server.
For help with an option in this dialog box, click Help.
9. Click Yes to delete the NetWare user and group accounts that you are not propagating to the Windows NT Server domain. Click No to keep these accounts and continue managing them on the NetWare server using NetWare administrative tools.
Accounts left behind on the NetWare server cannot use chgpass; they must use NetWare utilities to change their passwords.
Note
When a NetWare server is added to a domain for management, a user account named WINNT_SYNC_AGENT appears in that server's bindery. This account is used by DSMN to access the NetWare server's bindery and should not be deleted.
You can remove a NetWare server from management with a domain at any time. You can then use NetWare administrative tools to administer the server and its current bindery. Or you can restore the bindery if you want to return the server to how it was before you added it to the domain. You can add the server back to a domain at any time.