If you are using all SCSI disks, it is a good idea to use the same translation on all SCSI controllers whose disks are members of a mirror set or stripe set with parity. On x86-based computers, you should disable translation any time that you do not need to do the following:
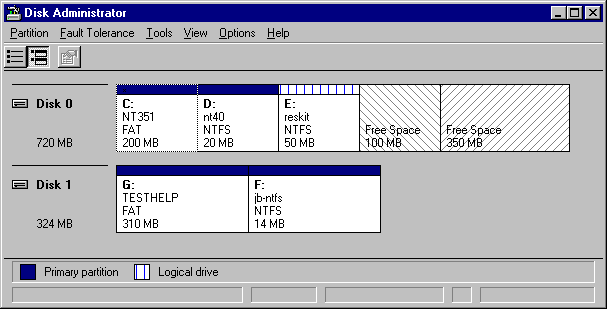
The following Disk Administrator screen shot shows three things:
Note
The key below the status bar in Disk Administrator identifies what kinds of volumes are configured on the computer. For example, if you created a mirror set, you would see Mirror set in addition to Primary partition and Logical drive.
When you create a mirror set or stripe set with parity, Disk Administrator creates a primary partition for the areas of unpartitioned space that you select on each disk. You cannot use free space on a disk for either of these volumes if:
Disk Administrator Help contains details about procedures for creating mirror sets and stripe sets with parity.
If you need to dual-boot with MS-DOS, you cannot mirror your system partition. If you need a boot partition larger than 1 GB, you need to enable translation. However, you should not mirror your system partition if it goes beyond 1 GB.
When you want to create a mirror set, the original partition that you want to mirror must already exist. You must have an area of unpartitioned disk space at least as large as the original partition on another disk connected to the computer.
If the unpartitioned space you select for the partition on the shadow disk is larger than the existing primary partition, the space left over remains unpartitioned space, and can be used to create other partitions (if there are fewer than four partitions on the disk). For example, if you create a mirror set using the configuration shown in the preceding Disk Administrator screen shot, there will be unpartitioned space following the shadow partition. However, you cannot use that unpartitioned space, because you will have three primary partitions and one extended partition on disk 0.
1. Select the partition that you want to duplicate. Press CTRL, and click an area of unpartitioned space on another disk that is the same size or larger than the partition you selected.
2. On the Fault Tolerance menu, click Establish Mirror.
Disk Administrator creates an equal-sized partition in the unpartitioned space for the mirror set, and assigns the drive letter to the mirror set.
Note In some cases, where a mirror set is being established, a slightly larger amount of space is required for the shadow partition than for the partition on the original disk. This happens when geometry differences exist between the disks.
If you are mirroring the system partition, Disk Administrator displays a message box reminding you to create a Windows NT startup floppy disk.
3. On the Partition menu, click Commit Changes Now. Select Yes in the Commit Changes dialog box.
A Confirm change/restart dialog box is displayed; again select Yes. A message box prompts you to update your Emergency Repair Disk, which you should do by using the Repair Disk program (Rdisk.exe). Finally, you are prompted to shutdown, and restart the system. The only option is OK. The system shuts down and restarts.
4. After the system restarts, open Disk Administrator. The status bar displays a message Mirror Set #N [INITIALIZING].
The drive letter, volume label, and size of the mirror set appear in red text. This visual cue indicates that the system is generating the partition in the background. While the text is highlighted in red, fault tolerance is not functional.
Note
In the Disk Administrator display, information about the partition is not updated automatically. If you click on the partition, the information for that volume updates. You can also check the event log to know when the generation of the shadow partition is finished.
When you want to create a stripe set with parity, you must have at least three unpartitioned areas on different disks connected to the computer. Even though a partition is not completely full, you cannot use the space that is part of an existing partition. If you do not have enough unpartitioned space available, but have enough unused areas in existing partition(s), you can create unpartitioned disk areas by:
As with a mirror set, if the areas of unpartitioned space that you select for a stripe set with parity are not all the same size, the space left over can also be used for other partitions.
When using a stripe set with parity, performance should be better if you put the operating system and page file on a controller other than the one used for the strip set with parity. You can use different types of controllers for the operating system and the stripe set with parity when you have them on different controllers. For more suggestions, see "Stripe Set With Parity" in Chapter 4, "Planning a Reliable Configuration."
1. Select areas of unpartitioned space on three to 32 hard disks by selecting an area of unpartitioned space on the first disk, pressing CTRL, and then choosing additional areas of unpartitioned space on other hard disks.
If the areas selected vary in size, then the smallest area is used as the base partition size. For example, if the unpartitioned space consists of a 700 MB on disk 1, and 900 MB each on disks 2 and 3, only 700 MB on each disk is used as part of the stripe set with parity.
2. On the Fault Tolerance menu, click Create Stripe Set With Parity.
Disk Administrator displays the minimum and maximum sizes for the stripe set with parity. The default size is the maximum allowed for the disk areas selected.
The size you choose is the total disk space that is used, not the size available for data on the stripe set with parity. For example, if four 200 MB partitions are selected:
3. On the Create Stripe Set With Parity dialog box, type the size of the set that you want to create, and then click OK.
Disk Administrator divides the total size that you enter by the number of disks in the set to create equal-sized, unformatted primary partitions on each of the selected disks. It then assigns a single drive letter to the collection of partitions that make up the stripe set with parity. Disk Administrator displays the stripe set with parity as New Unformatted space.
4. On the Partition menu, select Commit Changes Now.
You are prompted to save your disk configuration changes. Select Yes.
5. You are notified that you need to restart the computer for the changes to the configuration to take effect. Click Yes in the dialog box.
6. You are notified that the disks were updated successfully.
This means that the new configuration information has been saved in the Registry. This dialog box also prompts you to update the Emergency Repair Disk.
7. You are prompted to restart your computer so that the changes can take effect. The only option is OK. The system automatically closes all open applications and restarts the system.
8. When restart is completed, open Disk Administrator again. On the Tools menu, click Format. You can format a stripe set with parity with either the FAT file system or the NTFS file system. When you have entered all of the information in the Format dialog box, click Start. The stripe set with parity begins initializing immediately. Disk Administrator displays a message Stripe Set with Parity #N [INITIALIZING] on the status bar. The drive letter, volume label, and size of the stripe set with parity appear in red text during initialization.