| Microsoft Office 2000/Visual Basic Programmer's Guide | |
In Excel, you do your work on a worksheet, and when you have the sheet looking and working the way you want, you use the Publish as Web Page dialog box to specify how you want the sheet to appear in Internet Explorer. You get to the Publish as Web Page dialog box by clicking Save as Web Page on the File menu and then clicking the Publish button.
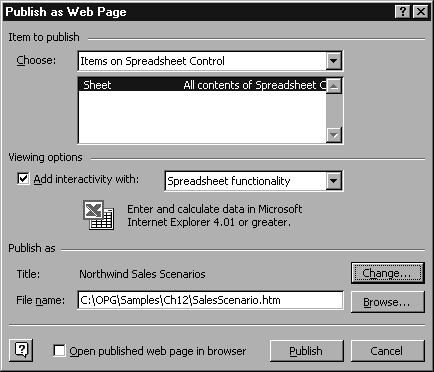
The SalesScenario.xls file in the ODETools\V9\Samples\OPG\Samples\CH12 subfolder on the Office 2000 Developer CD-ROM contains a worksheet with a simple interactive scenario calculator. The Publish as Web Page dialog box for this worksheet is shown in Figure 12.4.
Figure 12.4 The Publish as Web Page Dialog Box

Note Unlike what is shown in Figure 12.4, when you are using the Publish as Web Page dialog box, you most likely will be publishing to an HTTP address in the File name box.
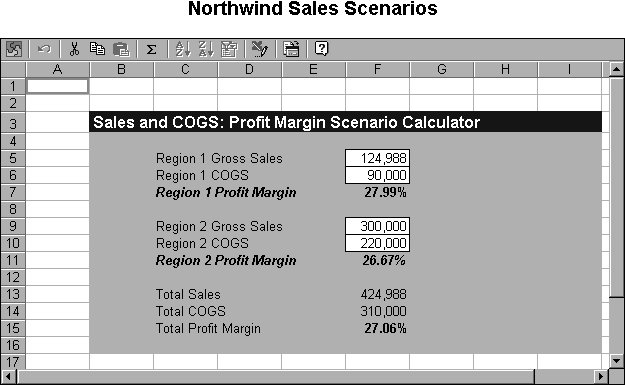
If you specify interactivity by selecting Spreadsheet functionality under Viewing options in the Publish as Web Page dialog box, Excel creates a Web page (shown in Figure 12.5) that contains a Spreadsheet control that displays your calculator. Anyone who views this page (SalesScenario.htm in the ODETools\V9\Samples\OPG\Samples\CH12 subfolder on the Office 2000 Developer CD-ROM) in Internet Explorer can use the calculator as if it were still an Excel worksheet.
Figure 12.5 The SalesScenario.htm File

In Figure 12.5, only the cells with a white background can be edited. To achieve this effect in Excel, you select the cells you want users to be able to edit and then set the Locked property for the cells to False. To do this, select the cells, click Cells on the Format menu, click the Protection tab, and then clear the Locked check box. Once you have unlocked the cells you want to edit, you protect the rest of the worksheet by pointing to Protection on the Tools menu, and then clicking Protect Sheet. When you publish the worksheet as a Web page, those protection settings will be preserved in the Spreadsheet control.
The Publish as Web Page dialog box lets you specify what to publish. In the preceding example, the entire worksheet was published. Publishing the entire sheet results in the scroll bars you see in Figure 12.5. You can eliminate the scroll bars by clicking Range of Cells in the Choose box in the Publish as Web Page dialog box and then specifying the range of cells or a named range in the following box.
You can specify a title for your Spreadsheet control by clicking the Change button in the Publish as Web Page dialog box. Clicking this button opens the Set Title dialog box.
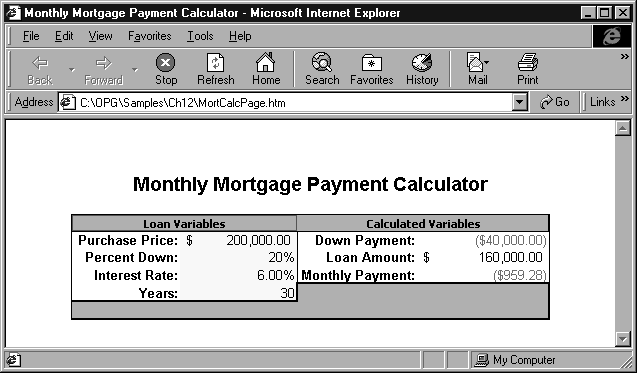
In the following figure (Figure 12.6), a range of cells was saved as a Spreadsheet control from an Excel worksheet (MortgageCalc.xls in the ODETools\V9\Samples\OPG\Samples\CH12 subfolder on the Office 2000 Developer CD-ROM) to create a mortgage payment calculator. A title for the control was added by using the Set Title dialog box. As in the previous example, worksheet and cell protection was used to specify that only the cells in the shaded area can be edited.
Figure 12.6 Spreadsheet Control Containing Mortgage Calculator

The MortCalcPage.htm page is in the ODETools\V9\Samples\OPG\Samples\CH12 subfolder on the Office 2000 Developer CD-ROM.