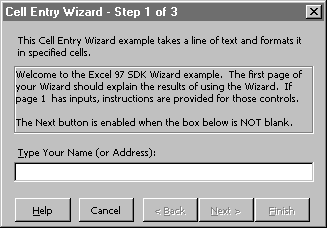
The CD included with this book contains a Wizard example workbook with complete source code (WizDemo.xls). This simple Cell Input Wizard provides a framework and contains many of the elements needed for real-world development. Here's an overview of the three-step example Wizard:
1. Explain the Wizard and ask for the user's name or address (the exact input is irrelevant).
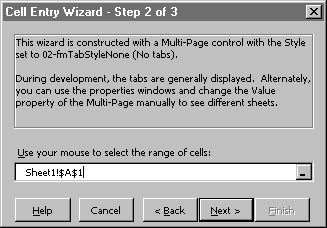
2. Ask the user to enter a destination range as their input.
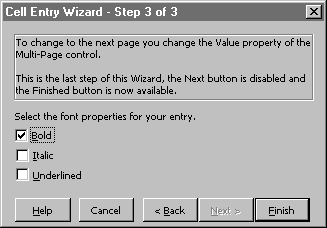
3. Allow the user to select among different font attributes.
The Wizard places the user input into the destination cells and formats the font of the specified range based on the check boxes selected. While this example is straightforward, the code needed to handle the real world can be much more complicated than most users would suspect. VBA makes Wizard creation much easier than it would be in another language, but you should not confuse "easier" with "easy." Great Wizard development often requires extensive initialization, data validation, and/or error handling. Before discussing these areas in detail, let's take a look at the Wizard's pages for this example.
The first step gives the user an introduction to the Wizard and asks the user for a name or an address.

The second step asks the user for a destination for the text provided in Step 1. The edit box is a RefEdit control, meaning that the user can use the mouse to point and click to select the destination range. The user could also type a range — or mistype a range — so the validation code verifies the selection before allowing the user to move to Step 3.
Step 3 allows the user to select font attributes; these attributes are applied to the text after it is written to the worksheet.
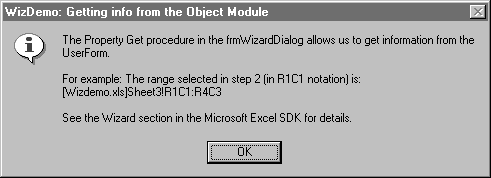
After your Wizard is finished and hidden, you may need to get some additional information from the UserForm. You do this by creating a custom property for the UserForm with a Property Get procedure. In the demo, the Property Get procedure, szSelectedRangeR1C1, takes the range selected in Step 2 and converts it to a text string using R1C1 notation for the reference. The routine ShowWizard in the Standard Module displays this value in a message box.
''' Property Get: szSelectedRangeR1C1
''' Arguments:    None
''' Comments:    Property Get allows you to get information
'''                from the Object Module in other modules.
'''        This example takes the range the user selects
'''        in step 2 of the wizard, converts the range
'''        to R1C1 notation if needed.  This string is
'''        displayed in a message box called in the mEntry
'''        module.
'''
'''        To use this new property, use the following syntax:
'''        frmWizardDialog.szSelectedRangeR1C1
'''        (UserFormName.Property)
'''
'''        IMPORTANT: This property is NOT available after the
'''        form has been unloaded.
Property Get szSelectedRangeR1C1() As String
    ''' Create an address string in R1C1 notation.
    With Application
        If .ReferenceStyle = xlA1 Then     ''' convert
            szSelectedRangeR1C1 = .ConvertFormula( _
                refEntryRange, xlA1, xlR1C1)
        Else
            szSelectedRangeR1C1 = refEntryRange.Text
        End If
    End With
End Property
While it's not obvious from the preceding figures, this Wizard is really a single UserForm with a three-page MultiPage control. This control covers the complete dialog except for the row of buttons at the bottom. These buttons are common to all pages of the Wizard. The Next and Back buttons set the Value property of the MultiPage to display a specific page. By managing this single property, you can display any page in the Wizard.
During the development process, it is generally easier to work with the page tabs showing. MultiPage controls with their tabs hidden don't show the outline of the pages, so only the page displaying can be seen (all other pages are hidden behind it). With the tabs showing, you can quickly move between pages for control layout and fine-tuning. It's also helpful to have the tabs showing while testing the Wizard, so you can quickly see which page is shown as your code sets the Value property of the MultiPage control.
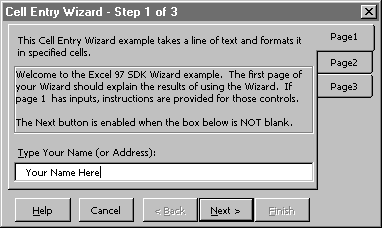
Showing or hiding the tabs is accomplished by setting the Style properties for the MultiPage control. Setting the TabOrientation property to fmTabOrientationRight allows the layout of your dialog to remain fixed, even when you hide the tabs. After hiding the tabs, simply readjust the right side of the dialog box to eliminate the extra space. The following figure shows the property window and the two properties needed to set up your MultiPage control as shown in the preceding figure.
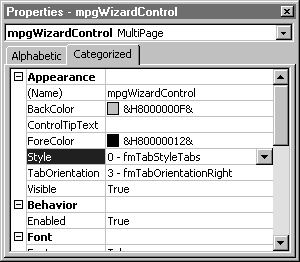
The buttons on the Show Demo worksheet call the demo subroutine (ShowWizard) with an optional flag, and the tabs are displayed when the flag is set. In practice, you'll generally leave the tabs showing during development and testing and then hide them manually before shipping to your users.