| C H A P T E R 25 | Part 5 Using Microsoft Office Throughout Your Organization | Microsoft Office Resource Kit |
| Web Support in Microsoft Office Applications |
|
|
This chapter describes features in each Microsoft Office 97 for Windows and Office 98 for the Macintosh application that can help you create and manage content on an intranet or on the World Wide Web. It is a companion to Chapter 24, "Integrating Microsoft Office with Your Intranet," which describes Officewide strategies and features you can implement to integrate Office into your intranet.
|
| Microsoft Access 97 for Windows provides many ways to create applications to display, run, and publish content on the Internet or an intranet. For example, you can use Access to publish information from datasheets and reports as Web pages. You can also use Access to create files that query a database on a Web server, and then return a Web page to display the results of the query. In addition, you can save an Access form as a Web page that emulates many of the features of the form so that users can view, enter, and update information in your database. |
You can also use Access 97 to create applications that display HTML documents in forms, and create hyperlinks that you click to move between database objects and other Office documents located on a hard disk or a local area network (LAN).
The following table summarizes the features available in Access that you can use to work with content on the Internet or an intranet.
| To do this | Use these features in Access |
| Connect to content on the Internet or an intranet | Store hyperlinks in fields with the Hyperlink data type and follow the hyperlinks to display Internet content. |
| Browse the folders of FTP sites in the Link To File dialog box when you insert or edit hyperlinks (for example, by clicking the Insert Hyperlink command on the Insert menu). | |
| Bind a text box control on a form to a field with the Hyperlink data type to enter, display, or follow a hyperlink. | |
| Bind a text box control on a report to a field with the Hyperlink data type to create a hyperlink when you save a report as an HTML document or to print the hyperlink address. | |
| Reference a hyperlink from a label, image control, or command button on a form or report. | |
| Use Visual Basic for Applications methods and properties to work with hyperlinks. For example, use the Follow method to go to the address referenced in a hyperlink, and use the AddToFavorites method to add a hyperlink to the Favorites folder. | |
| Connect to other Office documents and files on an intranet | Go to Access objects in the current database or other databases by using hyperlinks from the current Access database or from another Office application. |
| Go to documents from other Office applications by using hyperlinks from Access databases. | |
| Use the Back and Forward buttons on the Web toolbar to move between followed hyperlinks to database objects and other Office documents. | |
| Locate Access databases with Web Find Fast. For information about Web Find Fast, see Chapter 26, "Finding Microsoft Office Documents on the Network." | |
| Publish and share data in a database on the Web | Save the data from table, query, and form datasheets or from reports as static HTML documents. |
| Create Internet Database Connector/HTML extension (IDC/HTX) files to query data from a table, query, or form datasheet in a database on an Internet or intranet server and display it in a Web page. | |
| Save an Access form as an Active Server Page (ASP) that emulates many of the features of the form so that users can view, enter, and update information in a database on an Internet or intranet server. | |
| Create an ASP to query data from a table, query, or form datasheet in a database on an Internet or intranet server and display it in a Web page. | |
| Use the Publish to the Web Wizard to automate the process of publishing and sharing data, store settings from previous publications, and call the Web Publishing Wizard to copy Web files to your Internet or intranet server. | |
| Export HTML documents, IDC/HTX files, or ASPs using the OutputTo method or action. | |
| Attach HTML documents, IDC/HTX files, or ASPs to email messages using the SendObject method or action. | |
| Create simple client/server applications that use a Web browser as a frontend for an Access database or other ODBC data source using the ASP components of Internet Information Server 3.0 or later. | |
| Save Access reports to a special graphical format called a snapshot file, and distribute them using email or by publishing them from Web pages. | |
| Export tables as HTML tables by using the TransferText method or action. | |
| Use the Internet with database replication | Synchronize a database replica with a replica or Design Master on an Internet or intranet server. |
| Import, link, and export data located on the Internet or an intranet | Import and link HTML tables and lists by using the Import HTML Wizard and the Link HTML Wizard. When you link HTML tables, the data is readonly. |
| Import and link any data on an Internet or intranet server that is supported by a builtin Access driver. When you link data on an Internet server, the data is readonly. | |
| Use the Import and Link dialog boxes to browse FTP sites when you import or link data (for example, by pointing to Get External Data on the File menu and then clicking Import or Link table). You can also use the Import and Link dialog boxes to enter an HTTP address when you are importing or linking data. | |
| Import or link HTML tables by using the TransferText method or action. When you link HTML tables, the data is readonly. | |
| Import or link data by using HTTP and FTP addresses, and export data by using FTP addresses in the following Visual Basic properties, methods, and actions:
Connect property CreateTableDef method OutputTo method and action TransferDatabase method and action TransferText method and action TransferSpreadsheet method and action | |
| Display Web pages and other documents in Access forms | Use the WebBrowser control on your application's forms to browse Web sites, view Web pages and other documents, and download data located on the Internet or an intranet. You can use the WebBrowser control to browse folders on you hard disk and on a network. |
Many of these features are described in more detail in the following sections. For more information about Internet features in Microsoft Access, see Chapter 21, "Developing Applications for the Internet and the World Wide Web," in Building Applications with Microsoft Access 97. For more information about this and other Microsoft Press books, see "Microsoft Press Titles" in Appendix E, "Other Support Resources."
Using Hyperlinks in Microsoft Access Applications
With Access 97, you can create two kinds of hyperlinks in tables, forms, and reports:
You do not need Internet connections or intranet servers to use Office hyperlinks to move between Office documents or files. You can use both kinds of hyperlinks in the same database application.
There are two ways you can use hyperlinks in Access applications:
Like other bound fields, as the user moves from record to record, the value in the text box changes to display the current record's hyperlink value. For example, you can use hyperlinks in this way to create an application in which users can go to Web pages, or to other content on the Internet or an intranet, from a predefined list of addresses. You can also create an application that displays and manages Office documents.
In this case, the hyperlink does not change as you move from record to record. For example, you can use hyperlinks in this way to go to other database objects within the same database, or to open a Web page on an intranet that contains updated information about how to use your application.
Regardless of how a hyperlink is defined in your application, if the hyperlink goes to a database object or opens another Office document, you can use the Web toolbar to move between the hyperlinks that you have previously followed. For example, in the following illustration, the Products form has a command button with a hyperlink that opens a report. Once you have clicked the hyperlink, you can use the Web toolbar to move between other objects you have opened with hyperlinks.
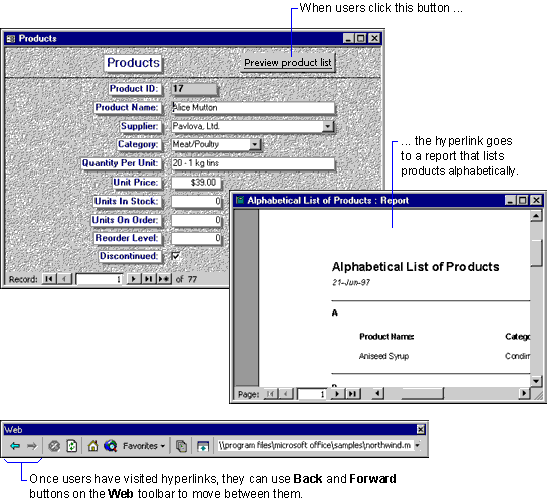
Similarly, if you follow a hyperlink from an Access form to a Word document, you can click the Back button on the Web toolbar in Word to return to the Access form.
Note By default, after a user clicks a hyperlink on a form, Access continues to display the Web toolbar when the user closes the form. If you want to prevent this, you can use Visual Basic code in the OnClose event of the form to hide the toolbar. To see an example of this code, open the Products form in the Northwind sample application in Design view, and then display the event procedure in the OnClose event of the form.
Storing Hyperlinks in Tables
In Access, a field in a table can store hyperlinks as data. To create a Hyperlink field, add a field in table Design view and set its DataType property to Hyperlink. You can also create a Hyperlink field in table Datasheet view with the Hyperlink Column command (Insert menu).
You can follow a hyperlink stored in a table by clicking it in the table, but the field is more typically bound to a text box control on a form.
![]() To
add a text box that is bound to a Hyperlink field to a form
To
add a text box that is bound to a Hyperlink field to a form

|
To see an example of how to use a Hyperlink field, open the Suppliers form in the Northwind sample database application. Go to Record 2, New Orleans Cajun Delights. The Home Page text box on the form is bound to the HomePage field in the Suppliers table. Clicking the hyperlink in the text box starts your Web browser and displays the supplier's home page. |
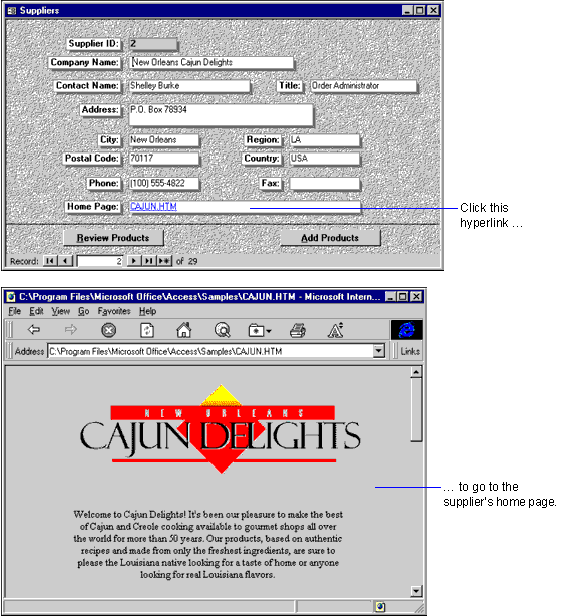
You can also use hyperlinks in Access to go to database objects and other Office documents. For example, you could create a document management application that uses a Hyperlink field to store paths to Word documents on a network. Users of such an application could add records to track new documents or click the hyperlink in a previously added record to open the specified document.
A Hyperlink field stores up to three pieces of information: the displaytext, the address, and the subaddress. Each piece is separated by the number sign (#), in the following format:
displaytext#address#subaddress
The following table describes each piece of the Hyperlink field storage format.
| Piece | Required? | Description |
| displaytext | No | The text the user sees in the Hyperlink field in a table or in a text box bound to the Hyperlink field. You can set the display text to any text string. For example, you may want the display text to be a descriptive name for the Web site or object specified by the address and subaddress. If you do not specify display text, Access displays the value of address instead. |
| address | Yes (unless the subaddress points to an object in the current database file) | Either a valid URL that points to a page or file on the Internet or an intranet, or the path to a file on a hard disk or LAN. If you enter a path on a LAN, you can omit a mapped drive letter and use the UNC format: server\share\path\filename. This prevents the path from becoming invalid if the database is later copied to another hard disk or shared network folder. |
| Subaddress | No | A specific location within a file or document; for example, a database object, such as a form or report. When referring to a database object, the name of the object should be preceded by its type: Table, Query, Form, Report, Macro, or Module. Other possible values for subaddress include a bookmark in a Word document, an anchor in an HTML document, a PowerPoint slide, or a cell in an Excel worksheet. |
Each piece of the Hyperlink field storage format can be up to 2,000 characters. The maximum length of the entire Hyperlink field value is 6,000 characters. You can display the stored hyperlink format by moving the insertion point into a Hyperlink field using the keyboard and then pressing F2. You can edit the stored hyperlink in this form as long as you enter number signs in the appropriate locations. You can add or edit the displaytext part of a hyperlink field by rightclicking a hyperlink in a table, pointing to Hyperlink on the shortcut menu, and then typing the display text in the Display Text box.
For more information about the Hyperlink field storage format, see Access online Help.
Entering a URL as a Hyperlink Address
To create a hyperlink that goes to a Web page or other Internet content, you must enter a valid Uniform Resource Locator (URL) as the hyperlink address. You can enter a URL that points to any Internet file type or resource supported by the browser or to an ActiveX control, such as the WebBrowser control, that is used to display or run it. You enter most URLs in the following format:
protocol://serveraddress/path
Protocol specifies the Internet protocol used to establish the connection to the server, and is generally followed by a colon and two slash marks. Serveraddress specifies what is usually called the domain name of the Internet server. Path specifies the location and name of the page or file on the Internet server. For example, the URL to the home page of the Access Developer Forum is:
http://www.microsoft.com/accessdev/
When you type a URL into a Hyperlink field, Access automatically recognizes the following Internet protocols.
| Internet protocols recognized by Access |
| cid | mailto | pnm |
| file | mid | prospero |
| ftp | mms | rlogin |
| gopher | msn | telnet |
| http | news | tn3270 |
| https | nntp | wais |
If you create a field by importing a column of data and all records in the imported data begin with one of these protocols, Access automatically sets the data type of the imported field to Hyperlink. Similarly, if you create a new table in Datasheet view and every entry you make in a field begins with one of these protocols, Access sets the data type of the new field to Hyperlink when you save the table.
Creating Labels, Image Controls, or Command Buttons That Reference a Hyperlink Address
To create a label, image control, or command button on a form that references a specified hyperlink address, set the HyperlinkAddress and HyperlinkSubAddress properties of the control to point to the content on the Internet or an intranet, or to the Office document or Access database object you to which you want to go.
Note The HyperlinkAddress and HyperlinkSubAddress property settings correspond to the address and subaddress values entered for a Hyperlink field. For more information about these values, see "Editing the Hyperlink Field" earlier in this chapter.
Additionally, to create the hyperlink display text for a label or command button control, you must set the Caption property. Because no text displays for an image control, there is no corresponding display text setting.
You can also create a label that references a hyperlink address by opening the form in Design view, and then clicking the Hyperlink command (Insert menu). However, this method does not define the display text. To define display text, you must set the Caption property of the label.
For more information about creating a label, image control, or command button that references a hyperlink address, see Access online Help.
Using Visual Basic Methods and Properties To Work with Hyperlinks
Access provides several methods and properties that you can use to work with hyperlinks in Visual Basic code. The following table summarizes these methods and properties.
| Method or property name | Description |
| Follow method | Has the same effect as clicking a hyperlink. When you use the Follow method, you do not need to know the address specified by a HyperlinkAddress or HyperlinkSubAddress property, or by the Hyperlink field that is bound to a text box control. You only need to know the name of the control that contains the hyperlink. |
| FollowHyperlink method | Goes to a hyperlink specified in code or passed to the method from an unbound text box. For example, you can prompt a user to type a hyperlink address in a dialog box, and then use the FollowHyperlink method to go to that address. You can also use the FollowHyperlink method to specify a hyperlink for controls other than labels, image controls, and command buttons, or text boxes bound to Hyperlink fields. |
| AddToFavorites method | Adds the hyperlink address specified in the referenced control to the Favorites folder. |
| Hyperlink property | Returns a reference to a hyperlink object in code. You can use the Hyperlink property to gain access to the hyperlinkspecific properties and methods of any control that contains a hyperlink. |
| HyperlinkAddress property | Specifies or determines the address of a hyperlink for a label, image control, or command button. |
| HyperlinkSubAddress property | Specifies or determines the location within the Office document or object specified by the HyperlinkAddress property. |
| HyperlinkPart function | Parses the information stored in a Hyperlink field. |
For more information about these methods and properties, see Access online Help or see Chapter 21, "Developing Applications for the Internet and the World Wide Web," in Building Applications with Microsoft Access 97. For more information about this and other Microsoft Press books, see "Microsoft Press Titles" in Appendix E, "Other Support Resources."
Making Microsoft Access Data Available on the Internet
With Access, you can make your data available on the Internet or an intranet by:
Saving Data as HTML Documents
Access provides four ways to save data from your database as HTML documents:
You can create static HTML documents from table, query, and form datasheets and from reports. When you save data as static HTML documents, the resulting pages reflect the state of the data at the time it was saved. If your data changes, you must save the pages again to share the new data.
You can save your table, query, and form datasheets as IDC/HTX files that generate HTML documents by querying a copy of your database located on a Web server for current data.
You can save your forms as ASPs that emulate most of the functionality of your forms and display data from a database located on a Web server. You can also save table, query, and form datasheets as ASPs that display current data from a copy of your database located on a Web server.
You can use the Publish to the Web Wizard to automate the process of saving multiple objects to any combination of all three file types. In the Publish to the Web Wizard, IDC/HTX files and ASP files are referred to as dynamic Web pages because these file types display current data to users.
The following sections discuss each of these options in more detail.
Saving Data as Static HTML Documents
With Access, you can save table, query, and form datasheets and reports as static HTML documents.
![]() To
save a table, query, or form datasheet or a report as a static
HTML document
To
save a table, query, or form datasheet or a report as a static
HTML document
For information about HTML templates, see "Using an HTML Template When You Save Data as HTML Documents" later in this chapter.
You can also save data as static HTML documents by using the Publish to the Web Wizard (available through the Save As HTML command on the File menu), the OutputTo method in code, or the OutputTo action in macros.For more information about saving table, query, or form datasheets and reports as HTML documents, see Access online Help.
When saving table, query, and form datasheets, Access saves each datasheet to a single HTML file. Access saves reports as multiple HTML documents, with one HTML file per printed page. To name each page, Access uses the name of the object and appends _Pagenn to the end of each file name after the first page; for example, ProductList.htm, ProductList_Page2.htm, ProductList_Page3.htm, and so on.
Saving Table, Query, and Form Datasheets as Static HTML Documents
When you save a table, query, or form datasheet as an HTML document, the HTML document generated is based on the table or query associated with the datasheet, including the current setting of the OrderBy or Filter property of the table or query, which determines how the table, query, or form is sorted or filtered.
The HTML document contains an HTML table that reflects as closely as possible the appearance of the datasheet by using the appropriate HTML tags to specify color, font, and alignment. The HTML document follows as closely as possible the page orientation and margins of the datasheet. Whenever you want to use settings that are different from the default orientation and margins for a datasheet, you must first open the datasheet, and then use the Page Setup command (File menu) to change settings before you save the datasheet as an HTML document.
If a field has a Format or InputMask property setting, that setting is reflected in the data in the HTML document. For example, if a Format property of the field is set to Currency, the data in the HTML document is formatted with a dollar sign, a comma as the thousand separator, and two decimal places; for example, $1,123.45.
Saving Reports as Static HTML Documents
When you save a report as a series of HTML documents, the HTML documents generated are based on the report's underlying table or query, including the current OrderBy or Filter property setting of the table or query.
The HTML documents closely approximate the proportions and layout of the actual report and follow as closely as possible the page orientation and margins set for the report. To change the page orientation and margins, open the report in Print Preview, and then click the Page Setup command (File menu) to change settings before you save the report as HTML documents. These settings are saved from session to session for reports, so if you change them once, they will be used the next time you save the form or report as HTML documents.
If you specify an HTML template that contains placeholders for navigation controls when you save a report as multiple HTML documents, Access creates hyperlinks that the user can use to go to the first, previous, next, and last pages in the publication. Where Access places the hyperlinks depends on where you locate the placeholders in the HTML template.
For information about HTML templates and placeholders, see "Using an HTML Template When You Save Data as HTML Documents" later in this chapter.
How Microsoft Access Saves Data Types in HTML
When you save data as static HTML documents, Access saves values from most data types as strings and formats them as closely as possible to their appearance in the datasheet or report. There are two exceptions:
| In this scenario | This anchor tag format is used |
| The hyperlink does not include a subaddress. | <A HREF="address">displaytext</A> |
| The hyperlink includes a subaddress. | <A HREF="address#subaddress">displaytext</A> |
| The display text is not specified. | <A HREF="address">address</A> |
Access determines the displaytext, address, and subaddress values in the anchor tags by parsing the value stored in the Hyperlink field.
For information about the displaytext, address, and subaddress values, see "Editing the Hyperlink Field" earlier in this chapter.
Saving Table, Query, and Form Datasheets as IDC/HTX Files
With Access, you can save a table, query, or form datasheet as IDC/HTX files that generate HTML documents by querying a copy of your database located on a Web server. In contrast to static HTML documents, IDC/HTX files display current data from your database; therefore, the HTML documents that they generate are dynamic.
![]() To
save a table, query, or form datasheet as IDC/HTX files
To
save a table, query, or form datasheet as IDC/HTX files
Note You can specify any of these items later, except the HTML template, by editing the resulting IDC file in a text editor, such as Notepad.
You can also save a table, query, or form datasheet as IDC/HTX files by using the Publish to the Web Wizard (available through the Save As HTML command on the File menu), the OutputTo method in code, or the OutputTo action in macros.
For more information about saving table, query, or form datasheets as IDC/HTX files, see Access online Help
How the Internet Database Connector Works
When you save a table, form, or query datasheet as Internet Connector files, Access creates two files: an Internet Database Connector (IDC) file and HTML extension (HTX) file. These files are used to generate a Web page that displays current data from your database.
An IDC file contains the necessary information to connect to a
specified Open Database Connectivity (ODBC) data source and to
run an SQL statement that queries the database. The information
needed to connect to the database includes the data source name
and, if userlevel security is established for the database,
the user name and password required to open the database. For
example, if you save the Current Product List query datasheet
from the Northwind sample database application as IDC/HTX files,
Access creates the following IDC file:
Datasource:Northwind
Template:Current Product List.htx
SQLStatement:SELECT [Product List].ProductID, [Product List].ProductName
+FROM Products AS [Product List]
+WHERE ((([Product List].Discontinued)=No))
+ORDER BY [Product List].ProductName;
Password:
Username:
An IDC file also contains the name and location of an HTML extension
(HTX) file. The HTX file is a template for the HTML document;
it contains field merge codes that indicate where the values returned
by the SQL statement should be inserted. For example, if you save
the Current Product List query datasheet from the Northwind sample
database application as IDC/HTX files, Access creates the following HTX file:
<HTML>
<TITLE>Current Product List</TITLE>
<BODY>
<Table Border=1 BGCOLOR="#ffffff"><FONT FACE="ARIAL" COLOR="#000000">
<CAPTION><B>Current Product List</B></CAPTION>

<THEAD>
<TR>
<TD><FONT SIZE=2 FACE="ARIAL" COLOR="#000000">Product ID</FONT></TD>
<TD><FONT SIZE=2 FACE="ARIAL" COLOR="#000000">Product Name</FONT></TD>
</TR>
</THEAD>
<TBODY>
<%BeginDetail%>
<TR VALIGN=TOP>
<TD ALIGN=RIGHT><FONT SIZE=2 FACE="ARIAL" COLOR="#000000"><%ProductID%><BR></FONT></TD>
<TD><FONT SIZE=2 FACE="ARIAL" COLOR="#000000"><%ProductName%><BR></FONT></TD>
</TR>
<%EndDetail%>
</TBODY>
<TFOOT></TFOOT>
</BODY>
</HTML>
Access saves the HTX file to be used with an IDC file with the same name as the IDC file, but with an .htx extension rather than an .idc extension. After the database information has been merged into the HTML document, the HTML document is returned to the Web browser.
If you open Current Product List.idc from a Microsoft Internet Information Server that has an appropriately defined Northwind data source name (DSN), the Web page shown in the following illustration is generated.
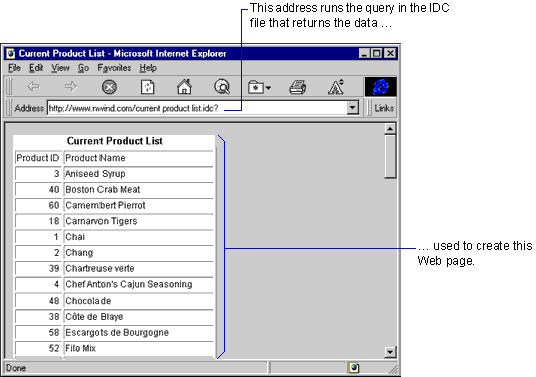
Note You can also reference an HTML template when you create IDC and HTX files. An HTML template contains additional HTML code to enhance the appearance of the resulting pages. If you specify an HTML template, it is merged with the HTX file. For information about the format of an HTML template, see "Using an HTML Template When You Save Data as HTML Documents" later in this chapter.
Requirements for Using IDC/HTX Files
To display and use IDC/HTX files, a copy of your database and the IDC/HTX files must reside on a computer running one of the following operating systems and Internet server environments:
Use Peer Web Services or Personal Web Server only for testing IDC/HTX files or if no more than 10 users use the server simultaneously. Microsoft IIS, Peer Web Services, and Personal Web Server use a component called the Internet Database Connector (Httpodbc.dll) to generate Web pages from IDC/HTX files.
For more information about installing Peer Web Services or Personal Web Server, see "Setting Up a Personal Web Server" in Chapter 24, "Integrating Microsoft Office With Your Intranet."
| World Wide Web For more information about Microsoft Internet Information Server, connect to the IIS Web site at: |
However, the Access Desktop driver is not installed with Peer Web Services or Personal Web Server. If Access is installed on the computer you are using to run Personal Web Server, and if you selected the driver when you installed Access, the driver is already available. If you do not have Access installed on the computer you are using to run Personal Web Server, you must install the Access Desktop driver.
![]() To install the Access Desktop driver
To install the Access Desktop driver
If you are running Setup for the first time, click Custom.
– or –
If you are rerunning Setup, click Add/Remove.
Important The Microsoft Access option must also be selected or the driver will not be installed.
After the Access Desktop driver is installed, you must create either a system DSN or a file DSN that specifies the name and connection information for each database you want to use on the server. You then specify that DSN when you generate the IDC/HTX files.
For information about how to define a system DSN or a file DSN, see Access online Help. For more information about using IDC/HTX files, see Microsoft Internet Information Server online Help.
| World Wide Web You can learn more about applications that use IDC/HTX files by reading about the Job Forum application. For information about the Job Forum application, connect to the Job Forum white paper at: |
http://www.microsoft.com/accessdev/articles/jobforpa.htm
Saving Forms and Datasheets as Active Server Pages
With Access, you can save a form as an ASP that emulates much of the functionality of your form. When saving a form as an ASP, Access saves most but not all controls on the form as ActiveX controls that perform the same or similar functions.
Access does not save or run Visual Basic code behind the form or controls. To copy the layout of your form as closely as possible, Access uses the Microsoft HTML Layout control to position the controls on an ASP. The resulting page uses a feature of the ASP component of Microsoft Internet Information Server 3.0 called serverside scripting to connect to a copy of your database on an Internet server.
| World Wide Web For information about the HTML Layout control, connect to: |
Users who open a form saved as an ASP can browse records, update or delete existing records, and add new records.
You can also save table, query, and form datasheets as ASPs. When you open a datasheet saved as an ASP, Access displays current data from a copy of your database located on an Internet server, much like IDC/HTX files do. However, unlike IDC/HTX files, ASPs require only one file per datasheet. The ASP file uses scripting to establish a connection to the database on the server and contains information that it uses to format the datasheet. Unlike a form saved as an ASP, users cannot update existing records in or add new records to a datasheet saved as an ASP.
![]() To
save a form or datasheet as an ASP
To
save a form or datasheet as an ASP
You can also save forms and datasheets as ASPs by using the Publish to the Web Wizard (available through the Save As HTML command on the File menu), the OutputTo method in code, or the OutputTo action in macros.
For more information about saving forms and datasheets as ASPs, see Access online Help.
Form Views Supported for APSs
If the form you save as an ASP has its DefaultView property set to Single Form or Continuous Forms, the ASP is displayed as a single form, unless it is opened in Datasheet view with the Save As/Export command (File menu). If the form has its DefaultView property set to Datasheet, the ASP is displayed as a datasheet. Subforms are always displayed as datasheets, regardless of their DefaultView property setting. All field data types are saved unformatted — that is, the Format and InputMask property settings are not saved.
Control Types Supported for ASPs
When Access saves a form as an ASP, it replaces Access controls with ActiveX controls, as described in the following table.
| This Access control | Is replaced with this ActiveX control |
| Text box | Text box. |
| Text box control bound to a Hyperlink field | Text box that displays the hyperlink text, but the hyperlink cannot be followed. |
| List box | List box (single column only). |
| Combo box | Combo box. |
| Label | Label. If the label has HyperlinkAddress or HyperlinkSubAddress properties set, a hyperlink is created for the label. |
| Command button | Command button, but any code associated with the button is lost. If the command button has HyperlinkAddress or HyperlinkSubAddress properties set, a hyperlink is created for the button. |
| Option group | Option group, but without a group frame. |
| Option button | Option button. |
| Check box | Check box. |
| Toggle button | Toggle button. |
| ActiveX control | ActiveX control, but any code associated with the control is lost. |
Access does not support the following when saving a form as an ASP:
Requirements for Using ASPs
To display and use an ASP, a copy of your database and ASP components must reside on a computer running one of the following operating systems and Internet server platforms:
The Microsoft HTML Layout control must be installed on the computer opening the ASP. If the computer opening an ASP produced by Access 97 does not have the HTML Layout control installed, a message is displayed prompting the user to download the control. To display the ASP, the user must click Yes to download the control.
| World Wide Web The Microsoft HTML Layout control is not included on the Office CD, but you can download it directly from the Web. To download the Microsoft HTML Layout control, connect to: |
Use Personal Web Server or Peer Web Services only for testing ASPs or if no more than 10 users will be using the server simultaneously. ASPs also require the Access Desktop driver and a valid DSN to gain access to a database.
| World Wide Web For more information about installing the ASP components for Peer Web Services and Personal Web Server, connect to the Windows NT Server home page at: |
http://www.microsoft.com/ntserver/
Note Access forms saved as ASP files (using the Save As command on the File menu or using the Publish to the Web wizard) cannot be used on the Macintosh because they require the HTML Layout control. The HTML Layout control does not exist for Macintosh computers. Access tables and queries saved as ASP files can be used on the Macintosh, however, because they do not require the HTML Layout control. You can create your own ASP database application that allows you to browse and update data in a shared Access database from a Web browser on the Macintosh as long as you do not use the HTML Layout control.
Using the Publish to the Web Wizard
With the Publish to the Web Wizard, you can publish a set of Access database objects to any combination of static HTML documents, IDC/HTX files, or ASPs. Using the wizard, you can:
To run the Publish to the Web Wizard, click Save As HTML (File menu). For more information about using the Publish to the Web Wizard, see Access online Help.
Note The Publish to the Web Wizard and Web Publishing Wizard cannot copy the database itself or create a DSN on your server when publishing IDC/HTX or ASP. You must perform these operations yourself.
Using an HTML Template When You Save Data as HTML Documents
When you save data as HTML documents, you can use an HTML template to give a consistent look to the HTML documents you create. For example, you can include your company logo, name, and address in the page header; use the background that is used throughout your company; or include standard text in the header or footer of the HTML document.
Note You can use an HTML template when you save data as static HTML documents, when you save datasheets as IDC/HTX files, when you save a form or datasheet as an ASP, and when you use the Publish to the Web Wizard.
The HTML template can be any HTML document — that is, a text file that includes HTML tags and userspecified text and references. In addition, the HTML template can include placeholders that tell Access where to insert certain pieces of data in the HTML documents. When data is saved as HTML documents, the placeholders are replaced with data. The following table describes each of the placeholders that you can use in an HTML template.
| Placeholder | Description | Location |
| <!AccessTemplate_Title> | The name of the object being saved | Between <TITLE> and </TITLE> |
| <!AccessTemplate_Body> | The data or object being saved | Between <BODY> and </BODY> |
| <!AccessTemplate_FirstPage> | An anchor tag to the first page | Between <BODY> and </BODY> or after </BODY> |
| <!AccessTemplate_PreviousPage> | An anchor tag to the previous page | Between <BODY> and </BODY> or after </BODY> |
| <!AccessTemplate_NextPage> | An anchor tag to the next page | Between <BODY> and </BODY> or after </BODY> |
| <!AccessTemplate_LastPage> | An anchor tag to the last page | Between <BODY> and </BODY> or after </BODY> |
| <!AccessTemplate_PageNumber> | The current page number | Between <BODY> and </BODY> or after </BODY> |
When you install Access, sample HTML template files and graphics files are installed in the Program Files\Microsoft Office\Templates\Access folder.
Creating Active Server Pages Database Applications
You can create simple client/server applications that use a Web browser, such as Microsoft Internet Explorer, as a front-end for an Access database or other ODBC data source. It is beyond the scope of this book to discuss these applications in detail, but this section points to resources that document how to create them.
You can use the Active Server Pages (ASP) components of Microsoft Internet Information Server 3.0 or later on Windows NT Server version 4.0 to gain access to an Access database.
You can also install and use the Active Server Pages components from a workstation used as a Web server with Microsoft Peer Web Services 3.0 on Windows NT Workstation version 4.0 or Microsoft Personal Web Server version 1.0a on Windows 95. To use Active Server Pages with Peer Web Services or Personal Web Server, you must install the Active Server Pages components from the Internet Information Server Web site after you install your Web server software.
The following table lists sources of information for each of these applications.
| For information about | See this Web site |
| Microsoft Internet Information Server 3.0 and installation of Active Server Pages components | Internet Information Server site at http://www.microsoft.com/iis/ |
| Microsoft Peer Web Server 3.0 | Peer Web Services site at http://www.microsoft.com/ntworkstation/info/peerweb.htm |
| Microsoft Personal Web Server 1.0a | Personal Web Server site at http://www.microsoft.com/ie/pws/ |
After you have installed Active Server Pages on any of the three Web servers, you can view the Active Server Pages online documentation. On the Windows Start menu, point to Programs, point to your Web server submenu, and then click Active Server Pages Roadmap. From the Roadmap, you can also view the Adventure Works sample Web site, which demonstrates many of the features of Active Server Pages scripting and is an excellent source of sample code.
You can also view the Roadmap by typing the following address: http://yourserver/iasdocs/aspdocs/roadmap.asp, where yourserver is the domain name of your server. The Roadmap documentation requires either Microsoft Internet Explorer version 3.0 or later, or a browser that supports frames. Microsoft Internet Explorer provides the best results.
The Database Access component of Active Server Pages uses ActiveX Data Objects (ADO) to provide easy access to information stored in a database that complies with the ODBC standard. To gain access to an Access database, use the Microsoft Access ODBC Driver running on your Web server. For information about how to create an Active Server Pages application that opens a database, open the Active Server Pages Roadmap documentation described earlier. In the Contents frame, open Tutorial, Module 2, Lesson 3, "Using the Database Access Component."
This Active Server Pages Roadmap documentation shows you how to create an ASP database application using a text editor. You can also create an ASP database application using Microsoft Visual InterDev. For more information, see the Microsoft Visual InterDev site at:
http://www.microsoft.com/vinterdev/
Note If you want to use an ASP database application from a Web browser running on the Macintosh, do not use the HTML Layout control in your application. The HTML Layout control does not run on Macintosh computers.
Saving Access Reports as Snapshot Files
As an alternative to printing and distributing Access reports, you can save and distribute them as snapshot files. A snapshot file is a graphics file with a .snp extension; the file contains a copy of each page of a report. After you create a snapshot file, you can e-mail or post it to a Web site for convenient access.
Unlike saving Access reports to other formats, such as HTML or RTF, saving as a snapshot file preserves the full fidelity of the original report, including its twodimensional layout, embedded graphics, fonts, colors, and charts. Users can view and print snapshot files using the Snapshot Viewer or Snapshot Viewer control, which does not require a full or run-time installation of Access. Report snapshots are a way of electronically distributing Access reports in print preview mode — users can view, scroll, and print the reports using the same features available in print preview in Access.
The Snapshot Viewer allows you to view, print, and mail a report snapshot. Snapshot Viewer version 8.0 consists of a stand-alone executable program (Snapview.exe), a Snapshot Viewer control (Snapview.ocx), a help file, and other related files. You can use the Snapshot Viewer control to view a report snapshot from Microsoft Internet Explorer version 3.0 or later, or from any application that supports ActiveX controls, such as Microsoft Visual Basic for Applications (VBA).
Requirements
To create report snapshots, you need Microsoft Access 97 Service Release 1 (SR-1) or Microsoft Office 97 Professional Edition SR-1. To make sure that you have this version, click About Microsoft Access on the Access Help menu. If you have SR-1, you already have Snapshot Viewer and the ability to create report snapshots. If not, you can download the SR-1 patch from the Microsoft Office 97 SR-1 Web site at http://officeupdate.microsoft.com/Articles/sr1howtoget.htm/.
Although you must have Microsoft Access 97 SR-1 to create report snapshots, users do not need Access to view, print, mail, or browse them on the Web. However, users must have the Snapshot Viewer or Snapshot Viewer control installed.
If you have the Microsoft Access 97 SR1 or Office 97 Professional Edition SR-1 on CD-ROM, the self-extracting file to install the Snapshot Viewer and Snapshot Viewer control, Snpvw80.exe, is available in the ValuPack\Access subfolder. To install the Snapshot Viewer and Snapshot Viewer control, double-click Snpvw80.exe. You can also download Snpvw80.exe from the Microsoft Office Developer Web site at http://www.microsoft.com/accessdev/prodinfo/snapshot.htm. In either case, you can freely distribute Snpvw80.exe to anyone who has Windows 95, Windows NT Workstation, or Windows NT Server.
The Snapshot Viewer and Snapshot Viewer control work only with the 32-bit versions of the Windows operating system. The internal format of a snapshot file is a Windows metafile, which can be read only by a computer running 32-bit versions of Windows. For example, users cannot display a report snapshot file from a World Wide Web page on a Macintosh computer or a computer running Unix. If you are using Microsoft Windows NT Workstation version 3.51, you must have Service Pack 5 or later installed to use the Snapshot Viewer control (Snapview.ocx).
To electronically mail a report snapshot, you must use a mail client program that supports MAPI, such as Microsoft Outlook. To display a report snapshot on the World Wide Web, you must use a Web browser that supports ActiveX controls, such as Microsoft Internet Explorer 3.0 or later.
Creating Report Snapshots
You create a report snapshot using the Save As command on the File menu in Access.
![]() To create a report snapshot
To create a report snapshot
A report snapshot is based on the table or query behind the report, including any sorting or filtering defined by the OrderBy or Filter property settings. If the report is based on a parameter query, Access first prompts you for the parameter values, and then outputs the results.
Opening Report Snapshots
After you create a report snapshot, users can open it using the Snapshot Viewer.
![]() To open a report snapshot
To open a report snapshot
You can also doubleclick the report snapshot file in Windows Explorer.
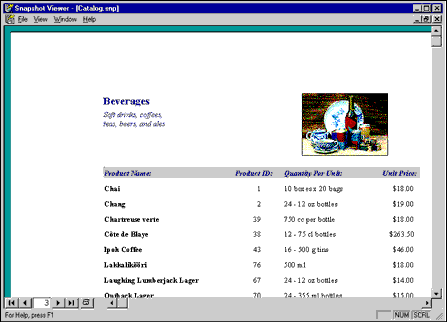
The following illustration shows a page from the Northwind Traders sample application Catalog report in Snapshot Viewer.
Sending a Report Snapshot in Email
In Snapshot Viewer, you can e-mail a report snapshot as an icon or as an embedded file to a mail recipient or distribution list. You can send a report snapshot as an icon from Snapshot Viewer or directly from Access. To send a report snapshot as an embedded file, you must use an e-mail program that supports ActiveX controls, such as Outlook.
![]() To send a report snapshot as an icon from Snapshot Viewer
To send a report snapshot as an icon from Snapshot Viewer
Snapshot Viewer starts your email program and creates an email message with an icon for your report snapshot file.
![]() To send a report snapshot as an icon from Access
To send a report snapshot as an icon from Access
Access outputs the report as a snapshot file, starts your email program, and creates an email message with an icon for your report snapshot file.
Note You can also create a macro that uses the SendObject action to automate the process of sending a report snapshot. For more information about using the SendObject action, see online Help in Access.
When using either method to send a report snapshot as an icon, it is a good idea to include a link to the Snapshot Viewer download page
(
http://www.microsoft.com/accessdev/prodinfo/snapshot.htm) in case a recipient does not have Snapshot Viewer installed.
For better performance and user convenience, you might want to set up a local site on your corporate LAN or intranet for downloading the Snapshot Viewer. You can do this by downloading the Snapshot Viewer self-extracting file (Snpvw80.exe) from the Microsoft Office Developer site, copying it to a public server, and providing a link to that location in your message.
The following illustration shows the Invoice report from the Northwind Traders sample application's embedded as an icon in an Outlook message.
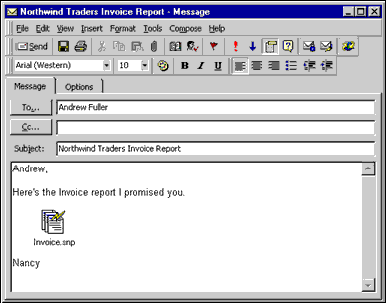
You can also embed a report snapshot as a file that displays the report snapshot inside a mail message using an electronic mail program that supports ActiveX controls, such as Outlook.
![]() To embed a report snapshot as a file in Outlook
To embed a report snapshot as a file in Outlook
The following illustration shows the Invoice report from the Northwind Traders sample application embedded as a file in an Outlook message.
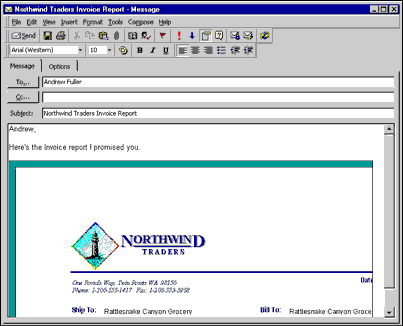
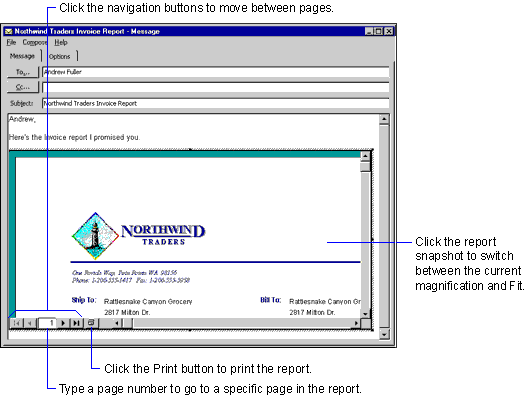
When your mail recipients read the mail message, they can doubleclick the image to activate Snapshot Viewer control in place and read or print the report.
The following illustration shows the Invoice report in an Outlook message after activating the Snapshot Viewer control.
|
Why is my email message so large in Windows 95? Embedding a report snapshot as a file produces a larger email message under Windows 95 than it does under Windows NT Workstation or Windows NT Server. This may prevent you from sending the email message (because of message size limitations set on your mail server). This size difference is related to the way the two operating systems support Windows metafiles. To reduce the size of the email message, you can do one of the following before sending the report snapshot:
|
Publishing Report Snapshots on the World Wide Web
You can also make report snapshots available from a Web page on your intranet or the Internet. Once you have created your report snapshots, there are two ways you can publish them on the World Wide Web:
![]() To create a Web page with a hyperlink to a report snapshot
To create a Web page with a hyperlink to a report snapshot
Note If you are updating the same reports on a regular basis, you may want to automate the process of creating snapshot files using the OutputTo action or method. For more information, see Access online Help.
For example, the following anchor tag creates a hyperlink to a snapshot file named Catalog.snp on an HTTP server:
‹A HREF="http://MyWebSite/Webreports/catalog.snp"›Catalog report‹/A›
This example creates a hyperlink to the snapshot file on a shared public folder:
‹A HREF="file://\\MyShare\MyFolder\catalog.snp"›Catalog report‹/A›
Note Remind users to use the Snapshot Viewer Print button to print each page of the report snapshot, rather than the Microsoft Internet Explorer Print button or command, which only prints the current Web page.
You can also embed a snapshot report directly in a Web page using the Snapshot Viewer control. Users can view such a Web page only if they are using a browser that supports ActiveX controls, such as Microsoft Internet Explorer version 3.0 or later.
![]() To embed a snapshot report on a Web page using the Snapshot Viewer control
To embed a snapshot report on a Web page using the Snapshot Viewer control
Note If you are updating the same reports on a regular basis, you may want to automate the process of creating snapshot files using the OutputTo action or method. For more information, see Access online Help.
or
If you use Word, use HTML Source view and enter HTML code to specify the control and its properties directly. (This is also required when you use Notepad or an HTML editor that does not provide a user interface for inserting an ActiveX control into a Web page.)
Regardless of how you create the Web page, the result should be HTML similar to the following example:
‹OBJECT ID="SnapshotViewer" WIDTH=640 HEIGHT=480
CLASSID="CLSID:F0E42D60-368C-11D0-AD81-00A0C90DC8D9"›
	‹PARAM NAME="_ExtentX" VALUE="16722"›
	‹PARAM NAME="_ExtentY" VALUE="11774"›
	‹PARAM NAME="_Version" VALUE="65536"›
	‹PARAM NAME="SnapshotPath" VALUE="http://MyWebSite/Webreports/catalog.snp"›
	‹PARAM NAME="Zoom" VALUE="0"›
	‹PARAM NAME="AllowContextMenu" VALUE="-1"›
	‹PARAM NAME="ShowNavigationButtons" VALUE="-1"›
‹/OBJECT›
Note The VALUE string specified for the SnapshotPath parameter does not have to be a URL to an HTTP server. You can also specify a UNC path to a shared folder. For example, you could specify the SnapshotPath parameter like this:
‹PARAM NAME="SnapshotPath" VALUE="\\MyShare\Webreports\catalog.snp"›
The following illustration shows a page in the Catalog report from the Northwind Traders sample application embedded as a report snapshot in a Web page.
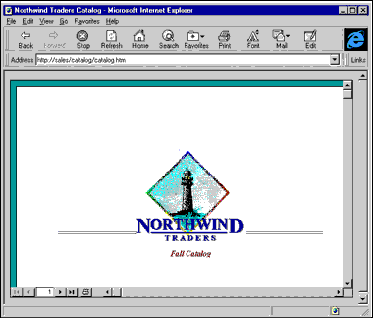
When a user without Snapshot Viewer installed on the computer opens a Web page with an embedded Snapshot Viewer control, Microsoft Internet Explorer automatically downloads the Snapshot Viewer control (but not the entire Snapshot Viewer program) from the Microsoft ActiveX home page. Alternatively, you can copy Snapview.ocx to a location on your corporate intranet and then use the CODEBASE parameter of the HTML OBJECT tag to specify this as the download location.
For example:
‹OBJECT ID="SnapshotViewer" WIDTH=640 HEIGHT=480
CLASSID="CLSID:F0E42D60-368C-11D0-AD81-00A0C90DC8D9"
CODEBASE="http://MyWebSite/LocalControls/Snapview.ocx"›
For more information about the Snapshot Viewer and the Snapshot Viewer control, see Snapshot Viewer online Help. If you have the snapshot viewer installed, you can read the help file, Snapview.hlp, directly from the C:\Program Files\Snapshot Viewer folder. You can also get more information about the Snapshot Viewer, including information about how to automate publishing and distributing snapshot reports, from the following article:
http://www.microsoft.com/accessdev/articles/snapshot.htm
Synchronizing Database Replicas over the Internet
With Access 97, you can synchronize replicas over the Internet. Before you can synchronize over the Internet, you must configure your Internet server for replication. To configure your Internet server, you need Replication Manager, which includes a wizard that guides you through the configuration process.
For more information about Replication Manager, see "Replication Manager" in Chapter 20, "Using Replication in Your Application," in Building Applications with Microsoft Access 97. For more information about this and other Microsoft Press books, see "Microsoft Press Titles" in Appendix E, "Other Support Resources."
Importing, Linking, and Exporting Data to the Internet
With Access, you can import or link data from HTML tables or other data sources on an Internet server. You can also export data in your database to an Internet server.
Importing and Linking Data from HTML Tables
You can import or link data formatted as an HTML table to an Access database. Before Access imports or links the data, it copies the data into the local cache. Whenever you open a linked table, Access makes a local copy from the original on the Internet or an intranet before opening it. For this reason, the data in the table is readonly. Similarly, if you export the linked HTML table to an HTML file, Access exports from the local copy of the file, not the original file on the Internet.
![]() To
import or link data from HTML tables
To
import or link data from HTML tables
– or –
In the File name box, type a valid HTTP or FTP URL.
– or –
In the Look in box, click Internet Locations (FTP) and select a previously defined FTP site.
– or –
In the Look in box, click Add/Modify FTP Locations, and then specify a new FTP site and browse its files.
For information about linking HTML files using Visual Basic, see "Working with HTML Files" in Chapter 18, "Accessing External Data," in Building Applications with Microsoft Access 97. For more information about this and other Microsoft Press books, see "Microsoft Press Titles" in Appendix E, "Other Support Resources."
When you import or link data from an HTML table, Access parses the information contained within the HTML tags. The primary HTML tags that define tables are described in the following table.
| HTML tag pair | Description |
| <TABLE>/office/ork.</TABLE> | Specifies the beginning and end of the table |
| <TH/office/ork.>/office/ork.</TH> | Specifies table header cells |
| <TR/office/ork.>/office/ork.</TR> | Specifies a row in a table |
| <TD/office/ork.>/office/ork.</TD> | Specifies table data cells |
| <CAPTION/office/ork.>/office/ork.</CAPTION> | Specifies the table caption, usually at the beginning or end of the table |
Access applies the following rules when it interprets the progression of tags and tag pairs within the HTML table it imports or links:
In many cases, a table cell can display something other than text. If a table cell contains an embedded graphic file, there is an <IMG SRC/office/ork.> tag associated with it. This tag may or may not have additional text that would be displayed. If additional text is present, Access imports it, but Access does not import the embedded graphic or the tag that defines it. However, this is not true of embedded anchor <A HREF> tags; Access imports anchor tags as Hyperlink fields.
HTML tables can contain lists that are embedded within a table cell. Lists in an HTML table cell are formatted with the <LI> and </LI> tags. Access inserts a carriage return and line feed (<CR><LF>) after each list item and imports each item in the list as a separate field for that record.
HTML tables can also contain tables that are embedded within a table cell. You can import these as separate tables. To achieve the most predictable results, however, import simple HTML tables with a fixed number of fields per record, without embedded lists or tables.
Exporting, Importing, and Linking Data from Other Data Sources on Internet Servers
You can export any Accesscompatible external data file to an FTP server. You cannot export files to HTTP servers through the Internet, however, because you cannot write to them using the HTTP protocol.
![]() To
export data from external data sources on Internet servers
To
export data from external data sources on Internet servers
– or –
In the Save in box, click Internet Locations (FTP) and select a previously defined FTP site.
– or –
In the Save in box, click Add/Modify FTP Locations, and then specify a new FTP site and browse its files.
You can also import and link any Accesscompatible external data file, except Access databases and ODBC data sources, by using an FTP or HTTP connection. An FTP or HTTP connection is only maintained long enough to perform a single transaction. Therefore, when you import or link a file located on an FTP or HTTP server, Access copies the data file to the user's local cache. Access then imports or links to the data file in the local cache. For this reason, files linked with an FTP or HTTP connection are readonly.
![]() To
import or link data from external data sources on Internet servers
To
import or link data from external data sources on Internet servers
– or –
In the Look in box, click Internet Locations (FTP) and select a previously defined FTP site.
– or –
In the Look in box, click Add/Modify FTP Locations, and then specify a new FTP site and browse its files
Displaying Web Pages and Other Documents in
Microsoft Access
Forms
The Microsoft WebBrowser control is an ActiveX control that you can use on your Access database application forms to browse Web sites, view Web pages and other documents, and download data located on the Internet. The WebBrowser control is useful in situations where you do not want to disrupt the work flow in a database application by switching from Access to a Web browser or other documentviewing program.
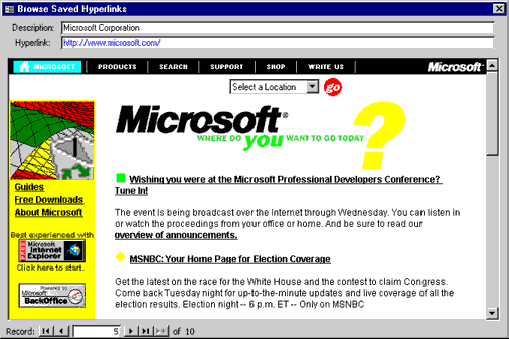
For example, the following illustration shows the Browse Saved Hyperlinks form in the Developer Solutions sample application. (This sample application is installed in the Microsoft Office\Office\Samples folder when you choose a Custom installation during Setup and select the Sample Databases option under the Microsoft Access option). You can use the Browse Saved Hyperlinks form to browse addresses saved in the Links table.
The WebBrowser control can display any Web page that Microsoft Internet Explorer version 3.0 can display. For example, the WebBrowser control can display pages that include any of the following features:
In addition to opening Web pages, the WebBrowser control can open any ActiveX document, which includes most Office documents. For example, if Office is installed on a computer, an application that uses the WebBrowser control can open and edit Microsoft Excel spreadsheets, Word documents, and PowerPoint presentations from within the control. Similarly, if Excel Viewer, Word Viewer, or PowerPoint Viewer is installed, users can view those documents within the WebBrowser control.
With the WebBrowser control, users of Microsoft database applications can browse sites on the Web, as well as folders on a hard disk or on a LAN. Users can follow hyperlinks by clicking them or by typing a URL into a text box. Also, the WebBrowser control maintains a history list that users can browse to view previously browsed sites, folders, and documents.
Note Additional ActiveX controls that you can use to work with content on the Internet or an intranet are available in Microsoft Office 97 Developer Edition.
For more information about using the WebBrowser control, see "Using the WebBrowser Control" in Chapter 21, "Developing Applications for the Internet and the World Wide Web," in Building Applications with Microsoft Access 97. For more information about this and other Microsoft Press books, see "Microsoft Press Titles" in Appendix E, "Other Support Resources."
|
Excel supports Officewide Web features, such as hyperlinks and the Web toolbar. In addition, Excel supports importing and exporting HTML documents, Web queries, and Web forms.
Converting Microsoft Excel Data and Charts to HTML
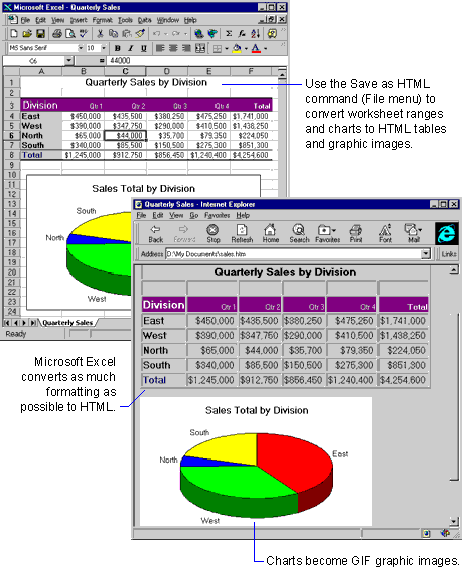
The Internet Assistant Wizard is an addin that provides HTML conversion functionality for Excel. With the Internet Assistant Wizard, you can:
| Note In Windows, the Internet Assistant Wizard is installed by the HTML addin; however, the HTML addin is not installed by default when you choose a Typical installation during Setup. To install the addin, rerun Setup, click Add/Remove, and select the Web Page Authoring (HTML) option. |
| Note On the Macintosh, the Internet Assistant Wizard is installed by the HTML addin; however, the HTML addins is not installed by default when you choose an Easy installation during Setup. To install the addin, run Microsoft Office Installer and click Custom Install. Select the Web Page Authoring option, and then click Install. |
![]() To convert Excel data to HTML
To convert Excel data to HTML
Note If you insert the table based on your Excel data into an existing HTML file, you must edit the HTML file before you can insert the table. Open the HTML file in a text editor (such as Notepad) and type <!##Table##> at the location where you want the table to appear. The Internet Assistant Wizard replaces this string with the table.
HTML Conversion Issues for Worksheet Ranges
When you convert a worksheet range to an HTML table, the following elements are preserved:
Note In the conversion, Office hyperlinks are converted to HTML hyperlinks.
GIF Image Conversion Issues for Charts
The Internet Assistant Wizard converts charts to GIF format images with a high degree of fidelity. Because the GIF images are static, however, all links back to the source data on which the chart data series or labels are based are broken.
Using Microsoft Excel Web Queries
To query data from a source on the Internet or your intranet and then import the data into Excel, you can use the Run Web Query command (Data menu, Get External Data submenu). Once you import the data, you can manipulate, analyze, and format it. For example, you can create a Web query that retrieves a current product price from a database on your intranet.
| Tools and Utilities The Office Resource Kit Tools and Utilities include the Excel Web Connectivity Kit. The Connectivity Kit includes detailed instructions for creating Web queries, as well as several sample queries. For more information, see "Microsoft Excel 97 Web Connectivity Kit" in Appendix A, "Microsoft Office Resource Kit Tools and Utilities." |
| World Wide Web For more information about Excel Web queries, connect to the Excel 97 Web Queries Web site at: |
http://officeupdate.microsoft.com/excel/webquery/samples.htm
Collecting Database Input with Web Forms
| This section describes the Web Form Wizard addin, which you can use to create dataentry forms on your intranet. The Web Form Wizard is available in Excel 97 for Windows. |
Overview
The Web Form Wizard is an Excel addin that you can use to create data entry forms (called Web forms) in Excel to capture user input to a database over the Internet or an intranet.
Note The Web Form Wizard is installed by the Web Form addin; however, the Web Form addin is not installed by default when you choose a Typical installation during Setup. To install the addin, rerun Setup, click Add/Remove, and select the Web Page Authoring (HTML) option.
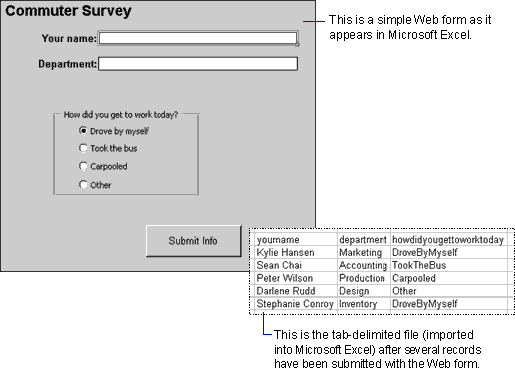
Web forms have a client/server architecture. On the client side, the user opens a Web form in Excel, enters data, and then submits it. On the server side, scripts created by the Web Form Wizard write this data to one of several formats, depending on your server setup and database tools. Following is a description of how a user might complete a Web form.
Web forms are best suited for data input. To use Web forms for database queries, you must manually modify the HTML extension (HTX file) created by the Web Form Wizard.
Client Requirements
On the client side, Web forms (which are Excel workbooks) require the Excel program. If a user opens a Web form from a Web browser (by clicking a hyperlink, for example) and the browser supports Active Documents, Excel starts within the Web browser and loads the form.
Because Web forms require Excel to handle user input, Web forms are best suited to intranets. Web forms work over the Internet as well, however, because most communication between the client and server is in standard TCP/IP format.
Note Because Excel Viewer does not support data input, you cannot use it in place of Excel on the client computer.
Server Requirements and Capabilities
Web forms support both the Microsoft Internet Information Server Application Programming Interface (ISAPI) and Common Gateway Interface (CGI) protocols.
Note The Web Form Wizard creates the necessary files to allow the client to insert new records into a database file. To perform more complex actions, however, such as searching a database or retrieving information, you must modify the Internet Database Connector (IDC) file created by the wizard. For more information about modifying an IDC file, see your Web server documentation.
Web Forms and IIS
If you are running IIS on your Web server, you can use Web forms to interact with any Open Database Connectivity (ODBC)compliant database such as Microsoft SQL Server or Access.
With an IISbased Web server and Web forms you can:
When you create a Web form for a server running IIS, the Web Form Wizard generates four files:
Web Forms and CGI
If you are running CGI on your Web server, you can use Web forms to add records to a tabdelimited database. You can then import this database into Access or Excel for further manipulation or analysis.
When you create a Web form for a server running CGI, the Web Form Wizard generates three files:
Creating a Web Form
Creating a Web form involves the following steps:
– or –
If you are using FrontPage to administer your Web site, add the Web form to your FrontPage Web and specify the path to which to save the form.
Each of these steps is described in more detail in the following sections.
Design the Web Form and Start the Web Form Wizard
When you design a Web form in Excel, use only the Forms toolbar (View menu, Toolbars submenu). The Web Form Wizard only supports forms created with the Forms toolbar. It does not support controls created with the Control Toolbox or by any other means.
The wizard converts control names to database field names according to the following rules:
Tip When entering control names in worksheet cells, add a colon to the name — for example Address: The Web Form Wizard now adds both the label and the cell reference to the list of available controls. This saves you from having to add the labels and cell references manually to the list.
The Web Form Wizard generates a Submit Info button and adds it to the Web form. Do not create a Submit Info button yourself.
Tip When using worksheet cells as data input fields, you can use the data input features in Excel, such as data validation (Data menu), conditional formatting (Format menu), and cell and object protection (Format menu). For more information about using these data input features, see Excel online Help.
To start the Web Form Wizard, click the Web Form command (Tools menu, Wizard submenu). The wizard displays a Welcome panel; click Next to continue.
Specify the Data Input Controls and Cells
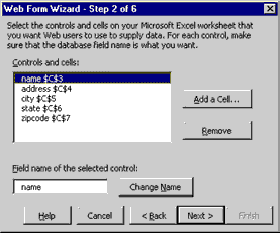
In Step 2 of the wizard, select the data input controls you want to use. You can remove any of the values that appear in the Controls and cells box or add values that do not appear.
For detailed information about these options, click the Help button.
Specify Your Web Server Software
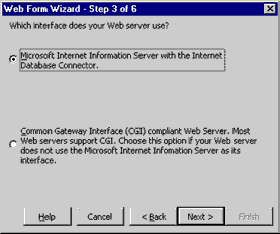
In Step 3, specify the software running on your Web server: IIS or CGI. You can create or add to an Access database only if your Web server is running IIS. For CGI Web servers, the Web Form Wizard creates a tabdelimited file. You can later import this file into Access or Excel for more analysis.
For detailed information about these options, click the Help button.
Choose the Results Format and Path
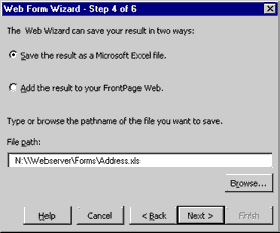
In Step 4, specify whether you want the form to be saved as an Excel workbook on your Web server or added to an existing FrontPage server by clicking one of the following options:
If you select this option, you must also specify a location in the File path box.
If you select this option, you must have a Web site open in the FrontPage Explorer. If FrontPage is not running, the Web Form Wizard starts it, and you must then open a Web site.
In the File path box, specify a location on your Web server where you want the Web form and its related files stored. If the path you specify differs from the path of the workbook in which you initially designed the form, you must also specify a Web form file name. The other files created by the Web Form Wizard are given the same base file name. For example, if you name your Web form Address.xls and specify a CGI interface, the Web Form Wizard creates Address.pl (the Perl script) and Address.txt (the tabdelimited text file) in the same location as Address.xls.
For detailed information about these options, click the Help button.
Design the Confirmation Message
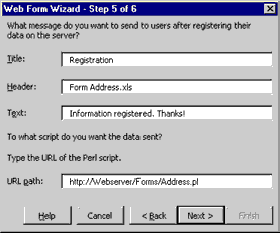
In Step 5, design the confirmation message you want returned to the user's Web browser after the user has submitted data.
In the URL path box, type the HTTP address of the location of the database file or tabdelimited file you specified in Step 4 of the wizard.
For detailed information about these options, click the Help button.
In Step 6 of the Web Form Wizard, click Finish to complete your Web form.
Add an ODBC Data Source and Edit the IDC File on Your Web Server (IIS only)
If you selected an IIS Web server in Step 3 of the wizard, you must add an Access system data source in the ODBC control panel and then edit the IDC file created by the wizard on your Web server. You may also want to move the files created by the wizard to different folders on your Web server.
Tip For better security you can move the IDC, HTX, and MDB files to a folder on your Web server with execute access but not read access. Set these properties for the folder through IIS Directory Properties. The XLS form itself, however, must remain in a folder with read access.
![]() To
add an ODBC system data source
To
add an ODBC system data source
– or –
In Windows NT Server 3.51, doubleclick Control Panel in the Main group in Program Manager.
This is not required to submit records to the database through the Web form you have created.
From this point on, do not move your MDB file from this location.
![]() To
edit the IDC file
To
edit the IDC file
|
| Outlook 97 for Windows provides a central point from which to communicate with others through the Internet, and provides ways to connect intranets within your organization to the Internet. |
This section describes the Internetrelated capabilities of Outlook. These include working with Outlook as a client for Internet mail, using hyperlinks in Outlook items, and using Outlook to organize and display Web pages.
As an administrator, you have many ways to set up your workgroup to send and receive Internet mail with Outlook. If your organization uses Microsoft Exchange Server, Internet mail is handled by the Internet Mail Connector. If your organization does not use Exchange Server, email can be sent to and received directly from the Internet using another email service provider that is compatible with the Simple Mail Transfer Protocol (SMTP) or Post Office Protocol (POP) version 3. SMTP and POP3 are MAPI service providers that are installed by default with Outlook.
With an Internet mail connection, your workgroup can use Internet messaging for the following activities in addition to sending and receiving messages:
For example, a traveling salesperson can check for new email while on the road.
For example, a user can have Outlook file all messages from a particular Internet address in a separate folder.
For example, a meeting organizer can send a meeting request to offsite clients or suppliers.
For example, a manager can send a task request to an employee who works at home.
When a user types an Internet email address in the To box, Outlook automatically resolves and properly formats the address by removing spaces and changing commas to periods. For example, if a user types R_King @ NorthWind,com Outlook formats the address as R_King@NorthWind.com
Outlook automatically recognizes Internet addresses (URLs) in the body of email messages and converts them to hyperlinks. Internet users can click the hyperlink to view the Web page with Microsoft Internet Explorer (included with Office) or another Web browser.
When you type one of the following Internet protocols in the text box of an email message or other item, Outlook creates a hyperlink from the text. If the Internet address includes spaces, you must enclose the entire address in angle brackets (< >). For example, type <file://c:\My Documents\MyFile.doc>
| Internet protocols recognized by Outlook | ||
| file | https | Outlook |
| ftp | mailto | prospero |
| gopher | news | telnet |
| http | nntp | wais |
Using Outlook as a Web Browser
Outlook provides a number of ways to organize and display Web pages. Users can use the Contacts list to keep track of contacts' Web sites, open the Web history folder from within Outlook, or create and share a catalog of Web sites in a public folder.
Keeping Track of Contacts' Web Sites
Outlook provides a way to keep an Internet address for each contact in the Contact list, so you can go directly to a contact's Web page from Outlook. While this feature is useful in individual contact lists, it can also be used by a workgroup. For example, a sales department can maintain a list of customers in a public folder of Outlook contacts. The public folder could include a custom view that shows each customer's name, business phone number, email address, and Web address.
Follow these general steps to create a list of contacts' Web addresses in a public folder.
For more information about how to set up public folders, see "Microsoft Exchange Public Folders" in Chapter 31, "Workgroup Features in Microsoft Outlook."
Using the Web History Folder in Outlook
The Windows\History folder contains a list of shortcuts to recently visited Web sites in Microsoft Internet Explorer 3.0. Unlike most folders, the History folder cannot be viewed or opened from within Outlook. (Microsoft Internet Explorer 3.0 uses shell extensions that are not compatible with Outlook.) To use the History folder from within Outlook, create a shortcut to the History folder and keep it in the Favorites folder.
![]() To
create a shortcut to the Web History folder
To
create a shortcut to the Web History folder
Tip To use a shortcut in the History folder from within Outlook, click Favorites in the Other group on the Outlook Bar, doubleclick the shortcut to the History folder, and then doubleclick the shortcut you want in Windows Explorer.
Creating a Catalog of Web Sites to Share
If your organization uses the Web as a source of information and also uses Exchange Server as a mail server, you can set up a public folder to organize Web site shortcuts for users. Keeping Web site shortcuts in a public folder gives users a way to collect, categorize, sort, and group the Web sites in different ways. When a user doubleclicks a shortcut, the Web browser starts up and displays the Web page.
Follow these general steps to create a catalog of Web sites in a public folder:
For more information about how to set up public folders, see "Microsoft Exchange Public Folders" in Chapter 31, "Workgroup Features in Microsoft Outlook."
In Microsoft Internet Explorer 3.0, you create a shortcut with the Create Shortcut command (File menu).
|
Customizing the View of a Web Page Catalog
You can create a custom view to organize a list of Web sites for
your organization. For example, you can create a table view that
includes custom text fields for owner, audience, address, and
page type (such as internal, customer, supplier, and so on). Users
can click the field headings to sort Web sites by any of these
fields.
|
|
In addition to the Officewide Web features such as hyperlinks and the Web toolbar, PowerPoint includes special features designed for publishing presentations on the Internet or an intranet. This section describes the Web authoring features of PowerPoint.
Performance improvements in PowerPoint have also made PowerPoint presentations more practical for use over a network. When you open a PowerPoint file, PowerPoint now loads only one slide at a time, so you do not wait for an entire presentation to load before you can view it. The text is retrieved first, followed by graphics and linked or embedded objects. These improvements mean that you have quicker access to the presentation online. For more information about ways to improve the performance of PowerPoint, see "Optimizing Microsoft PowerPoint" in Chapter 7, "Customizing and Optimizing Microsoft Office."
Using Action Settings as Hyperlinks
PowerPoint supports Office hyperlinks with the Hyperlink command (Insert menu) and the Hyperlink to option in the Action Settings dialog box (Slide Show menu). You can make any object on a slide into a hyperlink that goes to another slide in the active presentation, another presentation, another file, or a URL.
![]() To
add a hyperlink to a slide
To
add a hyperlink to a slide
– or –
On the Insert menu, click Hyperlink, and then enter a destination for the hyperlink in the Link to file or URL box; if you want to go to a particular location within the destination, enter it in the Named location in file (optional) box.
When a user clicks the object during a slide show, the hyperlink goes to the destination you specify.
Note When you set hyperlinks through the Action Settings dialog box, a hyperlink to another presentation opens a particular slide in the presentation, and a hyperlink to another file opens the file. If the other file is an Office Binder document, the hyperlink opens a particular section of the binder.
To standardize the look of interactive buttons, you can also add action buttons to a slide. Action buttons are graphic images designed to look like buttons. When you add one to a slide, the Action Settings dialog box (Slide Show menu) appears automatically so you can specify a destination for the action button.
You can create hyperlinks for objects, such as AutoShapes and text boxes, and you can create hyperlinks for text strings. Because text in PowerPoint exists within a text object, PowerPoint maintains distinct hyperlinks for a text string and for the text object that contains the string. For example, you can have a text box with action settings assigned to it, and you can create a hyperlink within the text box, as shown in the following illustration.
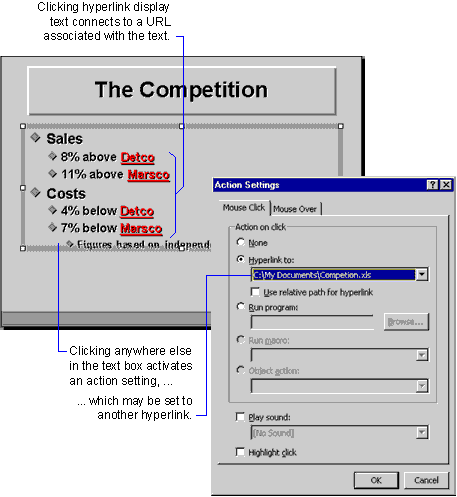
Note Although you cannot assign a hyperlink to grouped objects, you can group objects with hyperlinks attached to them.
PowerPoint uses two of the three accent colors in the current color scheme to format hyperlink display text. A hyperlink appears in the first color until you click it; then it appears in the second color. For more information about color schemes, see Chapter 38, "Microsoft PowerPoint Architecture." For more information about hyperlinks, see "Creating Hyperlinks in Office Documents" in Chapter 24, "Integrating Microsoft Office with Your Intranet."
PowerPoint includes new templates and an enhanced AutoContent Wizard to help you create Web documents easily. You can use the online templates to create a home page, an electronic information kiosk, an online personnel directory, and several other kinds of online documents.
To use a template for creating an online document, look for templates with (Online) in their names — for example, Business Plan (Online). The online templates contain graphic elements, such as buttons, bullets and backgrounds, and other objects tailored for using and viewing presentations online.
For information about customizing the templates used by the AutoContent Wizard, see "How You Can Customize PowerPoint" in Chapter 38, "Microsoft PowerPoint Architecture."
Saving Presentations as HTML Documents
By saving your presentation in HTML, you make it possible for anyone with a Web browser to view it. PowerPoint comes with many templates designed for creating Web documents, but you are not restricted to these. You can save any presentation in HTML.
![]() To save a presentation in HTML
To save a presentation in HTML
The Save as HTML Wizard prompts you to specify a folder in which to store the HTML files it creates. After the wizard stores the HTML files in this folder, you can move them to your Web site and connect them to existing Web pages.
The Save as HTML Wizard uses a set of templates to build HTML files from your presentation. If you are familiar with HTML tags, you can modify these templates (TPL files) by opening them in a text editor (such as Notepad) and modifying the HTML code created by the wizard.Before you modify the HTML templates, it is a good idea to make backup copies of the original TPL files.
| Note In Windows, the Save as HTML Wizard is not installed by default when you choose a Typical installation during Setup. To install the wizard, rerun Setup, click Add/Remove, and select the Web Page Authoring (HTML) option. |
| Note On the Macintosh, Save as HTML Wizard is not installed by default when you choose an Easy installation during Setup. To install the wizard, run Microsoft Office Installer and click Custom Install. Select the Web Page Authoring option, and then click Install. |
Using Microsoft PowerPoint Animation Player for ActiveX
The PowerPoint Animation Player is a PowerPoint addin that you use with your Web browser to play animated PowerPoint presentations. The Animation Player is similar to a PowerPoint viewer, which you can use to view a presentation; but unlike the viewer, the PowerPoint Animation Player integrates with your browser to play presentations over the Internet or an intranet in real time.
For users to play a PowerPoint animation over the Internet or an intranet, they must have Microsoft Internet Explorer version 2.0 or later or Netscape Navigator version 1.22 or later installed on their computers, and they must install the PowerPoint Animation Player.
| Tools and Utilities The Office Resource Kit Tools and Utilities include the PowerPoint Animation Player. For information about installing and using the Animation Player, see "PowerPoint Animation Player" in Appendix A, "Microsoft Office Resource Kit Tools and Utilities." |
If you want colleagues on the Internet to view your presentation online, you must first save the presentation as a PowerPoint animation.
![]() To
save a presentation as a PowerPoint animation
To
save a presentation as a PowerPoint animation
The Save as HTML Wizard prompts you to specify a folder in which to store the PowerPoint animation (PPZ) file and the HTML file it creates. You use the HTML file to gain access to the PowerPoint animation file from a Web browser. If you are familiar with HTML scripting, you can open this file and edit it to get the results you want. To see how your PowerPoint animation looks, open it in your Web browser.
![]() To view a PowerPoint animation
To view a PowerPoint animation
In Microsoft Internet Explorer 3.0 or Netscape Navigator version 2.0 or later, the PowerPoint animation plays directly in your Web browser.
In Microsoft Internet Explorer 2.0 or Netscape Navigator 1.22, a hyperlink to the PowerPoint animation is displayed; click the hyperlink to play the animation.
When you are ready to publish the presentation on the Web, copy both the PPZ file and the HTML file to a folder on the server. You must also set up the Web server so that it supports PowerPoint animations.
![]() To
add a PowerPoint animation to your Web site
To
add a PowerPoint animation to your Web site
Tip You can also use FrontPage to add a PowerPoint animation to your Web site. For information about FrontPage, see "Tools for Intranet Creation and Administration" in Chapter 24, "Integrating Microsoft Office with Your Intranet."
The procedure for setting up the Web server depends on the browser you want to support and the software on the server. If users are viewing Web documents with Netscape Navigator 2.0 or later, configure the Web server to send the PowerPoint animation files as a special type of file to avoid having users receive the message "Netscape was unable to find a plugin for application/octetstream." Add the following Multipurpose Internet Mail Extensions (MIME) mapping to the server.
| For this PowerPoint file type | Add this MIME mapping |
| PPT | application/mspowerpoint |
| PPZ | application/mspowerpoint |
| PPS | application/mspowerpoint |
| POT | application/mspowerpoint |
| If you are using the Microsoft Internet Information Server (IIS), set up the Web server to support PowerPoint animations by modifying the Windows registry. In the registry key HKEY_LOCAL_MACHINE\System\CurrentControlSet\Services\InetInfo\Parameters\MimeMap, add the following value entries: |
For more information about MIME mapping, consult the documentation for the server you are using. For more information about the PowerPoint Animation Player, point to Microsoft on the Web on the PowerPoint Help menu, and click Product News (requires Internet access).
| In Windows, you can click PowerPoint Central (Tools menu) to open a special presentation that contains hyperlinks to Internet sites and the Office Value Pack. PowerPoint Central is included when you choose a Typical installation during Setup. |
Note The CDROM version of Office includes the Office Value Pack, a collection of application extras such as clip art, maps, sounds, presentation enhancements, and utilities. For more information about the Office Value Pack and how to use its contents, see the Help file Valupack.hlp in the ValuPack folder on the Office CD. If you have Web access, you can also point to Microsoft on the Web (Help menu) in any Office application and then click Free Stuff.
The initial slide in the PowerPoint Central presentation provides a main menu from which you can go to the Internet or the Value Pack for clip art, videos, sound clips, graphic effects, templates, tips and hints, howto information, and an updated version of the PowerPoint Central presentation itself.
If the PowerPoint Central presentation works well for your organization, you can create your own similar presentation. For example, you could create a PowerPoint presentation that links users to corporate information, files, and other resources on the Internet or an intranet. You could then create a macro or addin that adds a command to PowerPoint for running the presentation. For information about customizing PowerPoint with macros and addins, see "How You Can Customize PowerPoint" in Chapter 38, "Microsoft PowerPoint Architecture."
|
Word supports the Officewide Web features, such as hyperlinks and the Web toolbar. In addition, Word includes HTML authoring tools for creating Web pages.
The main benefit of using Word as an HTML authoring tool is that you can use your existing knowledge of Word and most of the features in Word immediately, without ever viewing HTML code directly. Detailed information about using the HTML authoring features in Word is included in Microsoft Word Help (Help menu).
There are several ways to use Word to create Web pages in HTML.
| If you want to | Use this method |
| Create one of several predefined HTML documents such as a form or personal home page | Use the Web Page Wizard |
| Create an HTML document other than those supported by the Web Page Wizard | Use the Blank Web Page template |
| Convert one or more existing Word documents to HTML | Save in HTML |
Each of these methods is described in the following sections.
Use the Web Page Wizard to create predefined Web pages, such as multicolumn pages, forms, or personal home pages. The Web Page Wizard offers a variety of text formats and graphic images for each type of Web page it supports. After you have created the Web page, use the Word HTML authoring tools to modify it.
Tip In addition to using the Web Page Wizard to create a predefined Web page, you can also use the wizard as a starting point for other Web pages. For example, you can create a multicolumn Web page, and then paste the table portion of the HTML code into another Web page.
![]() To
start the Web Page Wizard
To
start the Web Page Wizard
| Note In Windows, the Web Page Wizard is not installed when you choose the Typical installation during Setup. To install the wizard, rerun Setup, click Add/Remove, and select the Web Page Authoring (HTML) option. |
| Note On the Macintosh, the Internet Assistant Wizard is installed by default when you choose an Easy installation during Setup. To install the addin, run Microsoft Office Installer and click Custom Install. Select the Web Page Authoring option, and then click Install. |
Using the Blank Web Page Template
When you create a blank Web page, Word attaches the HTML template to a blank document.
![]() To
create a blank Web page
To
create a blank Web page
Saving Existing Documents in HTML
If you want to convert an existing Word document to HTML, use the Save as HTML command (File menu).
![]() To
convert a Word document to HTML
To
convert a Word document to HTML
Note Not all Word document elements and formatting are supported in HTML. Some elements and formatting are lost when you save a Word document in HTML. For example, comments inserted with the Comments command (Insert menu) are lost when you save in HTML. For the complete list of lost or changed elements, see Word online Help.
| After you save a Word document in HTML, you can preview it in your Web browser by clicking the Web Page Preview button (Standard toolbar). |
Tip After you convert Office documents to HTML, you can use the Web Publishing Wizard to help you post your content to the Web or to an intranet. For more information about posting to the Web, see "Publishing to the Web or an Intranet" in Chapter 24, "Integrating Microsoft Office with Your Intranet."
Using the Look Up Command to Search the Internet
| Word 97 for Windows allows you to search the Internet or your intranet from within a Word document using the Word Internet Lookup template, named Ilookup.dot. |
The Internet Lookup template for Word allows you to:
Internet searching is enabled just by installing the Lookup template on a client computer (assuming the client has a properly registered browser and Internet access).
Web Find Fast index searches require that you use the System Policy Editor to change Windows registry settings, as described in "Enabling Searches of Web Find Fast Indexes" later in this section.
| Note Although Web Find Fast searching is not supported directly in Word 98, you can search Web Find Fast indexes through a Web browser such as Microsoft Internet Explorer. For more information, see "Supporting Web Find Fast" in Chapter 26, "Finding Microsoft Office Documents on the Network." |
| Tools and Utilities The Office Resource Kit Tools and Utilities include the Word Internet Lookup template. For information about installing the template, see "Word Internet Lookup Template" in Appendix A, "Microsoft Office Resource Kit Tools and Utilities." |
The Look Up command appears on the shortcut menu in Word. The buttons On the Internet and In Web FindFast Index also appear on the Look Up toolbar (View menu, Toolbars submenu).
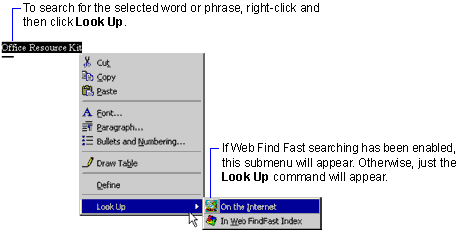
Enabling Searches of Web Find Fast Indexes
The Look Up command can search indexes created by Web Find Fast on Web servers running under Windows NT Server or Windows NT Workstation. For more information about administering Web Find Fast, see "Supporting Web Find Fast" in Chapter 26, "Finding Microsoft Office Documents on the Network."
Note If you do not enable Web Find Fast Index searches, the Look Up command can still search the Internet through Microsoft Internet Explorer AutoSearch from any client computer. The client computer must have a properly registered browser and access to the Internet.
To enable Web Find Fast index searches, you must enter information about your intranet's indexes in the Windows registries of all the users in your workgroup. Use the System Policy Editor and Office policy templates from the Office Resource Kit Tools and Utilities to edit the registries of all users in your workgroup. For more information about the System Policy Editor, see "Using Windows System Policies to Customize Office" in Chapter 7, "Customizing and Optimizing Office."
![]() To enable searches of Web Find Fast indexes for your workgroup
To enable searches of Web Find Fast indexes for your workgroup
– or –
If you have previously created a system policy file, click Open on the File menu, and then select your Config.pol file (for Windows 95 clients) or Ntconfig.pol (for Windows NT Workstation clients).
User\Office 97\Internet\Web Search
For more information about the value entries in the Internet Lookup Options subkeys, see "Web Search Policies" in Appendix C, "Registry Keys and Values."
To distribute the new policy file, store it on a network server. For more information about using the System Policy Editor, see "The System Policy Editor" in Chapter 7, "Customizing and Optimizing Office."
Tip The Look Up command can search Web Find Fast indexes on Web servers, but not Find Fast indexes on local or network drives. For information about the differences between the two, see "Differences between Find Fast and Web Find Fast" in Chapter 26, "Finding Microsoft Office Documents on the Network." To search Find Fast indexes on local or network drives, use the Text or property box in the Open dialog box (File menu) of Access, Excel, PowerPoint, Word, Office Binder, and Microsoft Project; in Outlook, use the Find Items command (Tools menu).
Using the Look Up Command in Word
The Look Up command can search for a single word or a short phrase from within a Word document.
![]() To search for a single word
To search for a single word
If you have enabled searches of multiple Web Find Fast indexes, you are also prompted to select the friendly name of the index you want to search.
Word submits your query to Microsoft Internet Explorer AutoSearch (for Internet searches) or to the Web Find Fast index (for Web Find Fast searches), and the results appear in your Web browser.
![]() To search for a short phrase
To search for a short phrase
If you select more than three words, Word uses only the first three words of the selected text.
If you have enabled searches of multiple Web Find Fast indexes, you are also prompted to select the friendly name of the index you want to search.
Word submits your query to Microsoft Internet Explorer AutoSearch (for Internet searches) or to the Web Find Fast index (for Web Find Fast searches), and the results appear in your Web browser.
|