C H A P T E R 14 | Microsoft Office 97/Visual Basic Programmer's Guide |
Debugging and Error Handling |
Ideally, Visual Basic procedures wouldn't need errorhandling code at all. Reality dictates that hardware problems or unanticipated actions by the user can cause runtime errors that halt your code, and there's usually nothing the user can do to resume running the application. Other errors might not interrupt code, but they can cause it to act unpredictably.
For example, the following procedure returns True if the specified file exists and False if it does not, but doesn't contain errorhandling code.
Function FileExists (filename) As Boolean
FileExists = (Dir(filename) <> "")
End Function
The Dir function returns the first file matching the specified file name (given with or without wildcard characters, drive name, or path); it returns a zerolength string if no matching file is found.
The code appears to cover either of the possible outcomes of the Dir call. However, if the drive letter specified in the argument is not a valid drive, the error "Device unavailable" occurs. If the specified drive is a floppy disk drive, this function will work correctly only if a disk is in the drive and the drive door is closed. If not, Visual Basic presents the error "Disk not ready" and halts execution of your code.
To avoid this situation, you can use the errorhandling features in Visual Basic to intercept errors and take corrective action. (Intercepting an error is also known as trapping an error.) When an error occurs, Visual Basic sets the various properties of the error object, Err, such as an error number, a description, and so on. You can use the Err object and its properties in an errorhandling routine so that your application can respond intelligently to an error situation.
For example, device problems, such as an invalid drive or an empty floppy disk drive, could be handled by the following example.
Function FileExists (filename) As Boolean
Dim Msg As String
' Turn on error trapping so error handler responds
' if any error is detected.
On Error GoTo CheckError
FileExists = (Dir(filename) <> "")
' Avoid executing error handler if no error occurs.
Exit Function
CheckError: ' Branch here if error occurs.
' Define constants to represent intrinsic Visual Basic error
' codes.
Const mnErrDiskNotReady = 71, mnErrDeviceUnavailable = 68
' vbExclamation, vbOK, vbCancel, vbCritical, and vbOKCancel are
'constants defined in the VBA type library.
If (Err.Number = MnErrDiskNotReady) Then
Msg = "Put a floppy disk in the drive and close the door."
' Display message box with an exclamation mark icon and with
' OK and Cancel buttons.
If MsgBox(Msg, vbExclamation & vbOKCancel) = vbOK Then
Resume
Else
Resume Next
End If
ElseIf Err.Number = MnErrDeviceUnavailable Then
Msg = "This drive or path does not exist: " & filename
MsgBox Msg, vbExclamation
Resume Next
Else
Msg = "Unexpected error #" & Str(Err.Number) & " occurred: " _
& Err.Description
' Display message box with Stop sign icon and OK button.
MsgBox Msg, vbCritical
Stop
End If
Resume
End Function
When Visual Basic generates the error "Disk not ready," this code presents a message telling the user to choose one of two buttons OK or Cancel. If the user chooses OK, the Resume statement returns control to the statement at which the error occurred and attempts to rerun that statement. This succeeds if the user has corrected the problem; otherwise, the program returns to the error handler.
If the user chooses Cancel, the Resume Next statement returns control to the statement following the one at which the error occurred (in this case, the Exit Function statement).
Should the error "Device unavailable" occur, this code presents a message describing the problem. The Resume Next statement then causes the function to continue execution at the statement following the one at which the error occurred.
If an unanticipated error occurs, a short description of the error is displayed and the code halts at the Stop statement.
The application you create can correct an error or prompt the user to change the conditions that caused the error. To do this, use techniques such as those shown in the preceding example. The next section discusses these techniques in detail.
An error handler is a routine for trapping and responding to errors in your application. You'll want to add error handlers to any procedure where you anticipate the possibility of an error (you should assume that any Visual Basic statement can produce an error unless you explicitly know otherwise). The process of designing an error handler involves three steps:
The On Error statement enables the trap and directs the application to the label marking the beginning of the errorhandling routine.
In the preceding example, the FileExists function contains an errorhandling routine named CheckError.
The CheckError routine handles the error using an If...Then...Else statement that responds to the value in the Err object's Number property, which is a numeric code corresponding to a Visual Basic error. In the example, if "Disk not ready" is generated, a message prompts the user to close the drive door. A different message is displayed if the "Device unavailable" error occurs. If any other error is generated, the appropriate description is displayed and the program stops.
In the case of the "Device unavailable" error, the Resume Next statement makes the code branch to the statement following the one at which the error occurred.
Details on how to perform these steps are provided in the remainder of this topic. Refer to the FileExists function in the preceding example as you read through these steps.
Setting the Error Trap
An error trap is enabled when Visual Basic runs the On Error
statement, which specifies an error handler. The error trap remains
enabled while the procedure containing it is active
that is, until an Exit Sub, Exit Function, Exit
Property, End Sub, End Function, or End Property
statement is run for that procedure. While only one error trap
can be enabled at any one time in any given procedure, you can
create several alternative error traps and enable different ones
at different times. You can also disable an error trap by using
a special case of the On Error statement
On Error GoTo 0.
To set an error trap that jumps to an errorhandling routine,
use a On Error GoTo line statement,
where line indicates the label identifying
the errorhandling code. In the FileExists function example,
the label is CheckError.
(Although the colon is part of the label, it isn't used in the
On Error GoTo line statement.)
Writing an ErrorHandling Routine
The first step in writing an errorhandling routine is adding
a line label to mark the beginning of the errorhandling
routine. The line label should have a descriptive name and must
be followed by a colon. A common convention is to place the errorhandling
code at the end of the procedure with an Exit Sub, Exit
Function, or Exit Property statement immediately before
the line label. This allows the procedure to avoid executing the
errorhandling code if no error occurs.
The body of the errorhandling routine contains the code
that actually handles the error, usually in the form of a Select
Case or If
Then
Else statement. You need
to determine which errors are likely to occur and provide a course
of action for each, for example, prompting the user to insert
a disk in the case of a "Disk not ready" error. An option
should always be provided to handle any unanticipated errors by
using the Else or Case Else clause
in the case of the FileExists function example, this option warns
the user then ends the application.
The Number property of the Err object contains a
numeric code representing the most recent runtime error.
By using the Err object in combination with the Select
Case or If...Then...Else statement, you can take specific
action for any error that occurs.
Exiting an ErrorHandling Routine
The Difference Between Resume and Resume Next
The difference between Resume and Resume Next is
that Resume continues running the application from the
statement that generated the error (the statement is rerun),
while Resume Next continues running the application from
the statement that follows the one that generated the error. Generally,
you would use Resume whenever the error handler can correct
the error, and Resume Next when the error handler cannot.
You can write an error handler so that the existence of a runtime
error is never revealed to the user or to display error messages
and allow the user to enter corrections.
The following example uses error handling to perform "safe"
division on its arguments without revealing errors that might
occur. The errors that can occur when performing division are
described in the following table.
In all three cases, the following example traps these errors and
returns Null.
Resuming Execution at a Specified Line
Resume Next can also be used where an error occurs within
a loop, and you need to restart the operation. Or, you can use
Resume line, which returns control to
a specified line label.
The following example illustrates the use of the Resume
line statement. A variation on the FileExists
example shown earlier, this function allows the user to enter
a file specification that the function returns if the file exists.
If a file matching the specification is found, the function returns
the file name. If no matching file is found, the function returns
a zerolength string. If one of the anticipated errors occurs,
a message is assigned to the strMsg
variable and execution jumps back to the label StartHere.
This gives the user another chance to enter a valid path and file
specification.
If the error is unanticipated, the Case Else segment regenerates
the error so that the next error handler in the calls list can
trap the error. This is necessary because if the error wasn't
regenerated, the code would continue to run at the Resume
StartHere line. By regenerating the error you are
in effect causing the error to occur again; the new error will
be trapped at the next level in the call stack.
Statement Description
Resume [0]
Program execution resumes with the statement that caused the error or the most recently run call out of the procedure containing the error-handling routine. Use it to repeat an operation after correcting the condition that caused the error.
Resume Next
Resumes program execution at the statement immediately following the one that caused the error. If the error occurred outside the procedure that contains the error handler, execution resumes at the statement immediately following the call to the procedure wherein the error occurred, if the called procedure does not have an enabled error handler.
Resume line
Resumes program execution at the label specified by line, where line is a line label (or nonzero line number) that must be in the same procedure as the error handler.
Err.Raise Number:= number
Triggers a run-time error. When this statement is run within the error-handling routine, Visual Basic searches the calls list for another error-handling routine. (The calls list is the chain of procedures invoked to arrive at the current point of execution. For more information, see "The Error-Handling Hierarchy" later in this chapter.)
Error Cause
"Division by zero"
Numerator is nonzero, but the denominator is zero.
"Overflow"
Both numerator and denominator are zero (during floating-point division).
"Illegal procedure call"
Either the numerator or the denominator is a nonnumeric value (or can't be considered a numeric value).
Function Divide (numer, denom) as Variant
Const mnErrDivByZero = 11, mnErrOverFlow = 6, mnErrBadCall = 5
On Error GoTo MathHandler
Divide = numer / denom
Exit Function
MathHandler:
If Err.Number = MnErrDivByZero Or Err.Number = ErrOverFlow _
Or Err = ErrBadCall Then
Divide = Null ' If error was Division by zero, Overflow,
' or Illegal procedure call, return Null.
Else
' Display unanticipated error message.
MsgBox "Unanticipated error " & Err.Number & ": " & _
Err.Description, vbExclamation
End If ' In all cases, Resume Next continues
Resume Next ' execution at the Exit Function statement.
End Function
Function VerifyFile As String
Const mnErrBadFileName = 52, mnErrDriveDoorOpen = 71
Const mnErrDeviceUnavailable = 68, mnErrInvalidFileName = 64
Dim strPrompt As String, strMsg As String, strFileSpec As String
strPrompt = "Enter file specification to check:"
StartHere:
strFileSpec = "*.*" ' Start with a default specification.
strMsg = strMsg & vbCRLF & strPrompt
' Let the user modify the default.
strFileSpec = InputBox(strMsg, "File Search", strFileSpec, 100, _
100)
' Exit if user deletes default.
If strFileSpec = "" Then Exit Function
On Error GoTo Handler
VerifyFile = Dir(FileSpec)
Exit Function
Handler:
Select Case Err.Number ' Analyze error code and load message.
Case ErrInvalidFileName, ErrBadFileName
strMsg = "Your file specification was invalid; try _
another."
Case MnErrDriveDoorOpen
strMsg = "Close the disk drive door and try again."
Case MnErrDeviceUnavailable
strMsg = "The drive you specified was not found. Try _
again."
Case Else
Dim intErrNum As Integer
intErrNum = Err.Number
Err.Clear ' Clear the Err object.
Err.Raise Number:= intErrNum ' Regenerate the error.
End Select
Resume StartHere ' This jumps back to StartHere label so
' the user can try another file name.
End Function
An enabled error handler is one that was activated by executing an On Error statement and hasn't yet been turned off either by an On Error GoTo 0 statement or by exiting the procedure where it was enabled. An active error handler is one in which execution is currently taking place. To be active, an error handler must first be enabled, but not all enabled error handlers are active. For example, after a Resume statement, a handler is deactivated but still enabled.
When an error occurs within a procedure lacking an enabled errorhandling routine, or within an active errorhandling routine, Visual Basic searches the calls list for another enabled errorhandling routine. The calls list is the sequence of calls that leads to the currently executing procedure; it is displayed in the Call Stack dialog box. You can display the Call Stack dialog box only when in break mode (when you pause the execution of your application), by clicking Call Stack on the View menu.
Searching the Calls List
Suppose that the following sequence of calls occurs:
While Procedure C is executing, the other procedures are pending.
If an error occurs in Procedure C and this procedure doesn't have
an enabled error handler, Visual Basic searches backward through
the pending procedures in the calls list first
Procedure B, then Procedure A, then the initial event procedure
(but no farther) and runs the first enabled error
handler it finds. If it doesn't encounter an enabled error handler
anywhere in the calls list, it presents a default unexpected error
message and halts execution.
If Visual Basic finds an enabled errorhandling routine,
execution continues in that routine as if the error had occurred
in the same procedure that contains the error handler. If a Resume
or a Resume Next statement is run in the errorhandling
routine, execution continues as shown in the following table.
Notice that the statement run is in the procedure where the errorhandling
procedure is found, not necessarily in the procedure where the
error occurred. If you don't take this into account, your code
may perform in ways you don't intend. To make the code easier
to debug, you can simply go into break mode whenever an error
occurs, as explained in the section "Turning Off Error Handling"
later in this chapter.
If the error handler's range of errors doesn't include the error
that actually occurred, an unanticipated error can occur within
the procedure with the enabled error handler. In such a case,
the procedure could run endlessly, especially if the error handler
runs a Resume statement. To prevent such situations, use
the Err object's Raise method in a Case Else
statement in the handler. This actually generates an error within
the error handler, forcing Visual Basic to search through the
calls list for a handler that can deal with the error.
Guidelines for Complex Error Handling
When you write large Visual Basic applications that use multiple
modules, the errorhandling code can get quite complex. Keep
these guidelines in mind:
Statement
Result Resume
The call to the procedure that Visual Basic just searched is re-run. In the calls list given earlier, if Procedure A has an enabled error handler that includes a Resume statement, Visual Basic re-runs the call to Procedure B.
Resume Next
Execution returns to the statement following the last statement run in that procedure. This is the statement following the call to the procedure that Visual Basic just searched back through. In the calls list given earlier, if Procedure A has an enabled error handler that includes a Resume Next statement, execution returns to the statement after the call to Procedure B.
Simulating errors is useful when you are testing your applications, or when you want to treat a particular condition as being equivalent to a Visual Basic runtime error. For example, you might be writing a module that uses an object defined in an external application, and want errors returned from the object to be handled as actual Visual Basic errors by the rest of your application.
In order to test for all possible errors, you may need to generate some of the errors in your code. You can generate an error in your code with the Raise method of the Err object. The Raise method takes a list of named arguments that can be passed with the method. When the code reaches a Resume statement, the Clear method of the Err object is invoked. It is necessary to regenerate the error in order to pass it back to the previous procedure on the call stack.
You can also simulate any Visual Basic runtime error by supplying the error code for that error.
Defining Your Own Errors
Sometimes you may want to define errors in addition to those defined
by Visual Basic. For example, an application that relies on a
modem connection might generate an error when the carrier signal
is dropped. If you want to generate and trap your own errors,
you can add your error numbers to the vbObjectError constant.
The vbObjectError constant reserves the numbers ranging
from its own offset to the sum of its offset and 512. Using a
number higher than this will ensure that your error numbers will
not conflict with future versions of Visual Basic.
To define your own error numbers, you add constants to the declarations
section of your module.
' Error constants
Const gLostCarrier = 1 + vbObjectError + 512
Const gNoDialTone = 2 + vbObjectError + 512
You can then use the Raise method as you would with any of the intrinsic errors. In this case, the description property of the Err object will return a standard description "Applicationdefined or object defined error." To provide your own error description, you will need to add it as a parameter to the Raise method.
When you check for errors immediately after each line that may cause an error, you are performing inline error handling. Using inline error handling, you can write functions and statements that return error numbers when an error occurs; raise a Visual Basic error in a procedure and handle the error in the calling procedure; or write a function to return a Variant data type, and use the Variant to indicate to the calling procedure that an error occurred.
Returning Error Numbers
There are a number of ways to return error numbers. The simplest
way is to create functions and statements that return an error
number, instead of a value, if an error occurs. The following
example shows how you can use this approach in the FileExists
function example, which indicates whether or not a particular
file exists.
Function FileExists (p As String) As Long
If Dir (p) <> " " Then
FileExists = conSuccess ' Return a constant indicating
Else ' the file exists.
FileExists = conFailure ' Return failure constant.
End If
End Function
Dim ResultValue As Long
ResultValue = FileExists ("C:\Testfile.txt")
If ResultValue = conFailure Then
.
. ' Handle the error.
.
Else
.
. ' Proceed with the program.
.
End If
The key to inline error handling is to test for an error immediately after each statement or function call. In this manner, you can design a handler that anticipates exactly the sort of error that might arise and resolve it accordingly. This approach does not require that an actual runtime error arise.
Handling Errors in the Calling Procedure
Another way to indicate an error condition is to raise a Visual
Basic error in the procedure itself, and handle the error in an
inline error handler in the calling procedure. The next example
shows the same FileExists procedure, raising an error number if
it is not successful. Before calling this function, the On
Error Resume Next statement sets the values of the Err
object properties when an error occurs, but without trying to
run an errorhandling routine.
The On Error Resume Next statement is followed by errorhandling
code. This code can check the properties of the Err object
to see if an error occurred. If Err.Number
doesn't contain zero, an error has occurred, and the errorhandling
code can take the appropriate action based on the values of the
Err object's properties.
Function FileExists (p As String)
If Dir (p) <> " " Then
Err.Raise conSuccess ' Return a constant indicating
Else ' the file exists.
Err.Raise conFailure ' Raise error number conFailure.
End If
End Function
Dim ResultValue As Long
On Error Resume Next
ResultValue = FileExists ("C:\Testfile.txt")
If Err.Number = conFailure Then
.
. ' Handle the error.
.
Else
.
. ' Continue program.
.
End If
The next example uses both the return value and one of the passed arguments to indicate whether or not an error condition resulted from the function call.
Function Power (X As Long, P As Integer, ByRef Result As Integer) _
As Long
On Error GoTo ErrorHandler
Result = x^P
Exit Function
ErrorHandler:
Power = conFailure
End Function
' Calls the Power function.
Dim lngReturnValue As Long, lngErrorMaybe As Long
lngErrorMaybe = Power (10, 2, lngReturnValue)
If lngErrorMaybe Then
.
. ' Handle the error.
.
Else
.
. ' Continue program.
.
End If
If the function was written simply to return either the result value or an error code, the resulting value might be in the range of error codes, and your calling procedure would not be able to distinguish them. By using both the return value and one of the passed arguments, your program can determine that the function call failed, and take appropriate action.
Using Variant Data Types
Another way to return inline error information is to take advantage
of the Visual Basic Variant data type and some related
functions. A Variant has a tag that indicates what type
of data is contained in the variable, and it can be tagged as
a Visual Basic error code. You can write a function to return
a Variant, and use this tag to indicate to the calling
procedure that an error has occurred.
The following example shows how the Power function can be written
to return a Variant.
Function Power (X As Long, P As Integer) As Variant
On Error GoTo ErrorHandler
Power = x^P
Exit Function
ErrorHandler:
Power = CVErr(Err.Number) ' Convert error code to tagged Variant.
End Function
' Calls the Power function.
Dim varReturnValue As Variant
varReturnValue = Power (10, 2)
If IsError (varReturnValue) Then
.
. ' Handle the error.
.
Else
.
. ' Continue program.
.
End If
When you add errorhandling code to your applications, you'll quickly discover that you're handling the same errors over and over. With careful planning, you can reduce code size by writing a few procedures that your errorhandling code can call to handle common error situations.
The following FileErrors function shows a message appropriate to the error that occurred and, where possible, allows the user to choose a button to specify what action the program should take next. It then returns code to the procedure that called it. The value of the code indicates which action the program should take. Note that userdefined constants such as MnErrDeviceUnavailable must be defined somewhere (either globally, or at the module level of the module containing the procedure, or within the procedure itself).
Function FileErrors As Integer
Dim intMsgType As Integer, strMsg As String
Dim intResponse As Integer
' Return Value Meaning
' 0 Resume
' 1 Resume Next
' 2 Unrecoverable error
' 3 Unrecognized error
intMsgType = vbExclamation
Select Case Err.Number
Case MnErrDeviceUnavailable ' Error 68
strMsg = "That device appears unavailable."
intMsgType = vbExclamation + 4
Case MnErrDiskNotReady ' Error 71
strMsg = "Insert a disk in the drive and close the door."
Case MnErrDeviceIO ' Error 57
strMsg = "Internal disk error."
intMsgType = vbExclamation + 4
Case MnErrDiskFull ' Error 61
strMsg = "Disk is full. Continue?"
intMsgType = vbExclamation + 3
Case ErrBadFileName, ErrBadFileNameOrNumber ' Error 64 & 52
strMsg = "That filename is illegal."
Case ErrPathDoesNotExist ' Error 76
strMsg = "That path doesn't exist."
Case ErrBadFileMode ' Error 54
strMsg = "Can't open your file for that type of access."
Case ErrFileAlreadyOpen ' Error 55
strMsg = "This file is already open."
Case ErrInputPastEndOfFile ' Error 62
strMsg = "This file has a nonstandard end-of-file marker, "
strMsg = strMsg & "or an attempt was made to read beyond "
strMsg = strMsg & "the end-of-file marker."
Case Else
FileErrors = 3
Exit Function
End Select
intResponse = MsgBox (strMsg, strMmsgType, "Disk Error")
Select Case intRresponse
Case 1, 4 ' OK, Retry buttons.
FileErrors = 0
Case 5 ' Ignore button.
FileErrors = 1
Case 2, 3 ' Cancel, End buttons.
FileErrors = 2
Case Else
FileErrors = 3
End Select
End Function
This procedure handles common file and diskrelated errors. If the error is not related to disk Input/Output, it returns the value 3. The procedure that calls this procedure should then either handle the error itself, regenerate the error with the Raise method, or call another procedure to handle it.
Note As
you write larger applications, you'll find that you are using
the same constants in several procedures in various forms and
modules. Making those constants public and declaring them in a
single standard module may better organize your code and save
you from typing the same declarations repeatedly.
You can simplify error handling by calling the FileErrors procedure
wherever you have a procedure that reads or writes to disk. For
example, you've probably used applications that warn you if you
attempt to replace an existing disk file. Conversely, when you
try to open a file that doesn't exist, many applications warn
you that the file does not exist and ask if you want to create
it. In both instances, errors can occur when the application passes
the file name to the operating system.
If an error trap has been enabled in a procedure, it is automatically disabled when the procedure finishes running. However, you may want to turn off an error trap in a procedure while the code in that procedure is still running. To turn off an enabled error trap, use the On Error GoTo 0 statement. After Visual Basic runs this statement, errors are detected but not trapped within the procedure. You can use On Error GoTo 0 to turn off error handling anywhere in a procedure even within an errorhandling routine itself.
Debugging Code with Error Handlers
When you are debugging code, you may find it confusing to analyze
its behavior when it generates errors that are trapped by an error
handler. You could comment out the On Error line in each
module in the project, but this is also cumbersome.
Instead, while debugging, you could turn off error handlers so
that every time there's an error, you enter break mode. To do
this, select the Break on All Errors option on the General
tab in the Options dialog box (Tools menu). With
this option selected, when an error occurs anywhere in the project,
you will enter break mode and the Watch window will display
the code where the error occurred. If this option is not selected,
an error may or may not cause an error message to be displayed,
depending on where the error occurred. For example, it may have
been raised by an external object referenced by your application.
If it does display a message, it may be meaningless, depending
on where the error originated.
In procedures that reference one or more objects, it becomes more difficult to determine where an error occurs, particularly if it occurs in another application's object. For example, consider an application that consists of a form module (MyForm), that references a class module (MyClassA), that in turn references a Microsoft Excel Worksheet object.
If the Worksheet object does not handle a particular error arising in the worksheet, but regenerates it instead, Visual Basic will pass the error to the referencing object, MyClassA. Visual Basic automatically remaps untrapped errors arising in objects outside of Visual Basic as error code 440.
The MyClassA object can either handle the error (which is preferable), or regenerate it. The interface specifies that any object regenerating an error that arises in a referenced object should not simply propagate the error (pass as error code 440), but should instead remap the error number to something meaningful. When you remap the error, the number can either be a number defined by Visual Basic that indicates the error condition, if your handler can determine that the error is similar to a defined Visual Basic error (for instance, overflow or division by zero), or an undefined error number. Add the new number to the Visual Basic constant vbObjectError to notify other handlers that this error was raised by your object.
Whenever possible, a class module should try to handle every error that arises within the module itself, and should also try to handle errors that arise in an object it references that are not handled by that object. However, there are some errors that it cannot handle because it cannot anticipate them. There are also cases where it is more appropriate for the referencing object to handle the error, rather than the referenced object.
When an error occurs in the form module, Visual Basic raises one of the predefined Visual Basic error numbers.
Note If you are creating a public class, be sure to clearly document the meaning of each nonVisual Basic errorhandler you define. Other programmers who reference your public classes will need to know how to handle errors raised by your objects.
When you regenerate an error, leave the Err object's other properties unchanged. If the raised error is not trapped, the Source and Description properties can be displayed to help the user take corrective action.
Handling Errors Passed from Reference
Objects
A class module could include the following error handler to accommodate
any error it might trap, regenerating those it is unable to resolve.
MyServerHandler:
Select Case ErrNum
Case 7 ' Handle out-of-memory error.
.
.
.
Case 440 ' Handle external object error.
Err.Raise Number:=vbObjectError + 9999
' Error from another Visual Basic object.
Case Is > vbObjectError and Is < vbObjectError + 65536
ObjectError = ErrNum
Select Case ObjectError
' This object handles the error, based on error code
' documentation for the object.
Case vbObjectError + 10
.
.
.
Case Else
' Remap error as generic object error and regenerate.
Err.Raise Number:=vbObjectError + 9999
End Select
Case Else
' Remap error as generic object error and regenerate.
Err.Raise Number:=vbObjectError + 9999
End Select
Err.Clear
Resume Next
The Case 440 statement traps errors that arise in a referenced object outside the Visual Basic application. In this example, the error is simply propagated using the value 9999, because it is difficult for this type of centralized handler to determine the cause of the error. When this error is raised, it is generally the result of a fatal automation error (one that would cause the component to end execution), or because an object didn't correctly handle a trapped error. Error 440 shouldn't be propagated unless it is a fatal error. If this trap were written for an inline handler as discussed previously in "Inline Error Handling," it might be possible to determine the cause of the error and correct it.
The statement Case Is > vbObjectError and Is < vbObjectError + 65536 traps errors that originate in an object within the Visual Basic application, or within the same object that contains this handler. Only errors defined by objects will be in the range of the vbObjectError offset.
The error code documentation provided for the object should define the possible error codes and their meaning, so that this portion of the handler can be written to intelligently resolve anticipated errors. The actual error codes may be documented without the vbObjectError offset, or they may be documented after being added to the offset, in which case the Case Else statement should subtract vbObjectError, rather than add it. On the other hand, object errors may be constants, shown in the type library for the object, as shown in the Object Browser. In that case, use the error constant in the Case Else statement, instead of the error code.
Any error not handled should be regenerated with a new number, as shown in the Case Else statement. Within your application, you can design a handler to anticipate this new number you've defined. If this were a public class, you would also want to include an explanation of the new errorhandling code in your application's documentation.
Debugging Error Handlers in Referenced
Objects
When you are debugging an application that has a reference to
an object created in Visual Basic or a class defined in a class
module, you may find it confusing to determine which object generates
an error. To make this easier, you can select the Break in
Class Module option on the General tab in the Options
dialog box (Tools menu). With this option selected, an
error in a class module will cause that class to enter the debugger's
break mode, allowing you to analyze the error.
The debugging techniques presented in this chapter use the analysis tools provided by Visual Basic. Visual Basic cannot diagnose or fix errors for you, but it does provide tools to help you analyze how execution flows from one part of the procedure to another, and how variables and property settings change as statements are run. Debugging tools let you look inside your application to help you determine what happens and why.
Visual Basic debugging support includes breakpoints, break expressions, watch expressions, stepping through code one statement or one procedure at a time, and displaying the values of variables and properties. Visual Basic also includes special debugging features, such as editandcontinue capability, setting the next statement to run, and procedure testing while the application is in break mode.
Kinds of Errors
To understand how debugging is useful, consider the three kinds
of errors you can encounter, described in the following paragraphs.
Compile errors These result
from incorrectly constructed code. If you incorrectly type a keyword,
omit some necessary punctuation, or use a Next statement
without a corresponding For statement at design time, Visual
Basic detects these errors when your code compiles.
Runtime errors These
occur while the application is running (and are detected by Visual
Basic) when a statement attempts an operation that is impossible
to carry out. An example of this is division by zero.
Logic errors These occur when
an application doesn't perform the way it was intended. An application
can have syntactically valid code, run without performing any
invalid operations, and yet produce incorrect results. Only by
testing the application and analyzing results can you verify that
the application is performing correctly.
How Debugging Tools Help
Debugging tools are designed to help you with troubleshooting
logic and runtime errors and observing the behavior of code
that has no errors.
For instance, an incorrect result may be produced at the end of
a long series of calculations. In debugging, the task is to determine
what and where something went wrong. Perhaps you forgot to initialize
a variable, chose the wrong operator, or used an incorrect formula.
There are no magic tricks to debugging, and there is no fixed
sequence of steps that works every time. Basically, debugging
helps you understand what's going on while your application runs.
Debugging tools give you a snapshot of the current state of your
application, including the values of variables, expressions, and
properties, and the names of active procedure calls. The better
you understand how your application is working, the faster you
can find bugs.
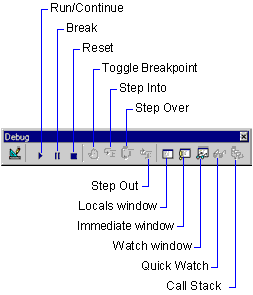
Among its many debugging tools, Visual Basic provides several
helpful buttons on the Debug toolbar, shown in the following
illustration.
The following table briefly describes each tool's purpose. This
chapter discusses situations where each of these tools can help
you debug or analyze an application more efficiently.
Debugging tool
Purpose Run/Continue
Switches from design time to run time (Run) or switches from break mode to run time (Continue). (In break mode, the name of the button changes to Continue.)
Break
Switches from run time to break mode.
Reset
Switches from break mode or run time to design time.
Toggle Breakpoint
Defines a line in a module where Visual Basic suspends execution of the application.
Step Into
Runs the next executable line of code in the application and steps into procedures.
Step Over
Runs the next executable line of code in the application without stepping into procedures.
Step Out
Runs the remainder of the current procedure and breaks at the next line in the calling procedure.
Locals Window
Displays the current value of local variables.
Immediate Window
Allows you to run code or query values while the application is in break mode.
Watch Window
Displays the values of selected expressions.
Quick Watch
Lists the current value of an expression while the application is in break mode.
Call Stack
While in break mode, displays a dialog box that shows all procedures that have been called but not yet run to completion.
There are several ways to avoid creating bugs in your applications:
To test and debug an application, you need to understand which of three modes you are in at any given time. You use Visual Basic at design time to create an application, and at run time to run it. In break mode, the execution of the program is suspended so you can examine and alter data. The Visual Basic title bar always shows you the current mode.
The characteristics of the three modes and techniques for moving among them are listed in the following table.
Mode | Description |
Design time | Most of the work of creating an application is done at design time. You can design forms, draw controls, write code, and use the Properties window to set or view property settings. You cannot run code or use debugging tools, except for setting breakpoints and creating watch expressions.
To switch to run time, click the Run button. To switch to break mode, click Step Into on the Run menu; the application enters break mode at the first executable statement. |
Run time | When an application takes control, you interact with the application the same way a user would. You can view code, but you cannot change it.
To switch back to design time, click the Reset button. To switch to break mode, click the Break button. |
Break mode | Execution is suspended while running the application. You can view and edit code, examine or modify data, restart the application, end execution, or continue execution from the same point.
To switch to run time, click the Continue button (in break mode, the Run button becomes the Continue button). To switch to design time, click the Reset button. You can set breakpoints and watch expressions at design time, but other debugging tools work only in break mode. See "Using Break Mode" later in this chapter. |
Sometimes you can find the cause of a problem by running portions of code. More often, however, you'll also have to analyze what's happening to the data. You might isolate a problem in a variable or property with an incorrect value, and then have to determine how and why that variable or property was assigned an incorrect value.
With the debugging windows, you can monitor the values of expressions and variables while stepping through the statements in your application. There are three debugging windows: the Immediate window, the Watch window, and the Locals window. To display one of these windows, either click the corresponding command on the View menu, or click the corresponding button on the Debug toolbar.
The Immediate window shows information that results from debugging statements in your code, or that you request by typing commands directly into the window.
The Watch window shows the current watch expressions, which are expressions whose values you decide to monitor as the code runs. A break expression is a watch expression that will cause Visual Basic to enter break mode when a certain condition you define becomes true. In the Watch window, the Context column indicates the procedure, module, or modules in which each watch expression is evaluated. The Watch window can display a value for a watch expression only if the current statement is in the specified context. Otherwise, the Value column shows a message indicating the statement is not in context.
The Locals window shows the value of any variables within the scope of the current procedure. As the execution switches from procedure to procedure, the contents of the Locals window changes to reflect only the variables applicable to the current procedure.
Tip A variable that represents an object appears in the Locals window with a plus sign (+) to the left of its name. You can click the plus sign to expand the variable, displaying the properties of the object and their current values. If a property of the object contains another object, that can be expanded as well. The same holds true for variables that contain arrays or userdefined types.
At design time, you can change the design or code of an application, but you cannot see how your changes affect the way the application runs. At run time, you can watch how the application behaves, but you cannot directly change the code.
Break mode halts the operation of an application and gives you a snapshot of its condition at any moment. Variable and property settings are preserved, so you can analyze the current state of the application and enter changes that affect how the application runs. When an application is in break mode, you can do the following:
Note You can set breakpoints and watch expressions at design time, but other debugging tools work only in break mode.
Entering Break Mode at a Problem Statement
When debugging, you may want the application to halt at the place
in the code where you think the problem might have started. This
is one reason Visual Basic provides breakpoints and Stop
statements. A breakpoint defines a statement
or set of conditions at which Visual Basic automatically stops
execution and puts the application in break mode without running
the statement containing the breakpoint.
You can enter break mode manually if you do any of the following
while the application is running:
It's possible to break execution when the application is idle
(when it is between processing of events). When this happens,
execution does not stop at a specific line, but Visual Basic switches
to break mode anyway.
You can also enter break mode automatically when any of the following
occurs:
Fixing a RunTime Error and Continuing
Some runtime errors result from simple oversights when entering
code; these errors are easily fixed. Frequent errors include misspelled
names and mismatched properties or methods with objects.
Often you can enter a correction and continue program execution
with the same line that halted the application, even though you've
changed some of the code. Simply choose Continue from the
Run menu or click the Continue button on the toolbar.
As you continue running the application, you can verify that the
problem is fixed.
If you select the Break on All Errors option, Visual Basic
disables error handlers in code, so that when a statement generates
a runtime error, Visual Basic enters break mode. If Break
on All Errors is not selected, and if an error handler exists,
it will intercept code and take corrective action.
Some changes (most commonly, changing variable declarations or
adding new variables or procedures) require you to restart the
application. When this happens, Visual Basic presents a message
that asks if you want to restart the application.
Monitoring Data with Watch Expressions
As you debug your application, a calculation may not produce the
result you want or problems might occur when a certain variable
or property assumes a particular value or range of values. Many
debugging problems aren't immediately traceable to a single statement,
so you may need to observe the behavior of a variable or expression
throughout a procedure.
Visual Basic automatically monitors watch expressions
expressions that you define for you. When the
application enters break mode, these watch expressions appear
in the Watch window, where you can observe their values.
You can also direct watch expressions to put the application into
break mode whenever the expression's value changes or equals a
specified value. For example, instead of stepping through perhaps
tens or hundreds of loops one statement at a time, you can use
a watch expression to put the application in break mode when a
loop counter reaches a specific value. Or you may want the application
to enter break mode each time a flag in a procedure changes value.
Adding, Editing, or Deleting a Watch Expression
You can add, edit, or delete a watch expression at design time
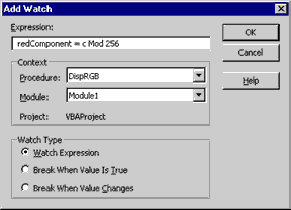
or in break mode. To add watch expressions, you can use the Add
Watch dialog box (Debug menu).
You use the Edit Watch dialog box (Debug menu) to
modify or delete an existing watch expression. The Add Watch
and Edit Watch dialog boxes share the same components (except
the Delete button, which only appears in the Edit Watch
dialog box). These shared components are described in the following
table.
Tip You
can add a watch expression by dragging an expression from a module
to the Watch window.
Using Quick Watch
While in break mode, you can check the value of a property, variable,
or expression for which you have not defined a watch expression.
To check such expressions, use the Quick Watch dialog box
(Debug menu or toolbar). The Quick Watch dialog
box shows the value of the selected expression in a module. To
continue watching this expression, click the Add button;
the Watch window, with relevant information from the Instant
Watch dialog box already entered, is displayed. If Visual
Basic cannot evaluate the value of the current expression, the
Add button is disabled.
Using a Breakpoint to Selectively Halt
Execution
At run time, a breakpoint tells Visual Basic to halt just before
executing a specific line of code. When Visual Basic is executing
a procedure and it encounters a line of code with a breakpoint,
it switches to break mode.
You can set or remove a breakpoint in break mode or at design
time, or at run time when the application is idle. To set or remove
a breakpoint, click in the margin (the left edge of the module
window) next to a line of code. When you set a breakpoint, Visual
Basic highlights the selected line in bold, using the colors that
you specified on the Editor Format tab in the Options
dialog box (Tools menu).
In a module, Visual Basic indicates a breakpoint by displaying
the text on that line in bold and in the colors specified for
a breakpoint. A rectangular highlight surrounds the current
statement, or the next statement to be run. When the
current statement also contains a breakpoint, only the rectangular
outline highlights the line of code. After the current statement
moves to another line, the line with the breakpoint is displayed
in bold and in color again. The following illustration shows a
procedure with a breakpoint on the fourth line.
After you reach a breakpoint and the application is halted, you
can examine the application's current state. Checking results
of the application is easy, because you can move the focus among
the forms and modules of your application and the debugging windows.
A breakpoint halts the application just before executing the line
that contains the breakpoint. If you want to observe what happens
when the line with the breakpoint runs, you must run at least
one more statement. To do this, use Step Into or Step Over.
When you are trying to isolate a problem, remember that a statement
might be indirectly at fault because it assigns an incorrect value
to a variable. To examine the values of variables and properties
while in break mode, use the Locals window, Quick Watch,
watch expressions, or the Immediate window.
Using Stop Statements
Placing a Stop statement in a procedure is an alternative
to setting a breakpoint. Whenever Visual Basic encounters a Stop
statement, it halts execution and switches to break mode. Although
Stop statements act like breakpoints, they aren't set or
cleared the same way.
Remember that a Stop statement does nothing more than temporarily
halt execution, while an End statement halts execution,
resets variables, and returns to design time. You can always click
Continue on the Run menu to continue running the
application.
Component Description
Expression box
Contains the expression that the watch expression evaluates. The expression is a variable, a property, a function call, or any other valid expression. When you display the Add Watch dialog box, the Expression box contains the current expression (if any).
Context option group
Sets the scope of variables watched in the expression. Use if you have variables of the same name with different scope. You can also restrict the scope of variables in watch expressions to a specific procedure or to a specific form or module, or you can have it apply to the entire application by selecting All Procedures and All Modules. Visual Basic can evaluate a variable in a narrow context more quickly.
Watch Type option group
Sets how Visual Basic responds to the watch expression. Visual Basic can watch the expression and display its value in the Watch window when the application enters break mode. Or you can have the application enter break mode automatically when the expression evaluates to a true (nonzero) statement or each time the value of the expression changes.
If you can identify the statement that caused an error, a single breakpoint might help you locate the problem. More often, however, you know only the general area of the code that caused the error. A breakpoint helps you isolate that problem area. You can then use Step Into and Step Over to observe the effect of each statement. If necessary, you can also skip over statements or back up by starting execution at a new line.
Step Mode | Description |
Step Into | Run the current statement and break at the next line, even if it's in another procedure. |
Step Over | Run the entire procedure called by the current line and break at the line following the current line. |
Step Out | Run the remainder of the current procedure and break at the statement following the one that called the procedure. |
Note You
must be in break mode to use these commands. They are not available
at design time or run time.
Using Step Into
You can use Step Into to run code one statement at a time. (This
is also known as single stepping.) When you use Step Into to step
through code one statement at a time, Visual Basic temporarily
switches to run time, runs the current statement, and advances
to the next statement. Then it switches back to break mode. To
step through your code this way, click the Step Into button
on the Debug toolbar.
Note Visual
Basic allows you to step into individual statements, even if they
are on the same line. A line of code can contain two or more statements,
separated by a colon (:). Visual Basic uses a rectangular outline
to indicate which of the statements will run next. Breakpoints
apply only to the first statement of a multiplestatement
line.
Using Step Over
Step Over is identical to Step Into, except when the current statement
contains a call to a procedure. Unlike Step Into, which steps
into the called procedure, Step Over runs it as a unit and then
steps to the next statement in the current procedure. To step
through your code this way, click the Step Over button
on the Debug toolbar.
Suppose, for example, that the statement calls the procedure SetAlarmTime.
If you choose Step Into, the module shows the SetAlarmTime procedure
and sets the current statement to the beginning of that procedure.
This is the better choice only if you want to analyze the code
within SetAlarmTime. If you use Step Over, the module continues
to display the current procedure. Execution advances to the statement
immediately after the call to SetAlarmTime, unless SetAlarmTime
contains a breakpoint or a Stop statement. Use Step Over if you
want to stay at the same level of code and don't need to analyze
the SetAlarmTime procedure.
You can alternate freely between Step Into and Step Over. The
command you use depends on which portions of code you want to
analyze at any given time.
Using Step Out
Step Out is similar to Step Into and Step Over, except it advances
past the remainder of the code in the current procedure. If the
procedure was called from another procedure, it advances to the
statement immediately following the one that called the procedure.
To step through your code this way, click the Step Out
button on the Debug toolbar.
Bypassing Sections of Code
When your application is in break mode, you can select a statement
further down in your code where you want execution to stop and
then click Run To Cursor on the Debug menu. This
lets you "step over" uninteresting sections of code,
such as large loops.
Setting the Next Statement to Be Run
While debugging or experimenting with an application, you can
select a statement anywhere in the current procedure and then
click Set Next Statement on the Debug menu to skip
a certain section of code for instance, a section
that contains a known bug so you can continue
tracing other problems. Or you may want to return to an earlier
statement to test part of the application using different values
for properties or variables.
Showing the Next Statement to Be Run
You can click Show Next Statement on the Debug menu
to place the insertion point on the line that will run next. This
feature is convenient if you've been executing code in an error
handler and aren't sure where execution will resume. The Show
Next Statement command is available only in break mode.
The Call Stack dialog box (Debug menu or toolbar) shows a list of all active procedure calls; you can display the Call Stack dialog box only when the application is in break mode. Active procedure calls are the procedures in the application that were started but not completed. You can use the list of active procedure calls to help trace the operation of an application as it runs a series of nested procedures. For example, an event procedure can call a second procedure, which can call a third procedure all before the event procedure that started this chain is completed. Such nested procedure calls can be difficult to follow and can complicate the debugging process.
Tracing Nested Procedures
The Call Stack dialog box lists all the active procedure
calls in a series of nested calls. It places the earliest active
procedure call at the bottom of the list and adds subsequent procedure
calls to the top of the list. The information given for each procedure
begins with the module name, followed by the name of the called
procedure. You can click the Show button in the Call
Stack dialog box to display the statement in a procedure that
passes control of the application to the next procedure in the
list.
Note Because
the Call Stack dialog box doesn't indicate the variable assigned
to an instance of a class, it does not distinguish between multiple
instances of classes.
Sometimes when you are debugging or experimenting with an application, you may want to run individual procedures, evaluate expressions, or assign new values to variables or properties. You can use the Immediate window to accomplish these tasks. You evaluate expressions by printing their values in the Immediate window.
Printing Information in the Immediate
Window
There are two ways to print to the Immediate window:
These printing techniques offer the following advantages over
watch expressions:
Printing from Application Code
The Print method sends output to the Immediate window
whenever you include the Debug object qualifier. For example,
the following statement prints the value of Salary
to the Immediate window every time it is run.
This technique works best when there is a particular place in
your application code at which the variable (in this case, Salary)
is known to change. For example, you might put the previous statement
in a loop that repeatedly alters Salary.
Printing from the Immediate Window
After you're in break mode, you can move the focus to the Immediate
window to examine data. You can evaluate any valid expression
in the Immediate window, including expressions involving
properties. The currently active module determines the scope.
Type a statement that uses the Print method and then press
ENTER to see the result. A question mark (?)
is useful shorthand for the Print method.
Assigning Values to Variables and Properties
As you start to isolate the possible cause of an error, you may
want to test the effects of particular data values. In break mode,
you can set values with statements like the following in the Immediate
window.
The first statement alters a property of the VScroll1
object, and the second assigns a value to the variable MaxRows.
After you set the values of one or more properties and variables,
you can continue execution to see the results or you can test
the effect of the change on procedures.
Testing Procedures with the Immediate
Window
The Immediate window evaluates any valid Visual Basic executable
statement, but it doesn't accept data declarations. You can enter
calls to procedures, however, which allows you to test the possible
effect of a procedure with any given set of arguments. Simply
enter a statement in the Immediate window (while in break
mode) as you would in a module, as shown in the following statements.
When you press the ENTER key, Visual Basic
switches to run time to run the statement, and then returns to
break mode. At that point, you can see results and test any possible
effects on variables or property values.
If Option Explicit is in effect (requiring all variable
declarations to be explicit), any variables you enter in the Immediate
window must already be declared within the current scope. Scope
applies to procedure calls just as it does to variables. You can
call any procedure within the currently active form. You can always
call a procedure in a module, unless you define the procedure
as Private, in which case you can call the procedure only
while executing in the module.
You can use the Immediate window to run a procedure repeatedly,
testing the effect of different conditions. Each separate call
of the procedure is maintained as a separate instance by Visual
Basic. This allows you to separately test variables and property
settings in each instance of the procedure. The Call Stack
dialog box maintains a listing of the procedures run by each command
from the Immediate window. Newer listings are at the top
of the list. You can use the Call Stack dialog box to select
any instance of a procedure, and then print the values of variables
from that procedure in the Immediate window.
Note Although
most statements are supported in the Immediate window, a control
structure is valid only if it can be completely expressed on one
line of code; use colons to separate the statements that make
up the control structure.
Checking Error Numbers
You can use the Immediate window to display the message
associated with a specific error number. For example, if you enter
the statement Error 58
in the Immediate window and then press ENTER
to run the statement, the appropriate error message ("File
already exists") is displayed.
Tips for Using the Immediate Window
Here are some shortcuts you can use in the Immediate window:
Debug.Print "Salary = "; Salary
VScroll1.Value = 100
MaxRows = 50
X = Quadratic(2, 8, 8)
DisplayGraph 50, Arr1
Form_MouseDown 1, 0, 100, 100
Certain events that are a common part of using Microsoft Windows can pose special problems for debugging an application. It's important to be aware of these special problems so they don't confuse or complicate the debugging process.
If you remain aware of how break mode can put events at odds with what your application expects, you can usually find solutions. In some event procedures, you may need to use Debug.Print statements to monitor values of variables or properties instead of using watch expressions or breakpoints. You may also need to change the values of variables that depend on the sequence of events. This is discussed in the following topics.
Breaking Execution During a MouseDown
or KeyDown Event Procedure
If you break execution during a MouseDown event procedure, you
may release the mouse button or use the mouse to do any number
of tasks. When you continue execution, however, the application
assumes that the mouse button is still pressed down. You don't
get a MouseUp event until you press the mouse button down again
and then release it.
When you press the mouse button down during run time, you break
execution in the MouseDown event procedure again, assuming you
have a breakpoint there. In this scenario, you never get to the
MouseUp event. The solution is usually to remove the breakpoint
in the MouseDown procedure.
If you break execution during a KeyDown procedure, similar considerations
apply. If you retain a breakpoint in a KeyDown procedure, you
may never get a KeyUp event.
Breaking Execution During a GotFocus or
LostFocus Event Procedure
If you break execution during a GotFocus or LostFocus event procedure,
the timing of system messages can cause inconsistent results.
Use a Debug.Print
statement instead of a breakpoint in GotFocus or LostFocus event
procedures.
There are several ways to simplify debugging: