One of the easiest and most practical applications of client-side code is input validation. When Microsoft and Netscape first started talking about adding scripting to HTML people asked why, and this was one of the first responses the marketing people gave. The horizons have expanded greatly with objects, but this remains one of the most beneficial uses of script code.
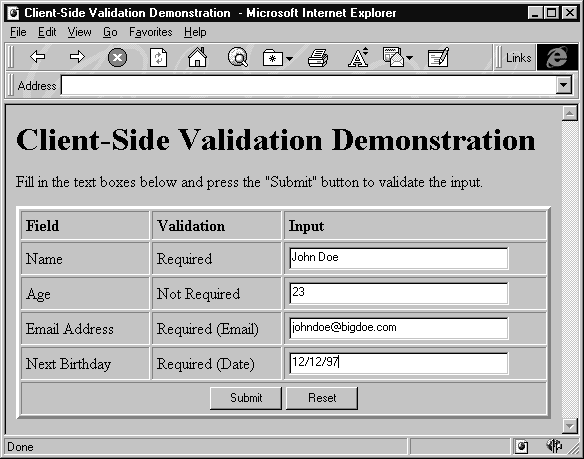
The code for this example (validation.htm) is a bit more complex than the last one, but it should be accordingly more useful. The screenshot below shows a form with four fields called, in turn, Name, Age, Email Address, and Next Birthday. Each field (with the exception of Age—we don't want to offend anyone!) must have a certain type of input before the form can be submitted.

So how do we determine what constitutes a valid input? The Name field is easy—it just requires some text. We're not going to try to make any judgements about whether or not a name is really a name. Email is similar—we couldn't expect to know if the user name or domain name was real. However, we do know that every valid email address always contains the @ character. Our validation criteria for the Email will just be that—we'll accept the input if we see a @.
How about the Next Birthday field? A date is more likely to follow a recognizable pattern, so we'll accept the input if it follows any date format our computer understands. With VBScript, it's taken care of easily in just a single line. In addition, we'll add one more parameter. Since we asked for the date of the user's next birthday, we'll need to check that the date hasn't already occurred.
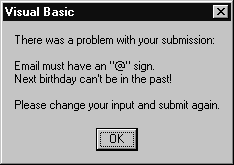
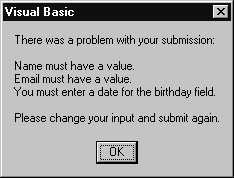
Now load up the page validation.htm and enter some different combinations of input. If you enter everything it's asking for, you'll be rewarded by a 404—Object Not Found reply. We don't want to do anything real with the data at the moment, so—again—the ACTION attribute in our form points to DeadLink.asp. In a real application we would take the validated data and insert it into a database or perform other processing. If we try to sneak some bad data to the server you'll see dialogs like these:


With invalid input, after pressing OK to dismiss the message box, you'll see the same page as before pressing Submit. The form data hasn't been sent to the server, and the page is still waiting patiently for input it can accept.
We could come up with additional data types ad infinitum, but these will get us started. Requiring some input, an email address, and a date (in a certain range) are some of the most common requests made on HTML forms. In addition, as you'll see when we look at the code, it can be easily extended to incorporate validation for any type of data.
The non-script HTML for this page isn't anything we haven't seen before. After printing a header, it creates a six-element form with these elements:
| Name | INPUT Type |
txtName |
TEXT |
txtAge |
TEXT |
txtEmail |
TEXT |
txtBirthday |
TEXT |
sbmMyForm |
SUBMIT |
rstMyForm |
RESET |
*** can we get the table alongside the paragraph above?
As always, the action occurs in between the <SCRIPT> and </SCRIPT> tags. All of our code for this example is in one routine, the onSubmit handler for our form object.
Function myForm_onSubmit
...
...
End Function
This is different to the other event handlers we often see. Remember that myForm_onSubmit is a Function, not a Sub. Functions return a value, and subroutines don't. With a form, we might want to cancel the form submission. Remember our discussion about this in the last chapter—the browser is set up to pay attention to the return value of this handler. If we return True, the form is submitted; if we send back False, nothing happens—it's like the user never pressed Submit in the first place. An alternative method is to create a normal button with an <INPUT TYPE="BUTTON"> tag and submit it using the Submit method of the Form object.
With onSubmit out of the way, we can focus on the code that does the validation. Since we might want to use this code with a wide variety of different forms, it's been set up so that adding and removing validation for various form fields is easy. The function itself can be subdivided into two parts: the validation code that may change for each form, and the supporting code that prints the error message.
Take a look at the all of the code outside of the specific validation sections. This is the code we're talking about:
Function myForm_onSubmit
   Dim msgError
   Dim fRef
   Set fRef = Document.myForm    'get myForm reference
   '... VALIDATION CODE GOES HERE ...
   If msgError <> "" Then   'print error message if validation failure
      MsgBox "There was a problem with your submission:" _
             & Chr(13) & msgError & Chr(13) & Chr(13) _
             & "Please change your input and submit again."
      myForm_onSubmit = False
   Else
      myForm_onSubmit = True
   End If
End Function
This code first prepares for the validation. Then, if a problem with the user's input has been detected, it displays a message box explaining the problem and cancels the form submission. If the input is OK, the form is submitted.
We first declare two variables, msgError and fRef. Like we've said, declaring variables isn't absolutely necessary, but it's good practice and makes our code easier to read. The msgError variable is what we'll use to store a string describing the problem(s) with the input. We'll write to it in the validation code, and display it if we decide to cancel the form submission. After we declare fRef, we initialize it with this line of code:
Set fRef = Document.myForm 'get myForm reference
The variable fRef isn't absolutely necessary, but it simplifies our repeated references to the myForm object. This allows us to use refer to the form in our validation sections with the code:
fRef.txtName.Valueinstead of:
Document.myForm.txtName.Value
In addition to simplifying our code, this technique makes it run faster. The script engine takes time to resolve each reference, so we shortcut this process by only performing the Document.myForm resolution once, and saving the result in a variable for later use.
After these initialization steps the validation code is allowed to do its work. We'll talk about these routines in a second, just understand for now that whenever the code detects a problem with the input it adds some text describing the problem to the string variable msgError. This is the basis for the code at the end of the routine. Since msgError starts as an empty string, we know that if it's still an empty string when the validation code is complete then there were no problems with the user's input, and we can submit the form by setting the return value of the myForm_onSubmit function to True.
If msgError holds anything other than the empty string, then we've found a problem. In this case we display a message box, wrapping the strings There was a problem with your submission: and Please change your input and submit again around the text in msgError describing the problem. We also set myForm_onSubmit to False to cancel the submission. The newline character, Chr(13), is used to separate the lines in the message box.
The only thing left is to understand how each field is validated. Of course this depends on exactly what constitutes a valid input. Take a look at the code for the Name field, where we just want to make sure the user has entered some text:
   If fRef.txtName.Value = "" Then
      msgError = msgError & Chr(13) & "Name must have a value."
   End If
We first test to see if the value of the txtName text box is equal to the empty string. If it is we append a newline character and the error string Name must have a value to the msgError variable and store it back into msgError. We need to keep any previous contents of msgError intact, so we can't just assign our error string to the variable—if we did this anything that was there previously it would be overwritten. Name is the first field, so we can be sure there won't ever be anything in msgError yet, but it's a good practice to stay consistent between validation steps and we will need to append in all the code after this. Plus, it gives us a space between the default error text, and makes our message box look nicer.
If the user has entered something into the txtName text box, everything is cool and we can move onto the next field without doing anything to msgError. All of the validation code follows this pattern: 1 - test the input and, 2a - write msgError if there's problem, or, 2b - don't write msgError if things are OK.
The only additional wrinkles are how we handle different kinds of validation, and how we deal with fields that must meet multiple criteria. Fortunately, the validation code for the Email field demonstrates both of these tasks.
When checking Email, we need to make sure it not an empty string, and that there is a @ character somewhere in it. We could check both of these in a single statement, but then our error message wouldn't give the user any clue about the specific thing that was wrong with their input. Instead we'll use an additional ElseIf clause in our code:
   If fRef.txtEmail.Value = "" Then
      msgError = msgError & Chr(13) & "Email must have a value."
   ElseIf InStr(fRef.txtEmail.Value, "@") = 0 Then
      msgError = msgError & Chr(13) & "Email must have an ""@"" sign."
   End If
We first check to see if anything exists in the text box, because we can't possibly find an @ if the text box is empty. If the user hasn't entered anything in txtEmail the validation for this field fails and we write the same error string as above into msgError.
If something does exist, we can use the VBScript InStr() function to see if the string includes an @. In its simplest form, InStr() (short for In String) takes two strings, one string to look in, and one string to look for. If it finds the second string in the first string it returns an integer specifying the location in the first string where the second string begins. If it doesn't find the string, it returns 0.
It's easy to understand how this code works then. If Instr doesn't find an @ in the value the user has entered it returns 0, and we know to write the message Email must have an ""@"" sign to the error string. We want the string displayed in the message box to include double quotation signs around the @, so we use the VBScript convention of specifying two double quotes when inside a string.
Finally, we need to cover the validation of the Birthday field. In this we need to check three things: that txtBirthday has a value, that the value is a date, and that the date isn't in the past (since we asked for the user's next birthday). There are a lot of things to check, but they're actually very easy to do using the date manipulation ability of VBScript. The whole of the validation code is only five lines long:
   If Not IsDate(fRef.txtBirthday.Value) Then
      msgError = msgError & Chr(13) &_
      "You must enter a date for the birthday field."
   ElseIf CDate(fRef.txtBirthday.Value) < Now Then
      msgError = msgError & Chr(13) &_
      "Next birthday can't be in the past!"
   End If
We wrap our first two criteria into one test using the IsDate function. IsDate takes a variable and returns True if the value in the variable can be converted into a date, or False if it can't. Fortunately, the empty string can't be converted into a date, so IsDate returns False both when nothing has been entered in the txtBirthday text box, and when the value entered can't be converted to a date. We can give a meaningful error message for both cases (and avoid using an additional ElseIf clause) by saying You must enter a date for the birthday field.
Once we're sure we have a valid date, we can compare it to the current date to make sure the user hasn't tried to sneak in with a date that has already gone. We can easily accomplish this by first converting the value in the text box to a date using the CDate function and then comparing our date value with the current date returned by the Now function. Since we're comparing two dates we just need to use the < (less than) operator to determine if our user's next birthday has already occurred. If it has then we write an appropriate error message to msgError and we are done.
From this discussion you can see how easy it is to add your own tests to the framework. All you need to do is plug in an If...Then block containing your validation test, and write to msgError if you detect a problem.
Again, there are plenty of ways that we could integrate this example with ASP. In fact it's likely that the results from a form like this will ultimately be stored in a database, so ASP would be an obvious way to manipulate the information after it has been submitted. You'll see some excellent examples of how this can be done in Chapter 12.
So, like the previous example, you could allow users to edit their details, by fetching them from the database with ASP, and building a page that contained the current values as the defaults. And, again as featured in the Chapter 12 example, we could quite easily add features such as sending a confirmation message to the user by email, using the address they had just entered.
One point to remember, and something we discussed in Chapter 6, is that you need to be aware of the limitations of client-side data validation. It is a great way of reducing server load and network traffic, because you can ensure that only data of the appropriate type is submitted from the form. However, there are a couple of problems.
What you can't do with just client-side validation, is be absolutely sure that the data is valid when it gets to your server. Unscrupulous users could send data from their own forms to your application—remember that the URL of the page that handles the data is freely visible in the original form page. In the next chapter, you'll see how we can reduce this risk, by using digital certificates and secure channels to communicate the results.
This also leads to the other concern we expressed in Chapter 6. If the method of validating the data requires some 'secret formula', it's not a good idea to do it in a scripting language on the client, where everyone can view the source of the page and see the code. Instead, you might want to use a custom control on the client, which hides the formula inside the control, or validate this data once you get it back at your server.