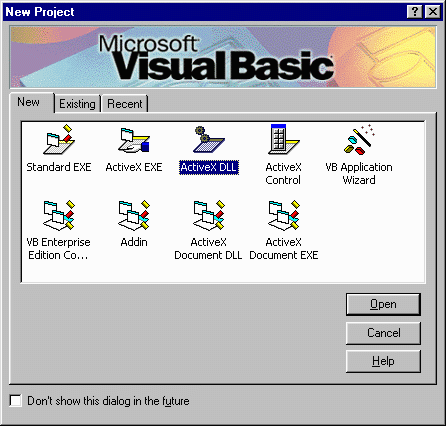
Now, we will begin to develop the components that we outlined in the previous section. For this example, we will develop all of the server components using Visual Basic 5.0 with at least Service Pack 2 installed. This will allow us to develop components that use the Apartment threading model. While this is not as efficient as using the Both threading model, for the purposes of this example, it will suffice. We will be creating one application component that has multiple methods. This component will be called Bank.
The first step in developing the components for our application is to create a project in Visual Basic. The project type for all server components should be an ActiveX DLL. Usually, when VB starts up, it prompts you to create a project. You will select the ActiveX DLL icon from the dialog box.

For this example, we will name our project BankExample. To set the project name, you can use the dialog box that comes up when you select the Properties menu item from the Project menu. From this dialog, you can set the name of the project and also set the Threading model for the project. Since we will be creating a server component for use with MTS, you should select the Apartment threading model. If for some reason you do not see the Threading Model selection area in your dialog box, you need to check to make sure that you have installed the Visual Studio Service Pack 2 or 3. The original revision of Visual Basic 5.0 could only create single-threaded components. The capability to create apartment-threaded components was added with Service Pack 2.
Note, the Visual Studio Service Pack is different from the NT Service Packs, and needs to be installed separately.
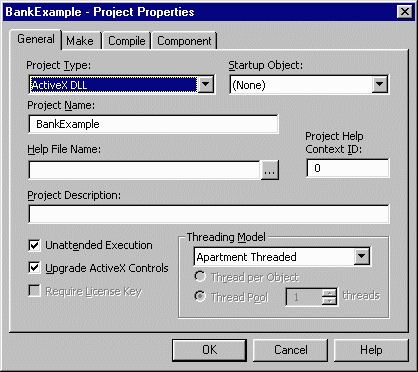
To ensure that as you are developing this component you do not inadvertently add some type of visual output to your component, check the Unattended Execution box. When this is checked, any messages that might have been displayed with a dialog box are rerouted to an event log file.
The last step that you need to do to set up the project to create the server component is to add the references to the various COM Libraries that this component needs. All components that participate in MTS transactions and wish to have access to the current ObjectContext object will need to link in the Transaction Server type library. To add this to the project, you will use the Project…References… dialog box.
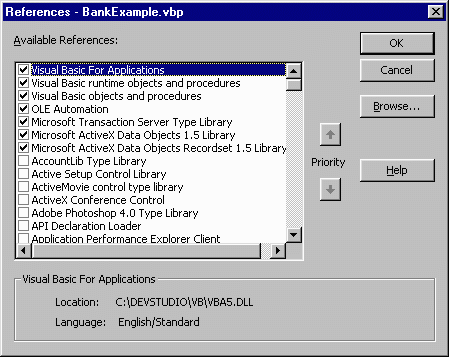
The three additional entries that you will need to add for this project are
If you do not find these listed in the Available References listbox, then use the browse button to locate their DLLs. They are generally found in the following locations:
| Type Library | DLL Location |
| MTS Library | \WINDOWS\SYSTEM\MTS\MTXAS.DLL or \WINNT\SYSTEM32\MTS\MTXAS.DLL for Windows NT |
| ADO Library | \Program Files\Common Files\System\ADO\MSADO15.DLL |
| ADO Recordset Library | \Program Files\Common Files\System\ADO\MSADOR15.DLL |
Now that we have configured the project correctly, it is time to start developing the components.
TheListAccounts method will take the customer ID as a parameter and return a comma delimited list of account numbers. These account numbers can then be parsed and displayed by the client. This component will access the SQL Server database using ADO. Even though this method will not be participating in any transactions, it should make a call to SetComplete or SetAbort when it has finished processing. This will prevent the component from becoming stateful, as was mentioned earlier.
Option Explicit
Private oObjectContext As ObjectContext
Private oDb As ADODB.Connection
Private oRs As ADODB.Recordset
Private vSql As Variant

Const vDbConn As Variant = "DSN=Bank;UID=sa;PWD=;"
This initial section is creating some variables that will be used in every method that we will be creating. The Option Explicit statement will force Visual Basic to ensure that every variable that is used is declared. This is good programming practice, and should be in every application that you write. We have also created variables to hold references to the various objects that we will be using in the application. The database connection string is stored as a constant, making it easy to change without having to locate all instances of it in the source code.
Public Function ListAccounts(ByVal vCustID As Variant) As Variant
    Dim vAccounts As Variant

    On Error GoTo ListAccountsErrHandler
The ListAccounts method will accept a parameter of type Variant. The value of this parameter is the customer ID number. The function will return a variant to the caller. This return value will be a string containing a comma delimited list of account numbers that the customer has.
If any errors occur during the processing of this method they will be intercepted by the On Error statement. This will allow the method to pass an error message back to the client, and also alleviate the need for error checking code throughout the method.
    Set oObjectContext = GetObjectContext()
    Set oDb = oObjectContext.CreateInstance("ADODB.Connection")
    oDb.Open vDbConn
The first step in the method is to obtain a reference to the current ObjectContext object. This reference will allow us to create other COM objects. These other objects will also be created inside of the environment that the Bank object is in, which is inside of Transaction Server. The other COM object that we will be using is the ADO Connection object. Normally, this object would be created with the standard Visual Basic New method. Since we want it to run in the current object's context, we will use the CreateInstance method of the ObjectContext object. This will return a reference to an ADO Connection object.
vSql = "SELECT AccountNumber from ACCOUNT WHERE CustomerID = " & vCustID & ";"

    Set oRs = oDb.Execute(vSql)

    Do While Not oRs.EOF
        vAccounts = vAccounts + CStr(oRs("AccountNumber"))
        oRs.MoveNext
        If Not oRs.EOF Then
            vAccounts = vAccounts + ","
        End If
    Loop

    ListAccounts = vAccounts
    Exit Function
We will use a SQL statement to retrieve all of the account numbers from the database for the current customer. The Execute method of the ADO Connection object will return an ADO Recordset object. With this object, we can go through each record and add the account number to our return string, which is being built in the vAccounts variable.
We will be separating each account number with a comma. To determine if a comma should be added to the return string, we need to see if the number that was just added to the string was the last in the recordset. The previous statement, oRs.MoveNext, will move to the next record in the recordset. If there is a valid record, which is when the value of EOF is false, then a comma should be added to the return string. This check is made so that a comma is not put at the end of the string, which makes parsing the string easier.
Once we have added all of the accounts to the return string, we assign the value of the return string to the ListAccounts variable, which is the variable that will be returned to the caller. An explicit call to Exit Function is made so that the error handling code that follows will not be executed.
ListAccountsErrHandler:
    ListAccounts = "ERROR: " & Err.Description

End Function
The error handler will get executed if any error occurs during the processing of the method. The return value for the method is set to the string "ERROR" plus a description of the error from the Visual Basic Error object. By adding the upper case string to the return value, it acts as a flag to indicate that an error has occurred. The caller program can readily identify this flag and take appropriate action.
The next method that we need to add to our component is a method to check if an account has sufficient funds available.
This method will be used to determine if an account has at least a specified amount of funds available. It may seem that a method that just returns the balance in the account would be a more powerful method. In some instances it could be. But by encapsulating the business logic to determine if funds are available inside of the component, it frees the client from having to know about how the determination is made. It also provides a more secure environment, in that the actual balance is not passed back to the client. Only a boolean response to indicate if sufficient funds are available is returned.
Public Function FundsAvailable(ByVal vAcctNum As Variant, ByVal vAmount As Variant) As Variant
Dim vRetVal As Variant

    On Error GoTo FundsAvailableErrHandler

    Set oObjectContext = GetObjectContext()
    Set oDb = oObjectContext.CreateInstance("ADODB.Connection")
    oDb.Open vDbConn
The calling application will pass in the account number using a variant data type. The other parameter will be the amount of funds that need to be available for this method to return a True response. The boolean return value will actually be returned as a variant data type.
The Visual Basic code to set up the method's error handler and open the connection to the database is the same as the ListAccount method's code. The SQL statement will retrieve the value of the Balance field from the record in the ACCOUNT table where AccountNumber matches the value passed into the method.
    vSql = "SELECT Balance from ACCOUNT WHERE AccountNumber = " & vAcctNum & ";"

    Set oRs = oDb.Execute(vSql)

    If oRs.EOF Then
        FundsAvailable = "ERROR: Invalid Account Number"
        Exit Function
    Else
        vRetVal = CCur(vAmount) <= CCur(oRs("Balance"))
    End If

    FundsAvailable = vRetVal
    Exit Function

FundsAvailableErrHandler:
    FundsAvailable = "ERROR: " & Err.Description

End Function
The execute method of the Connection object will return a recordset. If the recordset that is returned is empty, then the account number that the calling application supplied was wrong. This is indicated to the calling application by returning the same error flag as the ListAccounts method, with more description of the error included with the flag.
If there was a record found in the database, then the return value of the method will be set to the evaluation of the logical expression that will return true if the amount that was passed in to check is less than or equal to the balance in the account. At this point, additional business logic could be easily added. If there was a requirement to maintain a minimum $50 balance, then the logical expression could be written as: vRetVal = CCur(vAmount)+ 50 <= CCur(oRs("Balance")). For this example, there are no extra business rules, so the logical expression just compares the parameter with the balance.
The error handler for this method also uses the Visual Basic Err object to return a detailed description of the error that caused the method to fail.
Now that we have determined that there are sufficient funds in the account, the next application component we need is one that will withdraw funds from a given account.
This method will be used to decrease the balance of a specified account. The desired account number and the amount to withdraw will be supplied as parameters to the method. As a check, the method will return the amount withdrawn as its return value. The application can then double check to make sure this was the same amount desired.
Public Function Withdrawal(ByVal vAcctNum As Variant, ByVal vAmount As Variant) As Variant
    Dim vRetVal As Variant

    On Error GoTo WithdrawalErrHandler

    Set oObjectContext = GetObjectContext()
    Set oDb = oObjectContext.CreateInstance("ADODB.Connection")
    oDb.Open vDbConn

    vSql = "SELECT * from ACCOUNT WHERE AccountNumber = " & vAcctNum & ";"
Up to this point, the Withdrawal method is identical to the FundsAvailable method that we described earlier. The error handler is installed, the reference to an ADO Connection object is created, and the database is opened using the global database connection string. The SQL statement is slightly different, in that the query in the FundsAvailable method only returned the Balance field from the ACCOUNT table. In this method, the SQL query will return the all of the fields of the record that matches the account number passed into the method.
In the previous methods, we used the Execute method of the ADO Connection object. This created a recordset object, but it was a read-only recordset. Since this method will need to update the value in the Balance field, it will require a read-write recordset. We will need to explicitly create a Recordset object, and then open it using the SQL statement.
    Set oRs = oObjectContext.CreateInstance("ADODB.Recordset")
    oRs.Open vSql, oDb, adOpenDynamic, adLockOptimistic
The Open method accepts four parameters. The first parameter is the SQL query statement. The second is a reference to a valid Connection object. This is necessary so that ADO knows which database to open this recordset for. The third parameter identifies this recordset as a dynamic recordset. In a dynamic recordset, the information in the recordset will be updated automatically whenever any user, even on a separate client, changes any part of the recordset. This is essential, as there may be other applications that are affecting the balance in this account at the same time that funds are being withdrawn. The last parameter, adLockOptimistic, sets the lock type for the recordset. Since data will need to be updated, we need to have the ability to write to the database. This lock type will only lock the record for writing when the data is actually being updated, freeing it for other users to change while this recordset is still open.
    If oRs.EOF Then
        Err.Raise vbObjectError + 500, "Withdrawal", "Invalid Account Number"
    Else
        If CCur(vAmount) > CCur(oRs("Balance")) Then
            Err.Raise vbObjectError + 510, "Withdrawal", "Insufficient Funds"
In this method, we will be using the Raise method of the Visual Basic error object. Since this method will participate in a transaction, we want to centralize the transaction commit and transaction abort to one location in the method. The Raise method call will cause method's error handler to take over processing. All errors in Visual Basic are required to have an error number. These numbers should be unique across a single application. To ensure that user-created error numbers do not conflict with existing Visual Basic error numbers, the user numbers are generated by adding some unique number to the vbObjectError constant.The last parameter in the method will become the Description property of the Error object. It is this textual information that will be passed back to the calling application.
The previous function was used to check if an account had sufficient funds available. Since the balance in the account may have changed since that method was run, or if the client application chose not to call that method first, the Withdrawal method will generate an error, which will generate a transaction abort, if there are insufficient funds to make the withdrawal.
        Else
            Dim vNewBal As Variant
            vNewBal = CCur(oRs("Balance") - vAmount)
            oRs("Balance") = vNewBal
            oRs("LastTransaction") = Now
            oRs.Update
            vRetVal = vAmount
        End If
    End If
If there are sufficient funds for withdrawal, then first we will calculate the new balance by subtracting the withdrawal amount from the balance that was stored in the database. This new balance will be written back into the database, along with a timestamp of this transaction, and the database will be updated using the Update method of the Recordset object.
With the withdrawal successfully completed, the return value of the method is set to the amount of the withdrawal as a double check. To indicate that this method's processing was successful, the method calls the SetComplete methodof the current object context. This indicates that this method's work in the transaction is complete and that the object can be released. Remember that the changes are not committed to durable data until ALL components participating in a transaction indicate completion.
Withdrawal = vRetVal
    oObjectContext.SetComplete
    Exit Function

WithdrawalErrHandler:
 Withdrawal = "ERROR: " & Err.Description
   oObjectContext.SetAbort

End Function
When the error handler is fired, we know that an error has occurred and that the transaction should be aborted. By calling the SetAbort method of the current object context, the transaction will begin to rollback any changes that were made to durable data during the transaction. The type of error is indicated to the client through the use of the error flag along with a more detailed description. This description could either be one generated by Visual Basic, or one of the two errors that could be explicitly raised by this method.
Now that we have the money out of the account, we need to be able to put it in another account somewhere. This is the job for the Deposit method.
This method will be used to increase the balance of a specified account. The desired account number and the amount to deposit will be supplied as parameters to the method. As a check, the method will return the amount deposited as its return value. The application can then double check to make sure this was the same amount desired. This method is nearly identical to the Withdrawal method. We are including the entire method here for completeness, but will only indicate those few areas that are different.
Public Function Deposit(ByVal vAcctNum As Variant, ByVal vAmount As Variant) As Variant
    Dim vRetVal As Variant

    On Error GoTo DepositErrHandler

    Set oObjectContext = GetObjectContext()
    Set oDb = oObjectContext.CreateInstance("ADODB.Connection")
    oDb.Open vDbConn

    vSql = "SELECT * from ACCOUNT WHERE AccountNumber = " & vAcctNum & ";"

    Set oRs = oObjectContext.CreateInstance("ADODB.Recordset")
    oRs.Open vSql, oDb, adOpenDynamic, adLockOptimistic
Up to this point everything is nearly the same. The only difference is that the error information that is generated if the account number is invalid has been changed.
The primary difference between the Withdrawal method and the Deposit method is the math used to compute the new balance in the account. For a deposit, we are adding the deposit amount to the current balance to arrive at the new balance.
If oRs.EOF Then
        Err.Raise vbObjectError + 600, "Deposit", "Invalid Account Number"
    Else
        Dim vNewBal As Variant
        vNewBal = CCur(oRs("Balance") + vAmount)
        oRs("Balance") = vNewBal
        oRs("LastTransaction") = Now
        oRs.Update
        vRetVal = vAmount
    End If

    Deposit = vRetVal
    oObjectContext.SetComplete
    Exit Function

DepositErrHandler:
    oObjectContext.SetAbort
    Deposit = "ERROR: " & Err.Description

End Function
We now have a complete component that can be used to transfer money from one account to another. But these transfers should not take place without some checks and balances. By using MTS to manage the transfer, we are ensuring that no money will be lost in the system. But to be prudent, we should keep a record of each transaction. To accomplish this, we will create a LogTransaction method to write this information to a database.
When a funds transfer occurs, there should be a record kept so that the accounts can be audited at a later date. Even though MTS ensures that funds will either be transferred successfully, or not at all, most financial institutions have strict record keeping requirements. In our application, we will track the type of transaction, the source and destination account numbers, the amount, and a timestamp indicating when the transaction took place.
We are taking very big liberties with our transaction log format. Since our financial institution only support funds transfers, we can afford to be specific in our log format.
The information that will be logged to the database is passed in as a series of parameters to the method. The failure return value for this method will be the same error flag plus descriptive information that was used in the previous messages. The success return value will be a string containing 'OK'.
Public Function LogTransaction(ByVal vTransType As Variant, ByVal vSrcAcctNum As Variant, vDestAcctNum As Variant, ByVal vAmount As Variant) As Variant
    Dim vRetVal As Variant

    On Error GoTo LogTransactionErrHandler

    Set oObjectContext = GetObjectContext()
    Set oDb = oObjectContext.CreateInstance("ADODB.Connection")
    oDb.Open vDbConn

    Set oRs = oObjectContext.CreateInstance("ADODB.Recordset")
    oRs.Open "TRANSREC", oDb, adOpenDynamic, adLockOptimistic
The TRANSREC table in the database will be explicitly opened. Since we are only adding information to the database, and not retrieving any, we do not need to limit the records using a SQL query.
The insertion of the transaction information in the database could be done using a SQL INSERT statement. If this was the case, then the bulk of this method would be used for building up the string that makes up the INSERT statement. Using the ADO Recordset object to add the information just makes for an easier explanation of the database manipulation that is taking place, even though its performance is less than using the SQL INSERT statement..
    oRs.AddNew
    oRs("TransactionType") = vTransType
    oRs("SourceAccount") = vSrcAcctNum
    oRs("DestinationAccount") = vDestAcctNum
    oRs("Amount") = vAmount
    oRs("TransTime") = Now
    oRs.Update
    oRs.Close
The AddNew method of the Recordset object will create a blank record in the recordset. The values for the various fields in the record are then set to the values passed into the method as parameters. The TransTime field is a date/time stamp that indicates when the transaction took place. This is set to the current date and time of the server by using the Visual Basic Now function. Once all of the fields have been updated, the Update method writes the information to the database.
    LogTransaction = "OK"
    oObjectContext.SetComplete
    Exit Function

LogTransactionErrHandler:
 LogTransaction = "ERROR: " & Err.Description
   oObjectContext.SetAbort

End Function
The component is created using the Make command under the File menu in Visual Basic. This will create the BankExample.DLL, an ActiveX DLL that contains our application logic. We now have a complete application component that is ready to add to transaction server in anticipation of creating the application user interface using Active Server Pages.
To deploy the BankExample component in Transaction Server, we will use the MTS Explorer. This application allows the user to manage the components that are already in MTS, as well as add new components to MTS. When you launch MTS Explorer, you will see a screen like this one:
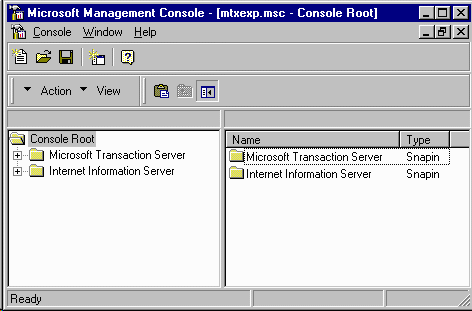
To get ready to install the new application component, the first step is to create a new package. A package in MTS can hold one or more application components. Usually, a package is roughly associated with an application. You will need to navigate through the Microsoft Transaction Server part of the Console Root tree to the Packages Installed folder. When you get to this point, you will see a listing of all of the packages currently installed on this computer.
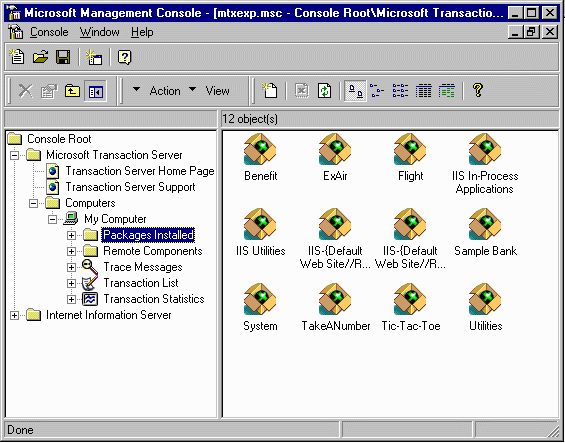
Since this is a new application, you will need to create a new package to hold it. To create a new package:
Right-click on Packages Installed in the left pane and select New and then Package.
Bank. IUSR_ServerName user will be the user that is accessing the package.Your new package will now appear in the right hand pane of the MTS Explorer window. Now that you have a package created, you can add your application component to it. Expand the Packages Installed folder, and then expand the new Bank package. There are two folders under Bank: Components and Roles. Select the Components folder.
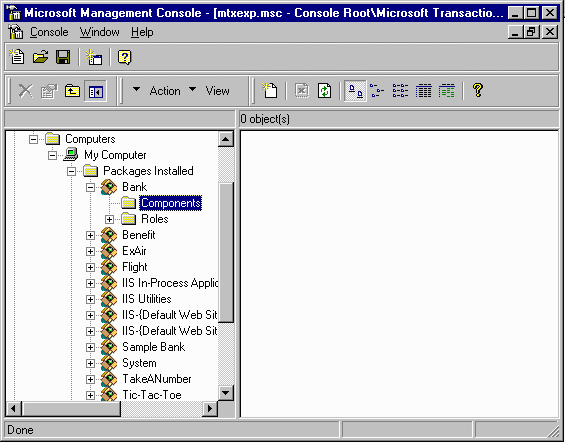
To add components to the Bank package, right click on the Components folder and select New then Component. The Component wizard will then run.
You can either install a new component, or select from a list of components that have already been registered. Since the Bank component has not been registered with MTS yet, choose to install a new component.
From the Install Components dialog box, press the Add files… button and navigate to where you created the BankExample.DLL file.
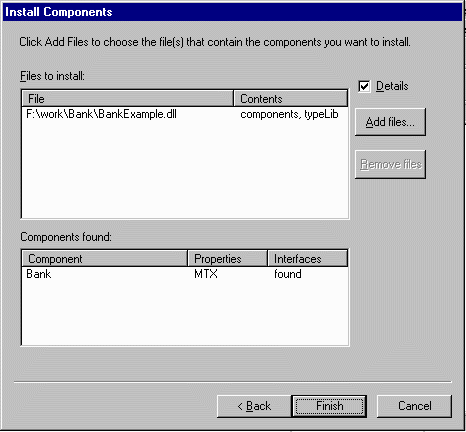
You will now see the file that you selected, along with a list of components contained in that file. Since our BankExample.DLL file only contains the Bank component, there is only one component listed in the component list. Click on Finish to complete the addition of the component.
You will now see the component in the right hand side of the MTS Explorer window.
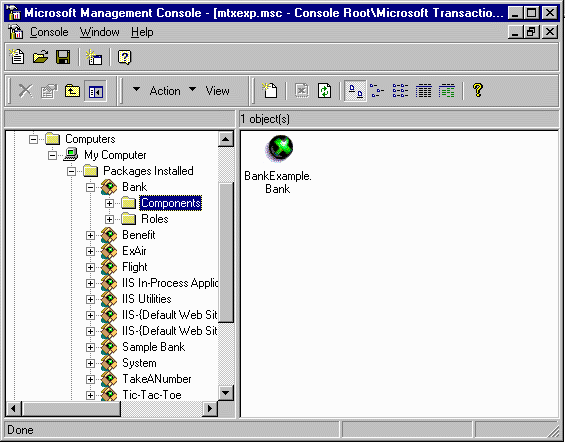
The last step that you need to take to finish adding the component to MTS is to set its transaction attribute. If you remember earlier in this chapter, a component has a transaction attribute setting that identifies how it will participate in transactions. By default, a new component will not support transactions. However, we want the Bank component to be able to participate in a transaction.
To change this attribute, right-click on the component in the right-hand pane and select properties.
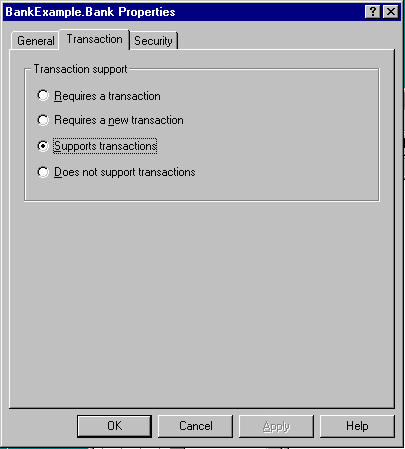
By setting the transaction attribute to Supports Transaction, this component can participate in existing transactions. It is not required to be inside of a transaction, and will not create one if one exists. This gives the component a great deal of flexibility.
Now that the component is successfully installed and configured inside of MTS, we can move on to the final part of our example. We will need a user interface to interact with the application components that we have developed here. This user interface will be web based, developed using Active Server Pages.