In a little while, we’re going to look at how we use ADO to make a simple database connection. In order to do this, however, we need to define an ODBC connection to SQL Server, and then configure our databases. If you’re a SQL Server guru, please feel free to skip this section. However, database expertise isn’t one of the prerequisites for this book’s readership, so I’ll go through the process in case you’re unfamiliar with it.
We’ll start off by creating an ODBC connection. We need to go into the Control Panel and double click on the ODBC button.
Select the File DSN (data source name) tab and click on the Add… button. This dialog appears:

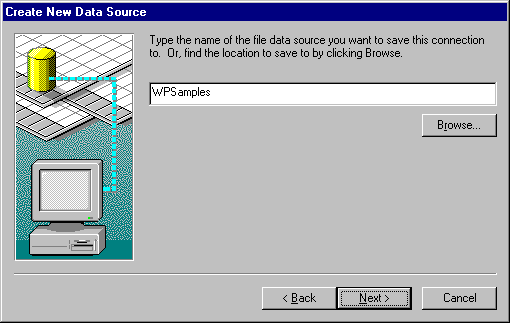
Select SQL Server, as shown and click on the Next > button. Now we tell ODBC what our data source name is going to be:

Clicking Next > again shows a confirmation dialog. If we click on Finish, we go into the SQL Server-specific part of the set-up:

Here we enter the name of the server to which we’re connecting, and a textual description of the connection. If we click on Next >, we move on, to decide how we are going to log onto the server. Accept the default, and keep going, and do the same in the next three dialogs.
Hurrah! We’re finished. We now get a confirmation screen, and we’re asked if we want to test the connection:

Oh, yes please! (I love pressing buttons…) Now we need to set up our databases.
Let’s start up the SQL Enterprise Manager. This is what we see (I’m using SQL Server version 6.5 here, by the way):
You may need to register your server machine, if you haven't done so already. Just select Server | Register Server… to do just that.

If we right-click on the Databases folder and select New Database from the drop-down menu, we see the following dialog:

As you can see, my Message Queue installation has very generously left me with 8Mb of space to play with. Well, that’s plenty enough for the kidnap game. Let’s allocate half of it to
, and click on the Create Now button. kidnap1
Our first database set-up is now complete, and we need to move on to setting up the
table within it. Back in the Server Manager window, we need to expand the hostages
database, then the Objects folder, and right-click on the Tables folder underneath the kidnap1
database. In the next dialog, we define all the fields in our kidnap1
table:hostages

We now have to decide which of these fields is going to be the key, so click on the button with the plus sign to get to the advanced features. By the way, you have to specify the key at this stage. You can’t come back later on and set it, because you won’t be allowed access to that field. It’s obvious when you think about it — key settings are pretty fundamental to database structure, and you can’t just go changing them willy-nilly.
In the advanced settings part of the dialog, we set the
to be the key:name

That's all we need to do here. Click on the disk icon to save our table, and specify
as the table name in the little dialog. Here’s our table now in all its glory:hostages

One database set up and ready for action. All we have to do is repeat the process for the
database (including the kidnap2
table).accounts
Next, we have to look at how we’re going to program our database access. I know you’re itching to get programming MTS — so am I — but we’ve got to sort out some resources first. The easiest way to get access to our resources is by using ActiveX data objects, or ADO.