The HTML Layout control reads the information for each object from the HTML layout file or alx file. This file is a simple text file, but you can create the file graphically by using the HTML Layout Editor.
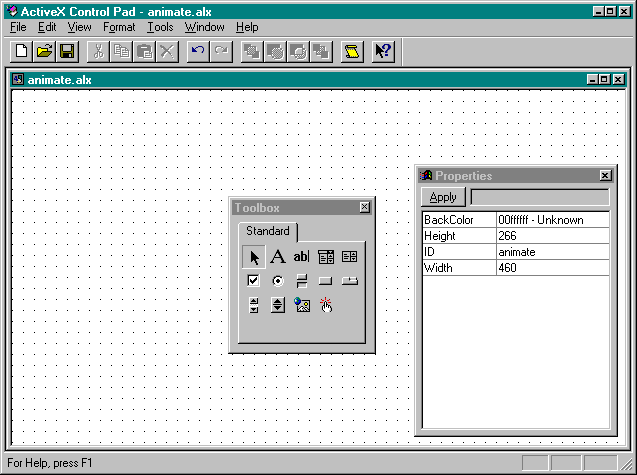
Access the HTML Layout Editor by clicking the HTML Layout icon next to the <OBJECT> tag in the HTML Source Editor. The HTML Layout Editor and the toolbox should appear. The toolbox has various controls that you can add to your HTML layout and is very similar to the toolbox in Visual Basic.
In the HTML Layout Editor, change the background color by clicking anywhere on the HTML Layout window with the right mouse button and selecting Properties. In the Properties window, you can change the background color by selecting BackColor and clicking the … button that appears. This brings up a Color dialog box, from which you can select a background color. Select a white background, and click the OK button. Also set the Height and Width properties in the Properties window as follows:
| Height | 266 |
| Width | 460 |
Figure 9-17 shows the HTML Layout Editor, along with the Properties window and the toolbox, after the background color, height, and width properties have been set.

Figure 9-17.
The HTML Layout Editor after the background color, height, and width properties have been set.
Add a Label control to the HTML layout by clicking on the Label control in the toolbox and dragging a rectangle onto the HTML Layout Editor window. Access the properties of the label by right-clicking on the Label control and selecting Properties. Set the Label control properties as follows:
| BackStyle | 0 - Transparent |
| Caption | My First Animated Web Page |
| Font | Arial, Bold, 28 |
| Height | 42 |
| Left | 17 |
| TextAlign | 2 - Center |
| Top | 8 |
| Width | 420 |
To display the butterfly, you will first need to copy the butterfly images to the example3 folder. Copy bfly1.gif and bfly2.gif from the project4 folder on the companion CD to your example3 folder. You will add two ISImage controls to the HTML layout to hold the images of the butterfly. Select the ISImage control from the toolbox, and drag out a rectangle to add the first Image control to the HTML layout. Repeat the process to add the second Image control. Set the Image1 control properties as follows:
| Height | 60 |
| ID | Image1 |
| Left | 10 |
| PicturePath | bfly1.gif |
| Top | 200 |
| Visible | -1 - True |
| Width | 60 |
Set the Image2 control properties as follows:
| Height | 60 |
| ID | Image2 |
| Left | 10 |
| PicturePath | bfly2.gif |
| Top | 200 |
| Visible | 0 - False |
| Width | 60 |
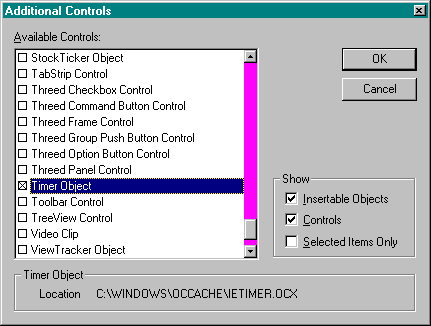
You will need to add a Timer control to your web page, but the default toolbox does not offer this option. However, you can add a Timer control to the toolbox by clicking on any control in the toolbox with the right mouse button and selecting Additional Controls. You'll see a dialog box listing all of the registered controls on your computer. Select the Timer object (Figure 9-18, on page 366, shows the Additional Controls dialog box)and click OK. The Timer control should now be in the toolbox.

Figure 9-18.
The Additional Controls dialog box.
Add a Timer control to the HTML layout by selecting it from the toolbox and clicking on the layout. Set the Timer control properties as follows:
| ID | Timer1 |
| Interval | 500 |
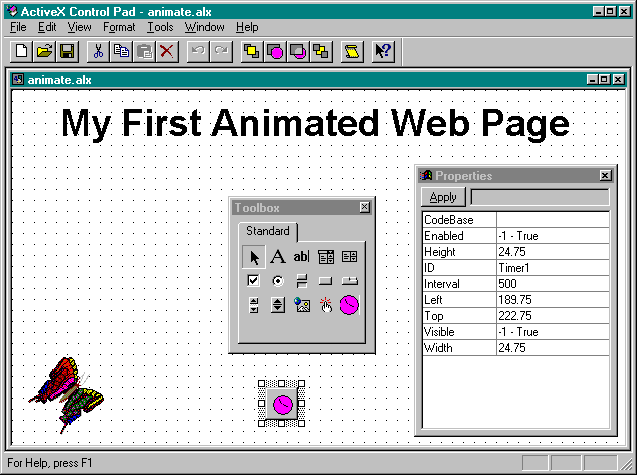
The layout portion of the page is now complete. You just need to make a final adjustment to the Zorder of the Label control. Right-click on the Label control, and select Bring To Front. This will make the butterfly appear to fly behind the label. Save the layout by selecting Save from the File menu. Figure 9-19 shows the layout after the controls have been placed.
Creating the animation is a matter of creating a Timer event handler that will modify the Visible, Left, and Top properties of the Image controls. Although the Script Wizard is available to generate code, its functionality is not rich enough to support the kind of VBScript code you need to write. Instead, you will write the code directly in a text editor such as Notepad.

Figure 9-19.
The completed layout page for Example #3.
Click on the HTML Layout Editor window with the right mouse button, and select View Source Code from the menu. You'll see a message box indicating that the current layout will be saved and closed. You will then be asked whether you want to continue. Click the Yes button, and the source code for the animate.alx file will appear in the Notepad text editor. Your code should be similar to this:
<DIV BACKGROUND="#ffffff" ID="animate"
STYLE="LAYOUT:FIXED;WIDTH:460pt;HEIGHT:266pt;">
    <OBJECT ID="Image1"
    CLASSID="CLSID:D4A97620-8E8F-11CF-93CD-00AA00C08FDF"
    STYLE="TOP:200pt;LEFT:10pt;WIDTH:60pt;HEIGHT:60pt;ZINDEX:0;">
        <PARAM NAME="PicturePath" VALUE="bfly1.gif">
        <PARAM NAME="BorderStyle" VALUE="0">
        <PARAM NAME="SizeMode" VALUE="3">
        <PARAM NAME="Size" VALUE="2117;2117">
        <PARAM NAME="PictureAlignment" VALUE="0">
        <PARAM NAME="VariousPropertyBits" VALUE="19">
    </OBJECT>
    <OBJECT ID="Image2"
    CLASSID="CLSID:D4A97620-8E8F-11CF-93CD-00AA00C08FDF"
    STYLE="TOP:200pt;LEFT:10pt;WIDTH:60pt;HEIGHT:60pt;DISPLAY:NONE;
    ZINDEX:1;">
        <PARAM NAME="PicturePath" VALUE="bfly2.gif">
        <PARAM NAME="BorderStyle" VALUE="0">
        <PARAM NAME="SizeMode" VALUE="3">
        <PARAM NAME="Size" VALUE="2117;2117">
        <PARAM NAME="PictureAlignment" VALUE="0">
        <PARAM NAME="VariousPropertyBits" VALUE="19">
    </OBJECT>
    <OBJECT ID="Timer1"
    CLASSID="CLSID:59CCB4A0-727D-11CF-AC36-00AA00A47DD2"
    STYLE="TOP:223pt;LEFT:190pt;WIDTH:25pt;HEIGHT:25pt;ZINDEX:2;">
        <PARAM NAME="_ExtentX" VALUE="873">
        <PARAM NAME="_ExtentY" VALUE="873">
        <PARAM NAME="Interval" VALUE="500">
    </OBJECT>
    <OBJECT ID="Label1"
    CLASSID="CLSID:978C9E23-D4B0-11CE-BF2D-00AA003F40D0"
    STYLE="TOP:8pt;LEFT:17pt;WIDTH:420pt;HEIGHT:42pt;ZINDEX:3;">
        <PARAM NAME="BackColor" VALUE="16777215">
        <PARAM NAME="VariousPropertyBits" VALUE="8388627">
        <PARAM NAME="Caption" VALUE="My First Animated Web Page">
        <PARAM NAME="Size" VALUE="14817;1482">
        <PARAM NAME="FontName" VALUE="Arial">
        <PARAM NAME="FontEffects" VALUE="1073741825">
        <PARAM NAME="FontHeight" VALUE="560">
        <PARAM NAME="FontCharSet" VALUE="0">
        <PARAM NAME="FontPitchAndFamily" VALUE="2">
        <PARAM NAME="ParagraphAlign" VALUE="3">
        <PARAM NAME="FontWeight" VALUE="700">
    </OBJECT>
</DIV> Next you will add a VBScript section to the animate.alx file that will handle Timer events. Add the following code before the <DIV> tag to begin the VBScript Timer1 subroutine:
<SCRIPT LANGUAGE="VBScript">
    Sub Timer1_Timer

    End Sub
</SCRIPT>
Inside the Timer1 subroutine, you will alternate the Visible properties of the butterfly images and move them to simulate animation. Add the following code to the Timer1 subroutine:
        If Image1.Visible Then
            Image2.Left=Image1.Left+10
            Image2.Top=Image1.Top-10
            If Image2.Top<0 Then
                Image2.Top=230
                Image2.Left=10
            End If
        Else
            Image1.Left=Image2.Left+10
            Image1.Top=Image2.Top-10
            If Image1.Top<0 Then
                Image1.Top=230
                Image1.Left=10
            End If
        End If
        Image1.Visible=Not(Image1.Visible)
        Image2.Visible=Not(Image2.Visible)
This completes the necessary VBScript code. Save animate.alx, and close Notepad.