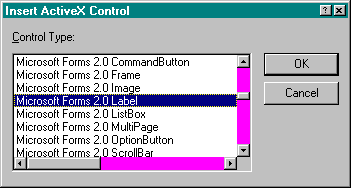
The ActiveX Control Editor allows you to insert ActiveX controls into a web page and set their properties. Only one control can be inserted at a time. You access the ActiveX Control Editor by selecting Insert ActiveX Control from the Edit menu. The Insert ActiveX Control dialog box is then displayed. A list box shows all of the ActiveX controls that have entries in the Registry. If you scroll the list box to the right, the class ID for each control is shown. Selecting a control in the list and then clicking the OK button begins the insertion process.
Figure 9-2 (page 348) shows the Insert ActiveX Control dialog box.
The ActiveX control will be inserted into the HTML code at the location specified by the text editor's cursor. When the OK button has been clicked, two new windows appear: the Edit ActiveX Control window and the Properties window. Figure 9-3 (page 348) shows these windows after the Microsoft Forms 2.0 Label control has been selected.
Figure 9-2.
The Insert ActiveX Control dialog box.
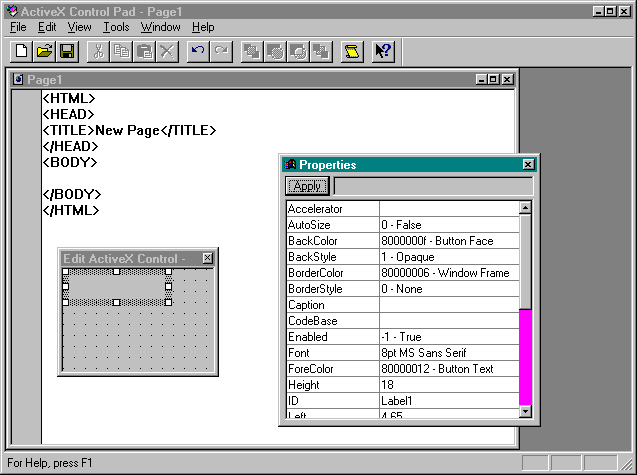
Figure 9-3.
The Edit ActiveX Control window and the Properties window.
The Edit ActiveX Control window allows you to resize the control and specify its appearance in the completed web page. Many of the controls that come with ActiveX Control Pad also support in-place editing of the Caption property. Simply click on the caption in the Edit ActiveX Control window and type the new entry.
To set other properties for the current control, you use the Properties window. The ActiveX Control Pad Properties window is similar to the Properties window found in Microsoft Visual Basic. In this window, you can edit any of the design-time properties supported by the ActiveX control. As in Visual Basic, runtime properties are not available in the Properties window. However, you can access them in your VBScript code.
You complete the insertion of the ActiveX control by closing the Edit ActiveX Control window. When this window is closed, the Properties window is automatically closed and the <OBJECT></OBJECT> tags and other necessary code are added to the HTML Source Editor at the current cursor location. The design-time properties you set in the Properties window are added to the page with <PARAM> tags.
When the controls have been added to the HTML document, you can edit them either by typing directly in the HTML code or by selecting Edit ActiveX Control from the Edit menu. The Edit ActiveX Control command will be available only when your cursor is somewhere in the code for the control. Selecting Edit ActiveX Control causes the Edit ActiveX Control and Properties windows to open. You can make your changes to the control and then close the window to update your HTML code.
When a new control is added, the HTML Source Editor flags the control by displaying a control icon in the left margin next to it. You can also edit an ActiveX control by simply clicking on its control icon. Similar icons are displayed in the left margin for other objects in the HTML code—for example, a script icon for a scripting module, and an HTML Layout icon for an HTML layout. Figure 9-4 shows the HTML Source Editor after the Label control has been inserted. Note the control icon for the Label control in the left margin of the figure.

Figure 9-4.
The HTML Source Editor after the Label control has been inserted.