You will use the HTML Layout Editor to construct the bytecomp.alx file. In the HTML Layout Editor, you will design an interactive ordering region that allows the user to click a button to select the product he or she wants to purchase. Clicking a product's button will move the product's icon and add the cost of the product to the total for the purchase. You will also use the HTML Layout Editor to construct an order form that will be submitted when the user has finished making his or her selections.
Access the HTML Layout Editor by clicking the HTML Layout icon next to the <OBJECT> tag in the bytecomp.htm file. When the HTML Layout Editor is visible, immediately right-click anywhere in the HTML Layout Editor window, and select Properties. Set the properties as follows:
| BackColor | white |
| Height | 270 |
| Width | 450 |
Locate the ToggleButton control in the toolbox. Draw a toggle button in the HTML Layout Editor window, and set its properties as follows:
| Caption | (Empty) |
| Height | 17 |
| Left | 112 |
| Top | 16 |
| Width | 17 |
Copy the toggle button and add seven more buttons by pasting the copy onto the HTML layout. The user will click on these toggle buttons in the browser to select the products to be purchased. Line the toggle buttons up by selecting all of them and setting the Left properties to 112. Space them vertically by setting their Top properties, naming each toggle button as you align it. The ID and Top properties for all eight toggle buttons are shown here:
| ID | Top |
| btnFloppy | 16 |
| btnHardDrv | 45 |
| btnCDROM | 74 |
| btnMonitor | 103 |
| btnKeyboard | 132 |
| btnMouse | 161 |
| btnModem | 191 |
| btnJoystick | 220 |
Locate the ISImage control on the toolbox. Place eight Image controls on the HTML layout for the images of the products that the user can purchase. Each of these Image controls will hold one of the images from the companion CD, all of which should now be in your bytecomp folder. Set the following properties for all eight Image controls:
| Height | 30 |
| Left | 154 |
| Width | 40 |
Set the ID, PicturePath, and Top properties for the individual Image controls as shown here:
| ID | PicturePath | Top |
| imgFloppy | floppy.gif | 16 |
| imgHardDrv | harddrv.gif | 42 |
| imgCDROM | cdrom.gif | 62 |
| imgMonitor | monitor.gif | 96 |
| imgKeyboard | keyboard.gif | 125 |
| imgMouse | mouse.gif | 152 |
| imgModem | modem.gif | 184 |
| imgJoystick | joystick.gif | 210 |
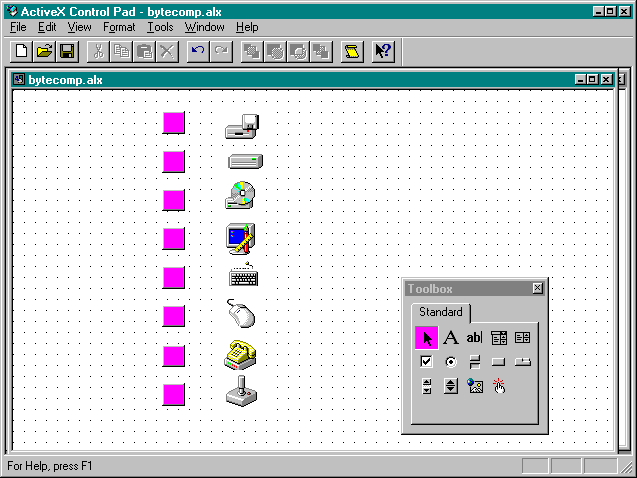
Your layout should look like the one shown in Figure 9-22. Be sure to save your layout at this point by selecting Save from the File menu in the HTML Layout Editor. You should save your layout frequently during this project, to avoid losing data.

Figure 9-22.
Buttons and images in the HTML Layout Editor.
Locate the Label control in the toolbox. Add a label for each of the images that represents a product. These labels will be used to identify each product to the user. Set the following properties for all eight labels:
| BackStyle | 0 - Transparent |
| Font | Arial, Bold, 10 |
| Height | 17 |
| Left | 5 |
| Width | 100 |
Set the Caption, ID, and Top properties for the individual labels as shown here:
| Caption | ID | Top |
| Floppy Drive ($200) | lblFloppy | 16 |
| Hard Drive ($400) | lblHardDrv | 45 |
| CD-ROM Drive ($400) | lblCDROM | 74 |
| Monitor ($250) | LblMonitor | 103 |
| Keyboard ($125) | lblKeyboard | 132 |
| Mouse ($60) | lblMouse | 161 |
| 28.8 Modem ($150) | lblModem | 191 |
| Joystick ($35) | lblJoystick | 220 |
Now you will build the order form that will collect the customer's shipping and billing information. The order form will be similar to the order forms you built previously with HTML, but in this case you will have complete control over the appearance of the form. This is a significant difference from the HTML order forms you built earlier, which used <TABLE></TABLE> tags to "suggest" a layout to the browser.
Locate the TextBox control in the toolbox. Add seven text boxes to the HTML layout for use in the order form. Set the Font and Height properties for all seven text boxes as follows:
| Font | Arial, Bold, 9 |
| Height | 17 |
Set the ID, Left, Top, and Width properties for each individual text box as shown here:
| ID | Left | Top | Width |
| txtName | 225 | 34 | 146 |
| txtCompany | 225 | 70 | 146 |
| txtAddress | 225 | 106 | 146 |
| txtCity | 225 | 144 | 52 |
| txtState | 293 | 144 | 24 |
| txtZip | 324 | 144 | 47 |
| txtCardNumber | 225 | 189 | 146 |
Locate the Label control in the toolbox. Use the Label control to label each of the text boxes you created for the order form. For all seven labels, set the BackStyle and Height properties as follows:
| BackStyle | 0 - Transparent |
| Height | 9 |
Set the Caption, ID, Left, Top, and Width properties for each individual label as shown here:
| Caption | ID | Left | Top | Width |
| Name | lblName | 225 | 23 | 32 |
| Company | lblCompany | 225 | 59 | 47 |
| Address | lblAddress | 225 | 95 | 88 |
| City | lblCity | 225 | 133 | 45 |
| State | lblState | 293 | 133 | 23 |
| Zip | lblZip | 324 | 133 | 36 |
| Credit Card Number | lblCardNumber | 225 | 178 | 88 |
Add another Label control to the layout to show the total purchase cost. Set this Label control's properties as follows:
| BackStyle | 0 - Transparent |
| Caption | $0.00 |
| Font | Comic Sans MS, Bold, 24 |
| Height | 38 |
| ID | lblTotal |
| Left | 227 |
| Top | 214 |
| Width | 142 |
When a customer picks a product, your web page will move the image of the product from the left side of the page to the right side of the page. The animation will be driven by a Timer control. In this step, you will add a Timer control to your layout.
If the Timer control is not in the toolbox, you can add it by right-clicking on any control in the toolbox and selecting Additional Controls. The Additional Controls dialog box will appear, and you can select the Timer object. Click the OK button to place the Timer control in the toolbox.
Add a Timer control to the HTML layout by selecting it from the toolbox and clicking on the layout. The exact position of the timer is not critical, since timers are not visible at runtime. Set the Timer control properties as follows:
| Enabled | 0 - False |
| ID | tmrBytes |
| Interval | 50 |
| Left | 8 |
| Top | 240 |
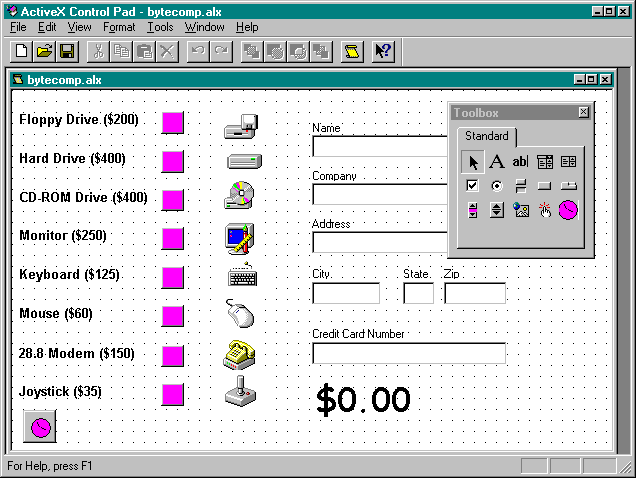
Save the entire layout by selecting Save from the File menu. The layout is now complete. (In the next section, you will add some VBScript code to the byte.alx file to bring the web page to life.) Figure 9-23 (page 378) shows the completed HTML layout.
Open the source file for the HTML layout by clicking in the HTML Layout Editor window with the right mouse button and selecting View Source Code. A message box will be displayed, indicating that the current layout will be saved and closed and asking whether you want to continue. Click the Yes button to display the source code in the Notepad text editor. Note that the alx file is largely a collection of <OBJECT></OBJECT> tags that position the various controls in the HTML layout. Note also that the STYLE attribute in the <OBJECT> tag is used to specify the position of the control in the HTML layout.

Figure 9-23.
The completed order form layout.
Here is the code for the floppy drive ToggleButton control:
<OBJECT ID="btnFloppy"
CLASSID="CLSID:8BD21D60-EC42-11CE-9E0D-00AA006002F3"
STYLE="TOP:16pt;LEFT:112pt;WIDTH:17pt;HEIGHT:17pt;TABINDEX:0;ZINDEX:0;">
    <PARAM NAME="BackColor" VALUE="2147483663">
    <PARAM NAME="ForeColor" VALUE="2147483666">
    <PARAM NAME="DisplayStyle" VALUE="6">
    <PARAM NAME="Size" VALUE="600;600">
    <PARAM NAME="FontCharSet" VALUE="0">
    <PARAM NAME="FontPitchAndFamily" VALUE="2">
    <PARAM NAME="ParagraphAlign" VALUE="3">
    <PARAM NAME="FontWeight" VALUE="0">
</OBJECT>
When you have finished viewing bytecomp.alx in Notepad, close it. Save bytecomp.htm, and close ActiveX Control Pad.