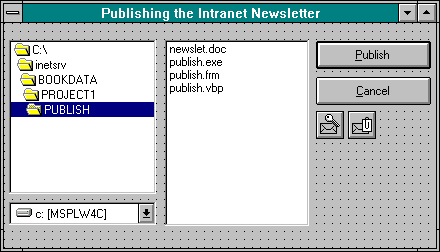
The graphical user interface (GUI) for your project will consist of a Visual Basic form with controls that allow the user to select the file to be sent to the subscribers. Two buttons are also included. One allows the user to publish the newsletter, and the other lets the user exit the application. There are also two invisible Mail API (MAPI) controls that are used to access email and send the newsletter to the subscribers.
Start a new project in Visual Basic 4.0. Form1 will be the primary user interface for the application. Change the form properties for Form1 as follows:
| BorderStyle | 3 - Fixed Dialog |
| Caption | Publishing the Intranet Newsletter |
| Height | 3735 |
| MaxButton | False |
| MinButton | False |
| Name | frmPublish |
| Width | 6600 |
The user will employ a set of file controls to select the files to publish. These controls allow him or her to select the drive, folder, and file for publishing. Place a DriveListBox control on the form, and change the properties as follows:
| Left | 90 |
| Name | drvPublish |
| Top | 2700 |
| Width | 2175 |
The DirListBox control works with the DriveListBox control to specify the complete path to the file. Place a DirListBox control on the form, and change the properties as follows:
| Height | 2280 |
| Left | 90 |
| Name | dirPublish |
| Top | 270 |
| Width | 2175 |
The FileListBox control allows the user to select the file to be published. Place a FileListBox control on the form, and set the properties as follows:
| Height 2790 | Left 2430 |
| Name filPublish | Top 270 |
| Width 2130 |
In this step you add a button to the form to allow the user to exit the application. Place a CommandButton control on the form, and set the properties as follows:
| Cancel | True |
| Caption | &Cancel |
| Height | 420 |
| Left | 4680 |
| Name | cmdCancel |
| Top | 810 |
| Width | 1725 |
A second button is used to initiate the publishing process. Place another CommandButton control on the form, and set its properties as follows:
| Caption | &Publish |
| Default | True |
| Height | 420 |
| Left | 4680 |
| Name | cmdPublish |
| Top | 270 |
| Width | 1725 |
The mail system is accessed through the MAPI controls that ship with Visual Basic. Add the MAPI controls to your project by selecting Tools/Custom Controls from the Visual Basic menu bar. In the Custom Controls dialog box, select Microsoft MAPI Controls and then click on the OK button. The MAPI controls should then be added to your toolbox. When the controls are visible in the toolbox, place a MAPISession control and a MAPIMessages control on your form. Your form should now look like the one in Figure 6-17.

Figure 6-17.
The Publish application interface.
You have now completed the interface for the Publish application. Save this form as publish.frm and this project as publish.vbp. The next section describes the code for implementing the Publish application.