At this point in the exercise, you should have built the database by using either the Data Manager or Microsoft Access. Regardless of which method you used, your database should have the structure shown in Table 6-1. If your database is ready, you can go on to create the ODBC datasource used in the exercise. Make sure that the database is complete and that the appropriate ODBC drivers have been installed.
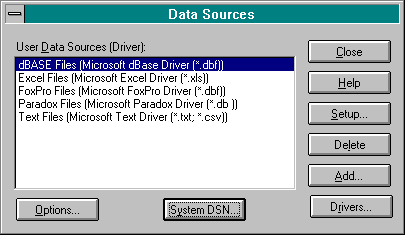
From the Control Panel or an ODBC group, start the ODBC Administrator. When the ODBC Administrator starts, you will see the Data Sources dialog box. Figure 6-9 shows the Data Sources dialog box.

Figure 6-9.
The Data Sources dialog box.
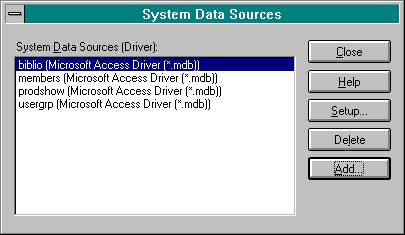
Install the new datasource by clicking on the System DSN button in the Data Sources dialog box. The System Data Sources dialog box should appear. Figure 6-10, on page 202, shows the System Data Sources dialog box.

Figure 6-10.
The System Data Sources dialog box.
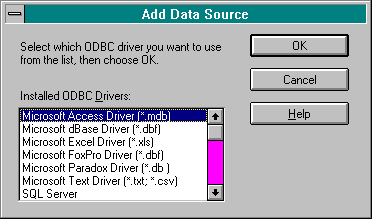
In the System Data Sources dialog box, click on the Add button. The Add Data Source dialog box will then appear. Figure 6-11 shows the Add Data Source dialog box.

Figure 6-11.
The Add Data SoAurce dialog box.
In the Add Data Source dialog box, select the Microsoft Access ODBC driver and click on the OK button. The ODBC Microsoft Access Setup dialog box should appear. This dialog box is used to set up the datasource.
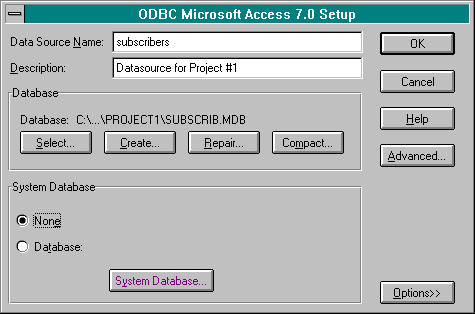
Give your datasource a name by typing the word subscribers into the Data Source Name text box. This is the name you will use to identify the database whenever you utilize an ODBC driver. This name can be anything you want and is not directly related to the name of the database you created previously.
Enter a brief description for your datasource in the Description text box. This can be any text you want and has no effect on the application.
To establish the database you created previously as your datasource, click the Select button. A dialog box appears that lets you select the file for this datasource. Navigate to the \bookdata\project1 folder, and select the subscrib.mdb database you created previously. Figure 6-12 shows a sample of the ODBC Microsoft Access Setup dialog box with the information for the subscribers datasource filled in. When you have finished, click on the OK button. Your new datasource should now be visible in the System data Source dialog box.

Figure 6-12.
The ODBC Microsoft Access Setup dialog box.
Click on the Close buttons in the System Data Sources dialog box and in the Data Sources dialog box to exit the ODBC Administrator. Your datasource is now ready to be accessed from the web.