In the body section, you will create the form used to gather data from the user. You will also use an ActiveX control called the PowerPoint Animation Player. The PowerPoint Animation Player is an ActiveX control that runs Microsoft PowerPoint presentations. With this control, you can add some dramatic animation to your web page without having to write any additional code. You simply create a PowerPoint slide show, save it, and pass it as a property to the PowerPoint Animation Player. Since PowerPoint presentations can be fairly large files, a PowerPoint for Windows 95 extension, called the Microsoft PowerPoint Animation Publisher, can be used to compress the presentation. The PowerPoint Animation Publisher is available from Microsoft and on the companion CD.
Most of the body section is used to create a form for collecting data and including controls. You will build the form with HTML tables. HTML tables allow sophisticated formatting of the content of a web page. You can space text, images, and controls with precision and create web pages that would otherwise not be possible. Begin the form by adding the following code to your HTML page:
<BODY BGCOLOR="WHITE">
<CENTER>

<FORM NAME="frmSubscribe" METHOD="POST"
ACTION="/scripts/project1/subscrib.idc">
<TABLE BORDER=0 CELLPADDING=0 CELLSPACING=0>
This code opens the form and directs the submitted data to the idc file subscrib.idc. The POST method is used to direct the data to the back-end process. In this case, the data is received by the Internet Database Connector file httpodbc.dll, which runs the query specified by the idc file. You will build the idc file later in this project.
Now that the table is open, you can fill in each cell. The <TR></TR> tags define table rows, and the <TD></TD> tags define table cells. You can place text, images, or controls in cells. Add the code at the top of page 206 to place an ActiveX label in the first row of the table in your HTML page.
<TR>
    <TD ROWSPAN=5>

    <OBJECT
    CLASSID="clsid:99B42120-6EC7-11CF-A6C7-00AA00A47DD2"
    ID="lblSubscribe"
    WIDTH=60
    HEIGHT=200
    >
    <PARAM NAME="Angle" VALUE="90">
    <PARAM NAME="ForeColor" VALUE="0">
    <PARAM NAME="FontName" VALUE="Times New Roman">
    <PARAM NAME="FontSize" VALUE="28">
    <PARAM NAME="FontBold" VALUE="True">
    <PARAM NAME="FontItalic" VALUE="True">
    <PARAM NAME="Caption" VALUE="Subscription">
    <PARAM NAME="Visible" VALUE="True">
    </OBJECT>
    </TD>
You can use the Angle property to rotate a label control through 360 degrees. In this example, you set the property to 90 degrees by using the <PARAM> tag when the label is loaded. The label acts as a vertical banner for the web page; this is a common use for such a label.
Now you will add the code to display a PowerPoint animation in the web page. Add the following code to the first row of your HTML table to use the PowerPoint Animation Player in your web page:
    <TD ROWSPAN=5>
    <OBJECT
    CLASSID="clsid:EFBD14F0-6BFB-11CF-9177-00805F8813FF"
    WIDTH=284
    HEIGHT=213
    >
    <PARAM NAME="File" VALUE="ppanim.ppz">
    <EMBED
    WIDTH=284 HEIGHT=213 SRC="ppanim.ppz"
    >
    </EMBED>
    <NOEMBED>
    This page contains a Microsoft PowerPoint
    animation that your browser was unable to view.
    </NOEMBED>
    </OBJECT>
    </TD>
</TR>
In this HTML code, the <EMBED></EMBED> tags are used to insert the PowerPoint presentation in the page if the browser does not understand the <OBJECT></OBJECT> tags. The <NOEMBED></NOEMBED> tags are used to display a message if the browser can't embed the presentation.
To view the PowerPoint animation, the user must have the PowerPoint Animation Player installed. The PowerPoint Animation Player is simply an ActiveX control. If a user tries to view this page and doesn't have the player installed on the computer, the presentation will not play. Therefore, either each user will have to install the PowerPoint Animation Player or you will have to add PowerPoint animation support to the web server. Step 4 describes both how to install the PowerPoint Animation Player and how to add PowerPoint animation support to the web server.
In the HTML code on page 206, the actual PowerPoint animation that will be displayed with the PowerPoint Animation Player is stored in the file ppanim.ppz, which is a compressed PowerPoint presentation file. The PowerPoint Animation Player can display a standard PowerPoint presentation, but compressed versions are much faster to download. You create compressed animations by using an extension to PowerPoint for Windows 95 called the Microsoft PowerPoint Animation Publisher. Step 4 describes how to install the PowerPoint Animation Publisher.
In this step, you will install the PowerPoint Animation Player and the PowerPoint Animation Publisher. The PowerPoint Animation Player should be installed on the computer that will be using the Internet Explorer to view the web page. To install just the PowerPoint Animation Player, use the setup program called axplayer.exe, which is available on the companion CD and on Microsoft's PowerPoint web site. Copy this self-extracting file to your computer, and run it by double-clicking on its icon.
If you want to install both the PowerPoint Animation Player and the PowerPoint Animation Publisher, use the setup program called axpub.exe. This file is available on the companion CD and on Microsoft's PowerPoint web site. When you run axpub.exe, it will install the PowerPoint Animation Player and PowerPoint Animation Publisher.
You can add PowerPoint Animation support to your web server. If you are using IIS, first install the PowerPoint Animation Player on your server and then add the following Registry entries on your server:
[HKEY_LOCAL_MACHINE\SYSTEM\CurrentControlSet\Services
\InetInfo\Parameters\MimeMap]
"application/ms-powerpoint,ppt,,5"=""
"application/ms-powerpoint,ppz,,5"=""

"application/ms-powerpoint,pps,,5"=""
"application/ms-powerpoint,pot,,5"=""
For more information, consult the PowerPoint Animation user's guide on the Microsoft PowerPoint web site and consult the MIME mapping section of your server documentation. This step describes how to create compressed PowerPoint animations with the PowerPoint Animation Publisher extension in PowerPoint for Windows 95. If you just want to use the ppanim.ppz file, or if you do not have PowerPoint for Windows 95, you can copy the ppanim.ppz file from the project1 folder on the companion CD and place it in the \wwroot\project1 folder you created at the beginning of this project.
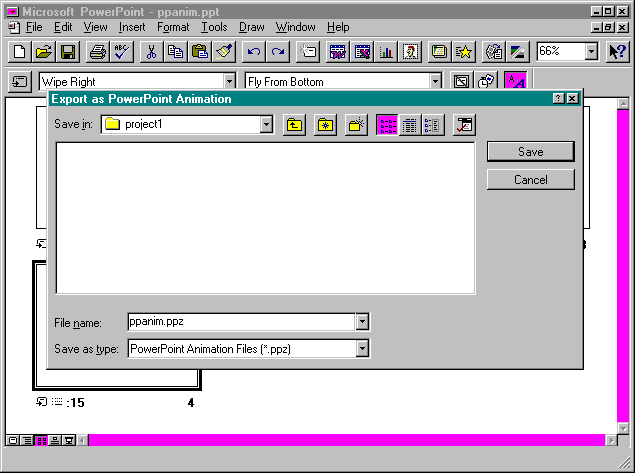
Launch PowerPoint for Windows 95, and open the file called ppanim.ppt on the companion CD. Feel free to modify the presentation or simply create your own. Select the File menu and notice the new entry: Export as PowerPoint Animation. Figure 6-13 shows a sample of the Export as PowerPoint Animation dialog box. This option takes any PowerPoint presentation and creates a compressed animation file with a ppz extension. When you are finished creating the PowerPoint presentation, simply select the command Export as PowerPoint Animation from the File menu. Save the file with the name ppanim.ppz in the \wwwroot\project1 folder you created at the beginning of this project.
Figure 6-13.
The export as PowerPoint Animation dialog box.
The Export as PowerPoint Animation command will create two files: one compressed animation file, called ppanim.ppz; and one sample HTML file, called ppanim.htm. You can see the results of your work immediately by viewing the sample ppanim.htm file in the Internet Explorer. Figure 6-14 shows a sample of the ppanim.htm file as viewed in the Internet Explorer.
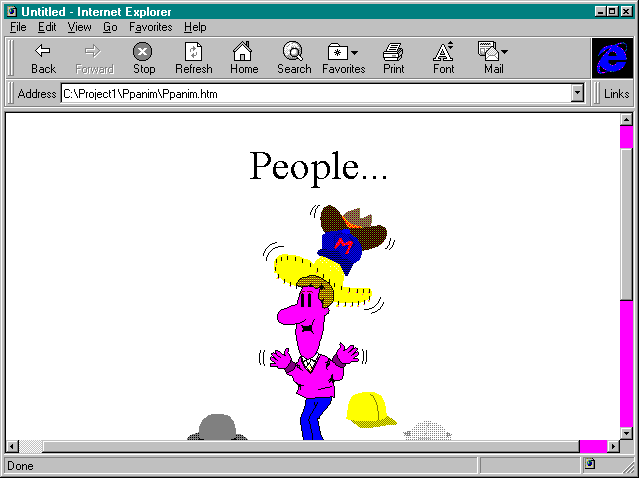
Figure 6-14.
The sample HTML file created with the PowerPoint Animation Publisher extension to PowerPoint for Windows 95.
The subscriber data is collected with simple intrinsic controls. In this step, you specify three text boxes to contain the name, department, and email address. All these controls are implemented with the <INPUT> tag. You need to maintain control of the layout, so these controls are used in an HTML table. Add the code at the top of page 210 to place the text boxes on the web page.
    <TR>
        <TD>
        </TD>
        <TD>
        <FONT FACE="ARIAL" SIZE=3>
        Name
        </FONT>
        </TD>
        <TD>
        <INPUT TYPE="TEXT" SIZE=40 NAME="txtName">
        </TD>
    </TR>
    <TR>
        <TD>
        </TD>
        <TD>
        <FONT FACE="ARIAL" SIZE=3>
        Dept
        </FONT>
        </TD>
        <TD>
        <INPUT TYPE="TEXT" SIZE=40 NAME="txtDept">
        </TD>
    </TR>
    <TR>
        <TD>
        </TD>
        <TD>
        <FONT FACE="ARIAL" SIZE=3>
        Email
        </FONT>
        </TD>
        <TD>
        <INPUT TYPE="TEXT" SIZE=40 NAME="txtEmail">
        </TD>
    </TR>
In the script section, you will use the OnBlur events for each of these controls to perform validation on the data entered. For now, however, just insert the controls.
Once your program has collected the data from the user, it must submit the information to the back-end process. In HTML, the ACTION attribute of a form is used to specify the file that will receive the data. In Step 1 of this section, you added code to post the data to subscrib.idc. This file is associated with the httpodbc.dll file.
The user initiates the transfer of data from the form to the back end by clicking on an intrinsic control called a Submit control. When clicked, the Submit control packages all the data in the form input variables and sends it to the process identified by the ACTION attribute of the form. The data is sent as a single string which has the following format:
field1=value1&field2= value2…&fieldn=valuen The back-end process can then parse this string and take action. Add the following code to add the Submit and Reset controls to the HTML page:
    <TR>
        <TD>
        </TD>
        <TD>
        </TD>
        <TD>
        <INPUT TYPE="SUBMIT" VALUE="Subscribe!" NAME="cmdSubscribe">
        <INPUT TYPE="RESET">
        </TD>
    </TR>
</TABLE>

</FORM>
Take note of the other control you inserted, the Reset control. When clicked, this control simply clears all text boxes in the input form. The user can take advantage of this button to start over if he or she makes any mistakes. After the data boxes are filled in, the user clicks on the Subscribe! button. IDC receives the data and adds it to the database. You will construct the idc file later in this exercise.
You finish the web page by adding some simple text to the bottom. The last few lines of code present a message prompting the user to subscribe right away and then close the form. Add the following code to finish the body section:
<P ALIGN="RIGHT">
<FONT FACE="Comic Sans MS" SIZE=6 COLOR="BLUE">
Sign up today!!
</FONT>
</P>

</CENTER>
</BODY>
</HTML>
In this section, you will add some Microsoft Visual Basic, Scripting Edition, code to your web page to perform data validation. The data validation consists of simply checking to see whether information has been entered into the text boxes. The code will not perform more sophisticated validation, such as verifying the user's email address. More advanced validation can be performed with OLEISAPI back-end processes. Although this project does not use OLEISAPI, Project 2 in this book uses it extensively.
Each of the validation routines for this section uses the OnBlur event to determine whether data has been entered into a text field. OnBlur is the intrinsic HTML equivalent of the Visual Basic LostFocus event. In this way, you check to see whether the field has data in it when the user exits the field. Add the following VBScript code to your HTML file after the <BASE HREF="/project1/"> tag, to create the validation routines (remember, VBScript standards require the script section to be in the head section, for consistency):
<SCRIPT LANGUAGE="VBScript">
<!--
    Sub txtName_OnBlur
        Dim MyForm
        Set MyForm=Document.frmSubscribe
        If MyForm.txtName.Value="" Then
            Msgbox "Please enter your name.",16,"Newsletter"
            Exit Sub
        End If
    End Sub

    Sub txtDept_OnBlur
        Dim MyForm
        Set MyForm=Document.frmSubscribe
        If MyForm.txtDept.Value="" Then
            Msgbox "Please enter your department.",16,"Newsletter"
            Exit Sub
        End If
    End Sub

    Sub txtEmail_OnBlur
        Dim MyForm
        Set MyForm=Document.frmSubscribe
        If MyForm.txtEmail.Value="" Then
            Msgbox "Please enter your email address.",16,"Newsletter"
            Exit Sub
        End If
    End Sub
-->
</SCRIPT>
In the preceding code, notice the beginning comment tag <!-- and the closing comment tag -->. Their purpose is to hide script code from browsers that do not understand it.
The web page is now complete. Save your web page as subscrib.htm in the folder \wwwroot\project1, which you created at the beginning of this project. Listing 6-1 shows the entire code for subscrib.htm, along with comments, and Figure 6-15, on page 217, shows its output.
<HTML>
<HEAD>
<TITLE>Intranet Newsletter Subscription</TITLE>
<BASE HREF="/project1/">

<!--
This demo allows a user to subscribe to a
company newsletter published through the
intranet
-->

<SCRIPT LANGUAGE="VBScript">
<!--
    Sub txtName_OnBlur
        Dim MyForm
        Set MyForm=Document.frmSubscribe
        If MyForm.txtName.Value="" Then
            Msgbox "Please enter your name.",16,"Newsletter"
            Exit Sub
        End If
    End Sub

    Sub txtDept_OnBlur
        Dim MyForm
        Set MyForm=Document.frmSubscribe
        If MyForm.txtDept.Value="" Then
            Msgbox "Please enter your department.",16,"Newsletter"
            Exit Sub
        End If
    End Sub

    Sub txtEmail_OnBlur
        Dim MyForm
        Set MyForm=Document.frmSubscribe
        If MyForm.txtEmail.Value="" Then
            Msgbox "Please enter your email address.", _
                16,"Newsletter"
            Exit Sub
        End If
    End Sub
-->
</SCRIPT>

</HEAD>
<BODY BGCOLOR="WHITE">
<CENTER>

<FORM NAME="frmSubscribe" METHOD="POST"
ACTION="/scripts/project1/subscrib.idc">
<TABLE BORDER=0 CELLPADDING=0 CELLSPACING=0>
    <TR>
        <TD ROWSPAN=5>

        <!--
        This is a Label control, rotated 90 degrees.
        It is used to place a label on the web page.
        -->

        <OBJECT
         CLASSID="clsid:99B42120-6EC7-11CF-A6C7-00AA00A47DD2"
        ID="lblSubscribe"
        WIDTH=60
        HEIGHT=200
        >
        <PARAM NAME="Angle" VALUE="90">
        <PARAM NAME="ForeColor" VALUE="0">
        <PARAM NAME="FontName" VALUE="Times New Roman">
        <PARAM NAME="FontSize" VALUE="28">
        <PARAM NAME="FontBold" VALUE="True">
        <PARAM NAME="FontItalic" VALUE="True">
        <PARAM NAME="Caption" VALUE="Subscription">
        <PARAM NAME="Visible" VALUE="True">
        </OBJECT>
        </TD>
        <TD ROWSPAN=5>

        <!--
        This is a Microsoft PowerPoint Animation Player
        control. It is used to display PowerPoint
        presentation files. It can also display a
        compressed PowerPoint presentation file, which
        typically has a ppz extension.
        The ppz file can be created with the Microsoft
        Powerpoint Animation Publisher, a PowerPoint for

         Windows 95 extension.
        -->

        <OBJECT
        CLASSID="clsid:EFBD14F0-6BFB-11CF-9177-00805F8813FF"
        WIDTH=284
        HEIGHT=213
        >
        <PARAM NAME="File" VALUE="ppanim.ppz">
        <EMBED
        WIDTH=284 HEIGHT=213 SRC="ppanim.ppz"
        >
        </EMBED>
        <NOEMBED>
        This page contains a Microsoft PowerPoint
        animation that your browser was unable to view.
        </NOEMBED>
        </OBJECT>
        </TD>
    </TR>
    <TR>
        <TD>
        </TD>
        <TD>
        <FONT FACE="ARIAL" SIZE=3>
        Name
        </FONT>
        </TD>
        <TD>
        <INPUT TYPE="TEXT" SIZE=40 NAME="txtName">
        </TD>
    </TR>
    <TR>
        <TD>
        </TD>
        <TD>
        <FONT FACE="ARIAL" SIZE=3>
        Dept
        </FONT>
        </TD>
        <TD>
        <INPUT TYPE="TEXT" SIZE=40 NAME="txtDept">
        </TD>
    </TR>
    <TR>
        <TD>
        </TD>
         <TD>
        <FONT FACE="ARIAL" SIZE=3>
        Email
        </FONT>
        </TD>
        <TD>
        <INPUT TYPE="TEXT" SIZE=40 NAME="txtEmail">
        </TD>
    </TR>
    <TR>
        <TD>
        </TD>
        <TD>
        </TD>
        <TD>
        <INPUT TYPE="SUBMIT" VALUE="Subscribe!" NAME="cmdSubscribe">
        <INPUT TYPE="RESET">
        </TD>
    </TR>
</TABLE>
</FORM>

<P ALIGN="RIGHT">
<FONT FACE="Comic Sans MS" SIZE=6 COLOR="BLUE">
Sign up today!!
</FONT>
</P>

</CENTER>
</BODY>
</HTML>
Listing 6-1
The complete code for subscrib.htm.
Up to this point, you have created a database, set up the ODBC drivers, and created the HTML page. Now you need to create the necessary files so that subscriber information on the web page can be added to the database when the Subscribe! button is clicked. This will be accomplished with the Internet Database Connector (IDC).